
Dom's Nav and UsaSpec install
 06-08-2006, 07:07 PM
#1
Instructor
Thread Starter

Join Date: Nov 2005
Age: 46
Posts: 164
Likes: 0
Received 0 Likes
on
0 Posts
Dom's Nav and UsaSpec install
Here is the install of my system. Hopefully this will help some people out. 
This is what I ended up using (all prices include tax and shipping):
Dom's Navigation Converter w/ Plug n Play $240
Accelevision 8500 Dvd Player $173
UsaSpec PA11-HON2 and P.I.E HON03-F/MM $137
Pyle PLVWAN6 Antenna $37
12ft Video Composite Cable $18
0.5m Audio Composite Cable $10
Switch $3
Antenna combiner $12
Misc (electrical tape, t-taps, wire, etc.) $20
Grand total = $650
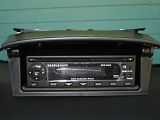
Deciding on the right dvd player took me a while, till I found the Accelevision 8500. I absolutely love this dvd player! It's the perfect size and had the features that I was looking for. It has audio and video inputs (one in the front [this was very important]and one in the back). I also wanted controls on the unit itself so I would not need to use the remote. This unit also has a built in tv tuner. There are cheaper units that fit in the compartment under the stereo, but none have all these features. Most required the use of the remote or were too big.
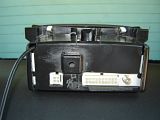
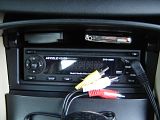
Install of the dvd player was pretty straight forward. Pulled out the compartment (apply pressure from the inside on the top and the side and pull). Dremeled the back and sides. I also cut the back corner for the iPod cable from the UsaSpec. Make sure you tie a knot on the cable to prevent anyone from pulling out the cable from the UsaSpec (very important).

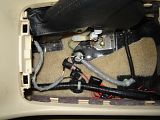
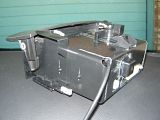
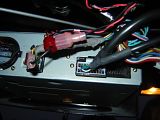
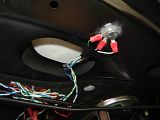
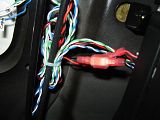
Here you could see the installation of the UsaSpec and all the wiring. I didn't screw in the adapter. All the wires held it pretty snug in place. The big fat cable next to the UsaSpec is the P.I.E. y-adapter. You can also see the video out and coaxial cable on the left. There is an opening there in the left for the wires to go through. The yellow wire in the middle is the constant 12v power for the dvd player. I connected this wire to the White w/ Blue stripe wire in the amp. The second picture is where the y-adapter gets plugged into under the stereo. The last picture is where I tapped into for ground and power to the dvd. Those wires are the ones for the cigarette plug in the center compartment. White w/ Red stripe for 12v power and black for ground. I taped up the wires with electrical tape just in case of any spillage.

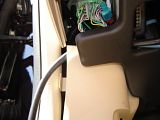
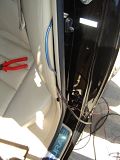
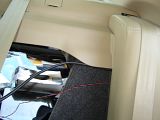
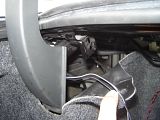
Here is how I ran the wires. First image is where the coaxial and video cable come out from behind the radio. The cables fit snugly under the dash. In the second picture I ran them along with the switch wires through the kick panel where the fuses are. You could see how I ran them through the rest of the kick panels. In the fourth picture you could see how the seat needs to be lifted with a bit of pressure. I ran them through the back of the seat with a coat hanger. Finally, the wires come out behind the seat.
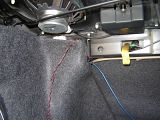

The wiring is pretty clean. I just zipped tied all the wires to the ones along the back. The only one that isn't zipped tied is the video cable. 12ft barely reached from the front to the back. it's close enough to the top that it doesn't interfere with anything though. To secure Dom's navigation I just used some double lock velcro tape. The plastic tape provides a sufficient amount of gap for there not to be any heat issues. The remainder of Dom's wire's were just zip tied to one of the bars hanging from the top.
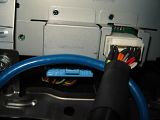
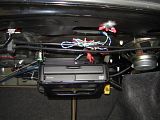
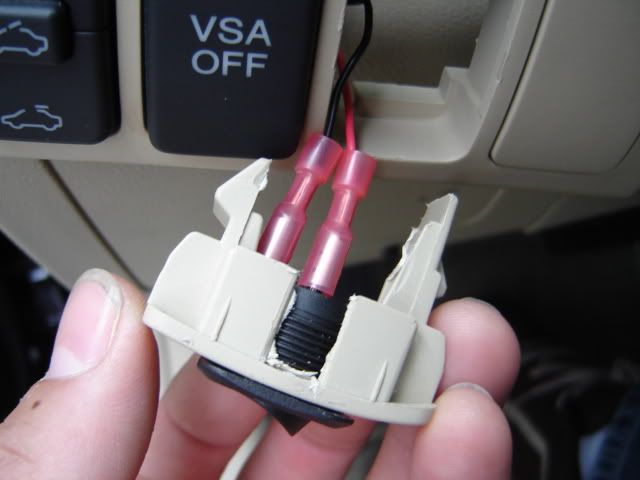
In order to power Dom's unit and the antenna I tapped into the Yellow w/ red stripe wire comming out of the back of the navigation dvd unit. This wire is a 12v switched power (the White w/ Red stripe is a constant 12v power in case anyone is interested). In order to ground the all the wires from Dom's nav unit (2 White and 1 Green) I just used a bolt and lugnut in one of the holes that's already in the trunk. The Blue wire was left alone. You could see in a previous picture that I also did this for all the Black wires. (1 from Dom's power cable, 1 from the plug n play cable, and 1 from the antenna power cable. I sanded the holes a little just to make sure I had good contact. The last picture is of the connectors to the switch. I wanted to make my whole install removable, which is why I've been using t-taps and male/female connectors.


Here are pictures of the switch. I just cut out a hole in one of the covers. It fits perfect. I originally wanted to use a lighted switch, but was unable to get it to work. If anyone has figured out how to use one for Dom's unit, please let me know how!
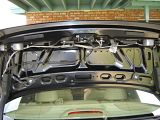
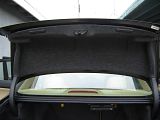
This is where I installed the antennal. The trunk lining pops right off. I ran the wires through the trunk lid and along the hinge. In the second picture is where I put the extra wire and the antenna combiner. I used a combiner because the dvd player only had an input for 1 antenna. It made a very minor difference. I just noticed the color was just a tad bit better. That was enough for me to use it. The reception is still not that good. I can't pick up some of my local channels. If I raise the trunk it gets better though. I hardly watch tv anyways. Having the option was just a plus. The install was very stealth as you can see from the final picture.
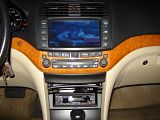
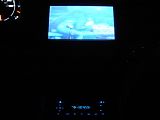
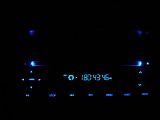
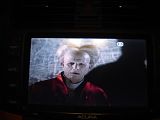
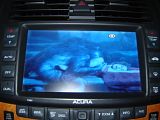
Here's some pictures of the finished install. The text on the display is a little hard to read in the day, but it looks great at night!
Here is one of the best parts about the size of this dvd player and the install. The remote and video ipod with the dock cable fit perfectly in the compartment with the door closed. No need for a cradle. When I want to watch videos or slideshows from the iPod all I have to do is connect the mini a/v plug from the ipod to the mini a/v plug in the front of the dvd player. Sorry guys, only the iPod video fits. I tried an iPod photo but it was too thick.
Now for pictures of the finished product! These pictures don't do the quality justice!
P.S. I know that you could find most of this through out the forum. I just thought it might help to have it all in one spot. Thank you to everyone who has helped and posted pictures. I couldn't have done it with all of you.
This is what I ended up using (all prices include tax and shipping):
Dom's Navigation Converter w/ Plug n Play $240
Accelevision 8500 Dvd Player $173
UsaSpec PA11-HON2 and P.I.E HON03-F/MM $137
Pyle PLVWAN6 Antenna $37
12ft Video Composite Cable $18
0.5m Audio Composite Cable $10
Switch $3
Antenna combiner $12
Misc (electrical tape, t-taps, wire, etc.) $20
Grand total = $650
Deciding on the right dvd player took me a while, till I found the Accelevision 8500. I absolutely love this dvd player! It's the perfect size and had the features that I was looking for. It has audio and video inputs (one in the front [this was very important]and one in the back). I also wanted controls on the unit itself so I would not need to use the remote. This unit also has a built in tv tuner. There are cheaper units that fit in the compartment under the stereo, but none have all these features. Most required the use of the remote or were too big.


Install of the dvd player was pretty straight forward. Pulled out the compartment (apply pressure from the inside on the top and the side and pull). Dremeled the back and sides. I also cut the back corner for the iPod cable from the UsaSpec. Make sure you tie a knot on the cable to prevent anyone from pulling out the cable from the UsaSpec (very important).


Here you could see the installation of the UsaSpec and all the wiring. I didn't screw in the adapter. All the wires held it pretty snug in place. The big fat cable next to the UsaSpec is the P.I.E. y-adapter. You can also see the video out and coaxial cable on the left. There is an opening there in the left for the wires to go through. The yellow wire in the middle is the constant 12v power for the dvd player. I connected this wire to the White w/ Blue stripe wire in the amp. The second picture is where the y-adapter gets plugged into under the stereo. The last picture is where I tapped into for ground and power to the dvd. Those wires are the ones for the cigarette plug in the center compartment. White w/ Red stripe for 12v power and black for ground. I taped up the wires with electrical tape just in case of any spillage.


Here is how I ran the wires. First image is where the coaxial and video cable come out from behind the radio. The cables fit snugly under the dash. In the second picture I ran them along with the switch wires through the kick panel where the fuses are. You could see how I ran them through the rest of the kick panels. In the fourth picture you could see how the seat needs to be lifted with a bit of pressure. I ran them through the back of the seat with a coat hanger. Finally, the wires come out behind the seat.


The wiring is pretty clean. I just zipped tied all the wires to the ones along the back. The only one that isn't zipped tied is the video cable. 12ft barely reached from the front to the back. it's close enough to the top that it doesn't interfere with anything though. To secure Dom's navigation I just used some double lock velcro tape. The plastic tape provides a sufficient amount of gap for there not to be any heat issues. The remainder of Dom's wire's were just zip tied to one of the bars hanging from the top.


In order to power Dom's unit and the antenna I tapped into the Yellow w/ red stripe wire comming out of the back of the navigation dvd unit. This wire is a 12v switched power (the White w/ Red stripe is a constant 12v power in case anyone is interested). In order to ground the all the wires from Dom's nav unit (2 White and 1 Green) I just used a bolt and lugnut in one of the holes that's already in the trunk. The Blue wire was left alone. You could see in a previous picture that I also did this for all the Black wires. (1 from Dom's power cable, 1 from the plug n play cable, and 1 from the antenna power cable. I sanded the holes a little just to make sure I had good contact. The last picture is of the connectors to the switch. I wanted to make my whole install removable, which is why I've been using t-taps and male/female connectors.

Here are pictures of the switch. I just cut out a hole in one of the covers. It fits perfect. I originally wanted to use a lighted switch, but was unable to get it to work. If anyone has figured out how to use one for Dom's unit, please let me know how!


This is where I installed the antennal. The trunk lining pops right off. I ran the wires through the trunk lid and along the hinge. In the second picture is where I put the extra wire and the antenna combiner. I used a combiner because the dvd player only had an input for 1 antenna. It made a very minor difference. I just noticed the color was just a tad bit better. That was enough for me to use it. The reception is still not that good. I can't pick up some of my local channels. If I raise the trunk it gets better though. I hardly watch tv anyways. Having the option was just a plus. The install was very stealth as you can see from the final picture.


Here's some pictures of the finished install. The text on the display is a little hard to read in the day, but it looks great at night!

Here is one of the best parts about the size of this dvd player and the install. The remote and video ipod with the dock cable fit perfectly in the compartment with the door closed. No need for a cradle. When I want to watch videos or slideshows from the iPod all I have to do is connect the mini a/v plug from the ipod to the mini a/v plug in the front of the dvd player. Sorry guys, only the iPod video fits. I tried an iPod photo but it was too thick.


Now for pictures of the finished product! These pictures don't do the quality justice!
P.S. I know that you could find most of this through out the forum. I just thought it might help to have it all in one spot. Thank you to everyone who has helped and posted pictures. I couldn't have done it with all of you.
 06-08-2006, 08:33 PM
#3
Senior Moderator
Awesome job and Excellent write-up!!! 
 The more the better.. Thank you for your contribution.. Already added to the sticky thread..!!
Originally Posted by Masterpoolcat
P.S. I know that you could find most of this through out the forum. I just thought it might help to have it all in one spot. Thank you to everyone who has helped and posted pictures. I couldn't have done it with all of you.
The more the better.. Thank you for your contribution.. Already added to the sticky thread..!!
06-09-2006, 09:23 AM
#5
Banned
Join Date: Nov 2005
Age: 48
Posts: 3,716
Likes: 0
Received 0 Likes
on
0 Posts
The reception is still not that good. I can't pick up some of my local channels. If I raise the trunk it gets better though. I hardly watch tv anyways.
I did the same and it's just plain not working
 -
- hood up = fair reception
hood down = no reception.
Difference was day/nite. I have the same tuner as his.
Not
 or surprised since it really flies in the face of good signal reception in car - antennas are NOT supposed to be close to body chasis and NOT enclosed.
I 'm convinced the fact he has no reception problem is a super rare exception,
(BTW he verified that his receptions didn't degrade with just ONE ant.)
his location must be some kinda Bermuda-Triangle kind of place. Frigging Microsoft put up a super-amplifier or something

Last edited by fuckleberry; 06-09-2006 at 09:26 AM.
06-09-2006, 10:26 AM
#6
Instructor
Thread Starter
Join Date: Nov 2005
Age: 46
Posts: 164
Likes: 0
Received 0 Likes
on
0 Posts
Originally Posted by fuckleberry
hmm so you decided to go with this unit after all and skip the "fancy" features you were raving about.
Good writeup
Good writeup
Originally Posted by fuckleberry
heheh did you get the idea of putting antennas in the hood from cjams as well ?
Originally Posted by fuckleberry
I did the same and it's just plain not working -
hood up = fair reception
hood down = no reception.
Difference was day/nite. I have the same tuner as his.
hood up = fair reception
hood down = no reception.
Difference was day/nite. I have the same tuner as his.
06-09-2006, 01:01 PM
#7
Banned
Join Date: Nov 2005
Age: 48
Posts: 3,716
Likes: 0
Received 0 Likes
on
0 Posts
Originally Posted by Masterpoolcat
So what did you decide to do after all? Did you remove them and put them back on the winshield? Did having them on the windshield make a big difference? I'm thinking maybe it's because one of the rabbit ears on each antenna ends up pointing to the floor when the trunk is closed. Wondering if I put an inline amplifier after the combiner might help a little?
Been busy, haven't had a chance to re-locate to the rear windshield,
which does not seem to be an easy job. (need to pull the damn panels again
 )
)and frankly I've had it with car-modding right now.
Trending Topics
 09-04-2007, 10:35 PM
#11
Intermediate

Join Date: Aug 2007
Age: 35
Posts: 29
Likes: 0
Received 0 Likes
on
0 Posts
Do The Steering Wheel Controls Still Work With This?
Like The Volume?
Did You Have To Disconect The Dvd Player In The Trunk To Install This One?
Did It Affect The Navigation System>?
Thanks Man
Like The Volume?
Did You Have To Disconect The Dvd Player In The Trunk To Install This One?
Did It Affect The Navigation System>?
Thanks Man


Thread
Thread Starter
Forum
Replies
Last Post
BoricuaTL
Car Parts for Sale
138
04-08-2016 01:08 PM
asahrts
Member Cars for Sale
0
09-04-2015 05:55 PM
2004, 8500, accelevision, acura, converter, dom, doms, installing, nav, navigation, plugnplay, spec, tl, tool, usa