
No Alarm no GPS and no Audio system


Thread Starter
Instructor


Joined: Jun 2012
Posts: 128
Likes: 5
From: Miami, FL
Help!
I would love to see if anyone here can help me with an issue with my Acura TL 4th gen. Last week, during the snow storm my battery died out. My friend has a car charger and we tried to turn on the car with it. Unfortunately, we put the clamps in the wrong polarity. The battery fuse seems to be okay. We put a new battery and the car started, but the the navigation screen did not turned on and also the radio. In Addition, the remote control is not working. I replaced the battery on the fog, but that is not the issue. Car starts if I put the fob in the dash. What fuse would I need to check to restore the gps the radio and the fob?
Any help is highly appreciated.
Any help is highly appreciated.

Racer

Joined: Aug 2011
Posts: 486
Likes: 100
From: Sacramento
Since you removed the battery, and apparently didn't use a device to maintain the car's memory, you will need to input the car's radio code. That should get the navi and radio back working. I don't know if that will fix the key fob issue.
If you don't have the radio code, you can look it up here:
https://mygarage.honda.com/s/radio-nav-code?brand=Acura
If you don't have the radio code, you can look it up here:
https://mygarage.honda.com/s/radio-nav-code?brand=Acura
Three Wheelin'

Joined: Jun 2016
Posts: 1,837
Likes: 589


Trending Topics
Thread Starter
Instructor
Joined: Jun 2012
Posts: 128
Likes: 5
From: Miami, FL
Thread Starter
Instructor
Joined: Jun 2012
Posts: 128
Likes: 5
From: Miami, FL
No Alarm no GPS and no Audio system
Hello and I hope someone will have an answer to my issue.
3 months ago, my battery ran out. My friend and I used a car charger/starter, but at first we placed the claws in the wrong polarity. We were able to start up the car, but the fob lock system is not working. The navigation screen does not turn on the same as the audio system. I asked for help 2 months ago, and I thought I found the solution, but still I haven't. I wonder what fuse I need to check that might be preventing those features to work. I want to avoid having to check all fuses so I am here trying my luck if someone will point me to the right direction on how I can fix this issue. Hopefully is nothing mayor..
Thanks in advance.
Senior Moderator


Joined: Apr 2010
Posts: 48,300
Likes: 9,171
From: SoCal, CA
[QUOTE=PiFive;17024285 I asked for help 2 months ago, and I thought I found the solution, but still I haven't.[/QUOTE]
Creating a new thread while leaving out all of the context of the old one is not helpful so I've merged your old into the new. Did you follow the instructions shared previously?
Creating a new thread while leaving out all of the context of the old one is not helpful so I've merged your old into the new. Did you follow the instructions shared previously?

^
Just curious, does anything 'happen' (on the navi screen) if you
1) Start the car, then
2) Press & hold Dest/Route+Map / Guide+Cancel?
3) Is the check engine light which may indicate the storage of car / navi system DTC's?
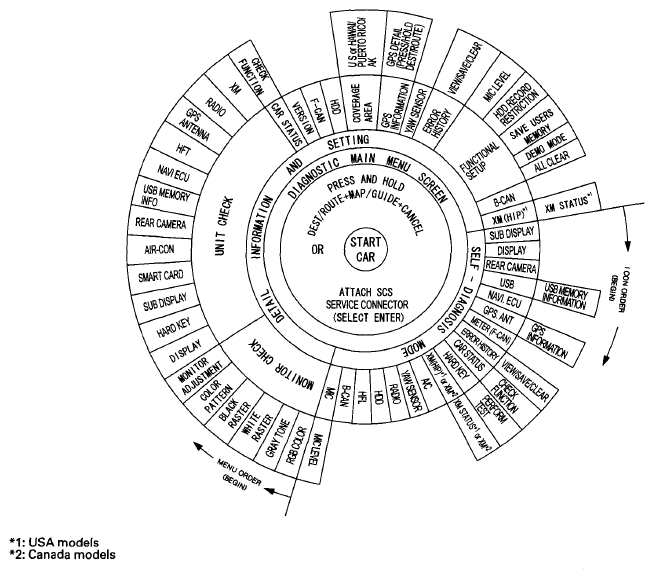
Access to the diagnostic features begins by starting the vehicle. This is necessary so the system can check the other systems connected by various busses. After starting the vehicle you can enter the diagnostic mode either by pressing and holding the DEST/ROUTE, the MAP/GUIDE, and the CANCEL buttons, or by connecting the 2-PIN SCS service connector.
The main menu screen allows 2 checking modes - one automatic, and one manual:
Fig 1: Navigation Diagnostic Features For Troubleshooting
Just curious, does anything 'happen' (on the navi screen) if you
1) Start the car, then
2) Press & hold Dest/Route+Map / Guide+Cancel?
3) Is the check engine light which may indicate the storage of car / navi system DTC's?
Diagnostic System Diagram
This diagram below shows all of the navigation diagnostic features available for system troubleshooting. The diagram starts at the center, and works outward in layers.Access to the diagnostic features begins by starting the vehicle. This is necessary so the system can check the other systems connected by various busses. After starting the vehicle you can enter the diagnostic mode either by pressing and holding the DEST/ROUTE, the MAP/GUIDE, and the CANCEL buttons, or by connecting the 2-PIN SCS service connector.
The main menu screen allows 2 checking modes - one automatic, and one manual:
- The automatic diagnostic check starts when you select SELF-DIAGNOSIS MODE. The system runs for several seconds, and reports any issues with Red icons. Rotate the interface dial and select the icon you wish obtain the problem details.
- The manual diagnostic check is selected from the main menu by selecting DETAIL INFORMATION AND SETTING. The traditional diagnostic menu is displayed. This allows you to obtain additional details as instructed in the troubleshooting procedures.
Fig 1: Navigation Diagnostic Features For Troubleshooting
Last edited by zeta; Yesterday at 03:00 PM.
[size=13px]Here's another more involved exercise that may help.
No Picture Displayed:
NOTE:[/size]
- Check the vehicle battery condition first.
- Check if the Day/Night button has been pressed, and turned off the display (see Navigation Manual for more information).
- Check the connectors for poor connections or loose terminals.
- Before troubleshooting, make sure you have the anti-theft code.
- After troubleshooting, enter the anti-theft code.
- Make sure that the latest navigation software is installed.
- Check any official Honda service website for more service information about the navigation system.
- Turn the ignition switch to ON (II), or press the engine start/stop button to select the ON mode.
- Check if the navigation display indicates any error message.Is error message displayed?
YES - Refer to the Error Message Table. ■
NO - Go to step 3. - Turn the ignition switch to LOCK (0), or press the engine start/stop button to select the OFF mode.
- Check the No. 15 (10 A) fuse in the under-hood fuse/relay box and No. 18 (7.5 A) fuse in the driver's under-dash fuse/relay box, and reinstall the fuses if they are OK.Are the fuses OK?
YES - Go to step 5.
NO - Replace the fuse(s), and recheck. If the fuse(s) blows again, check for a short in the No. 15 (10 A) fuse and/or the No. 18 (7.5 A) fuse circuits. ■ - Turn the ignition switch to ON (II), or press the engine start/stop button to select the ON mode.
- Do the Force Starting of the Audio-Navigation Unit.Is the diagnosis menu of the picture diagnosis displayed?
YES - Go to step 14.
NO - Go to step 7. - Shield the navigation display unit from the sun with your hand, and check that the display is back lit (only the back light is on.)Can you see the back light?
YES - Substitute a known-good audio-navigation unit, and recheck. If the symptom/indication goes away, replace the original audio-navigation unit. If the symptom/indication is still present, replace the navigation display unit. ■
NO - Go to step 8. - Turn the ignition switch to LOCK (0), or press the engine start/stop button to select the OFF mode.
- Connect the HDS to the DLC.
- Turn the ignition switch to ON (II), or press the engine start/stop button to select the ON mode.
- Clear the DTCs with the HDS.
- Turn the ignition switch to LOCK (0), or press the engine start/stop button to select the OFF mode, then back to ON (II), or the ON mode.
- Check for DTCs with the HDS.Are there any DTCs?
YES - Troubleshoot the indicated DTC, then recheck. ■
NO - Go to step 17. - Clear the hard error code.
- Turn the ignition switch to LOCK(0), or press the engine start/stop button to select the OFF mode, then back to ON (II), or the ON mode.
- Check for the hard error code.Is there a hard error code stored?
YES - Refer to the hard error code troubleshooting. ■
NO - Substitute a known-good audio-navigation unit, and recheck. If the symptom/indication goes away, replace the original audio-navigation unit. If the symptom/indication is still present, replace the navigation display unit. ■ - Measure the voltage between body ground and audio-navigation unit connector A (24P) terminals No. 14 and No. 24 individually.
Fig 1: Measuring Voltage Between Body Ground And Audio-Navigation Unit Connector A (24P) Terminals No. 14 And No. 24 Individually
Courtesy of AMERICAN HONDA MOTOR CO., INC.Is there battery voltage?
YES - Go to step 18.
NO - If the +B wire does not have voltage, repair an open in the wire between the under-hood fuse/relay box and the audio-navigation unit. If the ACC wire does not have voltage, repair an open in the wire between the driver's under-dash fuse/relay box and the audio-navigation unit. ■ - Measure the voltage between audio-navigation unit connector A (24P) terminal No. 12 and body ground.
Fig 2: Measuring Voltage Between Audio-Navigation Unit Connector A (24P) Terminal No. 12 And Body Ground
Courtesy of AMERICAN HONDA MOTOR CO., INC.Is there less than 0.2 V?
YES - Go to step 19.
NO - Repair an open or high resistance in the wire between the audio-navigation unit and body ground (G502) (see CONNECTOR TO FUSE/RELAY BOX INDEX). ■ - Measure the voltage between body ground and navigation display unit 36P connector terminals No. 1 and No. 2 individually.
Fig 3: Measuring Voltage Between Body Ground And Navigation Display Unit 36P Connector Terminals No. 1 And No. 2 Individually
Courtesy of AMERICAN HONDA MOTOR CO., INC.Is there battery voltage?
YES - Go to step 20.
NO - If the +B wire does not have voltage, repair an open in the wire between the under-hood fuse/relay box and the navigation display unit. If the ACC wire does not have voltage, repair an open in the wire between the driver's under-dash fuse/relay box and the navigation display unit. ■ - Measure the voltage between navigation display unit 36P connector terminal No. 19 and body ground.
Fig 4: Measuring Voltage Between Navigation Display Unit 36P Connector Terminal No. 19 And Body Ground
Courtesy of AMERICAN HONDA MOTOR CO., INC.Is there less than 0.2 V?
YES - Substitute a known-good navigation display unit, and recheck. If the symptom/indication goes away, replace the original navigation display unit. If the symptom/indication is still present, replace the audio-navigation unit. ■
NO - Repair an open or high resistance in the wire between the navigation display unit and body ground (G501) (seeCONNECTOR TO FUSE/RELAY BOX INDEX). ■

Thread
Thread Starter
Forum
Replies
Last Post
NSXFTW
3G RDX Audio, Bluetooth, Electronics & Navigation
121
Nov 9, 2019 10:28 PM
Padre Dave
3G RDX Audio, Bluetooth, Electronics & Navigation
2
May 6, 2019 08:26 PM
bahamas12
3G RLX Audio, Bluetooth, Electronics & Navigation
11
Sep 15, 2017 09:51 AM
jhon_wired
2G RL Audio, Bluetooth, Electronics & Navigation
1
Sep 23, 2014 02:50 PM