
TL-S Wheel Restoration pics
 04-24-2011, 11:29 AM
#1
6spd FTW
Thread Starter
Join Date: Oct 2007
Location: is everything.
Age: 37
Posts: 1,392
Likes: 0
Received 49 Likes
on
33 Posts
TL-S Wheel Restoration pics
So I picked up a set of Type-S wheels from a friend on the forums about 2 months ago. The price I paid for them was fair, and once I got home I realized they were not as good as I had hoped. They were all curbed up and scratched all around, tires were basically shot with bubbles and tread issues. So I knew I would have to have these refurbished before they went on my car as well as new tires. Turns out my awesome friend here had purchased the road hazard protection on the tires when he bought them! But before I went ahead to get the tires swapped, I wanted to do the majority of any sanding that needed to be done.
All of the wheels started out in this condition or worse:

Hard to see from the crappy cell phone picture, but there were scratches and nicks throughout the face of all of the wheels as well as some nice dings here and there.
So I went about sanding down the major imperfections with 60 grit sand paper. It turns out the factory coating on these wheels is pretty thick and some of the not-so-serious curbing easily disappears with some vigorous 60 grit action.
After about 3 hours of sanding all of the major blemishes off of the wheels, most of them had this kind of landscape going on:

On to the next step. I took out some 200 grit paper and went about scuffing up all of the wheels and smoothing out some of the 60 grit marks. After the sanding, every wheel looked like this:

Before I could paint though, I gave them all a mineral spirits bath.
As for the paint I selected, I went with Rust-Oleum "High Performance Wheel Paint". I was going to use Dupli-Color, but it appears that Autozone (at least near me) no longer carries it. I picked up several cans of Filler primer, Graphite, and Clear. I really only needed about 1 can of Primer and 2 cans each of Graphite and Clear. Personally, I didn't expect spectacular results as these are rattle cans, but I reserved my judgment.
On to the Primer!

You can see one of the larger blemishes in this wheel that I chose not to completely remove. I did pick up some metal filler epoxy, but decided I was going to just leave this be - I will be using the filler on a much heavier damaged wheel in the near future. At this point, if you have any heaving scratches, you can go ahead and sand down the primer a bit when it dries and apply another coat or two. I did 2 coats of primer.
This is how the wheel looked after 1 coat of color (soon to be 3):

And here is your finished product after 3 coats of clear. I waited approx. 12 minutes between each coat of color / primer and 50 mins between each coat of clear.
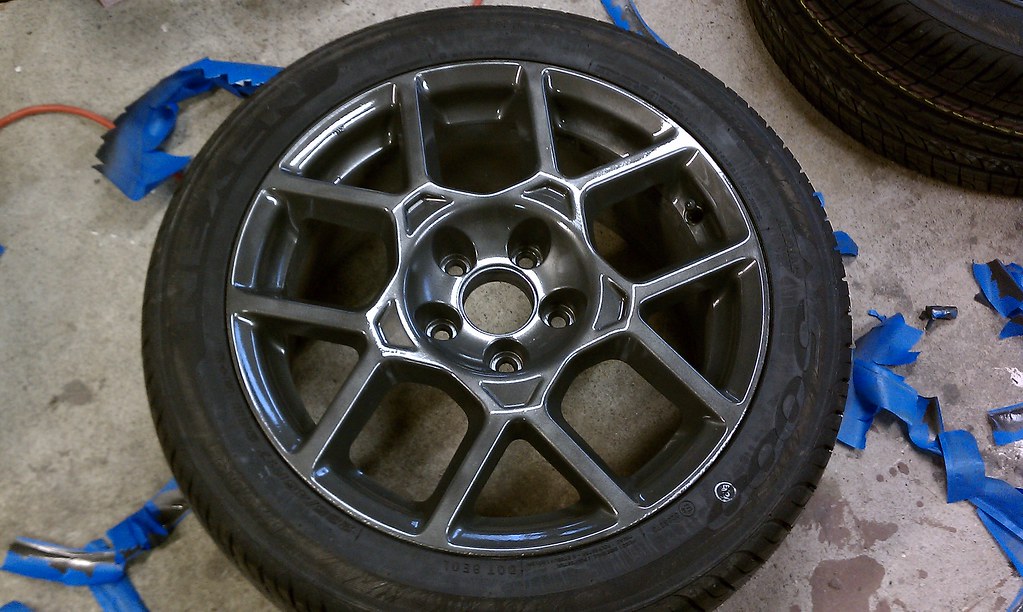
Of course, the all important finished shot on the car. Waited about 36 hours before I mounted them on the car.

Hope someone can possibly find some help in this thread or use it as a point of reference in the future!
Here is the wheel that needs a bit more TLC and cavity filling

Those blemishes are DEEP. No idea how one causes such damage to a wheel. But this is a spare, I can take my sweet time.
All of the wheels started out in this condition or worse:
Hard to see from the crappy cell phone picture, but there were scratches and nicks throughout the face of all of the wheels as well as some nice dings here and there.
So I went about sanding down the major imperfections with 60 grit sand paper. It turns out the factory coating on these wheels is pretty thick and some of the not-so-serious curbing easily disappears with some vigorous 60 grit action.
After about 3 hours of sanding all of the major blemishes off of the wheels, most of them had this kind of landscape going on:
On to the next step. I took out some 200 grit paper and went about scuffing up all of the wheels and smoothing out some of the 60 grit marks. After the sanding, every wheel looked like this:
Before I could paint though, I gave them all a mineral spirits bath.
As for the paint I selected, I went with Rust-Oleum "High Performance Wheel Paint". I was going to use Dupli-Color, but it appears that Autozone (at least near me) no longer carries it. I picked up several cans of Filler primer, Graphite, and Clear. I really only needed about 1 can of Primer and 2 cans each of Graphite and Clear. Personally, I didn't expect spectacular results as these are rattle cans, but I reserved my judgment.
On to the Primer!
You can see one of the larger blemishes in this wheel that I chose not to completely remove. I did pick up some metal filler epoxy, but decided I was going to just leave this be - I will be using the filler on a much heavier damaged wheel in the near future. At this point, if you have any heaving scratches, you can go ahead and sand down the primer a bit when it dries and apply another coat or two. I did 2 coats of primer.
This is how the wheel looked after 1 coat of color (soon to be 3):
And here is your finished product after 3 coats of clear. I waited approx. 12 minutes between each coat of color / primer and 50 mins between each coat of clear.
Of course, the all important finished shot on the car. Waited about 36 hours before I mounted them on the car.
Hope someone can possibly find some help in this thread or use it as a point of reference in the future!
Here is the wheel that needs a bit more TLC and cavity filling
Those blemishes are DEEP. No idea how one causes such damage to a wheel. But this is a spare, I can take my sweet time.

The following users liked this post:
SVTruong (02-21-2012)
 04-24-2011, 11:53 AM
#3
6spd FTW
Thread Starter
Join Date: Oct 2007
Location: is everything.
Age: 37
Posts: 1,392
Likes: 0
Received 49 Likes
on
33 Posts
Yeah, I entertained the idea of painting them silver or something different, but decided to just go graphite since I know they will look good that way.
04-24-2011, 04:05 PM
#6
Team Owner
iTrader: (2)
Join Date: Jan 2008
Location: Kansas City, MO (Overland Park, KS)
Posts: 36,545
Received 6,470 Likes
on
5,162 Posts
Well done Tehvine! I just had mine redone at the dealership, but awesome job.
2011 National AcuraZine Meet-Kansas City-June 12, 2011-Details Here!
.
2011 National AcuraZine Meet-Kansas City-June 12, 2011-Details Here!
.
Trending Topics
 04-24-2011, 09:17 PM
#10
Moderator
iTrader: (3)
Damn, nice work! They look great!
04-25-2011, 08:37 AM
#11
Nice!
I tackled this project earlier this month. Only two of my wheels were curbed, so i only refinished two. In the end, the two I refinished ended up being a much darker gunmetal color
What color paint did you use? Do you think it matches well with the factory paint? Looked damn good to me!
I tackled this project earlier this month. Only two of my wheels were curbed, so i only refinished two. In the end, the two I refinished ended up being a much darker gunmetal color
What color paint did you use? Do you think it matches well with the factory paint? Looked damn good to me!
05-11-2011, 03:59 PM
#12
Nice Job... I might need to do this to mines since the previous owner some how (Im guessing) took off the clear coat and the rims are stained now. IDK WTF happened to them but they have these terrible stains that don,t even come off with degreaser. So I may entertain this DIY since im tried of seeing these Dirty Type S wheels on my Type S. I will start a new threat with pictures to see if anyone could guide me in starting my mission.
02-07-2012, 03:04 AM
#15
Racer
02-08-2012, 02:26 PM
#17
6spd FTW
Thread Starter
Join Date: Oct 2007
Location: is everything.
Age: 37
Posts: 1,392
Likes: 0
Received 49 Likes
on
33 Posts
I used rustoleum graphite wheel paint. It is definitely darker than oem. I will check the exact code on the paint when I get home. They held up quite well for the season. I will be sanding and clearing before next season when they go on again just to touch up.
02-08-2012, 03:44 PM
#18
takin care of Business in
iTrader: (5)
Join Date: Jan 2008
Location: Kansas City, MO
Age: 40
Posts: 30,994
Received 4,732 Likes
on
4,064 Posts
GREAT work OP !!!
the wheels came out looking like new
the wheels came out looking like new
02-09-2012, 08:34 AM
#19
10th Gear

Join Date: Oct 2011
Location: Hamilton, Ontario
Posts: 10
Likes: 0
Received 0 Likes
on
0 Posts
Nice!! My buddy just picked up a set of these in similar condition and had to paint them also, he used automotive paint since he is a painter but the end result looks very similar.
02-09-2012, 09:44 AM
#20
I tried this a while back and gave up.
Just a warning to anyone wanting to paint type-s wheels. You can never match the factory finish as it is a sort of hyper silver that requires several different coats/colors to get the final finish that we all love. So you can't really repair one wheel and have it match the rest.
If you're doing any repair yourself you might as well paint all four wheels a matching color. But again, the stock hyper silver is beautiful because it sort of changes colors in the light. I actually like it a lot.
02-09-2012, 03:45 PM
#21
2nd Gear

Join Date: Nov 2011
Location: NE Pennsylvania
Age: 34
Posts: 2
Likes: 0
Received 0 Likes
on
0 Posts
From what I have read the Anthracite Metallic paint color on the 06 TL's is almost a perfect match to the TLS rims, I picked up a can of the base and clear from the website below, I plan on working on mine after the winter is over.
www.paintscratch.com
www.paintscratch.com
 02-16-2012, 07:36 AM
#23
Instructor
Looks Great!!!  I need to do something like this soon.
I will let the OP answer this incase I am wrong but from the looks of it looks like the regular painters tape you can find at home depot.
I need to do something like this soon.I will let the OP answer this incase I am wrong but from the looks of it looks like the regular painters tape you can find at home depot.
02-18-2012, 02:18 AM
#24
Mons shaver
Looks good.
I was thinking of picking up a set of 08 TypeS since my stock 08 rims are curbed to hell. But I didn't like the look of the dark gun metal on my CBP, so I passed. Maybe I'll see if they're still available and just repaint them.
This forum is like viagra, it gives me confidence to do all kinds of crazy shit that I would never have tried before.


 02-26-2012, 08:03 PM
#30
Intermediate
Thank you for your response. I should had read more carefully as you indicated the answer to my question on your post originally lol.
02-27-2012, 02:49 PM
#33
takin care of Business in
iTrader: (5)
Join Date: Jan 2008
Location: Kansas City, MO
Age: 40
Posts: 30,994
Received 4,732 Likes
on
4,064 Posts
^^^ 

Thread
Thread Starter
Forum
Replies
Last Post
nanos
Car Parts for Sale
26
11-12-2015 08:41 PM
merc009
3G TL (2004-2008)
21
10-03-2015 12:59 AM
DiamondJoeQuimby
Car Parts for Sale
1
09-10-2015 11:40 AM