When you click on links to various merchants on this site and make a purchase, this can result in this site earning a commission. Affiliate programs and affiliations include, but are not limited to, the eBay Partner Network.
Place a jack under the lca on the inside of the balljoint and lift 'til level. Once a good number of threads are showing the nut can pull the joint down if needed. Also, when the arm is level and if the bj won't go down try hitting the side of the arm with a hammer.
Last edited by Turbonut; Jun 15, 2012 at 09:03 AM.
Uh.....That isn't the ball joint that popped out of the LCA. That is the ball joint sleeve. According to the manual, if that sleeve comes out of the LCA, the entire LCA should be replaced. You see, your supposed to use a ball-joint separator that pulls on that sleeve while pushing on the ball-joint stud. The stud should have popped out of that sleeve. The sleeve should not have popped out of the LCA. No idea why Honda set it up like this this time around. I've only seen this setup on aluminum LCAs, but these sure look like steel to me. Chances are that sleeve is hardened-steel or something, while the LCA is just cast steel.
You can also try using the correct ball joint tool with a socket over stud sticking out the bottom. That should press the sleeve back into the arm without putting any pressure on the stud.
I'm surprised he pushed the sleeve out. I'm a bit dumbfounded actually. If the manual says replace LCA if the sleeve pushes out.. I'd play along. If the jack doesn't push it back in, you can remove LCA and have a shop use their static press to push it back in. I'd be worried that it would push off again.
Well, as long as there is still a "press fit" it should be fine (my opinion). The OEM castle nut has a large flange on it that sticks out beyond that lower portion of the sleeve and sandwiches everything against the cast-steel arm. This is why it cannot pop out while driving (otherwise it definitely would). In fact....the Moog replacement ball-joints from several years back included a new castle nut with no flange. Because there was no flange, and the nut was smaller diameter than the sleeve, the sleeve was able to slip out of the UCA while driving. Obviously this brings your car to a crashing halt. These ball joints were quickly recalled because of this stupid flaw. Of course if you simply re-used the OEM nut (which is perfectly fine to do), the new ball-joint would have been fine. Dumbasses. Moog's castle nuts are anything but OEM fit. Same was true for the CRX UCAs I just installed. Castle nut was too big to put the cover back on, so I reused the original.
BTW: raising the LCA with a jack won't press that sleeve back in on it's own. Since the weight of the car goes through the spring and straight into the LCA, there will be nothing pushing down on the knuckle other than the weight of the brake/knuckle assembly (which isn't much). And I don't know if he can take it somewhere to get that sleeve pressed back in since the sleeve is most likely stuck on the ball-joint stud. If the sleeve can be removed with a balljoint tool, then that is definitely a worthwhile option. Of course a simple large C-clamp might do the trick at that point too. You can rent a strong one from Autozone (ball joint press).
You can also try using the correct ball joint tool with a socket over stud sticking out the bottom. That should press the sleeve back into the arm without putting any pressure on the stud.
Which tool would you recommend?
Jacking the lca up didn't help. Also if I try tightening the nut I'm afraid I may strip the threads. Already had to chase them with a die.
I didn't use a tool to reomove. Tried wedging 1/2" drive ratchet handle in between lca nnd spindle.
Still at work...thx for all the replies. Ill keep u guys posted what works.
The ratchet trick works fine on Civics & Integras because they don't have that sleeve in the LCA. Of course the TL has to be more complicated.
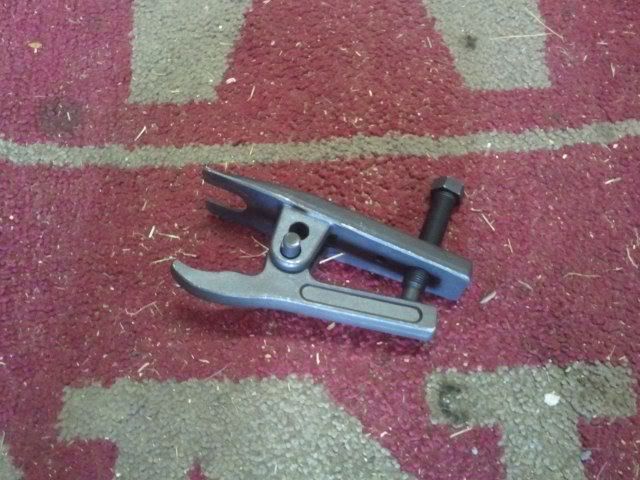
I haven't yet worked on my TL's suspension, so I don't know for sure....but a "tie-rod-lifter" tool should work. You should be able to rent one and try it. I believe it comes in the 5-piece front end service set at Autozone or O-reily's. The trick is to make sure the fork is narrow enough that it will grab pleanty of that sleeve's wide flange. Don't worry if it pushes the dust boot up a bit, it's just stretchy rubber. Just make sure you cover the bottom with a big/deep enough socket so the ball joint stud will press through without contacting anything. If the stud bottoms out while your pressing the sleeve in, it will damage the socket inside and ruin the ball joint.
I got this one from Amazon:
This is the 5-piece front end service set from the auto-parts store. Pretty much any of these should work as long as it can grab onto that sleeve flange. The Honda shop manual shows a special tool that looks just like the one in the lower left. Don't know if it has special fork spacing though.
I was thinking something like this. It should pull the sleeve down. At least far enough to get the nut on all the way so you can use it to pull the rest in.
Green = LCA Cyan = Ball Joint Tool Magenta = LCA/Balljoint Sleeve Red = Large Socket
Put the jack under lca, get it parallel to ground then tap the top of the knuckle to see it goes in, or remove the rotor and tap on the knuckle on top of the BJ, or a long drift placed on top of the BJ.
Last edited by Turbonut; Jun 15, 2012 at 08:48 PM.
Put the jack under lca, get it parallel to ground then tap the top of the knuckle to see it goes in, or remove the rotor and tap on the knuckle on top of the BJ, or a long drift placed on top of the BJ.
I wouldn't want to hammer through the lower ball joint. This ball joint is designed to be pulled on with great force. This is the normal loading of this joint as the weight of car through the spring is always pulling down on the stud. This is why the ratchet-trick doesn't damage them. It is not designed to take a high compression load. If all else fails you could give it a try though.
I wouldn't want to hammer through the lower ball joint. This ball joint is designed to be pulled on with great force. This is the normal loading of this joint as the weight of car through the spring is always pulling down on the stud. This is why the ratchet-trick doesn't damage them. It is not designed to take a high compression load. If all else fails you could give it a try though.
Got to agree with you on this one as I was thinking more on the surrounding material and not the BJ directly.
I was thinking something like this. It should pull the sleeve down. At least far enough to get the nut on all the way so you can use it to pull the rest in.
Green = LCA Cyan = Ball Joint Tool Magenta = LCA/Balljoint Sleeve Red = Large Socket
Wow...extremely helpful. After you mentioned there was a sleeve surrounding the ball joint I had a better idea of what I needed to do.
I'm used to the older integra/civic ball joint setup which is why I inserted the ratchet handle between the spindle and lca after jacking up the lca. Works well for those vehicles but evidently not for our TLs.
So I took your advice and used a ball joint separator tool that I bought from Harbor Freight for a 02 civic. Placed the forks of the tool above the sleeve's lip and the bottom tongue on the lca next to the ball joint. Compressed the tool by tightening and voila... it worked. Sleeve is now in its original position in the lca and my axle boot is resealed. It's now also lowered with Tein S techs and SPC rear camber kit installed
Btw, what program did you use to draw that sketch? I appreciate the time you took make the diagram. Very nice...
Anyhow, installing zkwr projector lenses in the headlamps today and off to get it aligned tomorrow. Here's a little eye candy...
That's great man, I'm so glad that worked out for you. Nice to know they have that tool at Harbor Freight too. Looks better than the one I got from Amazon. Not bad for only $17 too (less a 20% off coupon ): http://www.harborfreight.com/3-4-qua...tor-99849.html
For the drawing I used plain old Autocad. I'm a professional draftsman so it only took a few minutes....Plus I was bored at work.
this thread makes the lower control arm removal look more scary than it is. my sleeve popped out too when I removed my lower control arm, but I used the castle nut to help tighten the sleeve back in and everything sits flush and perfect, I dont see whats the big deal about the sleeve popping out if the castle nut is installed back on correctly.
I used the castle nut to help tighten the sleeve back in and everything sits flush and perfect, I dont see whats the big deal about the sleeve popping out if the castle nut is installed back on correctly.
The ratchet trick works fine on Civics & Integras because they don't have that sleeve in the LCA. Of course the TL has to be more complicated.
I haven't yet worked on my TL's suspension, so I don't know for sure....but a "tie-rod-lifter" tool should work. You should be able to rent one and try it. I believe it comes in the 5-piece front end service set at Autozone or O-reily's. The trick is to make sure the fork is narrow enough that it will grab pleanty of that sleeve's wide flange. Don't worry if it pushes the dust boot up a bit, it's just stretchy rubber. Just make sure you cover the bottom with a big/deep enough socket so the ball joint stud will press through without contacting anything. If the stud bottoms out while your pressing the sleeve in, it will damage the socket inside and ruin the ball joint.
I got this one from Amazon:
This is the 5-piece front end service set from the auto-parts store. Pretty much any of these should work as long as it can grab onto that sleeve flange. The Honda shop manual shows a special tool that looks just like the one in the lower left. Don't know if it has special fork spacing though.
That set is from harbor freight and even the ones that "hold" the sleeve in place will push it out if it is seized hard enough.
Reviving this thread from the dead in order to add some information for others if they happen to run into this problem (like I did today when replacing my CV shaft)...
The problem: ball joint sleeve comes out of LCA when removing the ball joint via the 'old school civic method.'
Solution: I understand the FSM suggest replacing the LCA, but in a pinch here's a short-term solution. Advance Auto Parts has two loaner tool kits that worked well to separate the sleeve from the ball joint, and then press the sleeve back into the ball joint.
I used kit #3, Front End Service Kit, to separate the sleeve from the ball joint.
Advance Auto Parts rental tool kit #3, Front End Service Kit
Then, I used kit #46, Ball Joint/U Joint Service Set, to press the sleeve back into the lower control arm.
Advance Auto Parts loaner tool kit #46, Ball Joint/U Joint Service Set
Finishing up...
Obviously, if I had it to do over, before trying the 'old school civic trick' I would try the Front End Service kit first. I would think it should be able to remove the ball joint from the sleeve while still attached to the LCA...
@SRT Ace. Thanks for the input, I went out and bought the OTC front and service kit since the auto parts stores ones sometimes are missing pieces and are abused beyond usability. As far as an alignment goes, I don't think you'll need one for just the ball joint replacement, unless you unscrewed the tie rods
Reviving this thread from the dead in order to add some information for others if they happen to run into this problem (like I did today when replacing my CV shaft)...
The problem: ball joint sleeve comes out of LCA when removing the ball joint via the 'old school civic method.'
Solution: I understand the FSM suggest replacing the LCA, but in a pinch here's a short-term solution. Advance Auto Parts has two loaner tool kits that worked well to separate the sleeve from the ball joint, and then press the sleeve back into the ball joint.
I used kit #3, Front End Service Kit, to separate the sleeve from the ball joint.
Advance Auto Parts rental tool kit #3, Front End Service Kit
Then, I used kit #46, Ball Joint/U Joint Service Set, to press the sleeve back into the lower control arm.
Advance Auto Parts loaner tool kit #46, Ball Joint/U Joint Service Set
Finishing up...
Obviously, if I had it to do over, before trying the 'old school civic trick' I would try the Front End Service kit first. I would think it should be able to remove the ball joint from the sleeve while still attached to the LCA...
-ace
i need to know the size of the spacer/spacer/insert please.
Uh.....That isn't the ball joint that popped out of the LCA. That is the ball joint sleeve. According to the manual, if that sleeve comes out of the LCA, the entire LCA should be replaced. You see, your supposed to use a ball-joint separator that pulls on that sleeve while pushing on the ball-joint stud. The stud should have popped out of that sleeve. The sleeve should not have popped out of the LCA. No idea why Honda set it up like this this time around. I've only seen this setup on aluminum LCAs, but these sure look like steel to me. Chances are that sleeve is hardened-steel or something, while the LCA is just cast steel.
Fig. Check the collar sleeve (A) on the lower arm (B). Replace the lower arm if the collar/sleeve is loose or damaged-2004-06 TL model
may i please have the size of the spacer/insert/sleeve. i�ve popped two ball joints in the past 3 months before i realzied that i needed that sleeve. amazon sells it but i need the size. they have lengths ranging from 1/4 inch in length up to 1&1/2 so i kinda need to know so i can do it in one shot


 ]
]


 ): http://www.harborfreight.com/3-4-qua...tor-99849.html