When you click on links to various merchants on this site and make a purchase, this can result in this site earning a commission. Affiliate programs and affiliations include, but are not limited to, the eBay Partner Network.
Have any of you guys had the problem of only the back of the seat gets warm? the bottom isn't hot, I'm guessing the wire burned out. Have any of you guys had any experience repairing this? is it hard to do?
i've read a few things about trying to fix/replace the heating elements in the seat (its essentially a heating pad with a bunch of wires kind of like an electric blanket). there are aftermarket kits to replace the seat heater. however, unless you're adventurous and handy with tools...it can be an undertaking. there is a special tool to help unhook the upholstery to get to all the seat parts (foam, the heating pad). i thnk there is a DIY somewhere on the web for this...i looked through it (it might have been for a honda accord-i was looking for a friend). it doesn't look too bad. so if you're handy...
if you go to the dealer it'll cost you $600-700! OUCH. most that is labor of course. the part is like $100-150 (if i remember correctly).
Check to see if it's getting current, which it probably is. Normally aftermarket heaters don't work well with the factory wiring, so you'd be better off getting a new heater @ $134/$100 net. I've installed heaters and repaired numerous heaters, not in the TL though, and not a hard job at all, but it just takes time taking the seat components apart.
In the morning I'll see if the FSM has any "hints" on the seat heater malfunction/checking.
yeah i know its august, but I have a bit of time now. I noticed it last year, but i pretty much put it off until its not cold anymore, so hopefully this year I can get a head start on it. It doesn't look too hard, but just very tedious.
I found this for the 2g TL. Looks like it will probably be about the same
I also have issues with the seats of my 08 TL-S. The passenger seat takes 10 min to get "just" warm. The driver seat on the other hand does not seem to be working at all. When I took the car in the first time after I bought the car, the dealer told me it does take a while for the seats to get warm but I think there's a problem. Does it usually take this long?
i'd say it takes a few minutes to warm up your back side. not 10. i know it warms up a hell of a lot faster than the when the heat finally kicks in on the car when its frosty out.
I have a similar issue. My driver's seat work fine, the passenger side doesn't seem to work at all. My car stereo's capacitor shows "12.0" with both off. Just the Passenger side on it stays at "12.0" when driver's side is on it drops to "11.8" then back up to "12.0" when turned off. So...the passenger side must not be pulling any juice, and therefore not heating up.
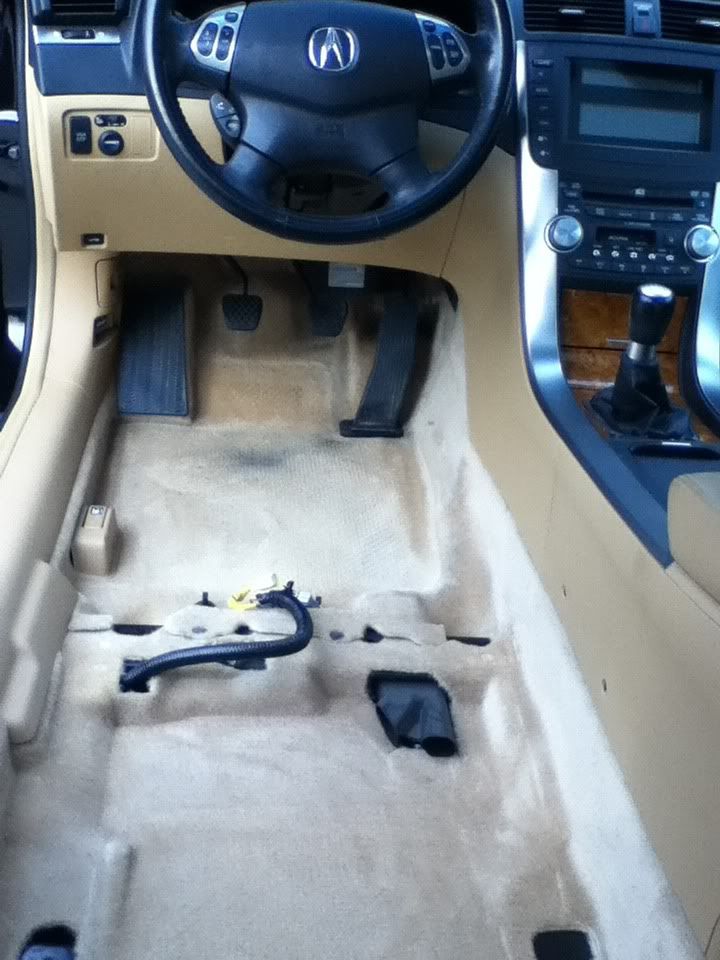
Is there a wire disconnect? Anyone have any pictures where it would be? I'm wondering if my car stereo guy screwed something up. Please help! It’s been about 15 degrees outside each morning and the wife is bitching about her frozen ass!
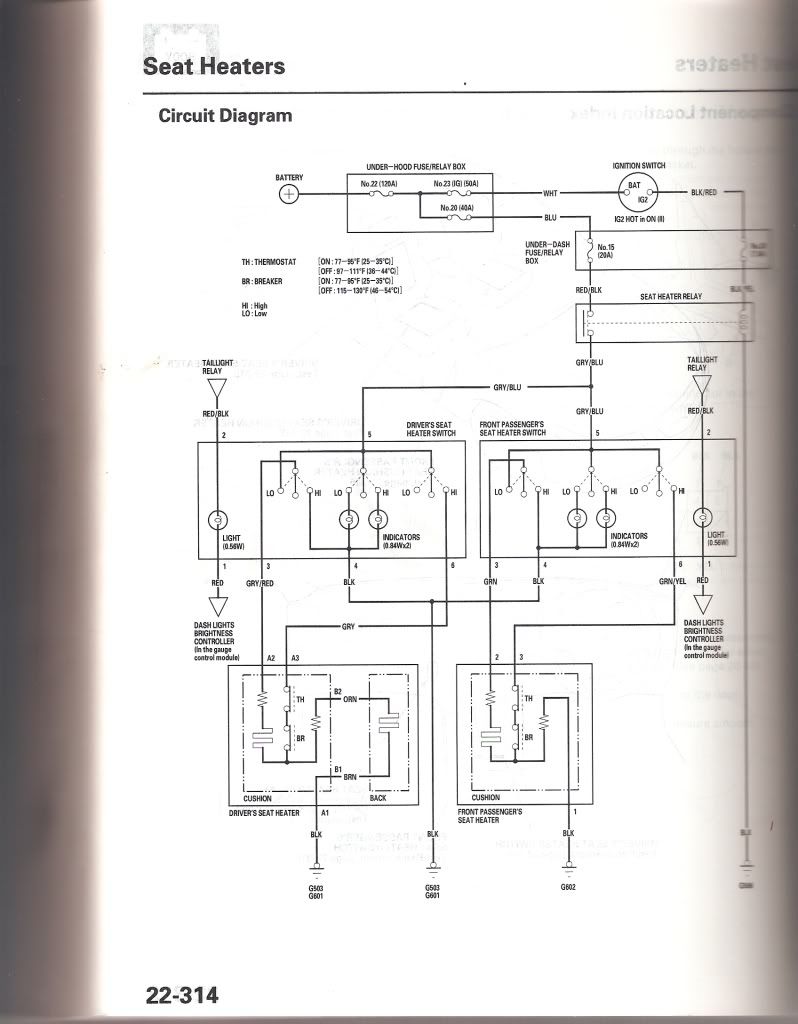
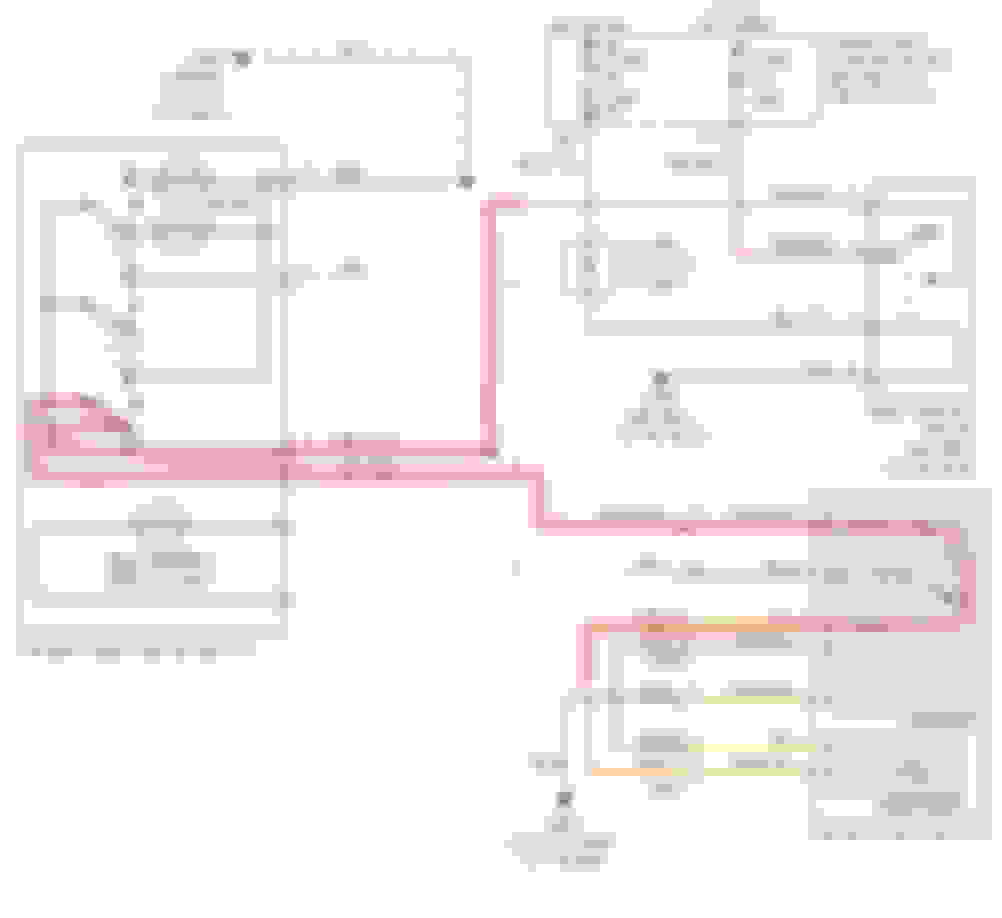
the link to a schematic...just to give you an idea. if someone actually has a service manual they can give you the exact scans of those pages with instructions and diagrams.
I have a similar issue. My driver's seat work fine, the passenger side doesn't seem to work at all. My car stereo's capacitor shows "12.0" with both off. Just the Passenger side on it stays at "12.0" when driver's side is on it drops to "11.8" then back up to "12.0" when turned off. So...the passenger side must not be pulling any juice, and therefore not heating up.
Is there a wire disconnect? Anyone have any pictures where it would be? I'm wondering if my car stereo guy screwed something up. Please help! It�s been about 15 degrees outside each morning and the wife is bitching about her frozen ass!
The electrical connector for the 3G TL passenger seat is a three pin connector under the seat at the fron tof the seat. It is above the crossover motor drive and has wire colors Green Green/Yellow and Black. There are three pins. I can scan the manual later and post the test for you.
yeah i know its august, but I have a bit of time now. I noticed it last year, but i pretty much put it off until its not cold anymore, so hopefully this year I can get a head start on it. It doesn't look too hard, but just very tedious.
I found this for the 2g TL. Looks like it will probably be about the same
My 2005 3G TL driver's seat bottom heater element has no continuity. So now I get the joy of doing this task. At least this video helps alot. Relatively cheap part ($67) so it's mostly a labor job.
I had to fix the release mechanism on the 2nd row seats on my wife's Honda Pilot a some years ago and had to take apart the seat, and those fabric "O" clips are tricky to get back on.
Thanks, guys. I'll pull the front plastic over off today when it warms up a bit and see if it's connected. If it IS connected, what should I try next? (Switch light comes on. Doesn't seem like there is any draw on the electrical system when passenger side is on, but there is draw from the driver's side and the driver's DOES work).
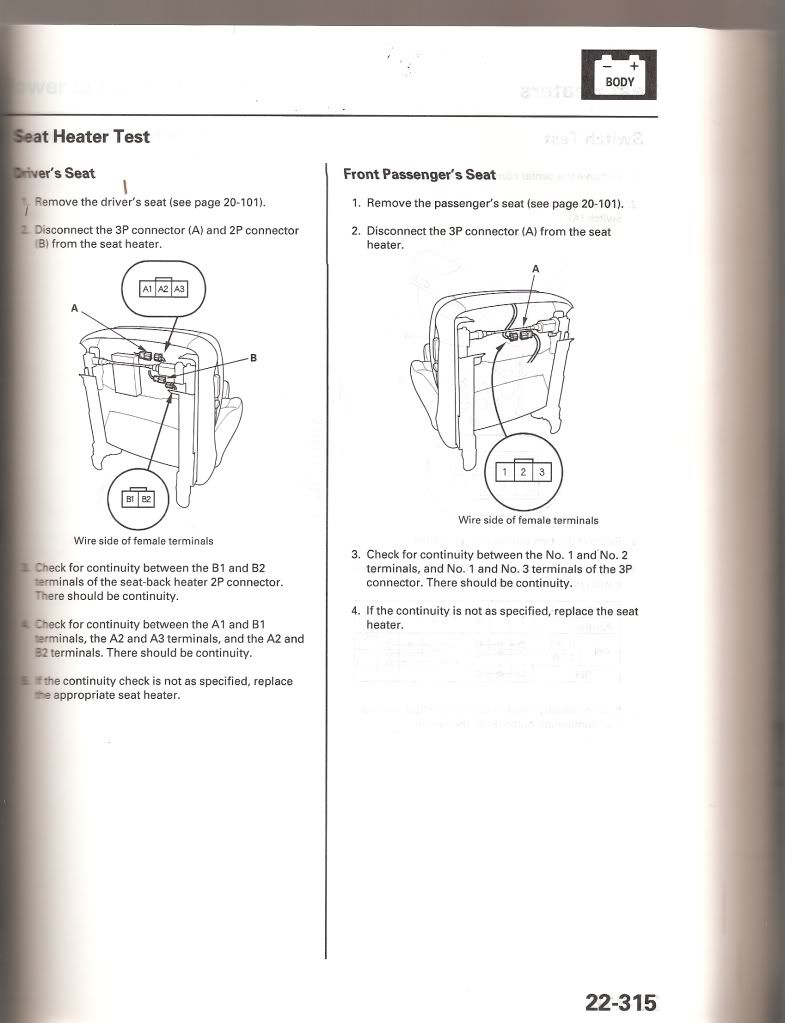
Yes, that looks like the "A" connector for the combined bottom and back heater. The "B" connector is a 2-pin connector also nearby. You can check the seat back heater with the "A" connector. Test pins A1 and A3 for continuity. Here are scans from the manual for more detail.
BTW, I check my bottom heater (A1 and A2) and it was open so today I'm going to order the heater and hopefully install this weekend.
Good luck with your back heater problem, I'll post some notes after I finish the replacement of the bottom heater.
Looks like there are a lot places there could be a failure however, I'm not great at reading electrical diagrams. I guess I'll pull the seat sometime but I think I'll have to wait until it warms up.
If you have to replace the seat warmer on the passenger side, is there an aftermarket warmer you can place in the seat back?
I'm not sure what you could place a heater in the passenger seat back, I believe there is a weight sensor for the airbag in the back and cushion.
You do not have to pull the seat to check the continuity of the seat back heater. I was able to do it by unplugging the "A" connector and using a multimeter to measure the resistance. Harbor Freight always has those small DMM's on sale ($4.99)
If the seat back heater is bad there will be a open between A1 and A3. My seat cushion is bad and I have a open between A1 and A2.
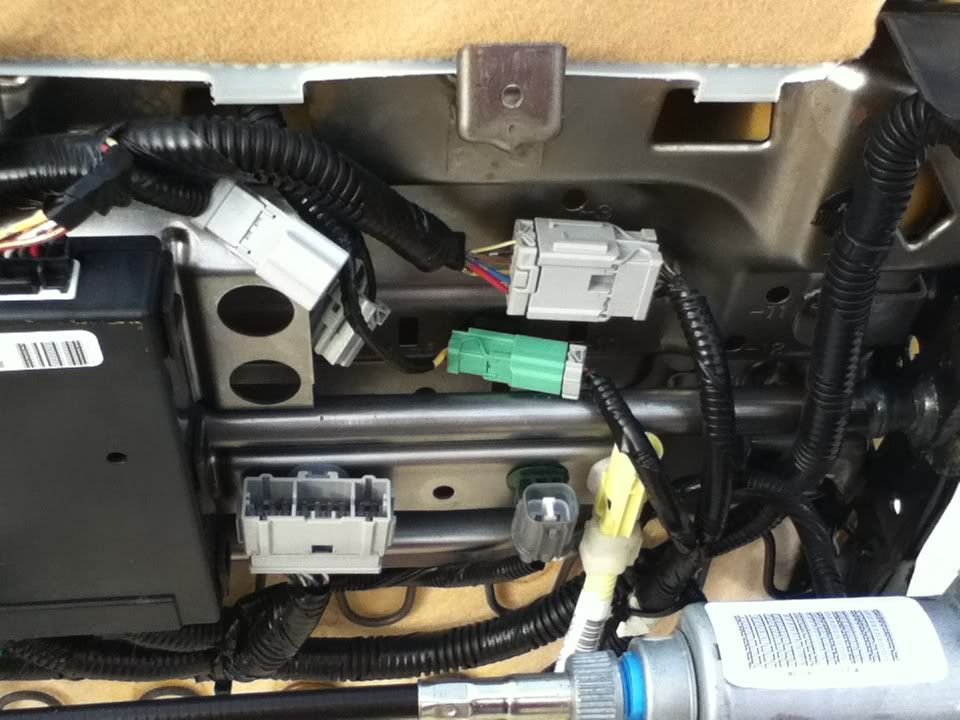
It's actually my passenger side seat bottom that isn't working, as well. How did you access the plugs? I tried from the front of the seat but maybe my arms are just too big? which color connectors are they (see my pics above)? The wiring diagram is helpful but hard to know which one(s) to try.
It's actually my passenger side seat bottom that isn't working, as well. How did you access the plugs? I tried from the front of the seat but maybe my arms are just too big? which color connectors are they (see my pics above)? The wiring diagram is helpful but hard to know which one(s) to try.
I'm pretty sure it's the connector you showed in your picture. For the passenger side there is only one connector. Measure resistance between 1 and 2, then 1 and 3. It should be fairly low (~5 ohm). 1 to 2 is the heater element, 1 to 3 is the thermostat switch. Both are integrated into the seat back heater.
Repaled the driver's seat cushion yesterday, overall it's a PIA job. The hard part is getting the "A" clips back on and closing them. They are also known as bull ring clips, they are very hard to reclose using two parts of needle nose pliers. If I had the time I would have gone down to Harbor Frieght but I'm not even sure if those pliers would have fit in the very tight area's in the seat.
If someone wants I can post tye pages in the manual for removing and taking apart the seat. My heater works which is a relief. Getting the seat into and out of the TL is pretty easy. And more important all the seat functions worked afterward (heater, power, memory, NO AIRBAG LIGHT!).
BTW, in your post it's the connector in your top photo
Thanks! I'll check it out next week sometime. I'm sure it's a bad heating element. How much did yours cost?
This may be a silly suggestion but: why not use zip ties to replace the bull rings? Cheap, easy to remove in the future and reinstalltion is easy. You'd probably need "police grade" but I bet it would work. Thoughts?
The heating element was $64.
Getting the seat in and out is fairly straightforward and having another person helps alot. Getting the seat apart just takes time and patience. There are alot of plastic tabs on the base covers and you never know how much force you need to get them loose to remove so the second time it would be easier. The whole effort took ~4 hours but could probably do it again in 1/2 time knowing how to get things apart. The manual only has like 4 pages to cover dis assembly and re-assembly of the seat so alot of just plain experience.
I thought of using the zip ties when I was doing it but decided to reuse the bull rings. The strength of the bull rings is not that phenominal so even regular zip ties should probably work OK.
Good to know. Thanks for the informative write up. Don't know when I'll have time to do this, plus it's freak'n cold outside. I may have to wait 'till next summer when I have a garage again and warmer climate.
Hello guys,
I'm new here as I just bought my 2006 Acura TSX. Great thread as I have the same problem; no cigarette lighter power or heated seats. From another thread I was able to diagnose the power issue thru fuse #9, however, fuse #15 for the heated seats seems okay. Yet, my heated seats still won't come on, neither will the lights on the switches; they won't illuminate. Is this indicative of wiring problem! The heating element work appears pretty invasive so I'm trying to do all due diligence before I go that route. I was hoping it's just a fuse issue, or something as simple
Thanks in advance!
So, I have a question. I have studied the wiring diagrams, and some are wrong. The one posted in post #16 above is right, but does not have colors associated with the connectors and wires.
3-pin A Connector:
Pin A1=black
Pin A2=white/blue
Pin A3=green yellow
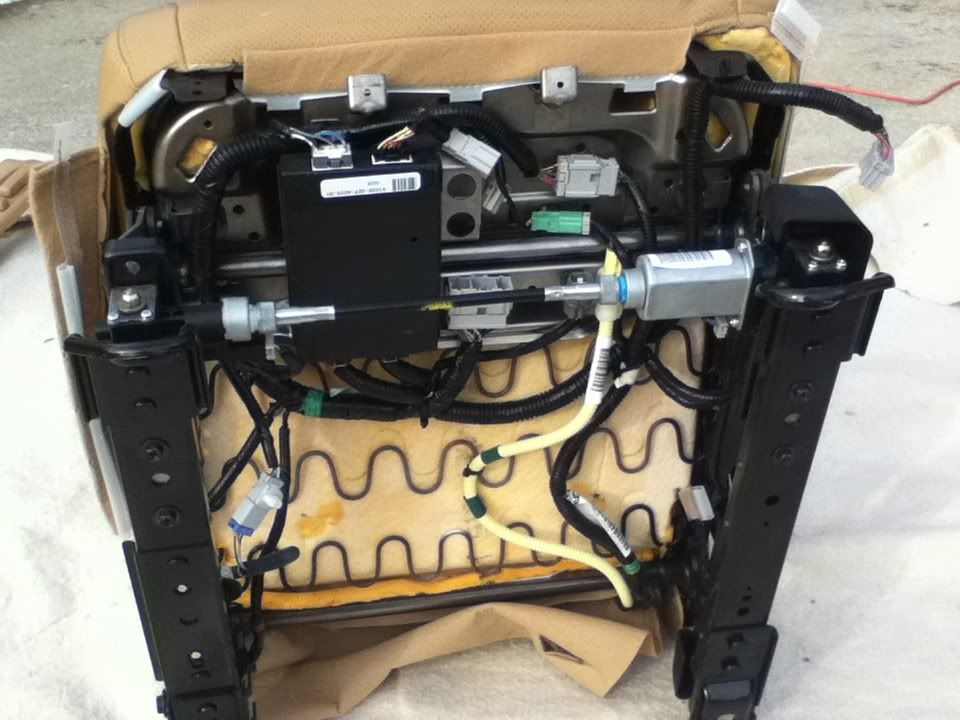
(You can see pins A1 and A3 marked in green in the picture below)
There are three wires coming INTO Connector A:
Black connected to black ( Pin A1)
Red/Gray connected to blue/white wire (Pin A2)
Gray connected to green/yellow wire (Pin A3)
There are three wires that go into the heated seat element: yellow wire (from the B connector), white/blue wire (Pin A2), and yellow/green wire (Pin A3). See below:
There are two small boxes on embedded in the heating element, which are the thermostat (denoted by TH in post #16 above) and the breaker (denoted by BR in post #16 above).
Breaker is on the left and thermostat is on the right (both colored in green).
The question is, there is nothing attached to the other side of the wires on the blue tape in the picture above. If that is the case, where are the heating wires?
I wonder if it's because the new leather I got is thicker. But then again, if that were the case, then I would not be able to feel my seat back heating up.
If the seat back heater is bad there will be a open between A1 and A3. My seat cushion is bad and I have a open between A1 and A2.
Point of clarification @Legend2TL , you will only have continuity between pins A1 (black wire) and A3 (green/yellow wire) if Connector B is plugged in.
Between Pins A1 (black wire) and A2 (blue/white wire) you should have roughly 31.5 ohms of resistance. This resistance is the combination between the seat cushion resistance heater and the back seat cushion resistance heater element.
Between Pins A1 (black wire) and A3 (green/yellow wire), you should have roughly 5.1 ohms of resistance. This is the back cushion heater resistance. ONLY IF CONNECTOR B IS PLUGGED IN. If you unplug connector B, you will not have any continuity between Pins A1 and A3.
Between Pins A2 (blue/white wire) and A3 (green/yellow wire), you should have roughly 26.4 ohms of resistance, which is the seat cushion heater resistance.
I'm really confused right now. I've pulled my seat apart at least twice now, but I never had a good look at the heating elements.
All of the diagrams that I can find show pretty much the same circuit, and from info from your posts all of them are somewhat wrong.
What is really annoying is that it's a simple circuit, where heaters are either run in series or parallel, depending on heat setting.
That's what I figured out so far:
Loom coming out of bottom cushion splits into connector A and B, correct? Can you trace the wires to be 100% sure which wire goes where.
So far it doesn't make sense to have "Connector A" #1 (grn/yel) coming into the actual heater, but not have "Connector A" #3 (black).
I'm also pretty sure that they show actual heating element with square wave. No idea what they mean by resistor symbols.
As you can see from my post above, the black wire does NOT go into the seat heater element. It's yellow, white/blue, and yellow/green that goes into the bottom seat heater element.
Maybe it is and it's breaking the circuit as soon as it warms up a bit. If you have lab bench power supply (or some other means of limiting the voltage and current) you could try powering the heater directly from there. Or assemble everything and measure current going to the heater as it's running in the car.
Does the heater work in low heat? In low heat both cushion and back elements are run in series, bypassing the thermistor / fuse / whatever it is.
Still it's either too late for me, or my diagram is wrong. Where does the black wire from Connector A (#3) goes? Take a note that you actually reversed the numbering of the pins. Usually #1 if looking at front of the connector, not the rear.
Just to be sure, this black wire that you labeled "1" goes to C918 (Connector B) pin #1, which turns to brown, and goes to the seat back?
What does black wire connects to on the male side of connector on this picture?
In your post #33 you are using correct connector and pin numbers, but wrong colors. (take a look at stuff in blue [representing "Connector A"] in post #35)
Looking at female Connector A (one that is unlabeled on my diagrams):
- pin 1 should be green yellow
- pin 2 should be white blue
- pin 3 should be black
(just like you wrote)
Pin 2 to pin 3 is cushion resistance.
Pin 3 to pin 1 is seat back resistance.
Pin 1 to pin 2 is total of cushion and seat.
Your cushion resistance is quite high compared to back seat.
26 ohm means at 12V you have ~0.5A running through the heater, meaning like 6W of power. I don't think that's enough.
In comparison you have 5 ohms at the seat back, meaning at 12V you have 2.4A which gives ~30W.
I bet that this resistance goes higher as you pass some current through it and that's why cushion doesn't work.
At high, seat back will see 12V, and will get hot. Bottom will also see 12V but high resistance means low power means low heat. At low, cushion's high resistance prevents the whole seat from warming up.