
A/C - Heat: Blower Transistor Fix


Thread Starter
9th Gear
Joined: Mar 2014
Posts: 9
Likes: 1
I do not often these forums unless something breaks. Recently, I was having an issue where my A/C would cut out midway while driving. It progressively got worse, my fan would shut off then turn on. Futzing around with different settings would occasionally yield some sort of result. Running A/C diagnostics would yield different results until finally the fan just stopped working and posted an S code. So, if your car is behaving similarly and you read on these forums that you cannot replace the individual transistor located in the component, you can.
So here is a quick write up (mostly taken from nicoclub.com for an Infiniti/Nissan - apparently they use the same transistor as the 3G TL when I Google the part #).
I am going to skip the part where you remove the Transistor (MOSFET AMP) as it is really simple. It is under the glovebox (passenger footwell) against the firewall on the leftmost side. There are some blue wires running from it to the blower and elsewhere. It takes two philips screws and its out. The following is extremely similar to the Transistor our car has:
Again, this was taken from nicoclub.com:
WHY THE FAN CONTROL AMP FAILS: In looking at the schematic shown above, it becomes obvious that control voltage from the A/C Auto Amp can only reach the transistor through a thermal cutout. If the cutout blows (due to temperatures in excess of 140 degrees C.), no control voltage is applied to the base (or gate) of the transistor, and the blower never comes on.
Or, if the transistor fails, it typically develops a permanent short circuit between the Drain and Source (Y33 version) terminals, causing the blower motor to run at full speed whenever the ignition switch is turned on (or not at all).
HOW TO TROUBLE-SHOOT IT: If the Thermal Cutout has blown, you will measure infinite resistance between the two printed-circuit pads shown at the top of this photo:
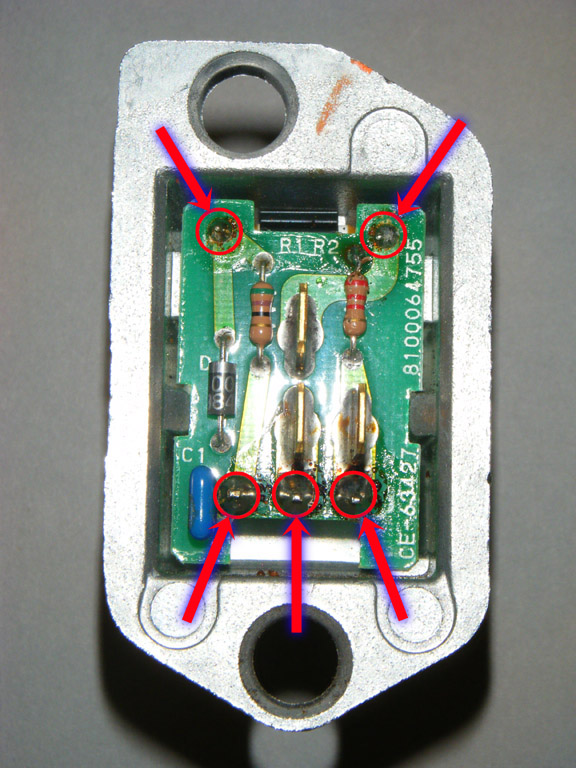
If the Cutout is still good, you will measure approximately zero ohms (or 0.007 ohms) across these same two pads.
If the Thermal Cutout is still good, the transistor has probably blown. In some cases, this will result in the same very low resistance being measured across terminals 35 and G when probing in both directions.
HOW TO REPAIR IT:
If the Cutout has blown, a quick-and-dirty fix would be to solder a jumper wire across both printed circuit pads, thereby bypassing the cutout. However, this defeats the safety feature of having the cutout. A better option is to replace the cutout with a new one (which only costs around 45 cents).
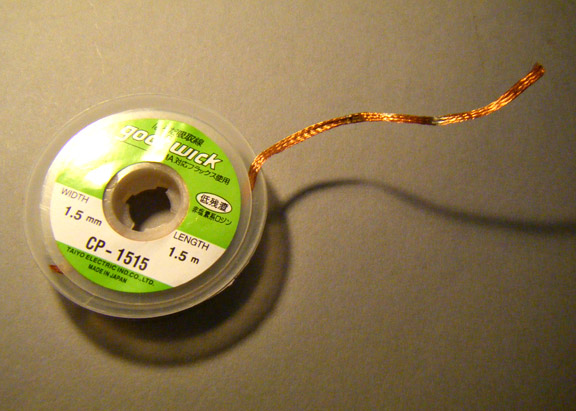
In order to replace either the Cutout or transistor, the printed circuit board must be unsoldered at the 5 points shown in the photo above. A roll of solder wick makes the unsoldering job much easier:
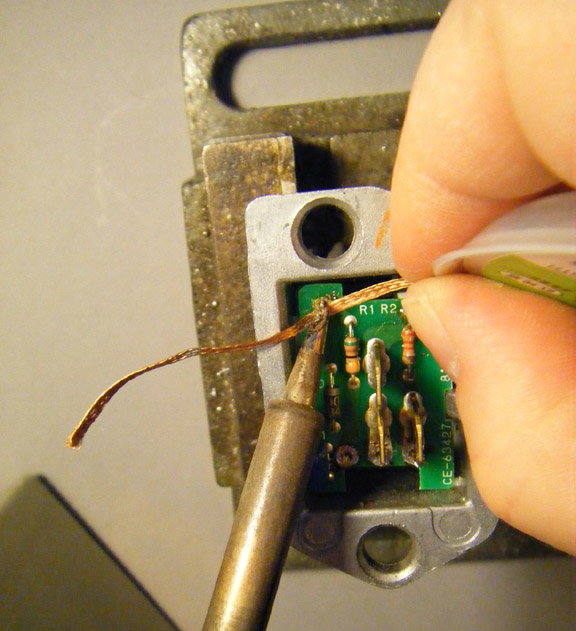
Use a soldering iron to heat both the printed circuit pad and the solder wick, until the molten solder �wicks up� into the solder wick�s copper braid. Gradually pull the braid across the pad so that fresh braid is continuously exposed to the pad and soldering iron, until all the solder is removed from the pad:
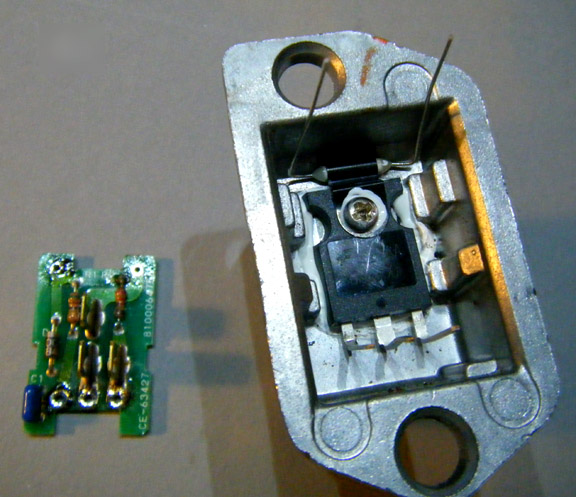
Printed circuit board removed:

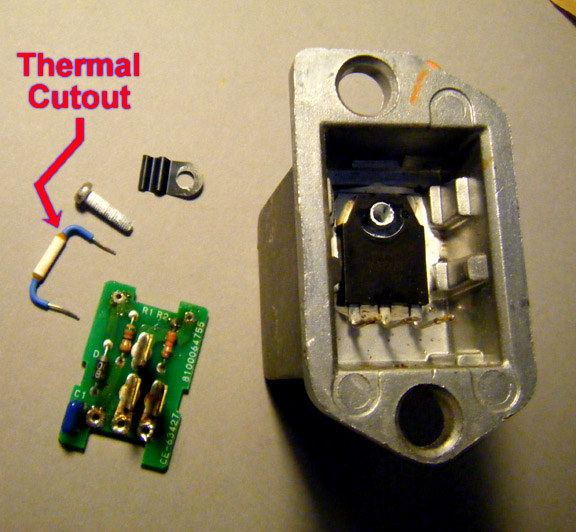
Unscrew the transistor mounting screw to remove the Thermal Cutout:
On the Y33, the 2SK2500 Power MOSFET is not available as a replacement part, but the Fairchild Semiconductor FDH5500 makes an excellent substitute. This MOSFET is rated to carry 75 amps, and has a very low on-resistance of 0.007 ohms.
At the time I read this, the FDH5500 was no longer in stock from Mouser, but I found that this was its replacement: FDH5500-F085
The original Thermal Cutout is rated to open at 140 degrees C (Y33 version). A replacement with a slightly higher 145 degree C. temperature was available from Mouser (Part No. 447-XYP2BN143-RC), for around 45 cents in single-piece quantities. However, I could not find a suitable replacement. I just settled for the MOSFET Transistor.
Original and replacement parts, prior to bending the leads on the new parts:
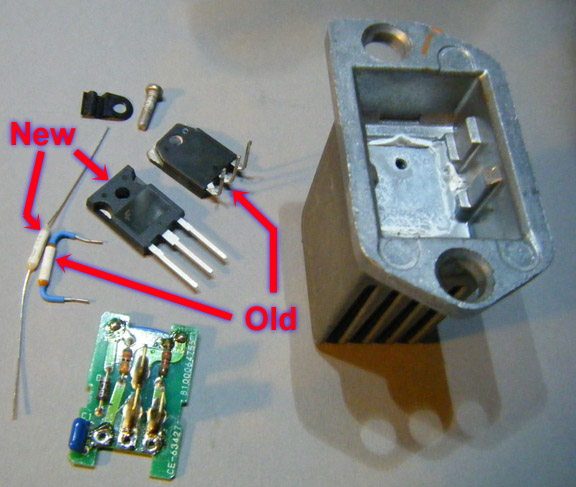
(NOTE: Apply a little bit of silicone thermal grease to the bottom of the new transistor before installing it. Permatex aluminum-based anti-seize compound can also be used in lieu of thermal grease).
New parts installed:
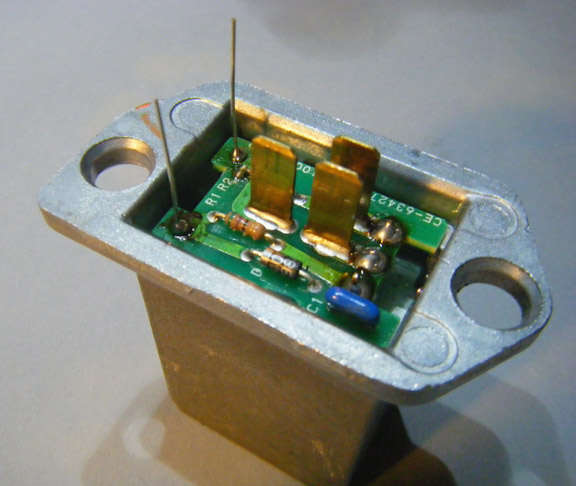
Printed circuit re-soldered:
Cut off the ends of the wire leads, re-install the Blower Amp in your vehicle, and you�re done.
All in all, it took a total of 10-20min to replace for $4.28 plus shipping and the blower is now operable at all power levels from low to high and everything in between.
Note: The pictures have a different wiring schematic than our car, but the TCO and MOSFET are the same.
So there you have it, $4-10 bucks and you have a working blower again, pocket the $20 you would've spent on a full transistor component and buy a six-pack while you work on your car
So here is a quick write up (mostly taken from nicoclub.com for an Infiniti/Nissan - apparently they use the same transistor as the 3G TL when I Google the part #).
I am going to skip the part where you remove the Transistor (MOSFET AMP) as it is really simple. It is under the glovebox (passenger footwell) against the firewall on the leftmost side. There are some blue wires running from it to the blower and elsewhere. It takes two philips screws and its out. The following is extremely similar to the Transistor our car has:
Again, this was taken from nicoclub.com:
WHY THE FAN CONTROL AMP FAILS: In looking at the schematic shown above, it becomes obvious that control voltage from the A/C Auto Amp can only reach the transistor through a thermal cutout. If the cutout blows (due to temperatures in excess of 140 degrees C.), no control voltage is applied to the base (or gate) of the transistor, and the blower never comes on.
Or, if the transistor fails, it typically develops a permanent short circuit between the Drain and Source (Y33 version) terminals, causing the blower motor to run at full speed whenever the ignition switch is turned on (or not at all).
HOW TO TROUBLE-SHOOT IT: If the Thermal Cutout has blown, you will measure infinite resistance between the two printed-circuit pads shown at the top of this photo:
If the Cutout is still good, you will measure approximately zero ohms (or 0.007 ohms) across these same two pads.
If the Thermal Cutout is still good, the transistor has probably blown. In some cases, this will result in the same very low resistance being measured across terminals 35 and G when probing in both directions.
HOW TO REPAIR IT:
If the Cutout has blown, a quick-and-dirty fix would be to solder a jumper wire across both printed circuit pads, thereby bypassing the cutout. However, this defeats the safety feature of having the cutout. A better option is to replace the cutout with a new one (which only costs around 45 cents).
In order to replace either the Cutout or transistor, the printed circuit board must be unsoldered at the 5 points shown in the photo above. A roll of solder wick makes the unsoldering job much easier:
Use a soldering iron to heat both the printed circuit pad and the solder wick, until the molten solder �wicks up� into the solder wick�s copper braid. Gradually pull the braid across the pad so that fresh braid is continuously exposed to the pad and soldering iron, until all the solder is removed from the pad:
Printed circuit board removed:
Unscrew the transistor mounting screw to remove the Thermal Cutout:
On the Y33, the 2SK2500 Power MOSFET is not available as a replacement part, but the Fairchild Semiconductor FDH5500 makes an excellent substitute. This MOSFET is rated to carry 75 amps, and has a very low on-resistance of 0.007 ohms.
At the time I read this, the FDH5500 was no longer in stock from Mouser, but I found that this was its replacement: FDH5500-F085
The original Thermal Cutout is rated to open at 140 degrees C (Y33 version). A replacement with a slightly higher 145 degree C. temperature was available from Mouser (Part No. 447-XYP2BN143-RC), for around 45 cents in single-piece quantities. However, I could not find a suitable replacement. I just settled for the MOSFET Transistor.
Original and replacement parts, prior to bending the leads on the new parts:
(NOTE: Apply a little bit of silicone thermal grease to the bottom of the new transistor before installing it. Permatex aluminum-based anti-seize compound can also be used in lieu of thermal grease).
New parts installed:
Printed circuit re-soldered:
Cut off the ends of the wire leads, re-install the Blower Amp in your vehicle, and you�re done.
All in all, it took a total of 10-20min to replace for $4.28 plus shipping and the blower is now operable at all power levels from low to high and everything in between.
Note: The pictures have a different wiring schematic than our car, but the TCO and MOSFET are the same.
So there you have it, $4-10 bucks and you have a working blower again, pocket the $20 you would've spent on a full transistor component and buy a six-pack while you work on your car

Thread
Thread Starter
Forum
Replies
Last Post
Biggie_B
5G TLX (2015-2020)
13
May 27, 2025 05:51 PM
detailersdomain
Wash & Wax
3
Oct 9, 2015 10:13 PM