Emerson's KBP Type S Rebuild Thread!!!
 03-25-2012, 10:00 PM
#1
Instructor
Thread Starter
Emerson's KBP Type S Rebuild Thread!!!
Hey everyone!!! I've been interested on buying a Tl type S for a while now that's why I joined Acurazine a couple of months ago. I search the forum to see what everyone does to their Tl's and I love what you guys do to your cars.
I've seem so many Progress Threads but I've never seem any one rebuild a Tl. Many say that after a crash the car is never the same. It might be true, but that all depends on the work you do to it, how you do it and how you manage to get the results you wanted. So I decided to do one my self.
This is a 2007 KBP Acura Tl Type S. I bought it from the auction for 8,000.00 It was rear ended by a small SUV just last december. I wanted to show everyone what I am doing to it to see what everybody thinks about it. So here you guys go.
any comments, critics and likes are welcome!!!
This is just when I got the car.
http://www.flickr.com/photos/emersont503/7016198343/http://www.flickr.com/photos/emersont503/7016198343/ by http://www.flickr.com/people/emersont503/, on Flickr
This is the car set up on the frame machine. You can also see that we clamped it down.
http://www.flickr.com/photos/emersont503/6870031788/http://www.flickr.com/photos/emersont503/6870031788/ by http://www.flickr.com/people/emersont503/, on Flickr
http://www.flickr.com/photos/emersont503/6870032836/http://www.flickr.com/photos/emersont503/6870032836/ by http://www.flickr.com/people/emersont503/, on Flickr
This is the rear view before any work was done to it.
http://www.flickr.com/photos/emersont503/6870034262/http://www.flickr.com/photos/emersont503/6870034262/ by http://www.flickr.com/people/emersont503/, on Flickr
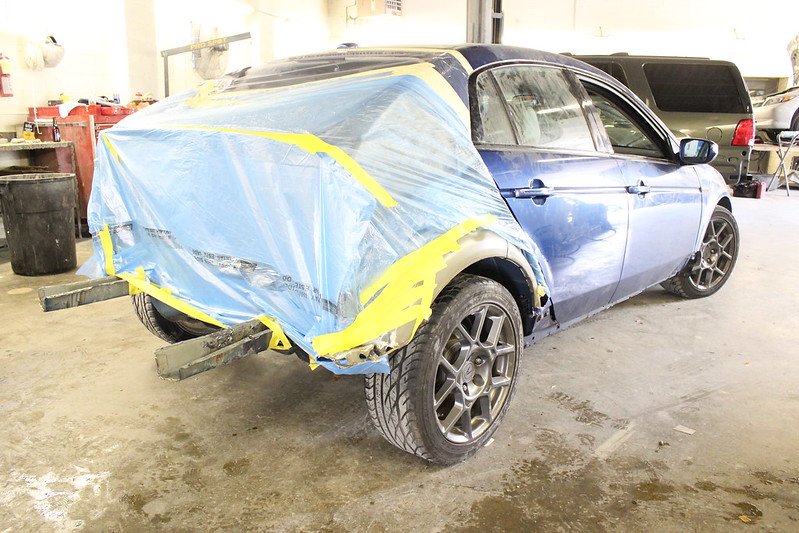
After that. First thing we needed to do was take everything apart.
http://www.flickr.com/photos/emersont503/7016144955/http://www.flickr.com/photos/emersont503/7016144955/ by http://www.flickr.com/people/emersont503/, on Flickr
This are some pics of the places where we're going to work on.
Right tail lamp pocket.
http://www.flickr.com/photos/emersont503/7016146103/http://www.flickr.com/photos/emersont503/7016146103/ by http://www.flickr.com/people/emersont503/, on Flickr
Left tail lamp pocket.
http://www.flickr.com/photos/emersont503/7016147429/http://www.flickr.com/photos/emersont503/7016147429/ by http://www.flickr.com/people/emersont503/, on Flickr
Rear body panel.
http://www.flickr.com/photos/emersont503/7016148673/http://www.flickr.com/photos/emersont503/7016148673/ by http://www.flickr.com/people/emersont503/, on Flickr
I meant to take a picture of the floor before but I forgot. This are snaps of the rear suspension which luckily wasn't damaged.
http://www.flickr.com/photos/emersont503/7016153917/http://www.flickr.com/photos/emersont503/7016153917/ by http://www.flickr.com/people/emersont503/, on Flickr
http://www.flickr.com/photos/emersont503/7016156717/http://www.flickr.com/photos/emersont503/7016156717/ by http://www.flickr.com/people/emersont503/, on Flickr
Also some pictures from underneath the car.
http://www.flickr.com/photos/emersont503/7016155213/http://www.flickr.com/photos/emersont503/7016155213/ by http://www.flickr.com/people/emersont503/, on Flickr
http://www.flickr.com/photos/emersont503/6870048288/http://www.flickr.com/photos/emersont503/6870048288/ by http://www.flickr.com/people/emersont503/, on Flickr
http://www.flickr.com/photos/emersont503/6870049362/http://www.flickr.com/photos/emersont503/6870049362/ by http://www.flickr.com/people/emersont503/, on Flickr
After that we pulled the rear body panel. this is how it turned out after the first pull.
http://www.flickr.com/photos/emersont503/7016165329/http://www.flickr.com/photos/emersont503/7016165329/ by http://www.flickr.com/people/emersont503/, on Flickr
http://www.flickr.com/photos/emersont503/6870054586/http://www.flickr.com/photos/emersont503/6870054586/ by http://www.flickr.com/people/emersont503/, on Flickr
http://www.flickr.com/photos/emersont503/7016162633/http://www.flickr.com/photos/emersont503/7016162633/ by http://www.flickr.com/people/emersont503/, on Flickr
After that we pulled the Right quarter panel. Also pulled the Right rail.
http://www.flickr.com/photos/emersont503/7016171791/http://www.flickr.com/photos/emersont503/7016171791/ by http://www.flickr.com/people/emersont503/, on Flickr
http://www.flickr.com/photos/emersont503/6870058358/http://www.flickr.com/photos/emersont503/6870058358/ by http://www.flickr.com/people/emersont503/, on Flickr
Then it was turn for the Left quarter panel which by the way it was the lease of the quarters with damage.
http://www.flickr.com/photos/emersont503/7016175599/http://www.flickr.com/photos/emersont503/7016175599/ by http://www.flickr.com/people/emersont503/, on Flickr
Next we pulled the rear body panel for the second time and this are the results.
http://www.flickr.com/photos/emersont503/7016172877/http://www.flickr.com/photos/emersont503/7016172877/ by http://www.flickr.com/people/emersont503/, on Flickr
http://www.flickr.com/photos/emersont503/7016174481/http://www.flickr.com/photos/emersont503/7016174481/ by http://www.flickr.com/people/emersont503/, on Flickr
After that we removed both quarter panels and also the rear body panel.
http://www.flickr.com/photos/emersont503/7016190173/http://www.flickr.com/photos/emersont503/7016190173/ by http://www.flickr.com/people/emersont503/, on Flickr
http://www.flickr.com/photos/emersont503/7016188881/http://www.flickr.com/photos/emersont503/7016188881/ by http://www.flickr.com/people/emersont503/, on Flickr
http://www.flickr.com/photos/emersont503/7016178553/http://www.flickr.com/photos/emersont503/7016178553/ by http://www.flickr.com/people/emersont503/, on Flickr
http://www.flickr.com/photos/emersont503/7016179909/http://www.flickr.com/photos/emersont503/7016179909/ by http://www.flickr.com/people/emersont503/, on Flickr
The next step was to pull the floor pan and then removed it.
http://www.flickr.com/photos/emersont503/7016185183/http://www.flickr.com/photos/emersont503/7016185183/ by http://www.flickr.com/people/emersont503/, on Flickr
http://www.flickr.com/photos/emersont503/7016192789/http://www.flickr.com/photos/emersont503/7016192789/ by http://www.flickr.com/people/emersont503/, on Flickr
Side view.
http://www.flickr.com/photos/emersont503/6870078150/http://www.flickr.com/photos/emersont503/6870078150/ by http://www.flickr.com/people/emersont503/, on Flickr
http://www.flickr.com/photos/emersont503/7016186275/http://www.flickr.com/photos/emersont503/7016186275/ by http://www.flickr.com/people/emersont503/, on Flickr
The final step for the day after all the pulling and hammering was the measure the frame rails.
http://www.flickr.com/photos/emersont503/7016195193/http://www.flickr.com/photos/emersont503/7016195193/ by http://www.flickr.com/people/emersont503/, on Flickr
http://www.flickr.com/photos/emersont503/7016193919/http://www.flickr.com/photos/emersont503/7016193919/ by http://www.flickr.com/people/emersont503/, on Flickr
We are all done for now. I am only able to work on the car on the weekends so you will have to wait until next Sunday to see the progress of the car.
This is how it looks now.
http://www.flickr.com/photos/emersont503/7016196363/http://www.flickr.com/photos/emersont503/7016196363/ by http://www.flickr.com/people/emersont503/, on Flickr
Thanks for watching and like I said comments, questions and critics are welcome!!!
I've seem so many Progress Threads but I've never seem any one rebuild a Tl. Many say that after a crash the car is never the same. It might be true, but that all depends on the work you do to it, how you do it and how you manage to get the results you wanted. So I decided to do one my self.
This is a 2007 KBP Acura Tl Type S. I bought it from the auction for 8,000.00 It was rear ended by a small SUV just last december. I wanted to show everyone what I am doing to it to see what everybody thinks about it. So here you guys go.
any comments, critics and likes are welcome!!!
This is just when I got the car.
http://www.flickr.com/photos/emersont503/7016198343/http://www.flickr.com/photos/emersont503/7016198343/ by http://www.flickr.com/people/emersont503/, on Flickr
This is the car set up on the frame machine. You can also see that we clamped it down.
http://www.flickr.com/photos/emersont503/6870031788/http://www.flickr.com/photos/emersont503/6870031788/ by http://www.flickr.com/people/emersont503/, on Flickr
http://www.flickr.com/photos/emersont503/6870032836/http://www.flickr.com/photos/emersont503/6870032836/ by http://www.flickr.com/people/emersont503/, on Flickr
This is the rear view before any work was done to it.
http://www.flickr.com/photos/emersont503/6870034262/http://www.flickr.com/photos/emersont503/6870034262/ by http://www.flickr.com/people/emersont503/, on Flickr
After that. First thing we needed to do was take everything apart.
http://www.flickr.com/photos/emersont503/7016144955/http://www.flickr.com/photos/emersont503/7016144955/ by http://www.flickr.com/people/emersont503/, on Flickr
This are some pics of the places where we're going to work on.
Right tail lamp pocket.
http://www.flickr.com/photos/emersont503/7016146103/http://www.flickr.com/photos/emersont503/7016146103/ by http://www.flickr.com/people/emersont503/, on Flickr
Left tail lamp pocket.
http://www.flickr.com/photos/emersont503/7016147429/http://www.flickr.com/photos/emersont503/7016147429/ by http://www.flickr.com/people/emersont503/, on Flickr
Rear body panel.
http://www.flickr.com/photos/emersont503/7016148673/http://www.flickr.com/photos/emersont503/7016148673/ by http://www.flickr.com/people/emersont503/, on Flickr
I meant to take a picture of the floor before but I forgot. This are snaps of the rear suspension which luckily wasn't damaged.
http://www.flickr.com/photos/emersont503/7016153917/http://www.flickr.com/photos/emersont503/7016153917/ by http://www.flickr.com/people/emersont503/, on Flickr
http://www.flickr.com/photos/emersont503/7016156717/http://www.flickr.com/photos/emersont503/7016156717/ by http://www.flickr.com/people/emersont503/, on Flickr
Also some pictures from underneath the car.
http://www.flickr.com/photos/emersont503/7016155213/http://www.flickr.com/photos/emersont503/7016155213/ by http://www.flickr.com/people/emersont503/, on Flickr
http://www.flickr.com/photos/emersont503/6870048288/http://www.flickr.com/photos/emersont503/6870048288/ by http://www.flickr.com/people/emersont503/, on Flickr
http://www.flickr.com/photos/emersont503/6870049362/http://www.flickr.com/photos/emersont503/6870049362/ by http://www.flickr.com/people/emersont503/, on Flickr
After that we pulled the rear body panel. this is how it turned out after the first pull.
http://www.flickr.com/photos/emersont503/7016165329/http://www.flickr.com/photos/emersont503/7016165329/ by http://www.flickr.com/people/emersont503/, on Flickr
http://www.flickr.com/photos/emersont503/6870054586/http://www.flickr.com/photos/emersont503/6870054586/ by http://www.flickr.com/people/emersont503/, on Flickr
http://www.flickr.com/photos/emersont503/7016162633/http://www.flickr.com/photos/emersont503/7016162633/ by http://www.flickr.com/people/emersont503/, on Flickr
After that we pulled the Right quarter panel. Also pulled the Right rail.
http://www.flickr.com/photos/emersont503/7016171791/http://www.flickr.com/photos/emersont503/7016171791/ by http://www.flickr.com/people/emersont503/, on Flickr
http://www.flickr.com/photos/emersont503/6870058358/http://www.flickr.com/photos/emersont503/6870058358/ by http://www.flickr.com/people/emersont503/, on Flickr
Then it was turn for the Left quarter panel which by the way it was the lease of the quarters with damage.
http://www.flickr.com/photos/emersont503/7016175599/http://www.flickr.com/photos/emersont503/7016175599/ by http://www.flickr.com/people/emersont503/, on Flickr
Next we pulled the rear body panel for the second time and this are the results.
http://www.flickr.com/photos/emersont503/7016172877/http://www.flickr.com/photos/emersont503/7016172877/ by http://www.flickr.com/people/emersont503/, on Flickr
http://www.flickr.com/photos/emersont503/7016174481/http://www.flickr.com/photos/emersont503/7016174481/ by http://www.flickr.com/people/emersont503/, on Flickr
After that we removed both quarter panels and also the rear body panel.
http://www.flickr.com/photos/emersont503/7016190173/http://www.flickr.com/photos/emersont503/7016190173/ by http://www.flickr.com/people/emersont503/, on Flickr
http://www.flickr.com/photos/emersont503/7016188881/http://www.flickr.com/photos/emersont503/7016188881/ by http://www.flickr.com/people/emersont503/, on Flickr
http://www.flickr.com/photos/emersont503/7016178553/http://www.flickr.com/photos/emersont503/7016178553/ by http://www.flickr.com/people/emersont503/, on Flickr
http://www.flickr.com/photos/emersont503/7016179909/http://www.flickr.com/photos/emersont503/7016179909/ by http://www.flickr.com/people/emersont503/, on Flickr
The next step was to pull the floor pan and then removed it.
http://www.flickr.com/photos/emersont503/7016185183/http://www.flickr.com/photos/emersont503/7016185183/ by http://www.flickr.com/people/emersont503/, on Flickr
http://www.flickr.com/photos/emersont503/7016192789/http://www.flickr.com/photos/emersont503/7016192789/ by http://www.flickr.com/people/emersont503/, on Flickr
Side view.
http://www.flickr.com/photos/emersont503/6870078150/http://www.flickr.com/photos/emersont503/6870078150/ by http://www.flickr.com/people/emersont503/, on Flickr
http://www.flickr.com/photos/emersont503/7016186275/http://www.flickr.com/photos/emersont503/7016186275/ by http://www.flickr.com/people/emersont503/, on Flickr
The final step for the day after all the pulling and hammering was the measure the frame rails.
http://www.flickr.com/photos/emersont503/7016195193/http://www.flickr.com/photos/emersont503/7016195193/ by http://www.flickr.com/people/emersont503/, on Flickr
http://www.flickr.com/photos/emersont503/7016193919/http://www.flickr.com/photos/emersont503/7016193919/ by http://www.flickr.com/people/emersont503/, on Flickr
We are all done for now. I am only able to work on the car on the weekends so you will have to wait until next Sunday to see the progress of the car.
This is how it looks now.
http://www.flickr.com/photos/emersont503/7016196363/http://www.flickr.com/photos/emersont503/7016196363/ by http://www.flickr.com/people/emersont503/, on Flickr
Thanks for watching and like I said comments, questions and critics are welcome!!!
 03-25-2012, 10:08 PM
#3
Race Director
iTrader: (8)
This is VERY interesting.
I was waiting for it lol
I LOVE KBP and that interior.
Do you have auto body experience yourself?
I was waiting for it lol
I LOVE KBP and that interior.
Do you have auto body experience yourself?
The following users liked this post:
Emersont503 (03-26-2012)
The following users liked this post:
Emersont503 (03-26-2012)
03-25-2012, 10:32 PM
#5
Suzuka Master
You have just created one of the most interesting threads on Acurazine. You should also post this in CarTalk. I'm sure the guys in there would love to read through this as well!
And good luck, it looks like you've got a tad bit of experience with these sorts of projects.
And good luck, it looks like you've got a tad bit of experience with these sorts of projects.
The following users liked this post:
CLtotheTL32 (03-26-2012)
03-25-2012, 10:33 PM
#6
Senior Moderator
iTrader: (1)
subscribed. good luck.
The following users liked this post:
Emersont503 (03-26-2012)
Trending Topics

The following users liked this post:
Emersont503 (03-26-2012)
03-26-2012, 01:04 AM
#10
Safety Car
 wow, that's a lot of work. Looks like you know what you are doing though.
Just wondering, how come you pull it before cutting off the bad section? Why not just cut it off? Are you able to save more by pulling?
Awesome color combo BTW.

The following users liked this post:
Emersont503 (03-26-2012)
03-26-2012, 02:46 AM
#12
'07 TL Type-S

 03-26-2012, 07:19 AM
#14
Instructor
Thread Starter
Thanks a lot for that comment. I was thinking about posting it to other websites but didn't know which one to put it on.
Last edited by Steven Bell; 03-26-2012 at 08:09 PM. Reason: Merged Posts.
03-26-2012, 07:29 AM
#15
Racer

sure it will never be 100% like it came off the assembly man, but I can't be hatin on someone willing to bring a KBP Type S back to life!!!
mad props man, can't wait to see her when she's all done
mad props man, can't wait to see her when she's all done
The following users liked this post:
Emersont503 (03-26-2012)
03-26-2012, 08:05 AM
#17
Instructor
Thread Starter
And well it doesn't matter about saving pieces. when you are fixing a car with that kind of damage you have to pull it until it reaches the factory measurements that way the car won't have future problems like suspension of part fitting right or not. so after we finish pulling the car you can see if my last couple of pics that we have sensors mounted of the rails of the cars... that's to measure if the rails are in the correct position and that all that you need to make sure you would get good results !!!
Yeah you right it might not be as a brand new factory car. it might have problems in the future, like suspension or something else. but trust its just more then bringing a car back to life.. it is more like a once in a lifetime experience to do something like this!!!
Last edited by Steven Bell; 03-26-2012 at 08:10 PM. Reason: Merged Posts.
03-26-2012, 08:21 AM
#18
 03-26-2012, 09:27 AM
#21
Instructor
Thread Starter
03-26-2012, 09:45 AM
#23
2014 Jeep SRT
Love this. Can't wait to see more.
03-26-2012, 09:56 AM
#24
Moderator
iTrader: (3)
KBP 
Good luck! I can't wait to see more pictures of the progress and seeing it restored back to it's former glory
Good luck! I can't wait to see more pictures of the progress and seeing it restored back to it's former glory

 03-26-2012, 01:07 PM
#27
All About Trance

Wow, can't wait to see this work of beauty when everything is said and done. for taking the time to restore it to its former glory. Love the exterior color . . . not so much on the interior though.
for taking the time to restore it to its former glory. Love the exterior color . . . not so much on the interior though.
 @ acura aztek
03-26-2012, 01:55 PM
@ acura aztek
03-26-2012, 01:55 PM
#29
Moderator
This is going to be an interesting project. Thanks for posting this up; looking forward to the updates.
03-26-2012, 02:22 PM
#30
Instructor
Thread Starter
Thanks everyone for your comments. I my self can't wait to see its progress as well, but unluckily my work schedule its pretty tight up so I can only work on it on the weekends.
For this weekend we are going to tear down a rear clip " the ass of another 07 tl " that's because just the floor pan from the dealer was 2000.00 which is something I can't not afford so I did some research and found a rear clip which only cost me 900.00 and it includes everything i need 2- quarter panels, rear body panel, truck floor and frame rails!!
so keep tuned this Sunday that's when I get a chance to upload the pics!!!
 03-26-2012, 07:01 PM
#32
-Brandon
Usually people take the plunge on a scrapped TL with minor damage... but man! Kudos to you for taking up this neglected baby. The fact that it's a Type-S AND KBP makes it all worth it. I'll stick around to see your progress, bring her back to life!
03-26-2012, 07:38 PM
#34
Instructor
Thread Starter
I even was thinking about a name for it. Something that has meaning that has come for. The death!!! Any ideas ???
03-26-2012, 08:05 PM
#35
Suzuka Master
mad prop, I am in to see more progress. BTW how does this frame pulling machine works? like you pulling on a sheet metal?
03-26-2012, 08:12 PM
#36
Team Owner
iTrader: (2)
Join Date: Jan 2008
Location: Kansas City, MO (Overland Park, KS)
Posts: 36,545
Received 6,470 Likes
on
5,162 Posts
Emerson, I'm really anxious to see how things go. You'll get a lot of satisfaction by doing it yourself.
Hey, to make things easier, in the lower right hand corner of each post, the middle icon is a multi-quote button. It allows you to respond to more than one person in a single reply.
Check it out and give it a try!
Best of luck, young squire.
Hey, to make things easier, in the lower right hand corner of each post, the middle icon is a multi-quote button. It allows you to respond to more than one person in a single reply.
Check it out and give it a try!
Best of luck, young squire.
03-26-2012, 09:03 PM
#37
Instructor
Thread Starter
Emerson, I'm really anxious to see how things go. You'll get a lot of satisfaction by doing it yourself.
Hey, to make things easier, in the lower right hand corner of each post, the middle icon is a multi-quote button. It allows you to respond to more than one person in a single reply.
Check it out and give it a try!
Best of luck, young squire.
Hey, to make things easier, in the lower right hand corner of each post, the middle icon is a multi-quote button. It allows you to respond to more than one person in a single reply.
Check it out and give it a try!
Best of luck, young squire.
03-26-2012, 09:34 PM
#39
Instructor
Thread Starter
As promised here you guys have a vid. of me and my brother pulling the rear body panel of my 07 KBP Type S.
Each tower of the frame machine has a force of 10 tons of pressure that's equals to 10 elephants all pilled up together all sitting on top of you... lol
we had to pull it with all 3 towers at the same time because we wanted to get an even pull !!!
So enjoy.
Each tower of the frame machine has a force of 10 tons of pressure that's equals to 10 elephants all pilled up together all sitting on top of you... lol
we had to pull it with all 3 towers at the same time because we wanted to get an even pull !!!
So enjoy.
03-26-2012, 09:37 PM
#40

love what you're doing to rebuild the TL-S
I drove a '02 RSX-S that was rebuilt properly by my uncle and loved it. It had front end damage and I ended getting in to a front end accident that totaled the car, since it was done properly, the front end took the impact as it was suppose to. my uncle actually bought it back from the insurance to rebuild again. i had a son at the time, so i got the TL for more room.
I drove a '02 RSX-S that was rebuilt properly by my uncle and loved it. It had front end damage and I ended getting in to a front end accident that totaled the car, since it was done properly, the front end took the impact as it was suppose to. my uncle actually bought it back from the insurance to rebuild again. i had a son at the time, so i got the TL for more room.
