DIY: Red Stripe/ Tail Light Opening
 07-18-2018, 01:17 PM
#1
DIY: Red Stripe/ Tail Light Opening
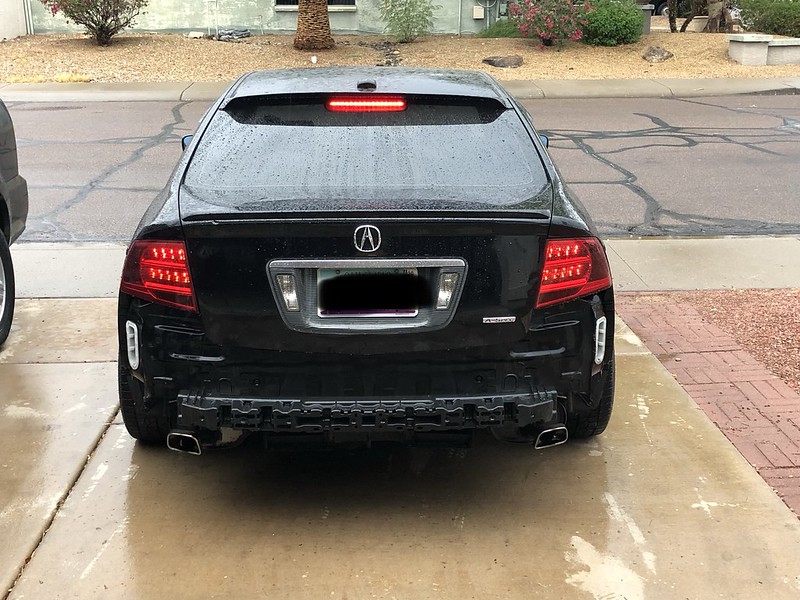
Had some questions about how I did my taillights so I thought I would post some pics I took and kind of do a step-by-step.
Just a reminder, most of this info I found here on the site, just some of the threads were old and lacking pictures. Also got some help from Rockstar143 so big thanks to him.
I would recommend a face mask, gloves and safety goggles. As I cut I had little pieces of hot plastic flying all over and burning the shit out of me. Doesn't feel goo in your eyes lol
You will also need the following to open the tails:
Dremel with cutting wheel, and sanding wheel if possible
Wide tip phillips screwdriver (the screws seem to like to strip if you use too narrow a tip)
Narrow pry tool or flathead screw driver
Windshields butyl and /or some sort of plastic epoxy
As well as the following for the Red Stripe mod:
1 can of VHT Nightshade in black
1 can of black paint (I used a VHT to be safe since it was handy, but you could probably use any cheap stuff)
Before we start:
Step 1: Prep the light
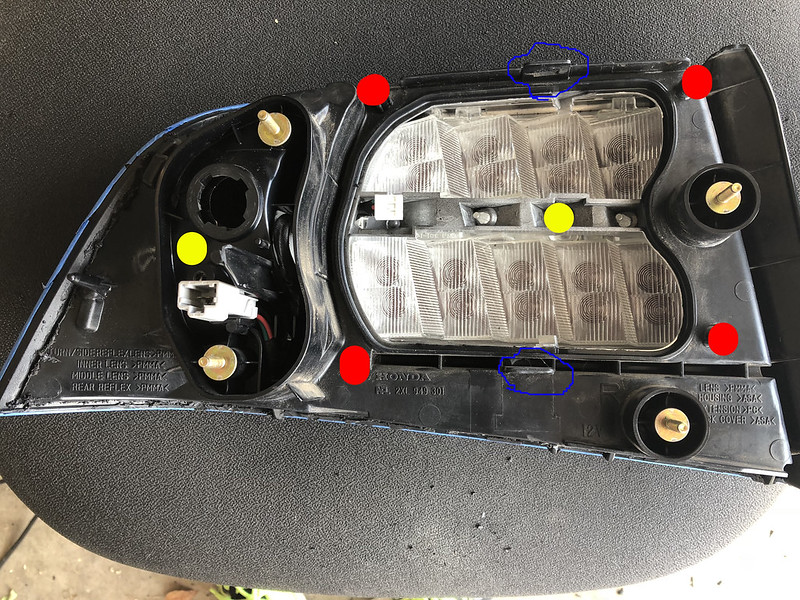
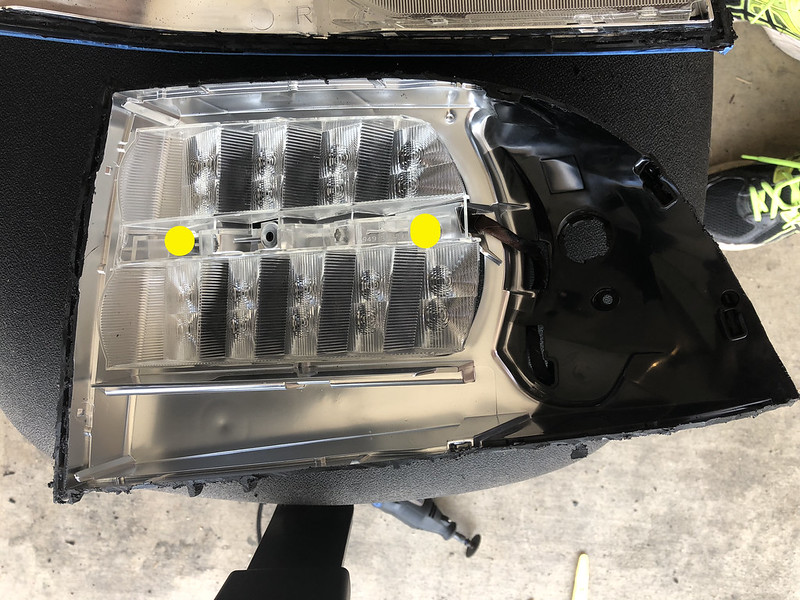
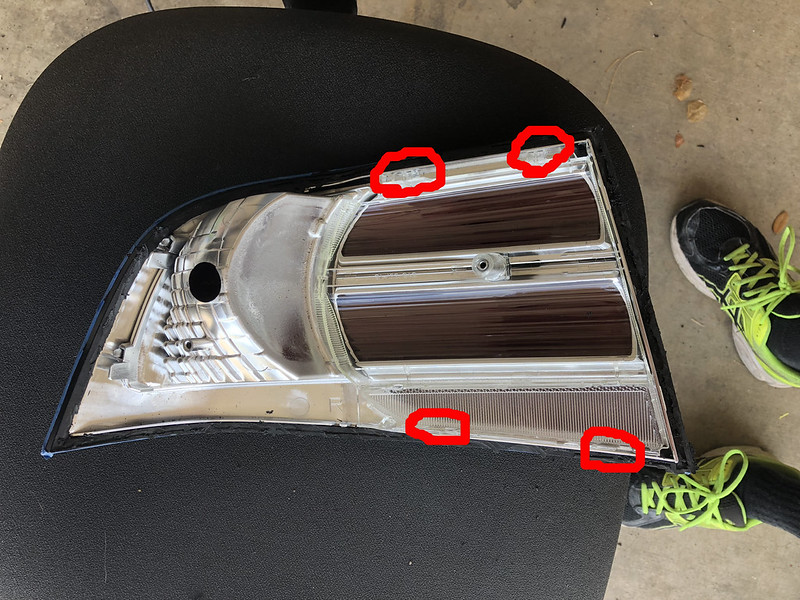
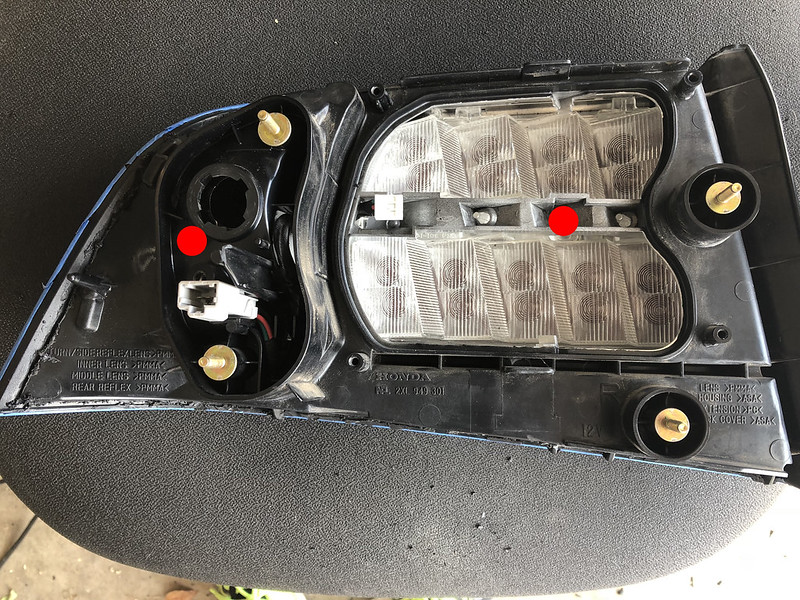
Tape the outside of your lens and trim off any excess that hangs over the edge of it, otherwise this will be in the way during cutting. Then remove your blinker bulb by twisting. One of the plugs will stay in the housing. Also, remove the grey brake light LED board by removing the 4 screws marked in red, then unclipping the 2 clips in the blue circles. lift the board and unclip the plug inside. You can use one of your screw drivers to help with this if you have fat fingers or wear gloves. Then remove the 2 screws in yellow that are holding the bezel on the inside to the back of the housing, in yellow. Take note of where the LED board plug/wire runs. It is not necessary to move it, but if you do, make sure it runs in the same spot on reassembly.
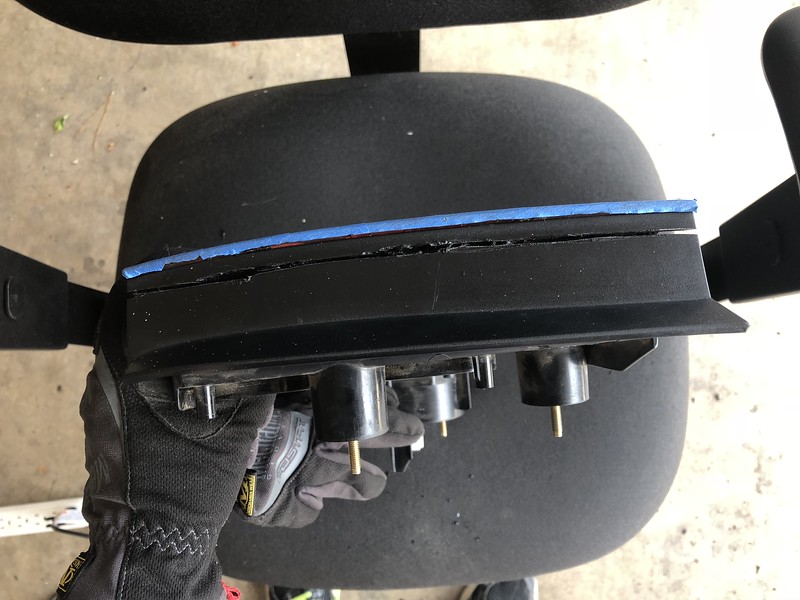
Step 2: Ready to cut
So the reason I got so much plastic in my face was I as all up in the light when cutting to make sure I wasn't going too deep. You will feel when you get through the single layer of plastic, as well as hear a difference in tone as you start hitting the bezel underneath. I wouldn't say its bad to hit the bezel, but if you cut through all the way around I would imagine it would be easy to break. The best way I can tell you to determine how deep you should be going, is below the black plastic housing is the chrome bezel. Once you see that, don't go deeper. If you do then you cut into it and the cut turns black and you wont see the chrome, and may go deeper than needed.
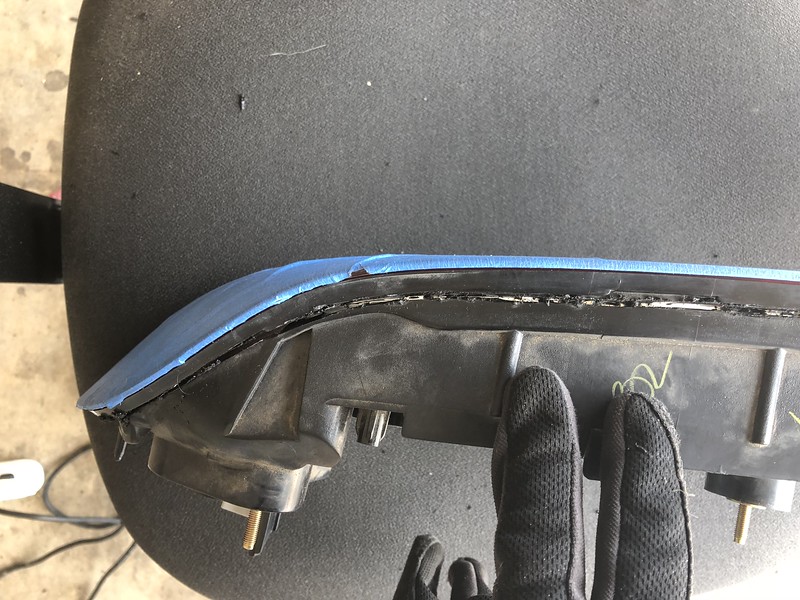
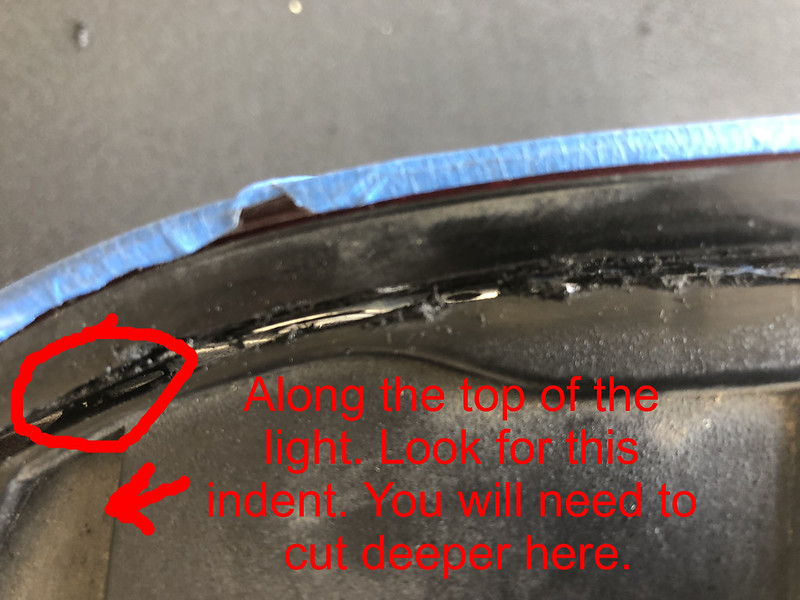
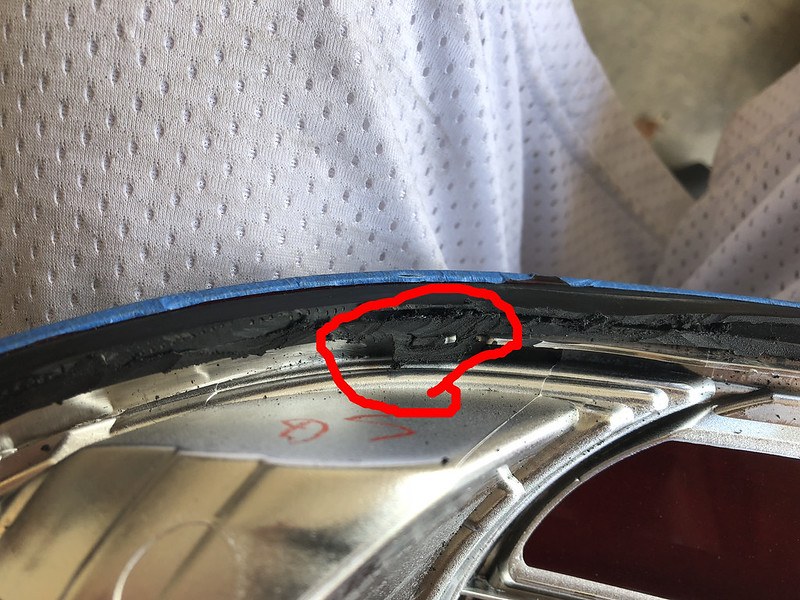
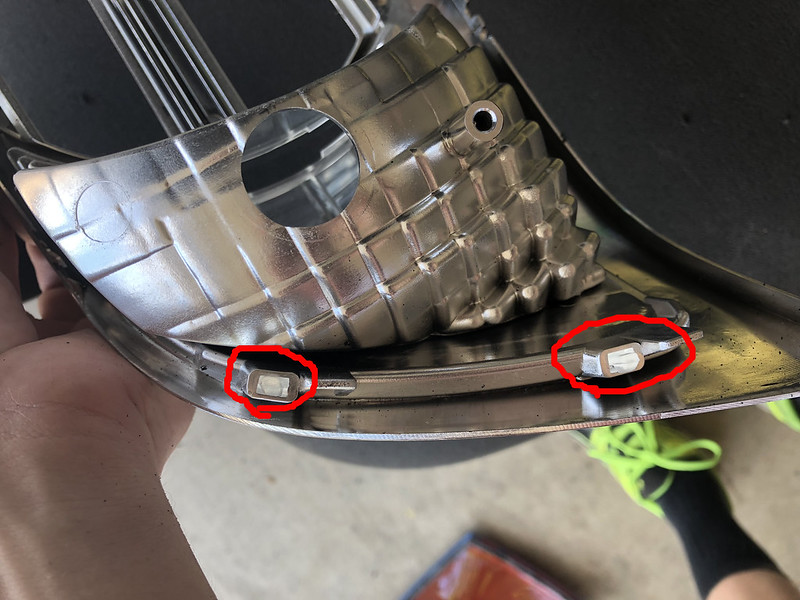
So the first and second cuts should be along the top and bottom of the light, the order doesn't really matter. Simply cut behind the little lip that starts along the trunkside of the light and follow that until you get to the outside corner of the light. When you start, don't be afraid to cut into the trunkside edge a little, as this will mark where your cuts on the trunk side go. Keep in mind that as you cut along the edge and the lip starts to go away, you will cut along where you see 2 edges of the plastic meet. It should be a smooth transition and you wont have to move your cutting path, just angle your Dremel a little differently. In one of the pictures I marked below in a red a small 1-inch-ish section that you will have to go a little deeper into as there is a tab here you will need tpo cut through. Once you cut through the black plastic, you can continue with your shallow cutting.
Next you will cut along the trunkside of the light. You should have 2 little notches already that went through from your two previous cuts. Simply connect the 2 cuts. Keep the same distance between the cut and the lens all the way across, as this will not be a straight line and will curve slightly. The tricky part about this is the trunk side has 2 layers of plastic to go through. Still not extremely deep, but none the less it is harder to see when you cut to chrome, but the chrome is still your stopping point. At any point here, take a second and use your fingers to break off any of he plastic that you cut and has melted into jagged pieces along your cut so that you can see better. You can also run a small screwdriver in here just to try to clear out any random pieces of plastic obscuring your view. These should take care of your initial cuts.
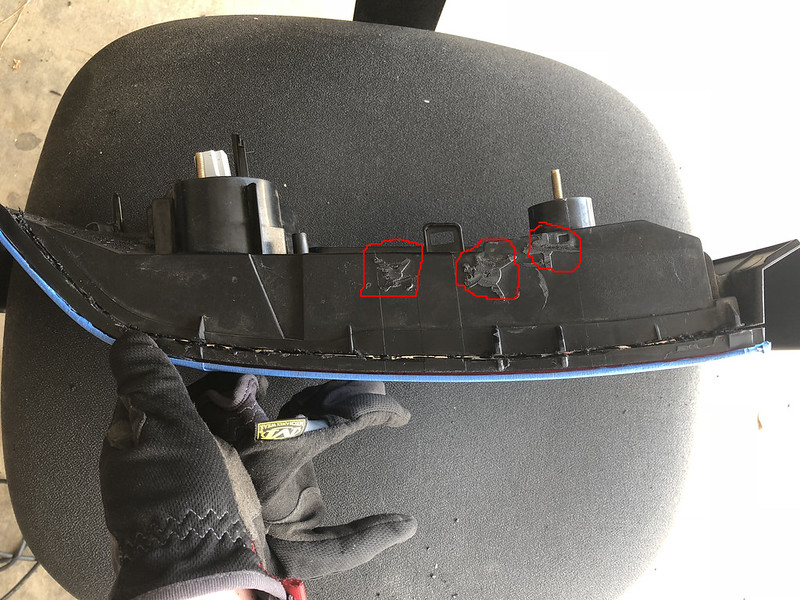
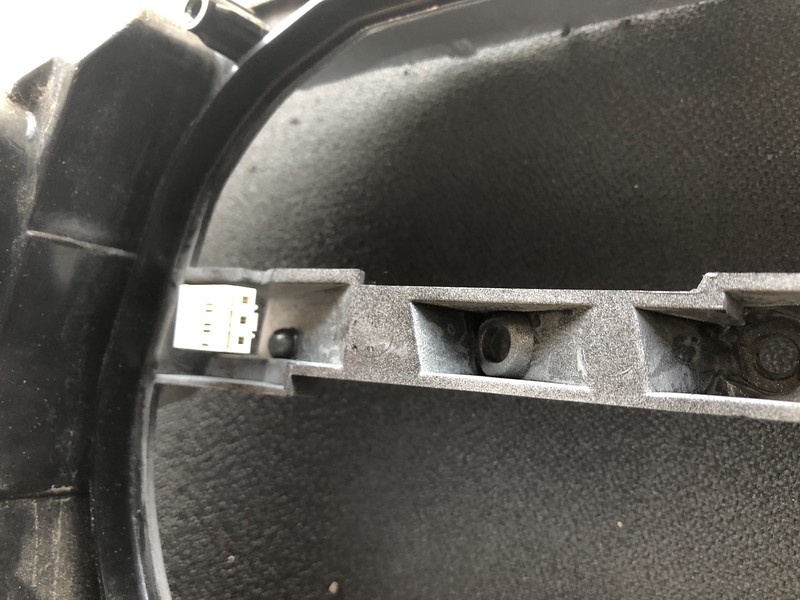
PRO TIP:
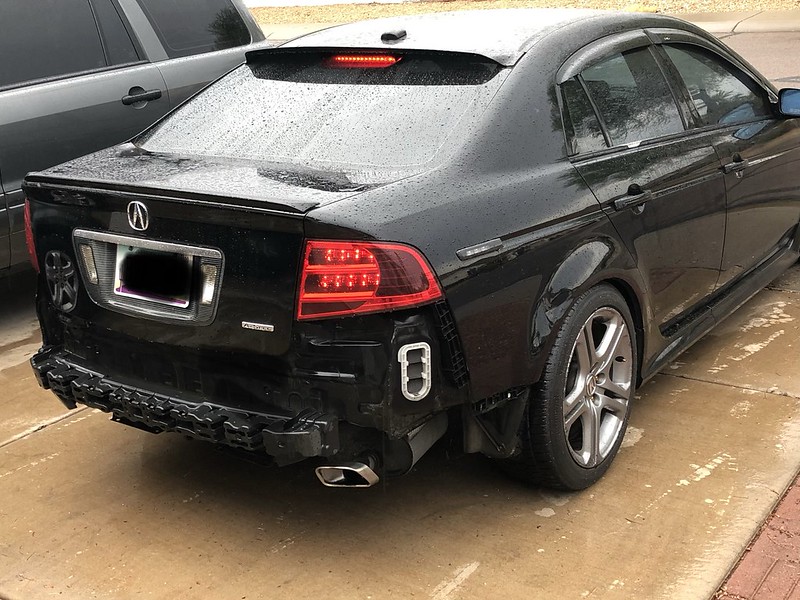
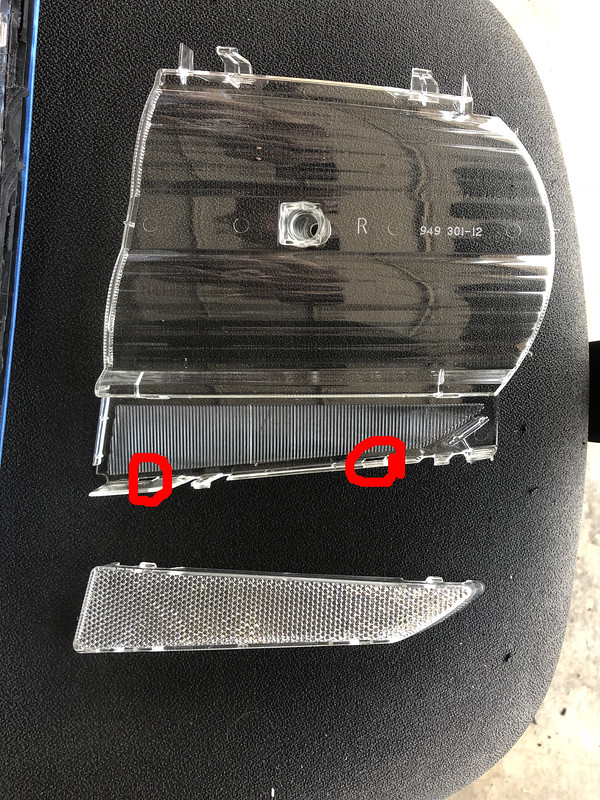
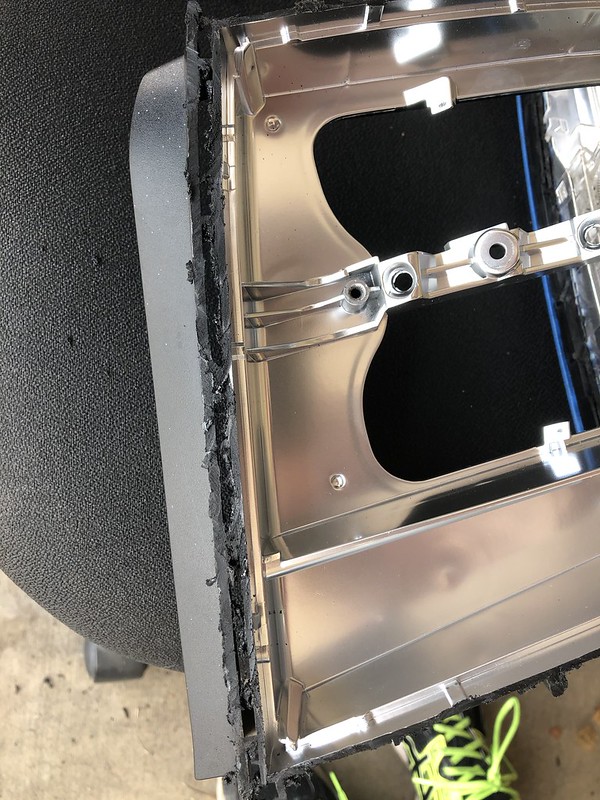
Cut these three tabs off. i picked this up from one of Rockstar143's old threads. In doing so, you no longer need that bracket below the taillight that connects to the body, and can now install and remove taillights without removing the bumper. You will only need to remove the four 8mm nuts from the inside of the trunk.
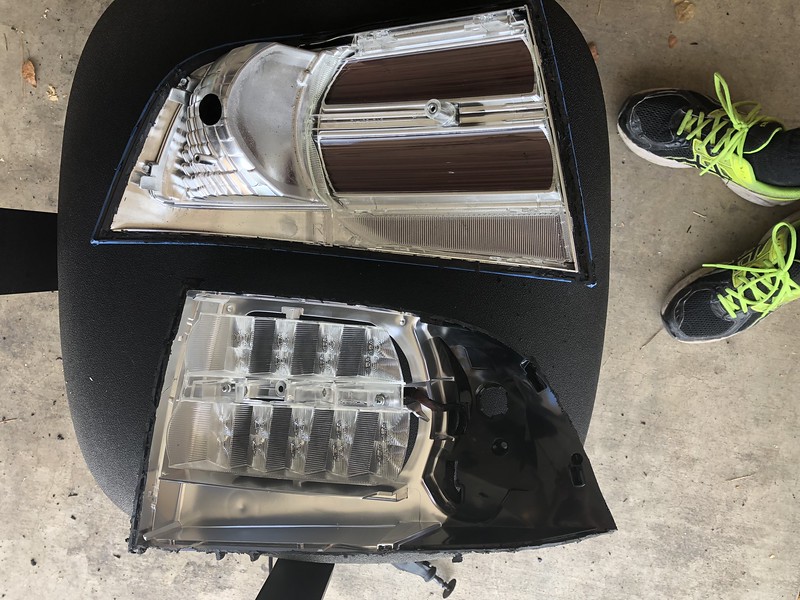
Step 3: Splitting the housing
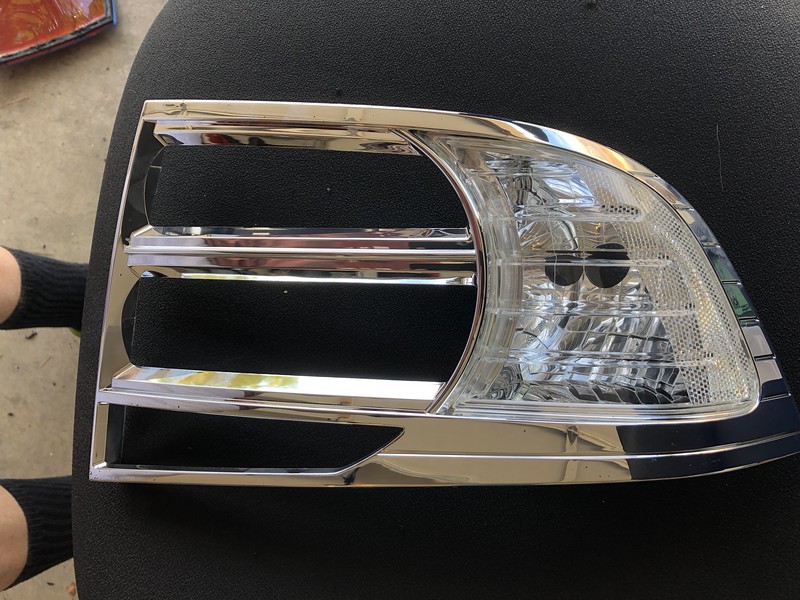
So initial cuts are done, the top and bottom cuts are pretty easy to see if you have cut through all the way along. But the trunkside cut isn't as obvious. At this point I took my pry tool and put the edge into the cut, and pried slightly. You may hear some small cracks as everything separated. these are a bit nerve wracking, but part of the process. Once you work your way around with the pry tool, start lifting on the outside corner opposite the trunkside, This should come out pretty easy with only 1 small pop. Don't be afraid to tug a bit, and you should be able to visible see the top and bottom edges separate. If you don't and cannot feel separation or feel like your pulling too hard, chances are you missed a cut somewhere. Go back and hit it again. But as you pull the corner up, the trunkside cut will not be as easy to separate. Lift up on the corner and let it back down repeatedly. If you cannot lift the outside corner about 3-4 inches away from the lens, you may need to go back in with your Dremel and ensure you cut deep enough all the way along. You and also put your pry tool into the cut and TWIST slightly to separate. Continue to lift, pry, and cut little by little until you can lift the outside corner 3-4ish inches away from the lens. Then I started slightly twisting the back of the taillight slightly, pivoting along the trunkside cut, not lifting the corner out of the housing necessarily, but moving the corner up and down from where it normally sits. At some point the trunkside of the light will noticeably separate,and you should be able to separate the two freely, leaving you with this...
While you have your Dremel handy, quickly trim this tab off above the blinker area on the lens side you seperated
Step 4: Removing the brake light diffuser
Pretty simple step. Take the backside of the housing you just separated, and in the frosted plastic piece you will see 2 screws holding the diffuser in place, marked in yellow. Remove both screws and the diffuser will slide out easily.
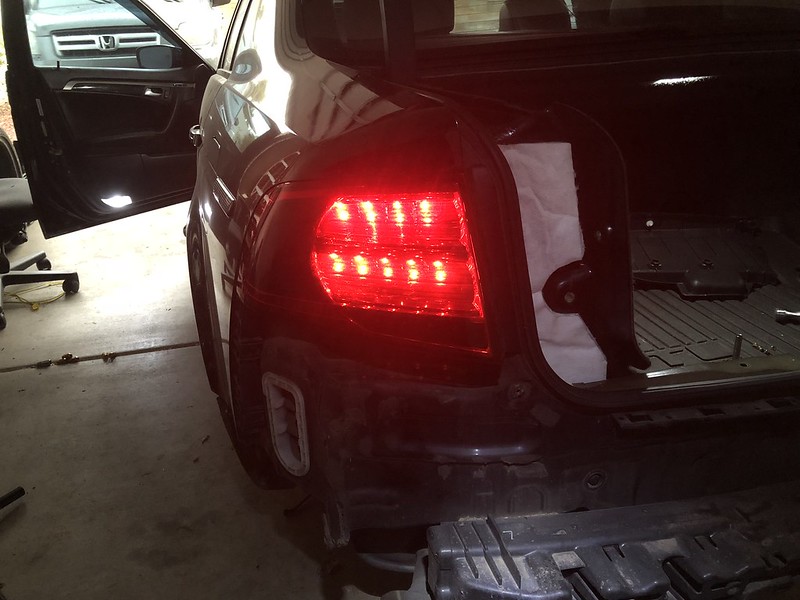
Now the diffuser you may not even want to put back in, especially of you are doing the red stripe mod. Basically, you can leave it out completely, put it back as is, or drill holes (another Rockstar143 tip) where the light shines through. If you do drill holes, make them pretty big. Here is a picture of the brakes applied with NO DIFFUSER. I have another set that I drilled the holes in the diffuser and installed it, but I do not have pics of that one. I'll have to get one later.
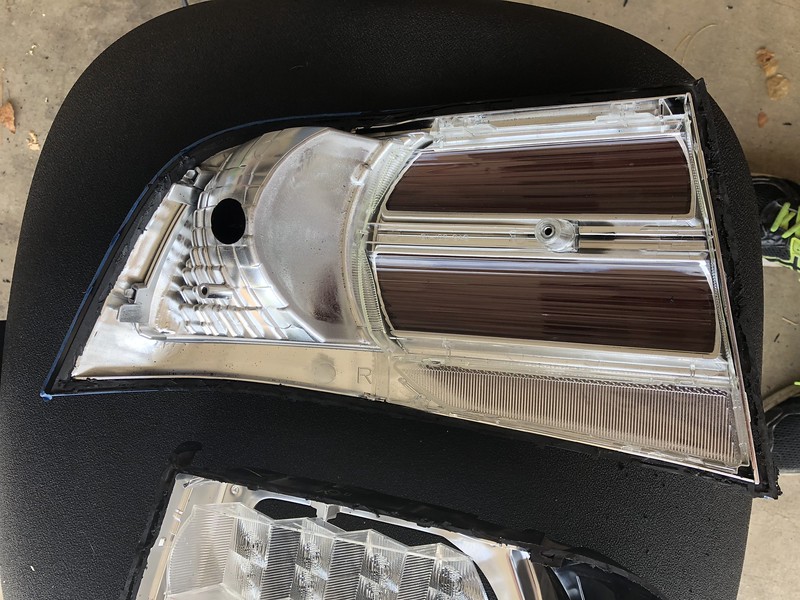
Step 5: Separating the chrome bezel from the lens
Next up is removing the chrome bezel from the inside of the lens. Once you cut and remove the back of the light you're left with the lens with the bezel inside.
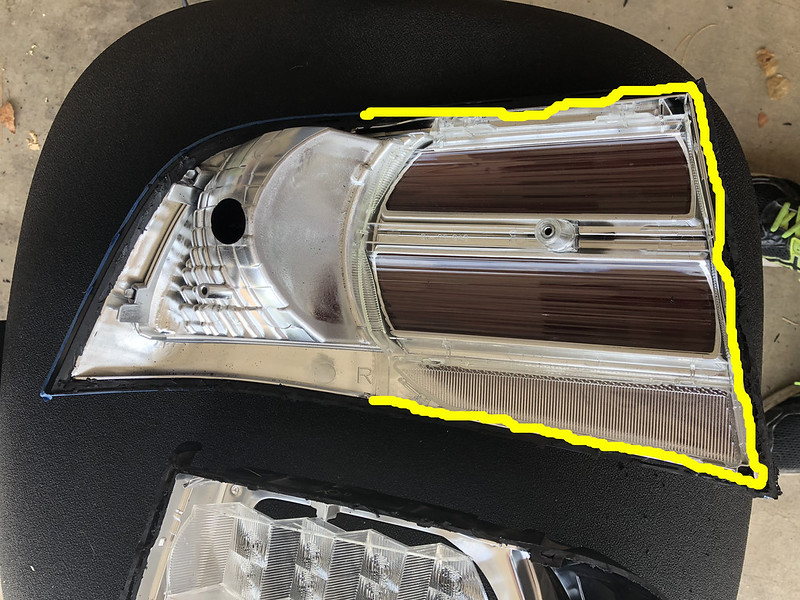
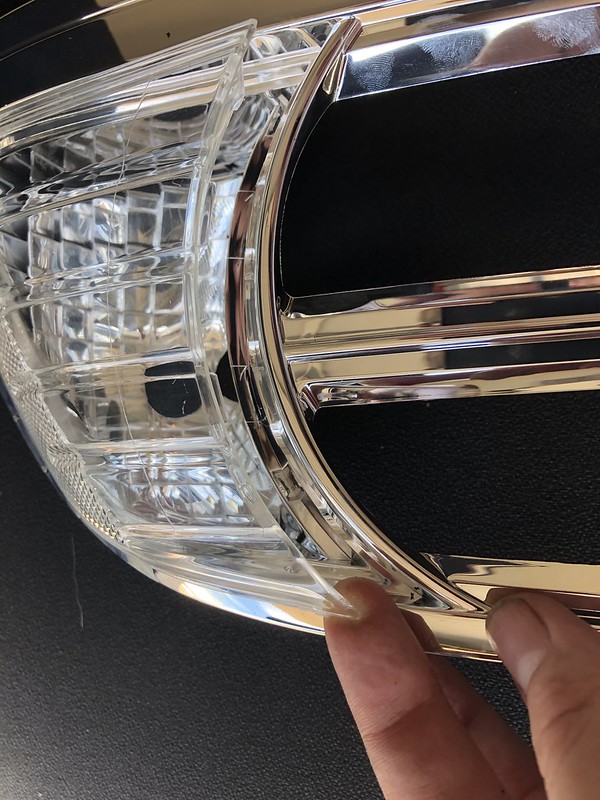
To make the removal a little easier I took my Dremel and trimmed some of the black plastic along the inside edge of the lens. But I only trimmed from halfway along the top edge to the trunk side and along half of the bottom of light. I trimmed along the inside as shown in yellow.
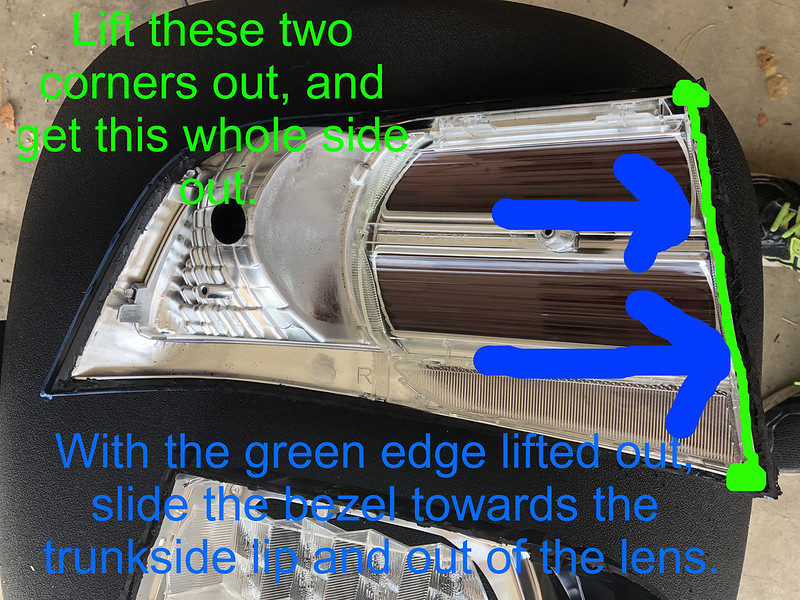
In doing this you don't trim a ton off, just a little bit. I held my Dremel at a 45 degree-ish angle and just hit a small amount of the black plastic off. You should be able to move the bezel inside the lens a little to make the trimming easier. Then pull up the corners of the bezel out of the lens starting with the trunk side. You should be able to wiggle the bezel towards the opposite side to get more clearance to lift the trunk side corners out and you'll have to tug a bit. Once you have those two corners of the bezel cleared of the lens, stop trying to lift up and out. Instead you should be able to slide the bezel towards the trunk side of the lens. Keep going until the bezel is clear of the light. When you put the bezel back in you slide it in the opposite way.
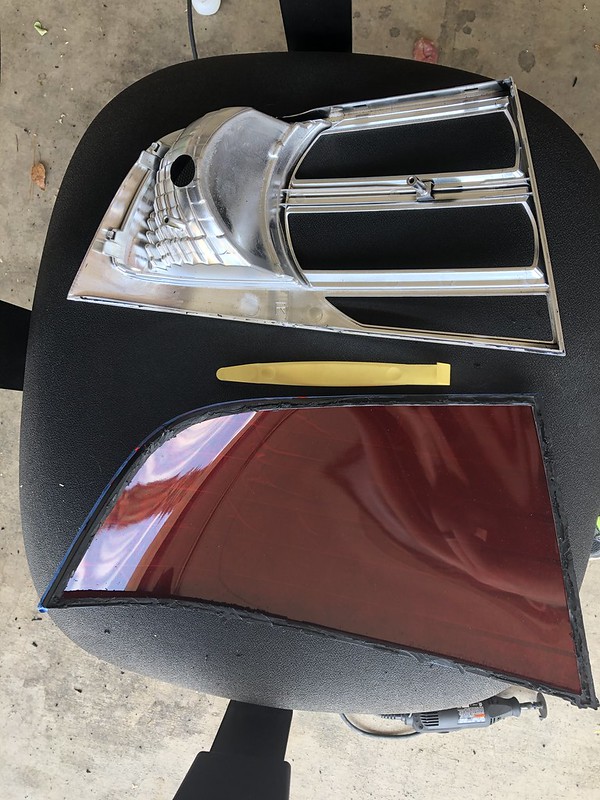
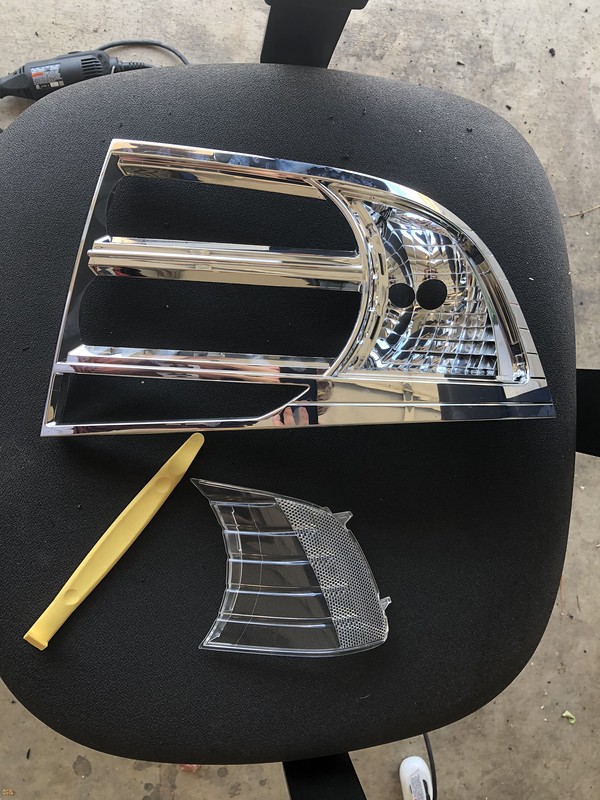
You should end up with this.
Step 6: Removing the bezel lens
On the back of the bezel there are 4 little retaining tabs. Just push them in one side at a time and lift the lens out.
On the plastic piece you just removed, near the bottom there will be 2 more tabs holding the frosted diffuser piece. Again, push the 2 tabs in and lift out. You should be left with the 2 pieces.
Go back to the chrome bezel. Flip it over. To get the blinker lens out, put your pry tool or screwdriver and pry up and out.
Then flip the bezel back over and on the back side of the blinker area, you will see two more tabs to be pushed in and then you can pull the blinker lens free.
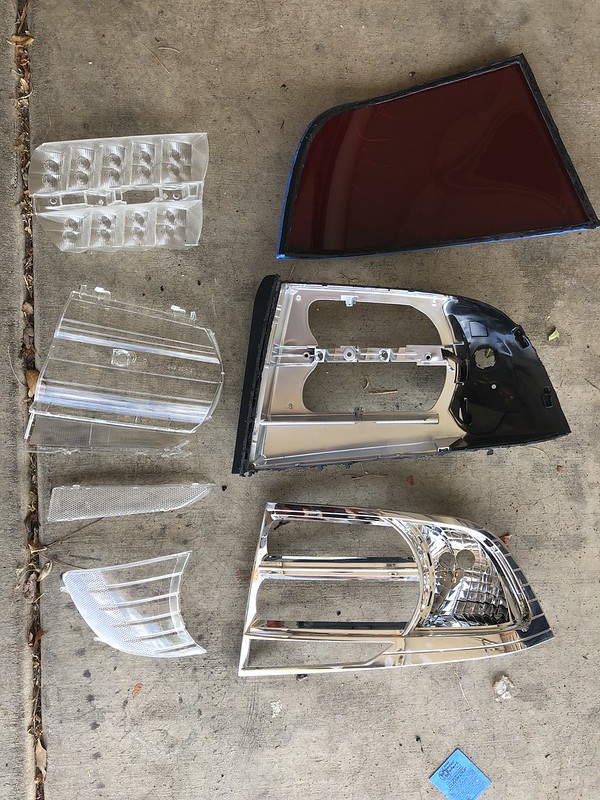
That's it for the disassembly. You should be left with this.
Now for red stripes:
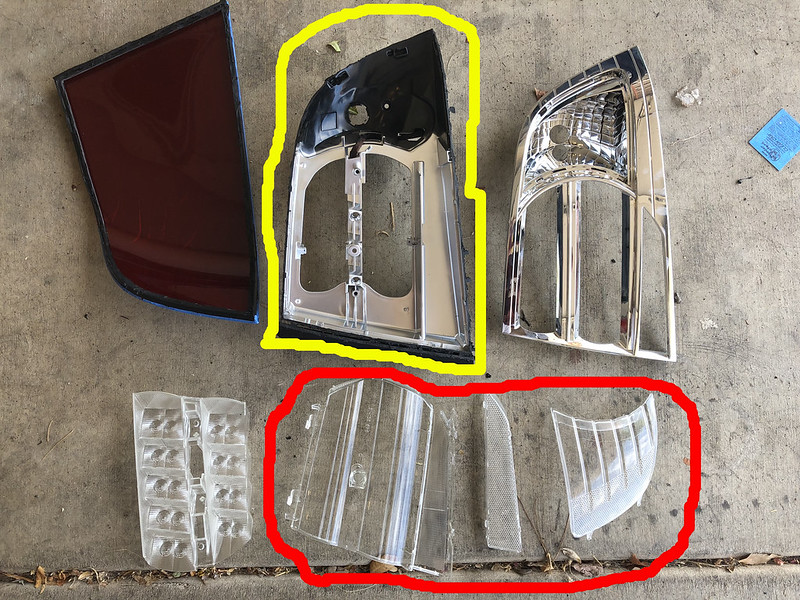
Use the VHT Nightshade to hit 2-3 coats (depending on how heavy they are) to the clear pieces, marked in red. And use the black spray paint to black out the housing, marked in yellow. Honestly the housing may not be necessary at all as its not reflective ot anything, just another Rockstar thing I picked up lol
That's about it.
I didn't take pictures of reassembly. Everything is just in reverse, but here area few tips.
1. Use the Dremel sanding wheel to clean up the mating surfaces on both the back of the housing as well as the lens of any excess plastic. This will make everything go back together easily. Just be careful! On one set I did I hit the INSIDE of the lens with the sanding wheel and had a nick that could have been avoided.
2. Make sure you clean everything before putting it back together. I use my air compressor to blow out dust and debris from everything, and rubbing alcohol on everything else. I will say, be careful with the rubbing alcohol on the chrome bezel. If you go too much or get too aggressive with it, it will rub the chrome off. You could use another cleaner, glass cleaner may work, just make sure you use a microfiber cloth to buff out any streaks. Also, take your time cleaning and assembling. I've done 3 sets of these now and each one had 2-3 minuscule specks of black plastic on the inside of the lens after I reassemble. Nothing that was a deal breaker, but if you rush through you may have much more that will bother you.
3. Make sure everything is back together that you want, like the diffuser if you want it. And make sure the LED board wire/plug is in the appropriate spot. Otherwise you will seal the light up and won't notice until you go to screw the LED board back in, that the wires ran in the wrong place and the board won't screw down all the way. Then, you'll have to the open the light and reseal to fix it. The plug should run in between here.
4. Sealing the housing back up is completely up to you. I used only the butyl. I've seen some use some sort of plastic epoxy. I've seen a few even use both. The butyl will be sticky/tacky. And will likely be that way for good. It will harden eventually, but will some time before it does.
When using the windshield butyl, I ran a strip along the trunk side of the mating surface, and left a little to hang out either side. Put the butyl along the crack inbetween the 2 layers of plastic.
Then with the light ready for reassembly, put the 2 pieces back together and screw in the 2 screws to hold the bezel/lens to the back of the housing.
Now you just take whatever you're sealing with and fill in your cuts. If you're using butyl its pretty easy to manipulate. Put a strip over the cut and put it inside. You don't have to spend a ton of time making sure it fills in the cracks, but push a bit in and run the rest over the top of the crack and smooth it out. If you use too much use your finger to push the butyl to another area that needs it. If you need more, just pull another piece off and add it to the mix. Seal til you're satisfied and you're good to go.
Hope that answers some questions. Anyone that has done this before feel free to chime in.
Just a reminder, most of this info I found here on the site, just some of the threads were old and lacking pictures. Also got some help from Rockstar143 so big thanks to him.
I would recommend a face mask, gloves and safety goggles. As I cut I had little pieces of hot plastic flying all over and burning the shit out of me. Doesn't feel goo in your eyes lol
You will also need the following to open the tails:
Dremel with cutting wheel, and sanding wheel if possible
Wide tip phillips screwdriver (the screws seem to like to strip if you use too narrow a tip)
Narrow pry tool or flathead screw driver
Windshields butyl and /or some sort of plastic epoxy
As well as the following for the Red Stripe mod:
1 can of VHT Nightshade in black
1 can of black paint (I used a VHT to be safe since it was handy, but you could probably use any cheap stuff)
Before we start:

Step 1: Prep the light
Tape the outside of your lens and trim off any excess that hangs over the edge of it, otherwise this will be in the way during cutting. Then remove your blinker bulb by twisting. One of the plugs will stay in the housing. Also, remove the grey brake light LED board by removing the 4 screws marked in red, then unclipping the 2 clips in the blue circles. lift the board and unclip the plug inside. You can use one of your screw drivers to help with this if you have fat fingers or wear gloves. Then remove the 2 screws in yellow that are holding the bezel on the inside to the back of the housing, in yellow. Take note of where the LED board plug/wire runs. It is not necessary to move it, but if you do, make sure it runs in the same spot on reassembly.
Step 2: Ready to cut
So the reason I got so much plastic in my face was I as all up in the light when cutting to make sure I wasn't going too deep. You will feel when you get through the single layer of plastic, as well as hear a difference in tone as you start hitting the bezel underneath. I wouldn't say its bad to hit the bezel, but if you cut through all the way around I would imagine it would be easy to break. The best way I can tell you to determine how deep you should be going, is below the black plastic housing is the chrome bezel. Once you see that, don't go deeper. If you do then you cut into it and the cut turns black and you wont see the chrome, and may go deeper than needed.
So the first and second cuts should be along the top and bottom of the light, the order doesn't really matter. Simply cut behind the little lip that starts along the trunkside of the light and follow that until you get to the outside corner of the light. When you start, don't be afraid to cut into the trunkside edge a little, as this will mark where your cuts on the trunk side go. Keep in mind that as you cut along the edge and the lip starts to go away, you will cut along where you see 2 edges of the plastic meet. It should be a smooth transition and you wont have to move your cutting path, just angle your Dremel a little differently. In one of the pictures I marked below in a red a small 1-inch-ish section that you will have to go a little deeper into as there is a tab here you will need tpo cut through. Once you cut through the black plastic, you can continue with your shallow cutting.
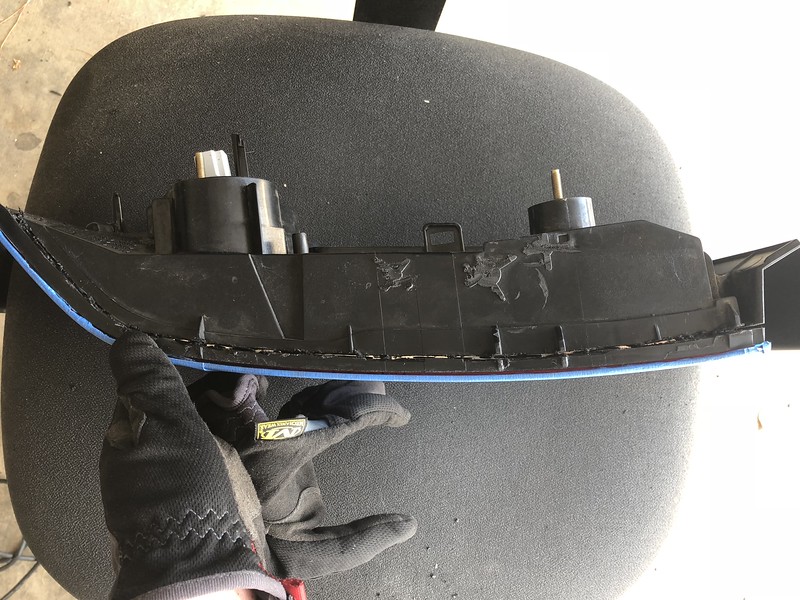
Cut these three tabs off. i picked this up from one of Rockstar143's old threads. In doing so, you no longer need that bracket below the taillight that connects to the body, and can now install and remove taillights without removing the bumper. You will only need to remove the four 8mm nuts from the inside of the trunk.
Step 3: Splitting the housing
So initial cuts are done, the top and bottom cuts are pretty easy to see if you have cut through all the way along. But the trunkside cut isn't as obvious. At this point I took my pry tool and put the edge into the cut, and pried slightly. You may hear some small cracks as everything separated. these are a bit nerve wracking, but part of the process. Once you work your way around with the pry tool, start lifting on the outside corner opposite the trunkside, This should come out pretty easy with only 1 small pop. Don't be afraid to tug a bit, and you should be able to visible see the top and bottom edges separate. If you don't and cannot feel separation or feel like your pulling too hard, chances are you missed a cut somewhere. Go back and hit it again. But as you pull the corner up, the trunkside cut will not be as easy to separate. Lift up on the corner and let it back down repeatedly. If you cannot lift the outside corner about 3-4 inches away from the lens, you may need to go back in with your Dremel and ensure you cut deep enough all the way along. You and also put your pry tool into the cut and TWIST slightly to separate. Continue to lift, pry, and cut little by little until you can lift the outside corner 3-4ish inches away from the lens. Then I started slightly twisting the back of the taillight slightly, pivoting along the trunkside cut, not lifting the corner out of the housing necessarily, but moving the corner up and down from where it normally sits. At some point the trunkside of the light will noticeably separate,and you should be able to separate the two freely, leaving you with this...

Step 4: Removing the brake light diffuser
Pretty simple step. Take the backside of the housing you just separated, and in the frosted plastic piece you will see 2 screws holding the diffuser in place, marked in yellow. Remove both screws and the diffuser will slide out easily.
Step 5: Separating the chrome bezel from the lens
Next up is removing the chrome bezel from the inside of the lens. Once you cut and remove the back of the light you're left with the lens with the bezel inside.
Step 6: Removing the bezel lens
On the back of the bezel there are 4 little retaining tabs. Just push them in one side at a time and lift the lens out.
That's it for the disassembly. You should be left with this.
Now for red stripes:
Use the VHT Nightshade to hit 2-3 coats (depending on how heavy they are) to the clear pieces, marked in red. And use the black spray paint to black out the housing, marked in yellow. Honestly the housing may not be necessary at all as its not reflective ot anything, just another Rockstar thing I picked up lol
That's about it.
I didn't take pictures of reassembly. Everything is just in reverse, but here area few tips.
1. Use the Dremel sanding wheel to clean up the mating surfaces on both the back of the housing as well as the lens of any excess plastic. This will make everything go back together easily. Just be careful! On one set I did I hit the INSIDE of the lens with the sanding wheel and had a nick that could have been avoided.
2. Make sure you clean everything before putting it back together. I use my air compressor to blow out dust and debris from everything, and rubbing alcohol on everything else. I will say, be careful with the rubbing alcohol on the chrome bezel. If you go too much or get too aggressive with it, it will rub the chrome off. You could use another cleaner, glass cleaner may work, just make sure you use a microfiber cloth to buff out any streaks. Also, take your time cleaning and assembling. I've done 3 sets of these now and each one had 2-3 minuscule specks of black plastic on the inside of the lens after I reassemble. Nothing that was a deal breaker, but if you rush through you may have much more that will bother you.
3. Make sure everything is back together that you want, like the diffuser if you want it. And make sure the LED board wire/plug is in the appropriate spot. Otherwise you will seal the light up and won't notice until you go to screw the LED board back in, that the wires ran in the wrong place and the board won't screw down all the way. Then, you'll have to the open the light and reseal to fix it. The plug should run in between here.
When using the windshield butyl, I ran a strip along the trunk side of the mating surface, and left a little to hang out either side. Put the butyl along the crack inbetween the 2 layers of plastic.
Hope that answers some questions. Anyone that has done this before feel free to chime in.

The following users liked this post:
*.jpg (07-20-2018)
07-30-2018, 11:34 PM
#5
Told you I'd get around to it at some point!
Thanks! Now you can do your tails next to match the headlights you just did
Thanks! Now you can do your tails next to match the headlights you just did
07-31-2018, 12:06 PM
#6
Burning Brakes
Don't you dare tempt me! My USR tail lights are starting to look like child's play and now I want to modify a set of 07-08 lights. Ughh...
Gosh, I have so many progress update threads I have to complete first. I feel like Acurazine has become a second job.
Gosh, I have so many progress update threads I have to complete first. I feel like Acurazine has become a second job.

Thread
Thread Starter
Forum
Replies
Last Post
Oh Sickest TL
Car Parts for Sale
12
06-25-2017 11:00 AM
johnny14
2G TL (1999-2003)
0
07-18-2016 11:41 PM
treez35
1G TSX (2004-2008)
35
01-23-2007 11:26 AM
Linner
2G CL (2001-2003)
2
04-17-2004 01:30 PM