
Shifter Bushing Install

Thread Starter
I do my own work.
Joined: Jul 2004
Posts: 1,488
Likes: 0
From: ATL
Shifter Bushing Install
Last week, there was a guy here selling shifter bushings for the 6mt. I'm not sure if I can post his name here since he was banned and not a paying vendor, so I'll let someone else do it or wait for a mod to confirm.
I've had a few PMs about the install, so I figured I would post a thread here. The only pic I really have of it is below. If someone wants to post a pic of the parts laid out flat, I could probably work up a better DIY with photoshop.
1. Remove factory airbox and battery in order to get access to the bushings. I removed the bolts on the fusebox, too, so that I could push it out of the way and get a bit more access.
2. Once you find the two shifter bushings, which are pretty much straight below the throttle body, follow the cables back about 3 inches and you'll see a metal bracket with 3 bolts. Remove these 3 bolts to free the bracket so that you don't kink the cables.
3. Remove the cotter pin or cut it off with a dremel. You will throw it away so you really don't have to worry about salvaging it.
4. Pull the endlink off the pin in the middle and then pry the bushing out.
5. Put some anti-seize lubricant on the outside and inside of the new bushing and place it into the endlink.
6. Next you will need to put on the C-clip on the top edge of the bushing to keep it from backing out. For the larger bushing, you will need a pair of snap-ring pliers. I do not own any, so I improvised with two pair of pliers and determination, but I wouldn't recommend it. The C-clip for the smaller bushing can be popped on with regular pliers.
7. Insert and secure the cotter pin.
8. Repeat steps 3-7 for the other bushing.
9. Reassemble in reverse order.
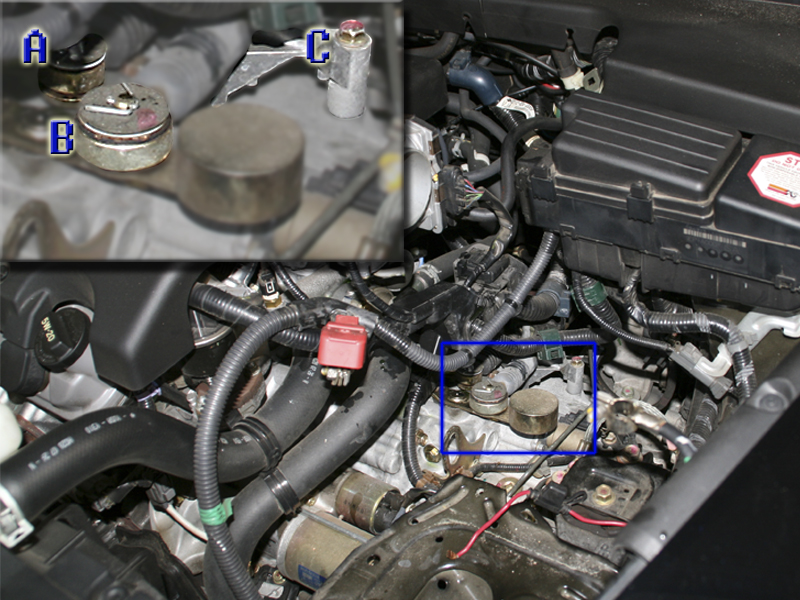
A. Small Shifter bushing
B. Large shifter bushing
C. One of three (other two not pictured) bolts for the cable housing bracket that needs to be removed to prevent the linkage lines from kinking when doing the install.
EDIT
Here is a pic of the kit from the site. I can say that the larger clip in the photo is not what I received. I recieved a snap ring for the larger bushing, which servers the same purpose and is probably a bit more secure. The smaller clip is a C-clip, as pictured in the photo below.
DOUBLE-EDIT
Evidently he REALLY pissed off the mods, because I can't link to his site. There's a redirect to usa.com, which I find hilarious. So you'll have to do your own research to find the seller.
I've had a few PMs about the install, so I figured I would post a thread here. The only pic I really have of it is below. If someone wants to post a pic of the parts laid out flat, I could probably work up a better DIY with photoshop.
1. Remove factory airbox and battery in order to get access to the bushings. I removed the bolts on the fusebox, too, so that I could push it out of the way and get a bit more access.
2. Once you find the two shifter bushings, which are pretty much straight below the throttle body, follow the cables back about 3 inches and you'll see a metal bracket with 3 bolts. Remove these 3 bolts to free the bracket so that you don't kink the cables.
3. Remove the cotter pin or cut it off with a dremel. You will throw it away so you really don't have to worry about salvaging it.
4. Pull the endlink off the pin in the middle and then pry the bushing out.
5. Put some anti-seize lubricant on the outside and inside of the new bushing and place it into the endlink.
6. Next you will need to put on the C-clip on the top edge of the bushing to keep it from backing out. For the larger bushing, you will need a pair of snap-ring pliers. I do not own any, so I improvised with two pair of pliers and determination, but I wouldn't recommend it. The C-clip for the smaller bushing can be popped on with regular pliers.
7. Insert and secure the cotter pin.
8. Repeat steps 3-7 for the other bushing.
9. Reassemble in reverse order.
A. Small Shifter bushing
B. Large shifter bushing
C. One of three (other two not pictured) bolts for the cable housing bracket that needs to be removed to prevent the linkage lines from kinking when doing the install.
EDIT
Here is a pic of the kit from the site. I can say that the larger clip in the photo is not what I received. I recieved a snap ring for the larger bushing, which servers the same purpose and is probably a bit more secure. The smaller clip is a C-clip, as pictured in the photo below.
DOUBLE-EDIT
Evidently he REALLY pissed off the mods, because I can't link to his site. There's a redirect to usa.com, which I find hilarious. So you'll have to do your own research to find the seller.
Administrator
Joined: Feb 2004
Posts: 16,412
Likes: 1,043
Originally Posted by ITL
Evidently he REALLY pissed off the mods, because I can't link to his site.
Thread Starter
I do my own work.
Joined: Jul 2004
Posts: 1,488
Likes: 0
From: ATL
Wow, I figured it was something significant with the redirect and all.
I am highly impressed with such a cheap, easy, quality mod. Thanks for the input. It's a shame that he wasn't more serious about his business here.
I'm sure collections can be quite a hassle sometimes.
I am highly impressed with such a cheap, easy, quality mod. Thanks for the input. It's a shame that he wasn't more serious about his business here.
I'm sure collections can be quite a hassle sometimes.
Racer
Joined: Oct 2004
Posts: 410
Likes: 18
From: Seattle
They're a great mod. Good bang for the buck. If you checkout the scionlife.com boards and do a search you should find some potential sources for the bushings. The RSX bushings fit on the TL.
http://www.scionlife.com
http://www.scionlife.com

Intermediate
Joined: Jul 2006
Posts: 44
Likes: 0
From: Edmonton
Is there a link for someone who DOES support this site and sells the bushings? I was really interested in buying the bushings and I know which guy got banned but now that I know what the issue was I'd really prefer to get stuff from people who support this site versus leeching.
Trending Topics

Racer
Joined: Oct 2004
Posts: 410
Likes: 18
From: Seattle
Racer
Joined: Oct 2005
Posts: 353
Likes: 0
From: Boston
Who else here has this installed? I haven't heard much about this but if others have installed the RSX ones sold at http://www.speed-source.net/products/shifter_cable.htm I may look into it...
07 NBP TL-S
Joined: Aug 2006
Posts: 227
Likes: 0
From: Fort Hood, Texas
Got my shifter bushing from MrHeeltoe yesterday and installed them this morning. The info in post 1 helped a lot; hardest part was taking out the battery, air box and moving the fuse box out of the way. At least I have a clue what I'm facing when I put in a CAI.
A couple of problems that I ran into...
The cotter pins that were sent with my new bushings were too large (in diameter) to fit into the pins, so I just put my original ones back on. Glad I didn't mangle 'em up when I took them out.
Also the large bushing took some coercion with a hammer and a six inch socket extension to get it into the endlink. The small one slid right in, but the large on was a PITA.
I smeared some white lightning lubricant on "liberally" before the install and then wiped away the excess after.
It seems to slide into gear a little better (I already have the Comptech Short Shifter installed) but I need more time to find out for sure. Thanks to ITL for the original write-up, and to TLFourplay for recommending it.

Originally Posted by SilverStoneTTL
Who else here has this installed? I haven't heard much about this but if others have installed the RSX ones sold at http://www.speed-source.net/products/shifter_cable.htm I may look into it...
product. Don't hesitate, they're only $30, and take 20 minutes to install. It's the perfect comlpement to the Comptech SS kit.
Thread Starter
I do my own work.
Joined: Jul 2004
Posts: 1,488
Likes: 0
From: ATL
Originally Posted by jonathan.chance
Thanks to ITL for the original write-up
Originally Posted by Kennedy
It's the perfect comlpement to the Comptech SS kit.
The DVD-A Script Guy


Joined: Apr 2005
Posts: 2,012
Likes: 186
From: CT
Originally Posted by Ron A
He pissed the admin off, which is much worse than pissing off the mods.
Moderators...Like unarmed, campus police driving in 3 wheeled "Cushman" carts.
Administrators ... Like Navy seals with "plausibly deniable" weapons in scary transports.
I'm just messing with you Ron..... you guys keep the peace and help us all out greatly.
Back on topic I'm interested in more feedback about the bushings. Seems easy enough to do but I'm sceptical that there really is that much of a difference. Or if the difference is in an area that matters enough. (without the short shifter kit)
hey guys
i'm out on my driveway right now trying to pry off the rubber bushing. I'm not having any success prying them off. What techniques did you guys used to get these off? Also, I can't seem to reach the 3 bolts that are holding the metal bracket down. How did you guys get these bolts off? I'm about to give up doing these bushings. Any help would be greatly appreciated.
thanks
07 NBP TL-S
Joined: Aug 2006
Posts: 227
Likes: 0
From: Fort Hood, Texas
Originally Posted by tonester
hey guys
i'm out on my driveway right now trying to pry off the rubber bushing. I'm not having any success prying them off. What techniques did you guys used to get these off? Also, I can't seem to reach the 3 bolts that are holding the metal bracket down. How did you guys get these bolts off? I'm about to give up doing these bushings. Any help would be greatly appreciated.
thanks
i'm out on my driveway right now trying to pry off the rubber bushing. I'm not having any success prying them off. What techniques did you guys used to get these off? Also, I can't seem to reach the 3 bolts that are holding the metal bracket down. How did you guys get these bolts off? I'm about to give up doing these bushings. Any help would be greatly appreciated.
thanks
Don't give up!!!
For me the, larger bushing was a little difficult - Make sure that you use a flat tip screwdriver to separate the bushing from the part that secures it into the end link. I don't know the name of this piece, but when it's installed it forms the top of the bushing and the center slides into the bushing. Once I removed the "un-named piece" I used the same flat tip screwdriver to push the edge of the bushing through the end link. Once I got it started it wasn't that hard. The smaller bushing was a lot easier.
The three bolts in the back were difficult to get to but with the right sized extension it's do-able. Rotating the fuse box out of the way helps a lot.
Hope this helps...
My day ended with an unsuccessful attempt to remove the rubber bushing. After I removed the cotton pin, the round plastic piece on top of the bushing came off w/o any effort. I noticed on the actual rubber bushing, there's a metal center piece (jonathan.chance, is this the piece you're referring to?) Since I wasn't able to remove the 3 anchoring bolts, I was afraid to put too much force in prying out the rubber bushing w/o bending the shifter cable. I didn't remove the fusebox because I noticed there's another group of wiring harness right above where the anchor was. Did you guys move that cluster out of the way also?
Well, at least my day wasn't 100% unsuccessful, I was also doing my AEM CAI install at the same time. I will try to do the bushing install again in a couple of weeks.
For those of you who did the install, was the difference that noticeable? I already have the comptech SS install and thought maybe this little mod will give it some more "pep" to the shifts.
thanks
07 NBP TL-S
Joined: Aug 2006
Posts: 227
Likes: 0
From: Fort Hood, Texas
Originally Posted by tonester
My day ended with an unsuccessful attempt to remove the rubber bushing. After I removed the cotton pin, the round plastic piece on top of the bushing came off w/o any effort. I noticed on the actual rubber bushing, there's a metal center piece (jonathan.chance, is this the piece you're referring to?) Since I wasn't able to remove the 3 anchoring bolts, I was afraid to put too much force in prying out the rubber bushing w/o bending the shifter cable. I didn't remove the fusebox because I noticed there's another group of wiring harness right above where the anchor was. Did you guys move that cluster out of the way also?
Well, at least my day wasn't 100% unsuccessful, I was also doing my AEM CAI install at the same time. I will try to do the bushing install again in a couple of weeks.
For those of you who did the install, was the difference that noticeable? I already have the comptech SS install and thought maybe this little mod will give it some more "pep" to the shifts.
thanks
Well, at least my day wasn't 100% unsuccessful, I was also doing my AEM CAI install at the same time. I will try to do the bushing install again in a couple of weeks.
For those of you who did the install, was the difference that noticeable? I already have the comptech SS install and thought maybe this little mod will give it some more "pep" to the shifts.
thanks
When I did mine I just unclipped and unbolted the fusebox and rotated it out of the way. I know what you mean about the cluster of wires coming out of it - but no worries; it'll be ok.
For me the difference wasn't SUPER noticeable; but there is a difference. I did the bushing change about 2 weeks after I installed my Comtech SS. It does feel a little crisper and less sloppy - word of warning my adjectives didn't get you very far in describing the plastic piece on the bushing!!! My bushings were less than 3 weeks old when I replaced them so the rubber didn't really have much give to it. But I'm happy that I did it.
Thread Starter
I do my own work.
Joined: Jul 2004
Posts: 1,488
Likes: 0
From: ATL
Originally Posted by tonester
jonathan.chance: thanks for your info. I will try this install again.
btw, does anyone have a picture w/ their new brass bushings installed?
btw, does anyone have a picture w/ their new brass bushings installed?

07 NBP TL-S
Joined: Aug 2006
Posts: 227
Likes: 0
From: Fort Hood, Texas
I pushed mine out through the bottom of the end link; but I seriously doubt that it makes a difference.
I don't think that it matters how you put the new bushings in either. ie c-clip on top/bottom. Hell, my large bushing was such a pain in the ass to get in it'll never come out again anyway.
I don't think that it matters how you put the new bushings in either. ie c-clip on top/bottom. Hell, my large bushing was such a pain in the ass to get in it'll never come out again anyway.
well, i finally did the install yesterday. I used a technique posted by someone on the spyderchat forum and it worked like a charm to get the rubber bushings off.
He threaded a nut and washer combo on the end of a carriage bolt, then slipped that through the inner sleeve of the OEM bushing. By grabbing the end of the bolt with pliers, he twisted the bushing out just like popping a beer cap.
I also sprayed some WD40 under the lip of the rubber bushing prior to help lubricate them. I also didn't have to remove the 3 bolts of the anchor. I just applied enough force to hold the endlinks in place while i popped the bushings out.
Props to the guy who posted the DIY on spyderchat.
Originally Posted by ITL
what's spyderchat?
I used the same technique desribed above with a simple screwdriver. Just have to apply a bit of force.
www.speed-source.net
I didn't really noticed any added difference w/ these new brass bushings. I already have the comptech SS installed in my car.
I didn't really noticed any added difference w/ these new brass bushings. I already have the comptech SS installed in my car.
Thread Starter
I do my own work.
Joined: Jul 2004
Posts: 1,488
Likes: 0
From: ATL
weird, I noticed quite a difference in mine. But didn't really notice them after installed in Warren803's car. Same setup with the SS; however, I think he drives like my grandma and has fewer miles...I beat it up pretty regularly.
the only thing I can think of is that I had put some wear on my bushings ???
the only thing I can think of is that I had put some wear on my bushings ???
Three Wheelin'
Joined: Jul 2006
Posts: 1,329
Likes: 27
From: Spring TX
so what are people's updated review on this? worth it or not?
also what is the dampener thingy that the 6spds have that cause that bungie-cord feeling when shifting? or part no? i can't find the thread with this info... any down sides to removing this? how long would that take and how difficult? thanks
also what is the dampener thingy that the 6spds have that cause that bungie-cord feeling when shifting? or part no? i can't find the thread with this info... any down sides to removing this? how long would that take and how difficult? thanks

HQTL6SPD: look at my above post (#28) regarding the trick to popping the stock bushings off. It works like a charm. As for a shifting difference w/ the brass bushings, I don't feel any difference. Unless, you're really rough on the shifts, your stock rubber bushings are probably just as good as these brass bushings.
