
A must for the 6MT TL - CorSport Aluminum Shifter Cable Bushings
 08-05-2009 | 10:47 AM
#1
Thread Starter
Ryan Christopher
Joined: Jul 2005
Posts: 1,230
Likes: 5
From: Alabama
A must for the 6MT TL - CorSport Aluminum Shifter Cable Bushings
CorSport Aluminum Shifter Cable Bushings
I was able to get these installed last week and I wanted to drive with them in before making any comments. My comments- A must do for the 6MT. This gives a much tighter feel to the shifter. Combined with the CSS and a weighted knob, this feels great. Now I just need to get the slave cylinder done!
The install is not horrible, but is a bit of a pain. Just getting the bushing out of the shift linkage was a headache. The larger one is not bad, but the small one took some serious work to force it out.
 08-05-2009 | 02:21 PM
#6
Thread Starter
Ryan Christopher
Joined: Jul 2005
Posts: 1,230
Likes: 5
From: Alabama
DIY instructions for CorSport Shifter bushings
Just a quick write up of the DIY.
Tools needed (for me) -
Ratchet
10mm socket
12mm socket
3" extension
needle nose pliers
white lithium grease
cotter pin extractor (helped a little, but not required)
Fender well cover
1. If you still have the factory airbox you will want to pull it out along with disconnecting the tube to the Throttle Body (TB). If you have a CAI, you will just need to remove it from the TB.
The instructions that are included with the bushings say you may need to remove the battery. I did not do this. If it is in the way, you may want to remove the strut bar. Not needed, but an option.
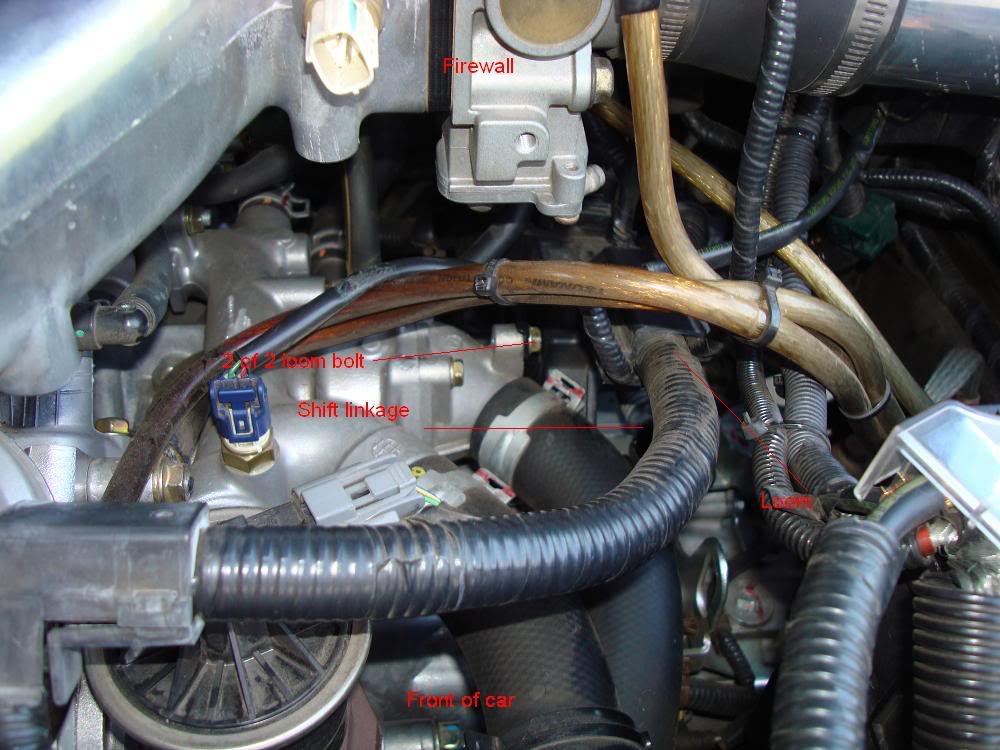
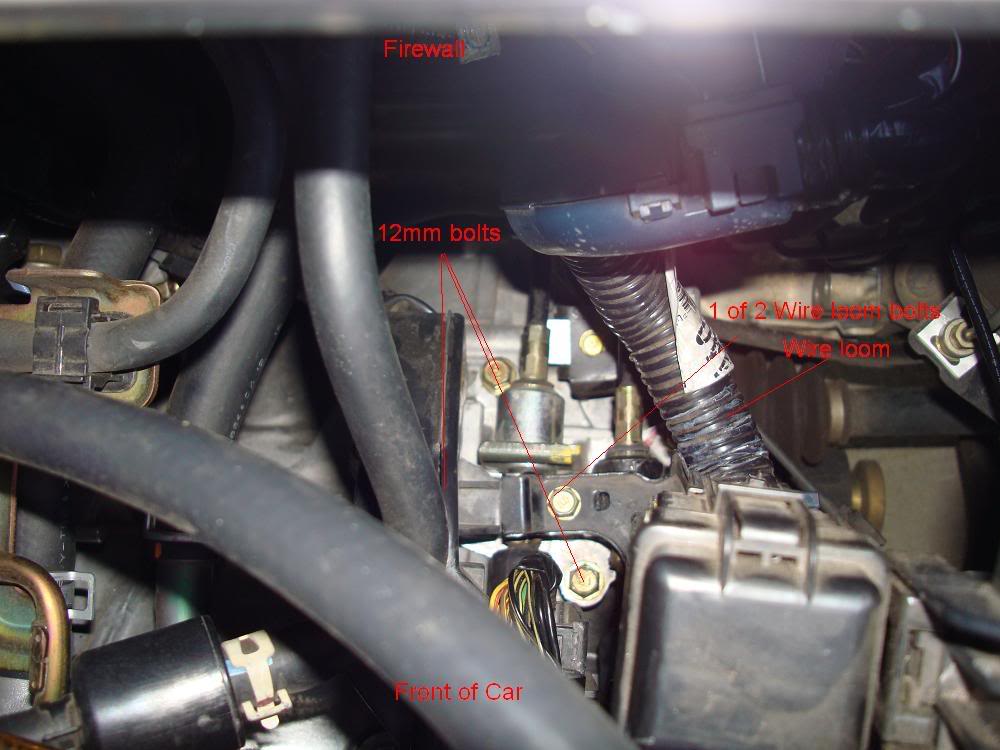
2. There are some wire looms in the way, you will need to move them to the side. This requires you to unbolt 2 10mm bolts. I will try and get some pictures of this and add to the thread.
3. You will then need to loosen three 12mm bolts that hold down the shift linkage. This is located towards the rear of the transmission. This is not needed to remove the rubber ones from the guide pins, but to put the aluminum ones back on the guide pins it has to be loose!
4. You will need to remove the cotter pins that are located on the top of the OEM bushings. This was a bit of a pain as there is not a lot of room to work.
I tried the cotter pin extractor, but could not get good leverage with it. I had to use a pair of needle nose pliers to work it out.
5 With the cotter pins removed, you can lift the shift linkage off the guide pin. I used a flat blade screw driver to force out the larger bushing. It came out fairly easy. The little one was a real booger.
I was finally able to force one side of the bushing out using the flat blade, just be extremely careful not to slip and cut yourself (and no, I did not cut myself, but have in the past trying to force something) as the shift linkage will want to spin.
6. With the rubber bushings removed, you are ready to install the aluminum ones. You will want to use some white lithium grease on the outside as well as a little on the inside of the bushing.
7. With the bushing greased, you will want to install the bushing into the shift linkage ring. You will then use the supplied E-clip and push it over the part of the bushing that is sticking out at the bottom.
It did not say anywhere what side was the top or bottom. I installed mine with the E-clip on the bottom.

8. This is where you will need to have the shift linkage loose, as you will need to set the bushing on the guide pin. Once they are installed, wipe any of the grease off the top of the guide pin and install the supplied cotter pin. Stick it through the guide pin hole and bend the ends back around the guide pin.
9. Now reinstall the three 12mm bolts that were removed to allow for the shift linkage to be moved. Start the bolts, but do not run one down until you have start all three.
10. Move wiring back into place and bolt it back up with the removed 10mm bolts.
11. Reinstall your intake and battery if you removed it.
Again, I will try to take some pictures to help illustrate this. Feel free to add comments if you have done the install yourself and would like to add to the thread.
Mods, if this is sufficient, feel free to add it in the garage as a DIY.
Trending Topics
08-05-2009 | 10:11 PM
#8
Thread Starter
Ryan Christopher
Joined: Jul 2005
Posts: 1,230
Likes: 5
From: Alabama
Took a few photos to add to the DIY
Tools needed (for me) -
Ratchet
10mm socket
12mm socket
3" extension
needle nose pliers
white lithium grease
cotter pin extractor (helped a little, but not required)
Fender well cover
1. If you still have the factory airbox you will want to pull it out along with disconnecting the tube to the Throttle Body (TB). If you have a CAI, you will just need to remove it from the TB.
The instructions that are included with the bushings say you may need to remove the battery. I did not do this. If it is in the way, you may want to remove the strut bar. Not needed, but an option.
2. There are some wire looms in the way, you will need to move them to the side. This requires you to unbolt 2 10mm bolts. I will try and get some pictures of this and add to the thread.
3. You will then need to loosen three 12mm bolts that hold down the shift linkage. This is located towards the rear of the transmission. This is not needed to remove the rubber ones from the guide pins, but to put the aluminum ones back on the guide pins it has to be loose!
4. You will need to remove the cotter pins that are located on the top of the OEM bushings. This was a bit of a pain as there is not a lot of room to work.
I tried the cotter pin extractor, but could not get good leverage with it. I had to use a pair of needle nose pliers to work it out.

5 With the cotter pins removed, you can lift the shift linkage off the guide pin. I used a flat blade screw driver to force out the larger bushing. It came out fairly easy. The little one was a real booger.
I was finally able to force one side of the bushing out using the flat blade, just be extremely careful not to slip and cut yourself (and no, I did not cut myself, but have in the past trying to force something) as the shift linkage will want to spin.
6. With the rubber bushings removed, you are ready to install the aluminum ones. You will want to use some white lithium grease on the outside as well as a little on the inside of the bushing.
7. With the bushing greased, you will want to install the bushing into the shift linkage ring. You will then use the supplied E-clip and push it over the part of the bushing that is sticking out at the bottom.
It did not say anywhere what side was the top or bottom. I installed mine with the E-clip on the bottom.
8. This is where you will need to have the shift linkage loose, as you will need to set the bushing on the guide pin. Once they are installed, wipe any of the grease off the top of the guide pin and install the supplied cotter pin. Stick it through the guide pin hole and bend the ends back around the guide pin.
9. Now reinstall the three 12mm bolts that were removed to allow for the shift linkage to be moved. Start the bolts, but do not run one down until you have start all three.
10. Move wiring back into place and bolt it back up with the removed 10mm bolts.
11. Reinstall your intake and battery if you removed it.
Again, I will try to take some pictures to help illustrate this. Feel free to add comments if you have done the install yourself and would like to add to the thread.
Mods, if this is sufficient, feel free to add it in the garage as a DIY.
Tools needed (for me) -
Ratchet
10mm socket
12mm socket
3" extension
needle nose pliers
white lithium grease
cotter pin extractor (helped a little, but not required)
Fender well cover
1. If you still have the factory airbox you will want to pull it out along with disconnecting the tube to the Throttle Body (TB). If you have a CAI, you will just need to remove it from the TB.
The instructions that are included with the bushings say you may need to remove the battery. I did not do this. If it is in the way, you may want to remove the strut bar. Not needed, but an option.
2. There are some wire looms in the way, you will need to move them to the side. This requires you to unbolt 2 10mm bolts. I will try and get some pictures of this and add to the thread.
3. You will then need to loosen three 12mm bolts that hold down the shift linkage. This is located towards the rear of the transmission. This is not needed to remove the rubber ones from the guide pins, but to put the aluminum ones back on the guide pins it has to be loose!
4. You will need to remove the cotter pins that are located on the top of the OEM bushings. This was a bit of a pain as there is not a lot of room to work.
I tried the cotter pin extractor, but could not get good leverage with it. I had to use a pair of needle nose pliers to work it out.
5 With the cotter pins removed, you can lift the shift linkage off the guide pin. I used a flat blade screw driver to force out the larger bushing. It came out fairly easy. The little one was a real booger.
I was finally able to force one side of the bushing out using the flat blade, just be extremely careful not to slip and cut yourself (and no, I did not cut myself, but have in the past trying to force something) as the shift linkage will want to spin.
6. With the rubber bushings removed, you are ready to install the aluminum ones. You will want to use some white lithium grease on the outside as well as a little on the inside of the bushing.
7. With the bushing greased, you will want to install the bushing into the shift linkage ring. You will then use the supplied E-clip and push it over the part of the bushing that is sticking out at the bottom.
It did not say anywhere what side was the top or bottom. I installed mine with the E-clip on the bottom.
8. This is where you will need to have the shift linkage loose, as you will need to set the bushing on the guide pin. Once they are installed, wipe any of the grease off the top of the guide pin and install the supplied cotter pin. Stick it through the guide pin hole and bend the ends back around the guide pin.
9. Now reinstall the three 12mm bolts that were removed to allow for the shift linkage to be moved. Start the bolts, but do not run one down until you have start all three.
10. Move wiring back into place and bolt it back up with the removed 10mm bolts.
11. Reinstall your intake and battery if you removed it.
Again, I will try to take some pictures to help illustrate this. Feel free to add comments if you have done the install yourself and would like to add to the thread.
Mods, if this is sufficient, feel free to add it in the garage as a DIY.
08-09-2009 | 06:09 PM
#9
Yep...
Had these for over 2 years... Good mod. he used to make them out of Brass.
I wrote up some material on these back then. It seems that stuff rolls off and is forgotten, then comes back with a new generation of folks coming on.
6MT must mods:
- GM Synchromesh
- Short Shifter
- Weighted shift knob
- Corsport bushings
I was just looking over the slave cylinder release valve removal to get the bite back on the clutch...
That's a likely add on too.
08-10-2009 | 07:52 AM
#10
Thread Starter
Ryan Christopher
Joined: Jul 2005
Posts: 1,230
Likes: 5
From: Alabama
Had these for over 2 years... Good mod. he used to make them out of Brass.
I wrote up some material on these back then. It seems that stuff rolls off and is forgotten, then comes back with a new generation of folks coming on.
6MT must mods:
- GM Synchromesh
- Short Shifter
- Weighted shift knob
- Corsport bushings
I was just looking over the slave cylinder release valve removal to get the bite back on the clutch...
That's a likely add on too.
I wrote up some material on these back then. It seems that stuff rolls off and is forgotten, then comes back with a new generation of folks coming on.
6MT must mods:
- GM Synchromesh
- Short Shifter
- Weighted shift knob
- Corsport bushings
I was just looking over the slave cylinder release valve removal to get the bite back on the clutch...
That's a likely add on too.
Would be nice to get this added to the DIY garage list for future modders!


The following users liked this post:
sauceja (02-03-2013)
08-11-2009 | 08:43 AM
#13
Had these for over 2 years... Good mod. he used to make them out of Brass.
I wrote up some material on these back then. It seems that stuff rolls off and is forgotten, then comes back with a new generation of folks coming on.
6MT must mods:
- GM Synchromesh
- Short Shifter
- Weighted shift knob
- Corsport bushings
I was just looking over the slave cylinder release valve removal to get the bite back on the clutch...
That's a likely add on too.
I wrote up some material on these back then. It seems that stuff rolls off and is forgotten, then comes back with a new generation of folks coming on.
6MT must mods:
- GM Synchromesh
- Short Shifter
- Weighted shift knob
- Corsport bushings
I was just looking over the slave cylinder release valve removal to get the bite back on the clutch...
That's a likely add on too.
08-15-2009 | 09:11 AM
#14
Instructor
Joined: Sep 2008
Posts: 121
Likes: 0
From: Taylors S.C.
Hey guys My slave cylinder is leaking or something .My master was empty the other day I filled it up now it's fine again . Is there another slave cylinder to replace the one I have that doesn't have the valve in it ?
11-21-2009 | 02:31 AM
#15
just did mine. so far feels stiffer, crispier. didnt move anything around. i was able to get to the rear and front bushing quite easy.
one thing i noticed is that in the larger bushing assembly, i was able to use the old paper and metal washers above the corsport bushing but not on the smaller one.
Also for the smaller bushing, i used a nut and bolt thru the old bushing and pryied it out using a panel puller ( 5 seconds and it was done!! ). that little fcker did not want to come out easy any other way.
Last edited by InFaMouSLink; 11-21-2009 at 02:36 AM.
11-21-2009 | 10:09 AM
#18
this is just on the smaller bushing, cuz the larger one just falls out with little force. i took off the cotter pin, lifted up on the old cable with bushing installed, turned it sideways in order to be able to use both hands to install the bolt and nut thru the center hole. thats give you something to hold on to and basically twist it off. i used a panel puller and that sucker popped right off. you dont want the nut and bolt tight on it just something for leverage.
The old bushing are rubber which gives it alot of play, you just got to twist/pry that thing out. same concept of the screwdriver but easier cuz you dont have to try to get the try screwdriver under that sucker. The OEM bushings have a lip that goes around the metel ring that holds it in so it would have probably been a pain in the ass with just a screwdriver.
Metal ring holder:

Metal ring holder and you can see the smaller bushing as well still untouched.
side comparison of the larger bushings
 11-23-2009 | 05:49 PM
#23

trini to de bone !
Joined: Nov 2005
Posts: 264
Likes: 0
From: Toronto ON Canada
i took off the cotter pin, lifted up on the old cable with bushing installed, turned it sideways in order to be able to use both hands to install the bolt and nut thru the center hole. thats give you something to hold on to and basically twist it off. i used a panel puller and that sucker popped right off. you dont want the nut and bolt tight on it just something for leverage.
The old bushing are rubber which gives it alot of play, you just got to twist/pry that thing out. same concept of the screwdriver but easier cuz you dont have to try to get the try screwdriver under that sucker. The OEM bushings have a lip that goes around the metel ring that holds it in so it would have probably been a pain in the ass with just a screwdriver.
The old bushing are rubber which gives it alot of play, you just got to twist/pry that thing out. same concept of the screwdriver but easier cuz you dont have to try to get the try screwdriver under that sucker. The OEM bushings have a lip that goes around the metel ring that holds it in so it would have probably been a pain in the ass with just a screwdriver.
 11-23-2009 | 10:07 PM
#24
We've been selling these for a while and have installed a bunch. We actually have a quote out now for getting some made in delrin...a light plastic with self-lubricating properties. We were hoping to get the feel of the corsport with a little smoother action.
07-13-2011 | 05:57 PM
#26
Instructor
Joined: Feb 2011
Posts: 145
Likes: 15
From: Long Island
just finished doing this with the above DIY... great reference...the only thing was that i didnt take out the 3mm bolts...you really dont have to but i wouldnt recommend it... i didnt notice much of a difference just yet so i will keep this thread in mind once i realize it...maybe it was bc my original bushings werent beat up yet.. am i babying the clutch at 54 k ? lol... i have the 6 little shifter bushings but i couldnt find a DIY for it so if anyone has any knowledge of those let me know.. i also have the gm synch sitting in my trunk for months now, im just afraid to switch that fluid man...
07-14-2011 | 04:01 PM
#28
UA6mt NBP
Joined: Nov 2010
Posts: 612
Likes: 16
From: HBG, PA
they do and i have them on my car and love em i had corsport before them and upgraded to the hybrid racing and must say its a way better feel for a little more money....DIY isnt needed is easy enough to see where they go and self explainitory on how to do it, just the rear bushing is a bitch to get out
 02-03-2013 | 01:00 AM
#31
Moderator
Chapter Leader (South Florida Region)
Chapter Leader (South Florida Region)
iTrader: (6)
Joined: Sep 2008
Posts: 78,016
Likes: 20,031
Out of curiosity, were there a lot of complaints on the feel of the original solid core aftermarket bushing sets?!?! I mean, I've heard great things about the hybrid racing ones...but seems counter intuitive to remove the rubber and then complain of the shifting feeling too precise. I guess I can always reverse the mod if need be.
J.
J.
02-03-2013 | 03:02 PM
#33
Moderator
Chapter Leader (South Florida Region)
Chapter Leader (South Florida Region)
iTrader: (6)
Joined: Sep 2008
Posts: 78,016
Likes: 20,031
Got up at 8am today after going to bed at 230pm and I washed and waxed Betty's SRX. Polished exhaust tips too. She has the Dupont treatment done to it, but I read up on it and it felt like it could use a coat of polymer protection.
After that, I opted to install the ebay delrin shifter bushings I bought. I didn't research enough prior to buying and only paid $22 shipped...install was not hard, but I made it harder by opting to do a bunch of other things while I was in there removing everything. I rewired some things and rerouted some wiring...just cleaned up the rat's nest, in general. Also, since I removed the throttle body, I cleaned it out too...
Now, the bushings I bought, true to ebay form, didn't fit properly. The small one did, but the bit one, the center hole was too small (yeah buddy!)...not a big deal, I drilled out the center little by little with a smaller bit until I was barely able to squeeze it into place. I did write to seller to complain though. If I had to do it over, I'd pay Marcus the $65 for his hybrid racing ones.
Impression after install...although it's not night and day, I don't regret it at all...I do feel something different...just seems easier to pop into whatever gear you're selecting, like your hand doesn't have to fish around the gate looking for the opening. I'd recommend this mod to anyone.
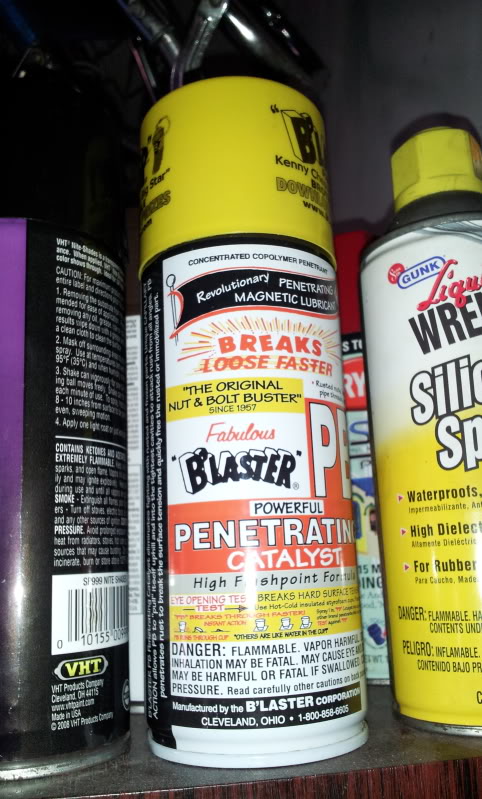
For install, what worked for me was to soak both oem bushings in PB Blaster for 15 minutes...I DID unbolt the 2 10MM bolts holding the wiring harness above the smaller one to move it around for access. After soaking, I was able to lift the bushing off the center stud and then I moved it up or down a little (toward or away from car) to put the stud UNDER the rubber part of the bushing instead of the center hole and I used the stud to press the bushing out upward. Worked easy on the big one, and after getting one hand on either side of the wiring and on the smaller one, it popped off first try too. Easy as heck.
Had I not cleaned up the wiring and brushed off and painted my corroding battery tray and dropped 1 bolt and had to install and uninstall and put the "c clip" under the new bushings...this would have taken me all of 30 minutes.
UGLY!

Here they are

OEM off

this stuff made it easy...after 9 years, those bushings didn't want to budge
Installed, but I flipped them over after this to mimmick how another member installed

Dang it was bad!
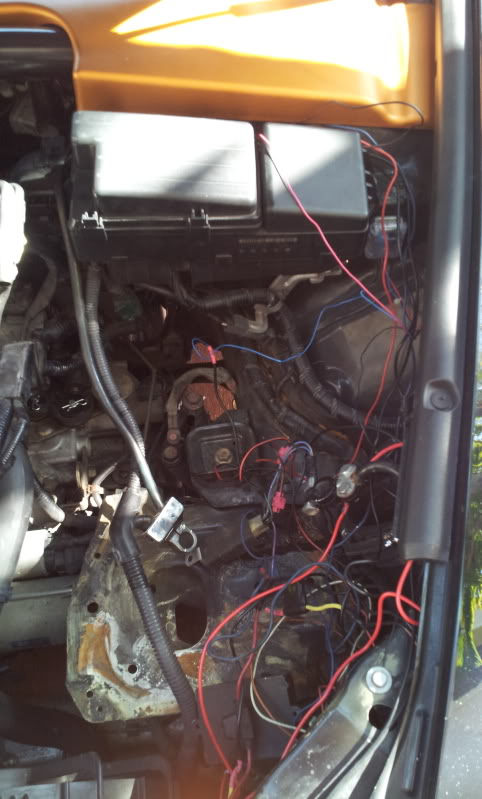
and here it is after install and cleaned and high temp painted the tray

and here it is all buttoned up!
After that, I opted to install the ebay delrin shifter bushings I bought. I didn't research enough prior to buying and only paid $22 shipped...install was not hard, but I made it harder by opting to do a bunch of other things while I was in there removing everything. I rewired some things and rerouted some wiring...just cleaned up the rat's nest, in general. Also, since I removed the throttle body, I cleaned it out too...
Now, the bushings I bought, true to ebay form, didn't fit properly. The small one did, but the bit one, the center hole was too small (yeah buddy!)...not a big deal, I drilled out the center little by little with a smaller bit until I was barely able to squeeze it into place. I did write to seller to complain though. If I had to do it over, I'd pay Marcus the $65 for his hybrid racing ones.
Impression after install...although it's not night and day, I don't regret it at all...I do feel something different...just seems easier to pop into whatever gear you're selecting, like your hand doesn't have to fish around the gate looking for the opening. I'd recommend this mod to anyone.
For install, what worked for me was to soak both oem bushings in PB Blaster for 15 minutes...I DID unbolt the 2 10MM bolts holding the wiring harness above the smaller one to move it around for access. After soaking, I was able to lift the bushing off the center stud and then I moved it up or down a little (toward or away from car) to put the stud UNDER the rubber part of the bushing instead of the center hole and I used the stud to press the bushing out upward. Worked easy on the big one, and after getting one hand on either side of the wiring and on the smaller one, it popped off first try too. Easy as heck.
Had I not cleaned up the wiring and brushed off and painted my corroding battery tray and dropped 1 bolt and had to install and uninstall and put the "c clip" under the new bushings...this would have taken me all of 30 minutes.
UGLY!
Here they are
OEM off
this stuff made it easy...after 9 years, those bushings didn't want to budge
Installed, but I flipped them over after this to mimmick how another member installed
Dang it was bad!
and here it is after install and cleaned and high temp painted the tray
and here it is all buttoned up!
The following users liked this post:
rockstar143 (02-04-2013)
02-03-2013 | 05:20 PM
#35
i'm glad someone revived this thread, because I had completely forgotten about this mod, lol, which is kindof silly considering I went to the trouble of buying a SS clutch line already
The following users liked this post:
rockstar143 (02-04-2013)
02-04-2013 | 10:53 AM
#36
We sell the HBR bushings almost constantly...it is a nice mod. The Corsports were definitely immediately noticeable but after a while they started feeling like they were binding.
The following users liked this post:
rockstar143 (02-04-2013)
02-04-2013 | 06:11 PM
#37
Moderator
Chapter Leader (South Florida Region)
Chapter Leader (South Florida Region)
iTrader: (6)
Joined: Sep 2008
Posts: 78,016
Likes: 20,031
My full review after driving for a day:
Also, after driving around today with the new delrin bushings, aside from the minor fitment issue (bigger bushing hole was too small, had to drill out)...I have to say that I'm VERY glad with this mod. Like I said yesterday, it's not a night day mod...it's subtle, but it DOES remove that little annoyance of going into gear and having that split millisecond where you're kinda fishing for the entrance into it...you won't know you ever did what I just described until you change the bushings and realize that you're so much happier that it just kinda GOES into the right gear with less effort. I did notice that 5th and 6th require a tad more effort but since those are 2 gears you normally go into and leave them there, it was worth the trade off for how awesome the first four are to row though.
I'm sure the bearing ones that Marcus sells are a better quality etc...but as far as the delrin being hard to shift in and out of, not an issue for me thus far...and at $22 shipped (and hoping for a partial refund for my need to drill out to make fit)...I dont' feel like I wasted my time on this.
and disclaimer for vendors and Marcus. If I were to do this over again, I'd recommend to any all to just get the piece of mind of knowing you're buying a tried and tested product. I was on the fence about whether or not to do this mod so the 20 buck price tag is what lured me in. Now that I've confirmed that I love it, or if I end up feeling like I'm getting binding or anything like that I'll be revisiting and purchasing from Marcus. It didn't feel good to have to whip out my drill to make this part fit and I was cursing myself for being such a cheapskate. If I get full refund from the ebay seller, I may be purchasing one from Marcus anyway.
J.
02-05-2013 | 01:08 PM
#38
Delrin is a great material. We looked and making our own delrin bushings at one point but scrapped it. I doubt you will have any issues with these. The delrin material is a lot more slippy than aluminum is which is what the corsports are.
The following users liked this post:
rockstar143 (02-05-2013)