Unique Style Racing - Type S Gauge Cluster DIY 3G
 08-06-2011, 03:42 PM
#1
So, I was recently contacted by my buddy Simon over at USR to put together a little DIY on an upcoming 3G product he'll be putting together.
Shipping was quick, packaging was great and the product looks well made and extremely well thought out. Kudos on another 3G Acura TL innovation! Thanks to vendors like this, we have a pseudo aftermarket for this US and A made Japanese car!
Anyway, please contact Simon directly in reference to pricing, shipping, product availability. He's easily attainable by email at fish123@speedstersource.com or USR website http://www.uniquestyleracing.com/
So, since I am coming up with this DIY I was a little intimidated but it ended up being VERY simple.
First start by tugging on the outer cluster bezel...bottom center comes out first, the rest will pop right out. Very easy. Unclip 2 green clips behind
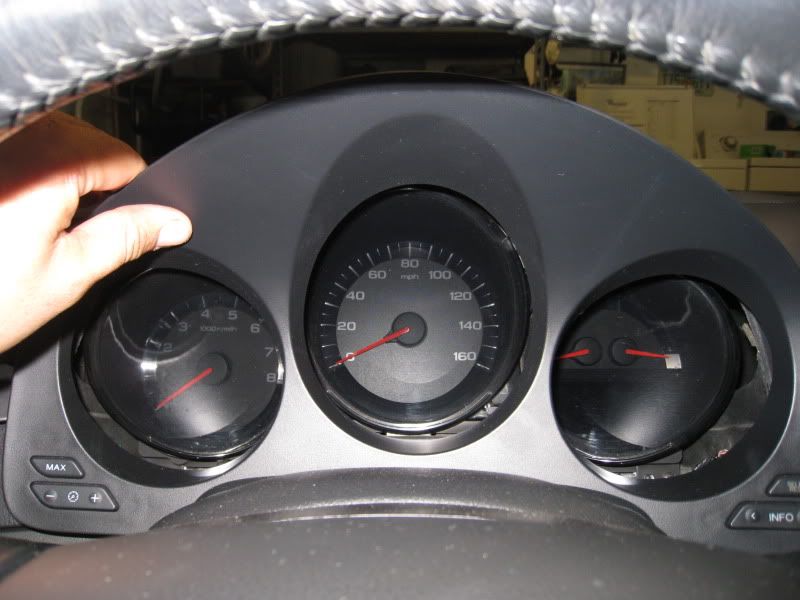
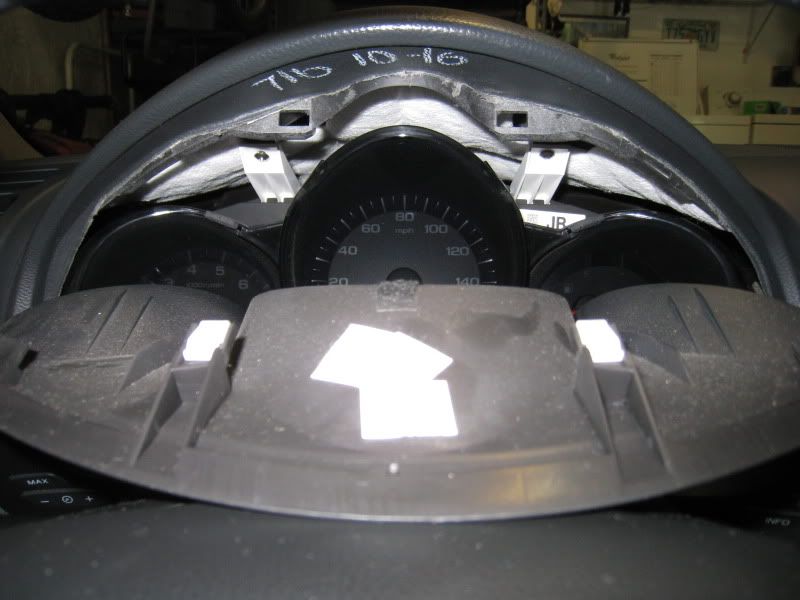
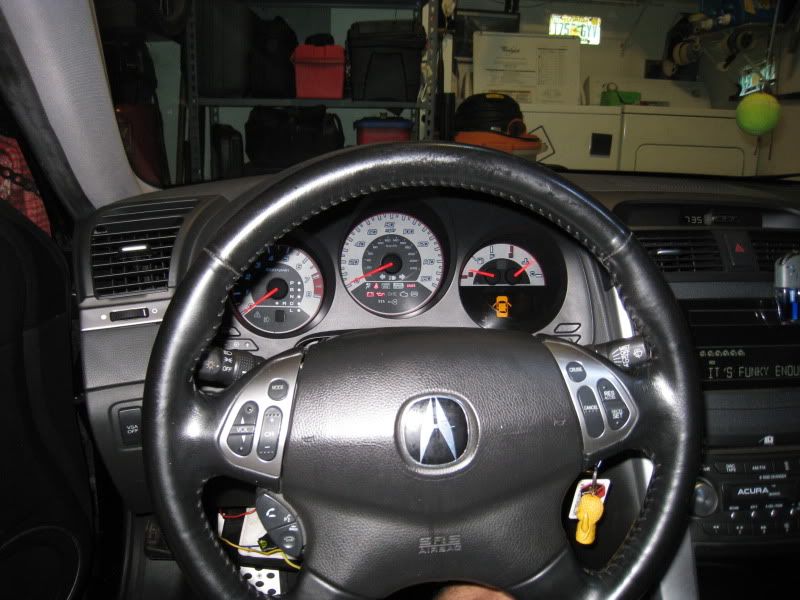
Next, there are 4 very obvious screws holding the actual gauges in: 2 top upper, and 2 lower.
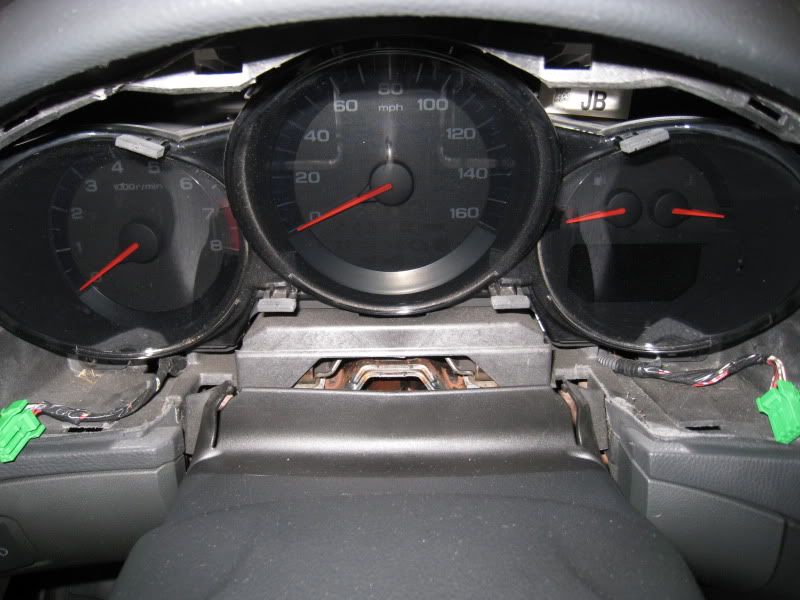
Unscrew and the assembly pulls forward really easily.
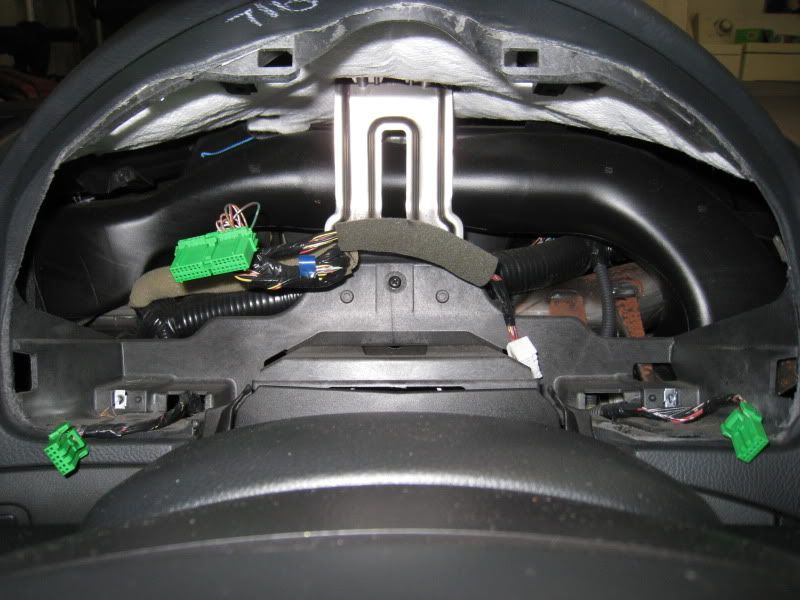
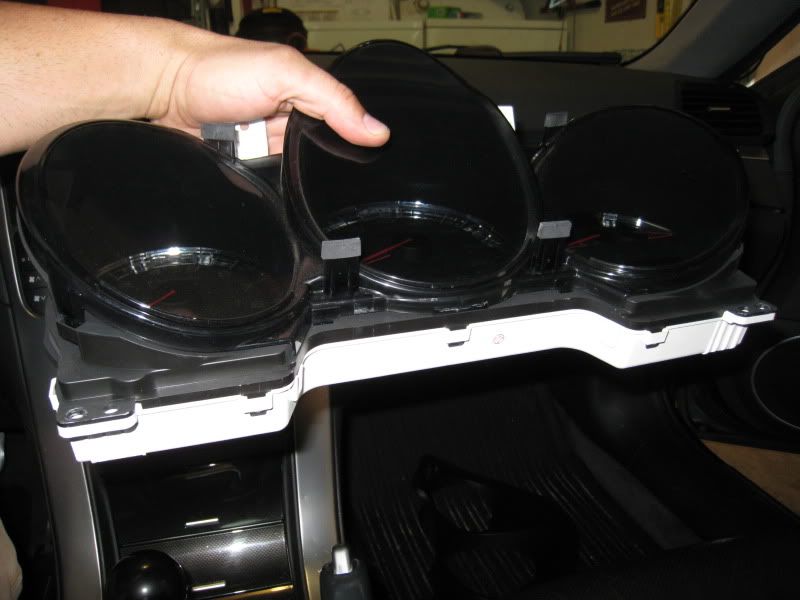
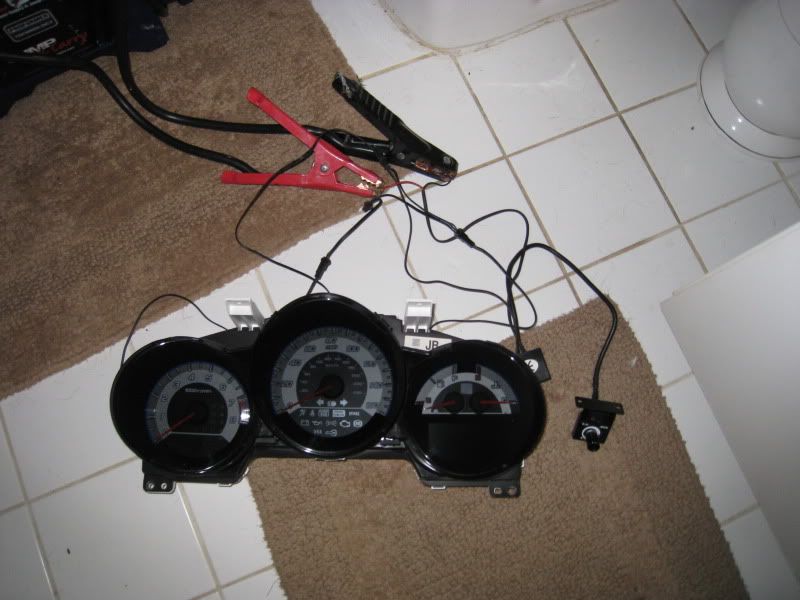
there are 2 harnesses that need to come out. this is what it looks like when out. All of 3 minutes in.
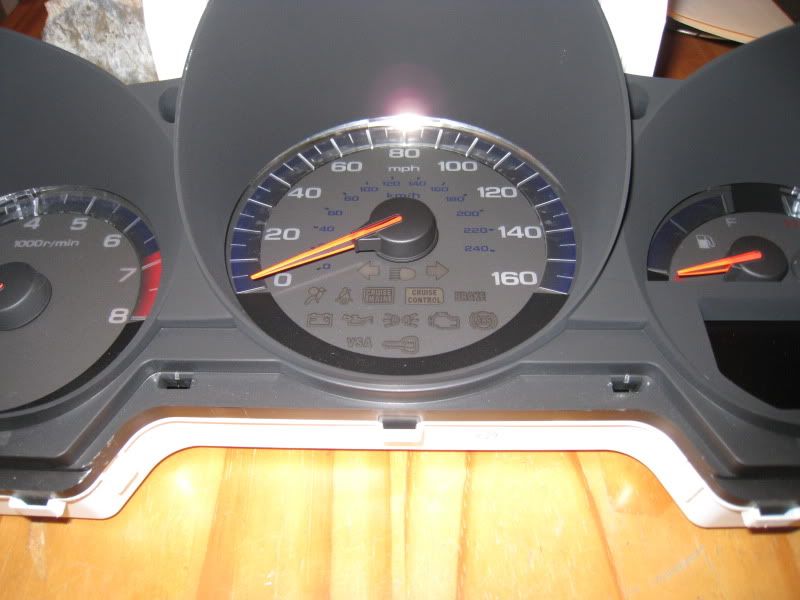
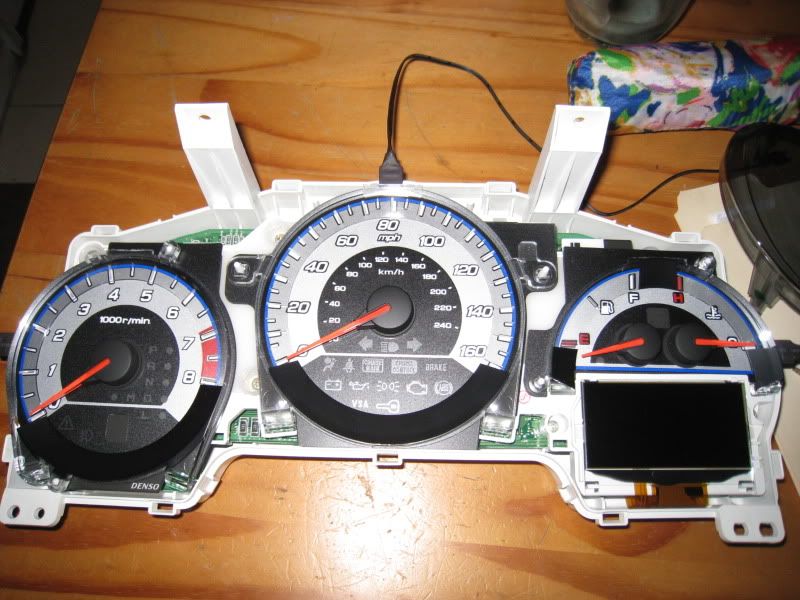
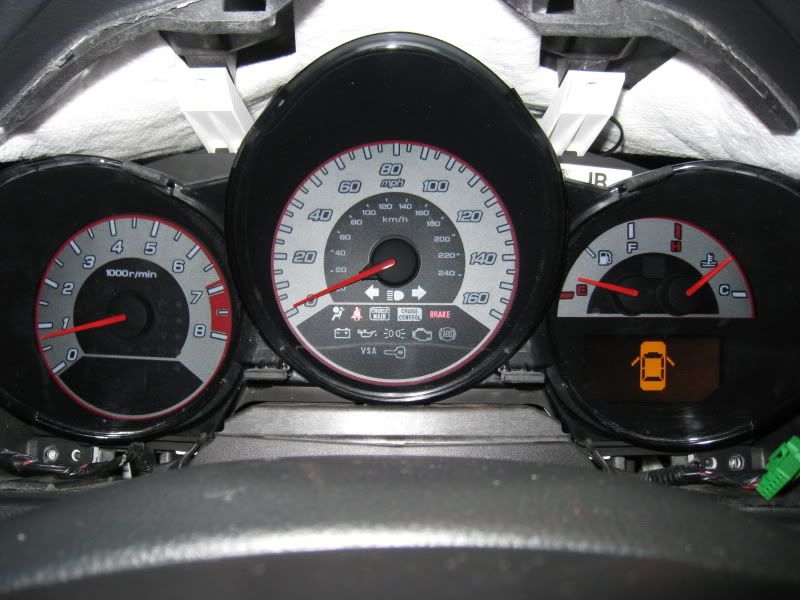
Now that the gauges are out...
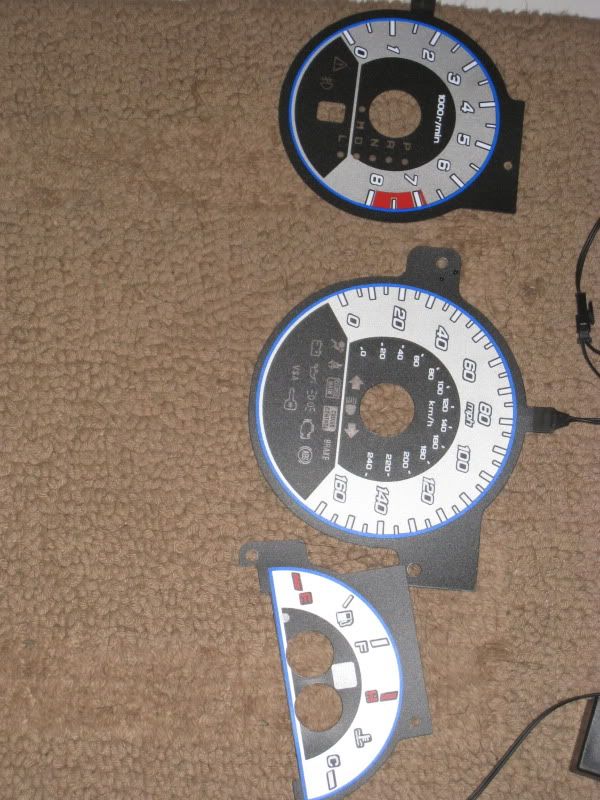
with your fingers, you can pop the inner bezel plastic cover off..8 clips total...2 of which will require a small screwdriver
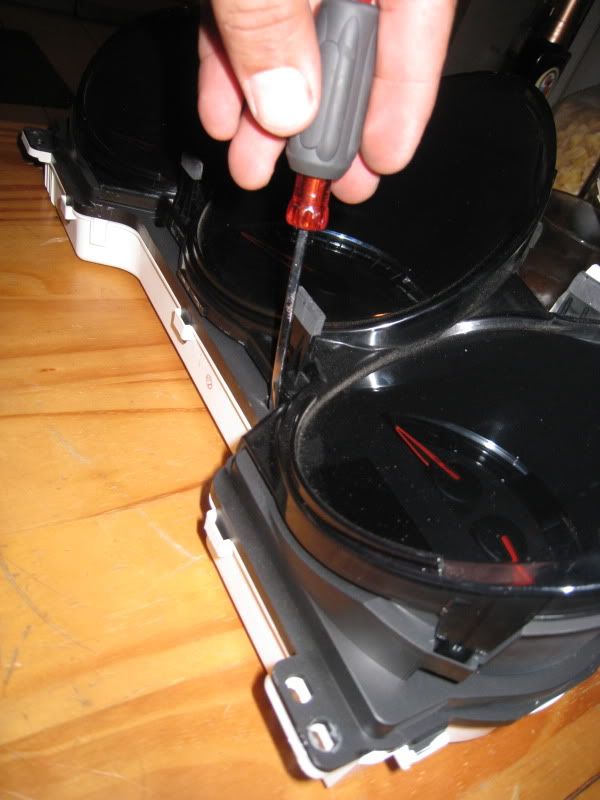
Then, you will take off the inner bezel, same process...work your way around unclipping and pulling.
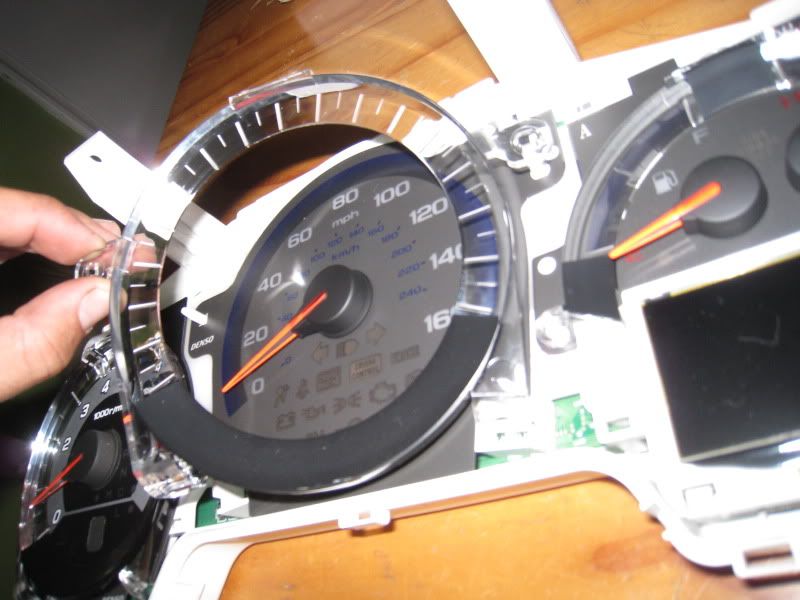
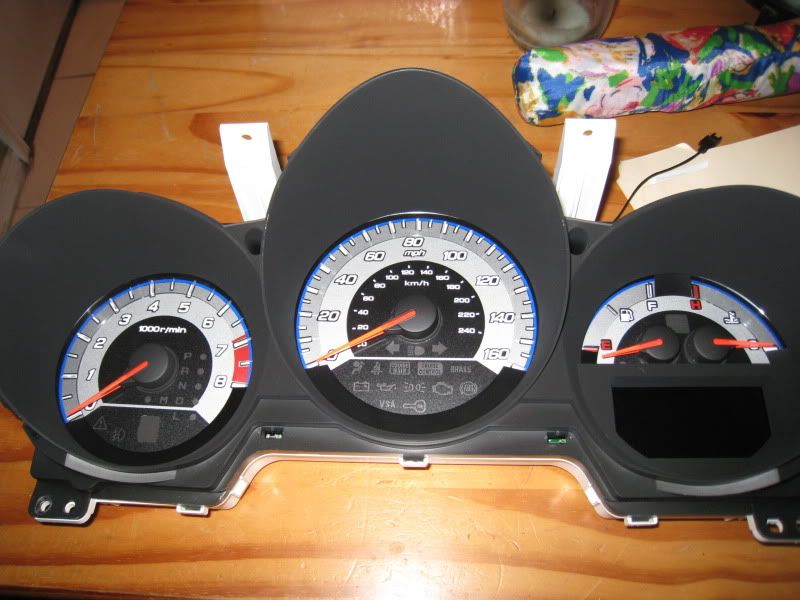
You will be left with this. Now pull the rings around the needs off one by one
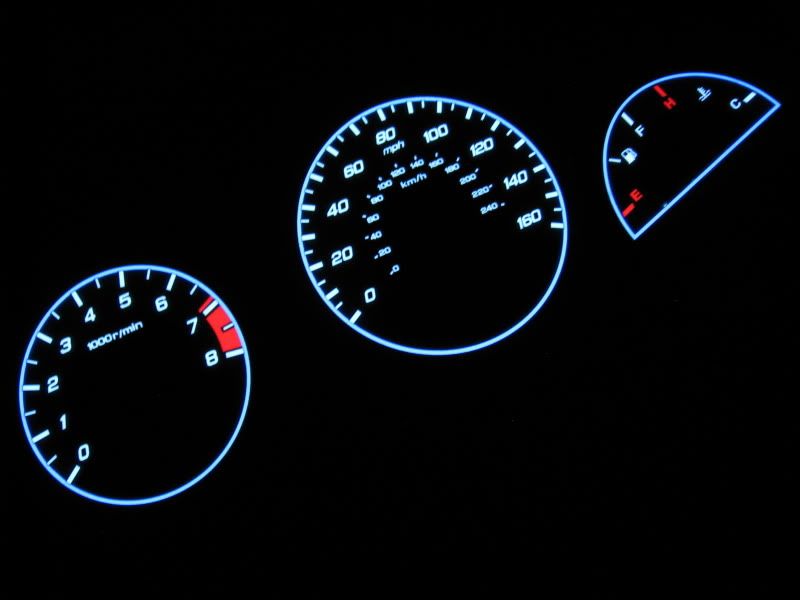
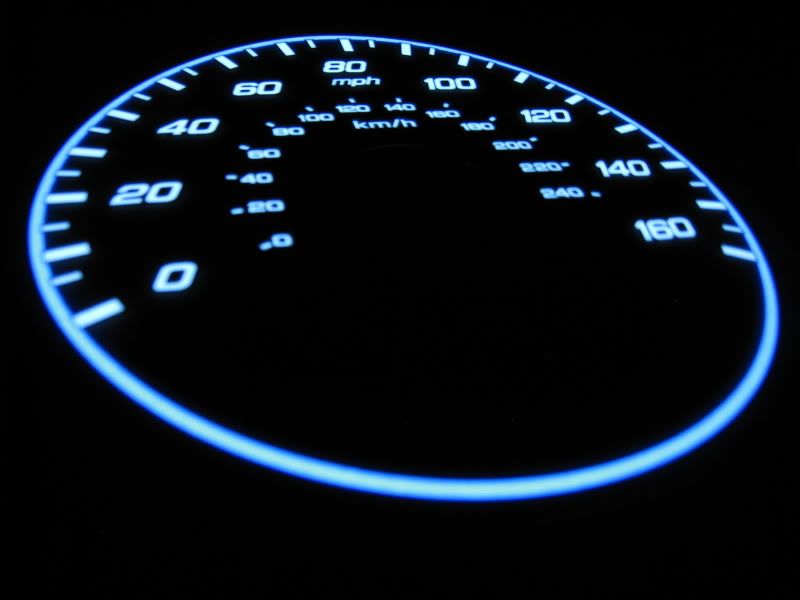
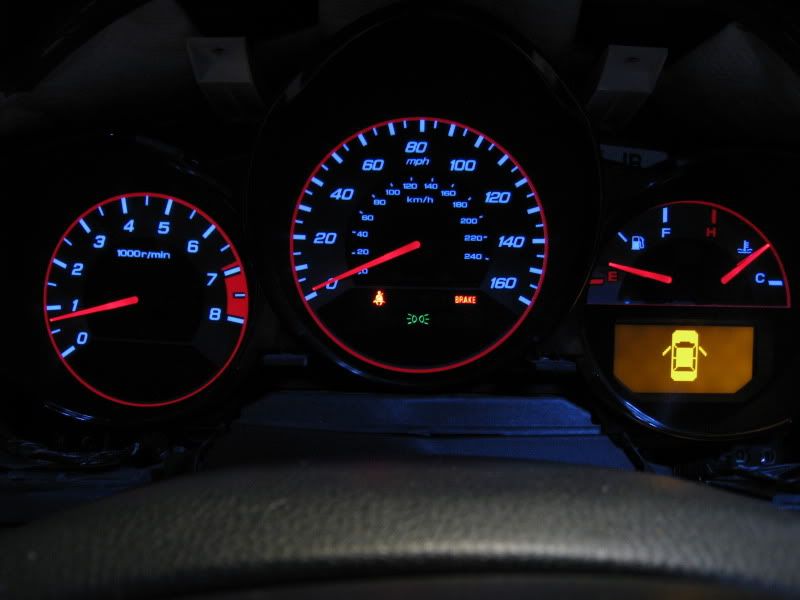
Now, at this point, because I have a 12V portable power source I tested...
NICE! BLUE
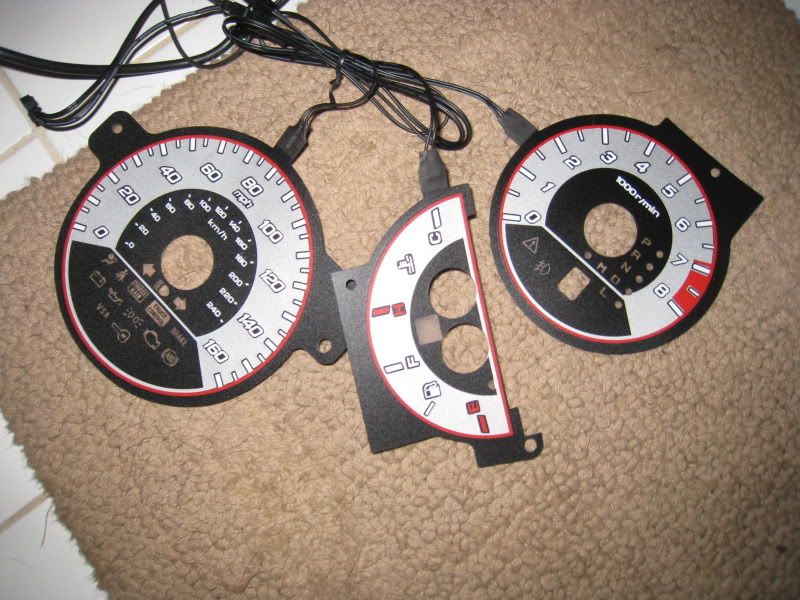
RED

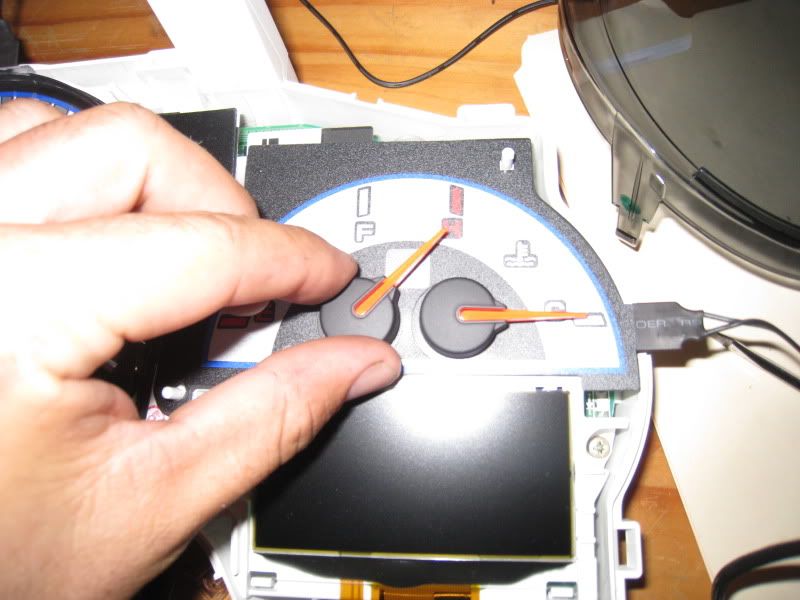
Now, you can slide them into place by sliding over the needles and over your original faceplate. Easy enough. One recommendation I would make is start putting it back together and get it to the point of putting the inner bezel on but not clipped into place...then plug it all back in and line everything up in the car, turn off traction control and turn signals and fog lights so you get as many little icons on as possible for alignment. The needles are electronic so don't worry about moving them around by hand. Actually, to get the gas and temp ones you HAVE to move them by hand, like this
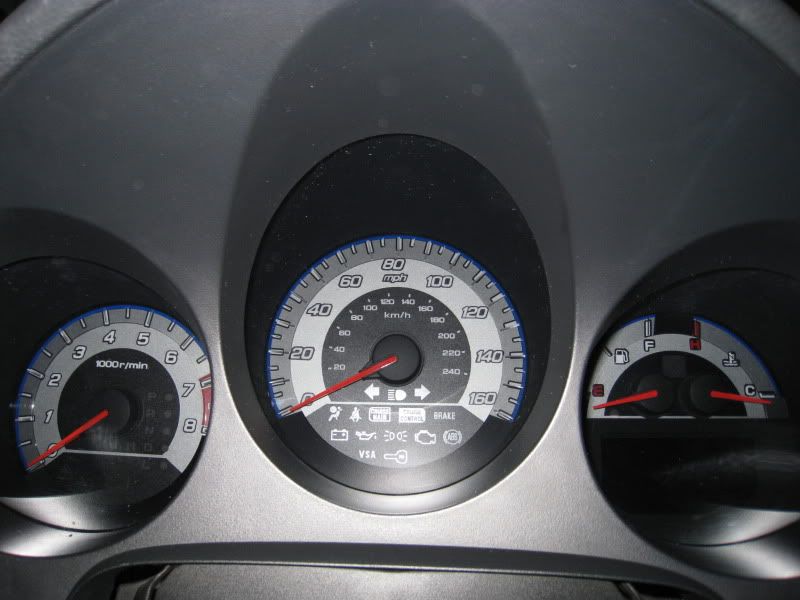
Here's what it will look like when they are all set on there
and with bezel back on (but not clipped into place if you want to avoid redoing it as mentioned above)
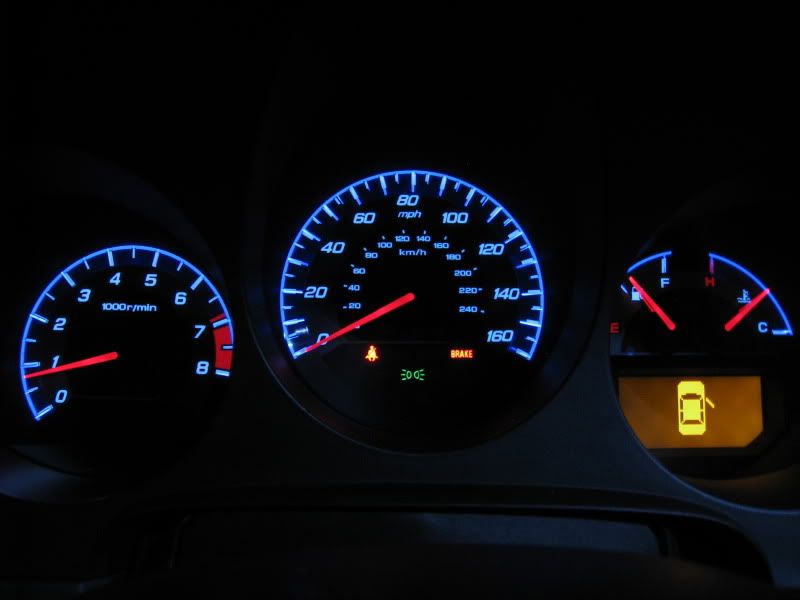
and here it is, assembled and lit up, another tip when putting the smoked plastic lense back on, make sure it's clean inside and out and make sure all clips are in place before applying pressure. Managed to break one of mine off although you won't be able to see it or anything.

ALMOST DONE!
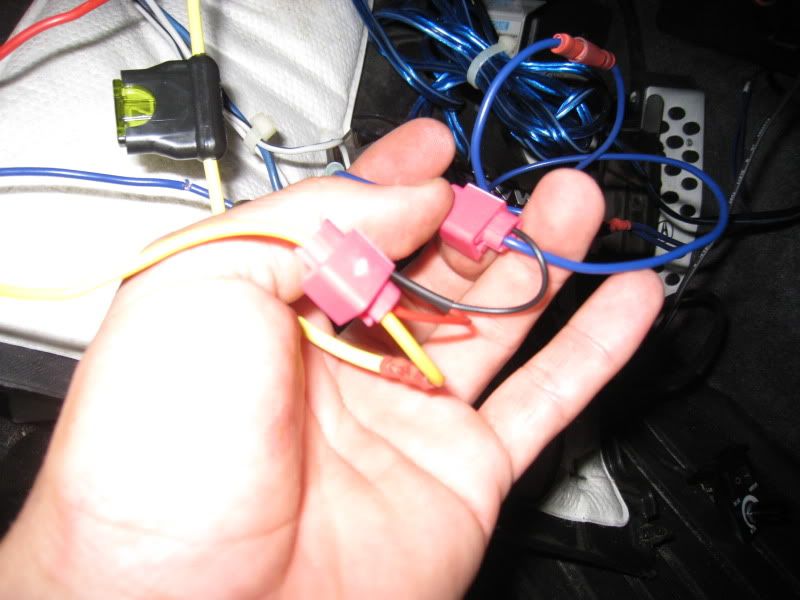
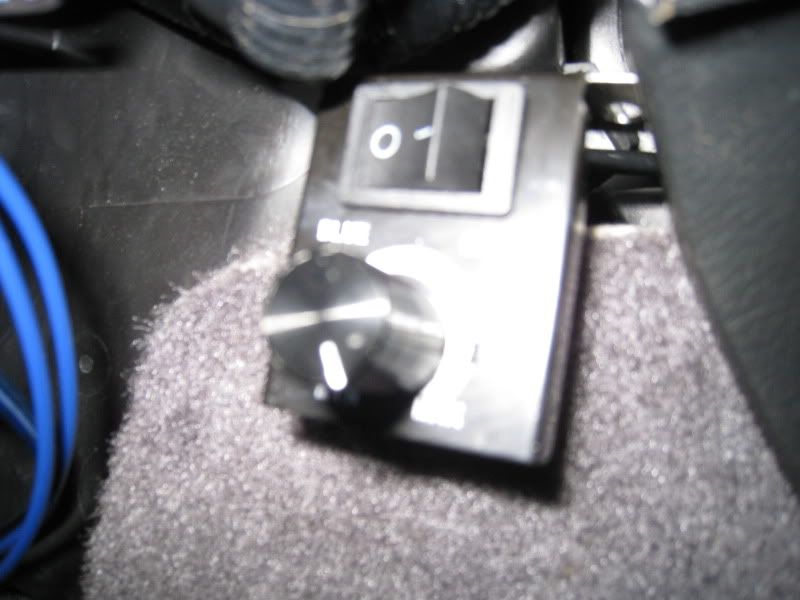
Now route wires down the hole under the bezel on the right side...clip all the clips from the switch to the led's sockets (you'll have 3), now put bezel back into place and screw in and pop front bezel back in.
The wires that dangle down...go ahead and t tap to a ground spot and a 12V parking light wire. Luckily I had already done this for my LED footwell lighting so made it easy. I also didn't want the switch that allows you to go super bright or dim and everything in between visible so I tucked it under the carpet in case I have to get to it.
AND WE ARE DONE! NICE!
Any questions, go ahead and ask away in the thread.
My PM's seem to be filling up fast!
BEFORE & AFTER

Shipping was quick, packaging was great and the product looks well made and extremely well thought out. Kudos on another 3G Acura TL innovation! Thanks to vendors like this, we have a pseudo aftermarket for this US and A made Japanese car!
Anyway, please contact Simon directly in reference to pricing, shipping, product availability. He's easily attainable by email at fish123@speedstersource.com or USR website http://www.uniquestyleracing.com/
So, since I am coming up with this DIY I was a little intimidated but it ended up being VERY simple.
First start by tugging on the outer cluster bezel...bottom center comes out first, the rest will pop right out. Very easy. Unclip 2 green clips behind
Next, there are 4 very obvious screws holding the actual gauges in: 2 top upper, and 2 lower.
Unscrew and the assembly pulls forward really easily.
there are 2 harnesses that need to come out. this is what it looks like when out. All of 3 minutes in.
Now that the gauges are out...
with your fingers, you can pop the inner bezel plastic cover off..8 clips total...2 of which will require a small screwdriver
Then, you will take off the inner bezel, same process...work your way around unclipping and pulling.
You will be left with this. Now pull the rings around the needs off one by one
Now, at this point, because I have a 12V portable power source I tested...
NICE! BLUE
RED
Now, you can slide them into place by sliding over the needles and over your original faceplate. Easy enough. One recommendation I would make is start putting it back together and get it to the point of putting the inner bezel on but not clipped into place...then plug it all back in and line everything up in the car, turn off traction control and turn signals and fog lights so you get as many little icons on as possible for alignment. The needles are electronic so don't worry about moving them around by hand. Actually, to get the gas and temp ones you HAVE to move them by hand, like this
Here's what it will look like when they are all set on there
and with bezel back on (but not clipped into place if you want to avoid redoing it as mentioned above)
and here it is, assembled and lit up, another tip when putting the smoked plastic lense back on, make sure it's clean inside and out and make sure all clips are in place before applying pressure. Managed to break one of mine off although you won't be able to see it or anything.
ALMOST DONE!
Now route wires down the hole under the bezel on the right side...clip all the clips from the switch to the led's sockets (you'll have 3), now put bezel back into place and screw in and pop front bezel back in.
The wires that dangle down...go ahead and t tap to a ground spot and a 12V parking light wire. Luckily I had already done this for my LED footwell lighting so made it easy. I also didn't want the switch that allows you to go super bright or dim and everything in between visible so I tucked it under the carpet in case I have to get to it.
AND WE ARE DONE! NICE!
Any questions, go ahead and ask away in the thread.
My PM's seem to be filling up fast!
BEFORE & AFTER


 08-06-2011, 11:40 PM
#5
^^^Yeah, I noticed that as well. Probably my only and main gripe about them. Other than that, they are very nice looking. The reds definitely look like Type S gauge...but I feel like since base 04's have mostly blue accents, the blue went better.
08-07-2011, 01:12 AM
#6
pretty sick. if I ever got a type s I would def do this mod for my gauges. I prefer the blue cluster from the 07-08 over the red.
also, I never liked the gauges on the 04-06 models. they were way too blue. these look way better than the stock 04-06 gauges. however, they got nothin on my 08 base gauges. perfect mix of white and blue
but these look pretty bad ass nonetheless
also, I never liked the gauges on the 04-06 models. they were way too blue. these look way better than the stock 04-06 gauges. however, they got nothin on my 08 base gauges. perfect mix of white and blue
but these look pretty bad ass nonetheless
Trending Topics
 08-08-2011, 06:43 PM
#11
Forgot to mention, it actually comes with an on/off toggle switch with a dimmer...but it brightens and dims separately from the OEM backlighting when you have your lights off...I wired it to turn the gauges on when I turn on the parking lights.
08-08-2011, 08:15 PM
#14
Race Director
iTrader: (1)
Match these with a retroed type-s bezel and you're money. 


 08-09-2011, 07:29 AM
#20
[Mod Censored Title]
08-09-2011, 11:13 AM
#22
takin care of Business in
iTrader: (5)
Join Date: Jan 2008
Location: Kansas City, MO
Age: 40
Posts: 30,994
Received 4,732 Likes
on
4,064 Posts
damn J....you beat me to it....
the weather in KS has been sucking lately and I am thinking of tackling this tomorrow....
So did you use the switch + brightness control that came with this ? where did you put all of that ?
the weather in KS has been sucking lately and I am thinking of tackling this tomorrow....
So did you use the switch + brightness control that came with this ? where did you put all of that ?
08-09-2011, 06:55 PM
#23
So...after the effort Simon at USR put into these, I felt they deserved a little troubleshooting time.
First of all, since I wired them to my parking lights, they only lit up when lights were on, when off they blocked the numbering so it was a little annoying. I moved my positive to my remote turn ons for my amps and now that's taken care of.
Next up, alignment. Who would have known...the clear plastic things that hold down the faces is what lights up the tick marks that were out of alignment. Got rid of them, and the thing looks flawless now. Since I was going on the mission of doing it anyway, figured I'd change over to red.
Here are the clear bezels
when you clip into place it holds the faceplates in place...only issue is that the RPM's don't have as many alignment pins so it moves over a little and the VSA and Fog switch don't align perfectly. Can be fixed with painters tape or something but since I may go back to blue, I didn't bother. I never have either of those warning lights on anyway.
And here is what it looks like with the annoying tick marks removed.
In addition, I figured out that without the extra blue tick marks...the brightness button doesn't really change brightness for you (actually turn it down to get ride of the faint blue shine from the bottom). You will now use the knob USR provides to change from light blue to light green numbers and brightness control.
Good luck and I apologize for getting it wrong the first time. This product gets an A plus!
08-09-2011, 10:13 PM
#24
Senior Moderator
Is there any chance they will think about redo'ing them or making a V2 version. IMO those look a bit rice since they are a bit "unfinished".
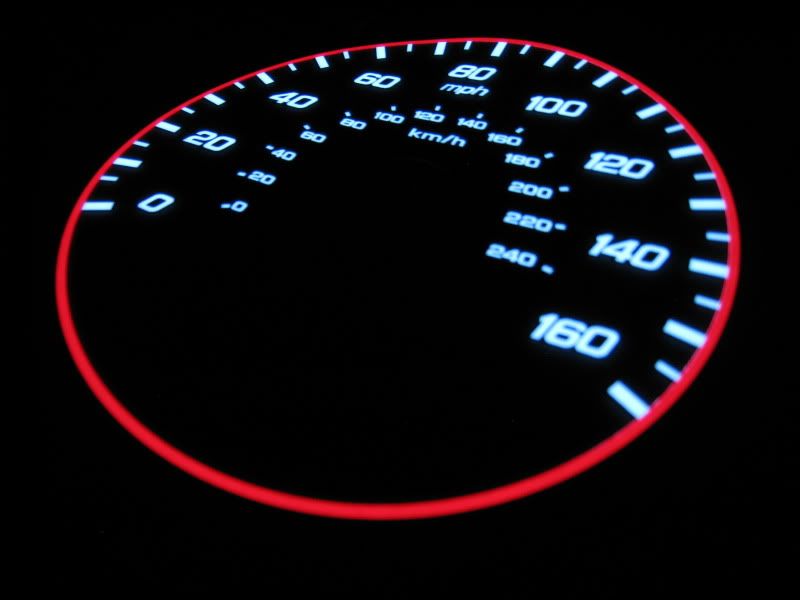
Just look at them, the numbers are FAR off the actual indicators, and to add insult to injury the indicators aren't even lined up with the factory stuff. Just look at the 80MPH marker, it is supposed to be DEAD center of the vertical line that runs down the gauge but it's offset and looks stupid. Look at the RPM gauge, the red-block doesn't even merge completely with the marker at 7K RPMS and at 7.5 and 8K. Also the redline looks a tad to high, isn't supposed to be 6700 RPM? Plus the FAUX brushed/metal finish is what I'd expect from a Chrysler with the indiglo gauges.
Plus look at the PRND lights in this picture:
IT LOOKS LIKE CRAP. I mean I can understand them wanting to have one version for the 6MT guys and the auto guys but COME ON, the least they could have done is increase the radius of the black and eliminate the L light.
IMO the TL-S gauges are MUCH more refined. Look at the round red stripe that goes around, it has breaks where the needle markers are. The gauges have a nice brushed finish to them and as well the gauges have a contrasting black with white KMH so you can read them.

I can appreciate their want to dive into this territory and would be MORE than happy to splurge some cash on a nice set of gauges to update the look a bit, but the current offering they have in their prototype falls WAY short of where I'd expect it to me. IMO, do it right or don't do it at all. That's why I didn't put wheels that were a good deal to my on my 7; that's while I took out my carputer when it kept on failing. If you can forward this to your contact with them, I'd be more than happy to voice my concerns over the phone as well and help them fix it and make it better and even buy an updated set! If they do want to contact me, PM me and I'll send you my phone #.
Just look at them, the numbers are FAR off the actual indicators, and to add insult to injury the indicators aren't even lined up with the factory stuff. Just look at the 80MPH marker, it is supposed to be DEAD center of the vertical line that runs down the gauge but it's offset and looks stupid. Look at the RPM gauge, the red-block doesn't even merge completely with the marker at 7K RPMS and at 7.5 and 8K. Also the redline looks a tad to high, isn't supposed to be 6700 RPM? Plus the FAUX brushed/metal finish is what I'd expect from a Chrysler with the indiglo gauges.
Plus look at the PRND lights in this picture:
IT LOOKS LIKE CRAP. I mean I can understand them wanting to have one version for the 6MT guys and the auto guys but COME ON, the least they could have done is increase the radius of the black and eliminate the L light.
IMO the TL-S gauges are MUCH more refined. Look at the round red stripe that goes around, it has breaks where the needle markers are. The gauges have a nice brushed finish to them and as well the gauges have a contrasting black with white KMH so you can read them.
I can appreciate their want to dive into this territory and would be MORE than happy to splurge some cash on a nice set of gauges to update the look a bit, but the current offering they have in their prototype falls WAY short of where I'd expect it to me. IMO, do it right or don't do it at all. That's why I didn't put wheels that were a good deal to my on my 7; that's while I took out my carputer when it kept on failing. If you can forward this to your contact with them, I'd be more than happy to voice my concerns over the phone as well and help them fix it and make it better and even buy an updated set! If they do want to contact me, PM me and I'll send you my phone #.
Last edited by csmeance; 08-09-2011 at 10:16 PM.
08-09-2011, 10:30 PM
#25
what's wrong with our OEM gauge? putting these on my TL feels like 10+ years ago when I put those for my accord since those gauges weren't even white or blue.
our gauge is already blue and white, plus these look very ricey, not classy at all.
convince me with a better design or something better to overlay my OEM gauge.
Also the font on the RMPs don't even match the mileage gauge.
our gauge is already blue and white, plus these look very ricey, not classy at all.
convince me with a better design or something better to overlay my OEM gauge.
Also the font on the RMPs don't even match the mileage gauge.
08-09-2011, 10:43 PM
#26
Good idea..but there's something missing.. I think the factory gauges are damn near perfect IMO... its gonna take alot to convince me otherwise but im only one person..good luck with everything though
08-10-2011, 07:27 AM
#28
[Mod Censored Title]
i agree with what has been said...something just looks off and almost 'cheapens' the appearance compared to OEM. these need some rework before they get released to the masses. sorry USR....
08-10-2011, 07:50 AM
#29
Race Director
iTrader: (1)
Hey, there is always a beginning to every product. I'm sure it will be tweaked.
08-10-2011, 08:06 AM
#30
Dang...things got rough since last I checked! He's got a group buy thread now where I linked this to it so he can see. I'm sure he'll appreciate all the comments. I will say that it does seem like he's invested some good money in making a quality product...all connections etc are well done. We'll see where it goes!
08-10-2011, 09:38 AM
#32
Race Director
iTrader: (1)
^bingo. sad but completely true
08-10-2011, 10:06 AM
#35
takin care of Business in
iTrader: (5)
Join Date: Jan 2008
Location: Kansas City, MO
Age: 40
Posts: 30,994
Received 4,732 Likes
on
4,064 Posts
I agree with KN_TL...
Lets see how this will hit in the market....
Lets see how this will hit in the market....
08-10-2011, 10:39 AM
#37
[Mod Censored Title]
don't get me wrong...i don't wish bad on anyone...especially on a company like USR (they have great products and great service). i think for the most part people are giving constructive criticism so USR can better the overall appeal of the product. maybe my original criticism sounded more harsh than i meant it too?...it was before my morning coffee so i'll use that as my excuse...ha.
08-10-2011, 10:51 AM
#38
with alcohol and without coffee are the most honest anyone will ever be!
I think USR is established enough to take the criticism well...he'll either not sweat it or he'll make some changes based on the recommendations on here. Overall, at the price and for what it is, I think it's still a great product for people looking to change up the look a bit.
I think USR is established enough to take the criticism well...he'll either not sweat it or he'll make some changes based on the recommendations on here. Overall, at the price and for what it is, I think it's still a great product for people looking to change up the look a bit.
08-10-2011, 10:58 AM
#39
[Mod Censored Title]
^^ha...yup!
anyway, regarding the product, i think the offset of the location of the '80' would drive me insane. i tend toward the perfectionist avenue however, so some may be content with this. if nothing else, Simon should fix the location of the mph designations.
anyway, regarding the product, i think the offset of the location of the '80' would drive me insane. i tend toward the perfectionist avenue however, so some may be content with this. if nothing else, Simon should fix the location of the mph designations.
08-10-2011, 11:51 AM
#40

i agree with what others have said here at first glance i really liked them. But the more i looked these look exactly like the gauges i put in my 93 civic... while they looked much better than the oem gauges in my civic these do not belong in a tl. The numbering looks cheap, but the fact they are not integrated into the oem wiring is what would bother me the most... i like the way the oem gauges stay lit and having to adjust brightness on that nob is cheap imo. If I am going to be changing something like a gauge cluster which i look at for an hour and a half every day it better be damn near perfect.