
Not just another V1 install....


Thread Starter
Suzuka Master
Joined: Mar 2004
Posts: 5,682
Likes: 2
Not just another V1 install....
Take a look:
https://acurazine.com/forums/showthr...51#post1162451
http://www.acurakid.com/v1guage.html
It is NOT the best install - but I have a couple friends with the TL who want the same for their car... I still have a couple extra bezels left so I am going to rework it to find a better place and try to make the install look a little cleaner.
I also plan on replacing the leds with blue ones to match the guages.
Looks like alot of work! Personally I would have just mounted the remote display on the top of the steering column but it is pretty cool to take it all apart like that.
Good job.
Good job.
Thread Starter
Suzuka Master
Joined: Mar 2004
Posts: 5,682
Likes: 2
I need to give credit to ahkim for the original idea:
https://acurazine.com/forums/car-parts-sale-361/fs-adr-valkyries-2-setsonly-m5-replicas-18x7-5-%24490-87747/
Thanks!
https://acurazine.com/forums/car-parts-sale-361/fs-adr-valkyries-2-setsonly-m5-replicas-18x7-5-%24490-87747/
Thanks!

Advanced
Joined: Sep 2003
Posts: 68
Likes: 0
From: Minnesota
Wow, that's looks great. It's funny that I logged onto this site to ask a question about how to take apart the dash, and here it is. Great timing. I'll be picking up my bezel today from Acura and hope to get started this weekend. I hope that you can answer a few questions:
1. What tool did you use to cut the holes into the bezel?
2. Where did you find info or how can I figure out how to run the cable for the remote display?
3. What kind of cable is that rainbow colored stuff? Can i get it from Radioshack?
4. Any plans for a mute button?
Thanks for all the work!
-Andy
1. What tool did you use to cut the holes into the bezel?
2. Where did you find info or how can I figure out how to run the cable for the remote display?
3. What kind of cable is that rainbow colored stuff? Can i get it from Radioshack?
4. Any plans for a mute button?
Thanks for all the work!
-Andy
Thread Starter
Suzuka Master
Joined: Mar 2004
Posts: 5,682
Likes: 2
Originally Posted by ahkim
Wow, that's looks great. It's funny that I logged onto this site to ask a question about how to take apart the dash, and here it is. Great timing. I'll be picking up my bezel today from Acura and hope to get started this weekend. I hope that you can answer a few questions:
1. What tool did you use to cut the holes into the bezel?
2. Where did you find info or how can I figure out how to run the cable for the remote display?
3. What kind of cable is that rainbow colored stuff? Can i get it from Radioshack?
4. Any plans for a mute button?
Thanks for all the work!
-Andy
1. What tool did you use to cut the holes into the bezel?
2. Where did you find info or how can I figure out how to run the cable for the remote display?
3. What kind of cable is that rainbow colored stuff? Can i get it from Radioshack?
4. Any plans for a mute button?
Thanks for all the work!
-Andy
dremmel
2. Where did you find info or how can I figure out how to run the cable for the remote display?
If you use the hardwire kit included with the V1 there are two slots on the adapter - one for the V1 and one for "Acc" which is the remote display... you simply plug in the phone cord to the ACC slot and then into the remote display3. What kind of cable is that rainbow colored stuff? I am not sure, I didn't do the circuit board modification - I am not savvy enough for that. If I had to guess it would be ribbon cable like what is used for IDE hard drives inside computers Can i get it from Radioshack? Probably
4. Any plans for a mute button?
No, I already have a switch next to the VSA and mirror adjustment buttons which cuts power to both the V1 and the alser jammer.
Trending Topics
Thread Starter
Suzuka Master
Joined: Mar 2004
Posts: 5,682
Likes: 2
This technically should be posted in the buy/sell forum..... so delete my post if you must mods...
the one I installed (as the pictures show at the site above)... i am selling... $40 + shipping costs... yes, still works... i did another one with a little cleaner install.. $40 as it was the cost of the remote display itself... the guages bezel was like $12 or something..... and the electrical work I will eat the costs..... so if somebody wants it...PM me...
you can take apart the work from this bezel and do it into your own mod in your own bezel if you want it to look a little cleaner.


Advanced
Joined: Sep 2003
Posts: 68
Likes: 0
From: Minnesota
Vikrampatel, if you have time to talk to whoever did the electrical, could you get some details? I opened up the remote display and found that the leds are very small and not the standard radioshack style. Do you know if the original leds were removed from the board, or was the actual board cut into pieces? Also, could you check if the rainbow cables are just computer IDE cables? Any help would be appreciated.
Do you have pics of your new install?
Thanks
Do you have pics of your new install?
Thanks
Moderator Alumnus
Joined: Dec 2003
Posts: 12,177
Likes: 86
From: NYC/SF/Tokyo/HK
Thanks so much for all the helps from vikrampatel
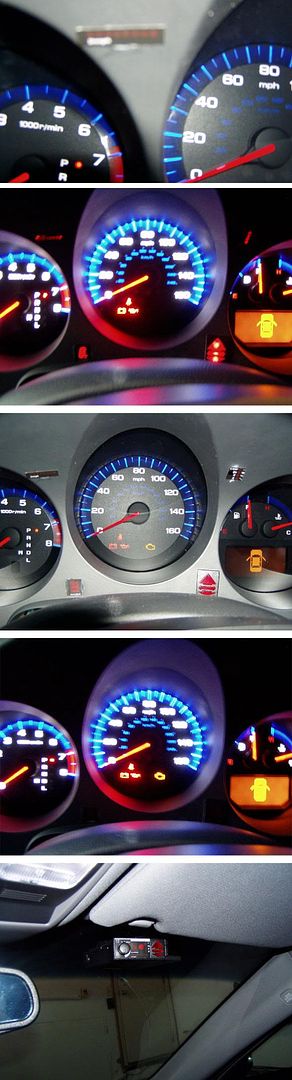
Well, the remote display circuit board was modified for this install. After that, the leds were moved into the bezel around the guages. The sticker that was over the remote display (to show what lights are being lit up) was then placed onto the guages.
The signal strength and radar band display are rather hard to see when driving because of the angle. I will work on finding another place in the bezel to locate them.
For the install - you do the following:
- Lower steering wheel as low as possible
- pull the bezel out from the bottom first.
- There are (I THINK) four clips, two on the bottom right and left, and two on the top part. It will take quite a bit of force to pull it out.
- When you get it loose, there is a green wire harness on BOTH sides of the bezel, connected to the buttons - to control the brightness of the guages - and then the buttons to control the MID
- For the wire connected to control the brightness of the guages the "button" to disconnect the wire is on the RIGHT hand side of the button.
- For the wire connected to the MID controls the button to disconnect the wire is on the LEFT hand side.
- Pull those out of course, then you can pull the entire bezel out of the dash.
- (for my install I had purchased another bezel) so you simply flip the bezel over, and there are four total screws holding in BOTH sets of the buttons, unscrew them and move the buttons over to the new bezel.
- I put the circuit board for the V1 remote display on the very left side, there is a VERY Small amount of room to do this in.
- I ran the phone cord from the remote display circ. board behind the dash, where the wires for the brightness control go through. (When you pull it apart you can see what I am talking about)
- When the phone cord is through that hole, you go under the drivers feet and pull off the plastic piece above the drivers feet and you will have to find the phone cord (wont be very hard) and pull it down and plug it into the direct wire adapter for the V1
- Push the bezel back in place - make sure all the clips get pushed in and are tightly secured again.
- Done!

Thread
Thread Starter
Forum
Replies
Last Post
cdguy707
3G TL Audio, Bluetooth, Electronics & Navigation
42
Feb 23, 2016 04:15 PM
supraken
Car Parts for Sale
7
Sep 23, 2012 06:37 PM
swoosh
Car Parts for Sale
33
Apr 19, 2012 10:01 AM