
Nexus 7 (2012) Dash Install - my experience, links, parts list, and pictures!
 05-19-2014 | 12:14 AM
#1

Nexus 7 (2012) Dash Install - my experience, links, parts list, and pictures!
Initial thoughts on the tablet- I'm happy to say everything seems to be running smoothly (so far...)! 
Links - First and foremost, credit to those that laid down the path for others to follow:
Software
Root the Nexus: http://nexus7.wonderhowto.com/how-to...guide-0148100/
- Background on “rooting,” for those like me who are starting from zero…: http://techgeniuses.wordpress.com/20...-a-custom-rom/
- Timur’s Kernel (power management): http://mehrvarz.github.io/nexus-7-usbrom/
- Apps: MiWi, Torque, Poweramp, Dashcam
Parts list (~$300 all in, links are below for all generic purchases so that you know what I used):
Below is a summary of the process, with a few tips from my “hiccups.”
(I won’t rehash the entire installation, as the other links go through it pretty well (and it did damage my brain a little ).
).

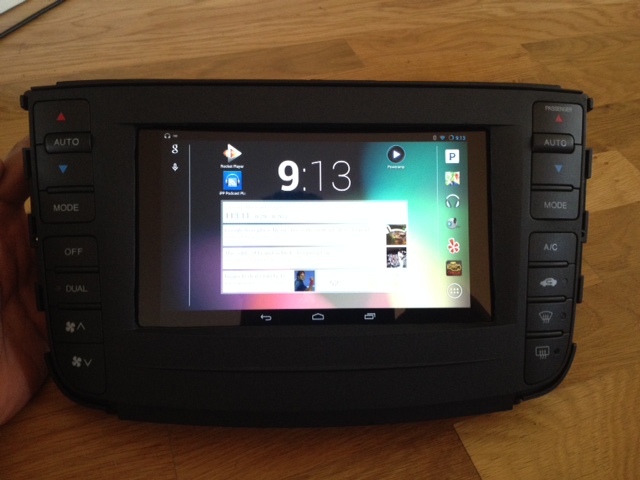
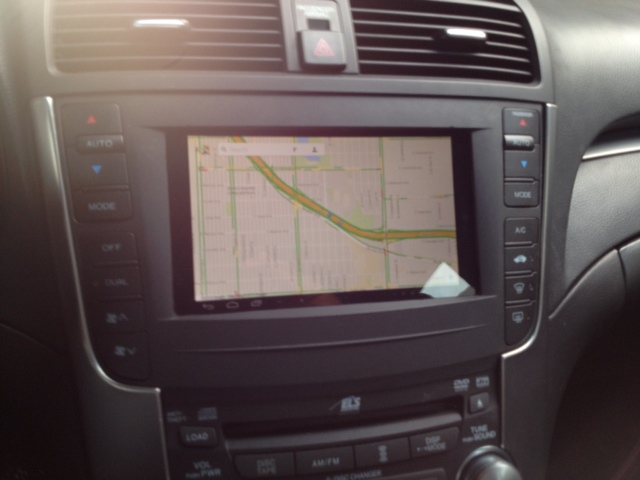
- Awesome! A great upgrade, and recommended for those who want their car’s interior to feel a little more updated. My 2005 TL w/Google Maps (+traffic), Pandora, Yelp, Torque, etc. feels more advanced than my friend’s 2014 Accord w/navigation, etc. Real-time traffic is fantastic (see 2nd from last picture). Graphics quality is far superior. Future upgradeability is another huge plus.
- Audio quality – passed through a DAC (Fiio E7), it’s pretty good and definitely better than my previous streaming of Pandora through my phone, and then bluetooth’ing it to the Blackberry Gateway. Note: I’m not an audiophile…
- Backup camera – works great, but I needed to use the Febon to bridge the camera’s analog output to the Nexus’s digital input. Also, it doesn’t turn on automatically when I switch into reverse, but I prefer this because I only use the camera selectively. I’m not using Tasker right now, but may add that in the future.
Links - First and foremost, credit to those that laid down the path for others to follow:
- Thanks Turbocoop! – https://acurazine.com/forums/3g-tl-audio-bluetooth-electronics-navigation-94/diy-guide-non-nav-acer-tablet-install-lots-pics-872367/
- Thanks 00g! – https://acurazine.com/forums/3g-tl-audio-bluetooth-electronics-navigation-94/successfully-swapped-out-nav-tablet-889608/ – thanks
- Thanks NitroViper! – https://acurazine.com/forums/3g-tl-audio-bluetooth-electronics-navigation-94/diy-acer-tablet-replacing-non-nav-display-relocate-fan-display-lots-pics-891106/
- Thanks mzilvar! – https://acurazine.com/forums/3g-tl-audio-bluetooth-electronics-navigation-94/my-nexus-7-usb-rom-install-902876/
- Chevy Truck - http://forum.xda-developers.com/show....php?t=2113259
- Subaru Sedan - http://linustechtips.com/main/topic/...all-completed/
Software
Root the Nexus: http://nexus7.wonderhowto.com/how-to...guide-0148100/
- Background on “rooting,” for those like me who are starting from zero…: http://techgeniuses.wordpress.com/20...-a-custom-rom/
- Timur’s Kernel (power management): http://mehrvarz.github.io/nexus-7-usbrom/
- Apps: MiWi, Torque, Poweramp, Dashcam
Parts list (~$300 all in, links are below for all generic purchases so that you know what I used):
- Nexus 7 ($90 used)
- Fiio E7 ($50 used) – this is optional, but I’m glad I included it.
- FebOn backup camera video converter ($77 shipped) – optional
- Esky backup camera ($18 shipped, from Amazon, optional)
- OTG Cable ($7 from Amazon)
- USB power converter for cigarette lighter – 2.1 amp output ($6 from Amazon)
- USB 4-port hub ($4 from Monoprice)
- USB Cables (4) ($1 each from Monoprice)
- OBD II adapter - ($10 from Amazon)
- Apps: (i) MiWi ($20 on an unlocked iphone) – creates a wireless network using cell phone data for the Nexus to stream music, navigation, etc., (ii) Torque ($5), (iii) Poweramp ($4), (iv) Dashcam (free)
Below is a summary of the process, with a few tips from my “hiccups.”
(I won’t rehash the entire installation, as the other links go through it pretty well (and it did damage my brain a little
).- Nexus prep – need to root the tablet so that you can install the Timur kernel for efficient power management (so that the tablet isn’t awake all of the time, draining its battery and the car’s battery). Using Timur’s kernel, when the tablet “loses” a power source (e.g. when the car is turned off), it goes into a “deep sleep” that loses ~1% of battery charge per day.
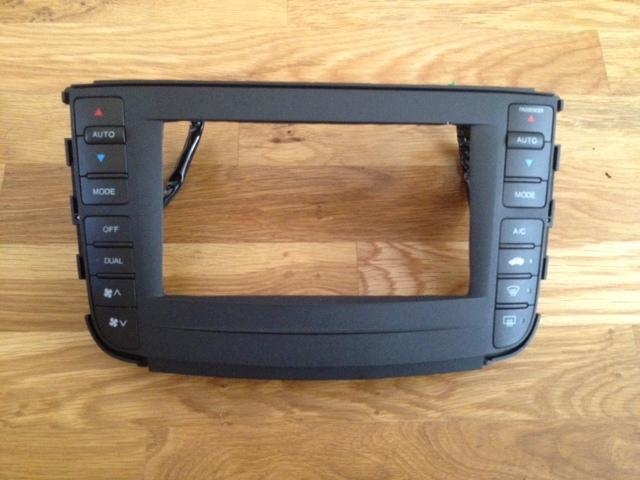
-Tip: I recommend you test the final software installation several times to confirm this “deep sleep” happens and that the USB OTG connections work as they should. Just remove the USB power source from the wall and it should show a countdown timer that it’s “going to sleep.” Sadly, after I installed the tablet in the car, it refused to go to sleep. After a few restarts, it works fine, but I’m keeping a close eye on it. I think it had to do with Rocketplayer, so I restored the system to an earlier version and used Poweramp. I also suggest you also load your music onto the Nexus as part of this “testing” process and make sure it goes to sleep without drawing down significant power while sleeping. Something called Mediaserver kept running in my background - this seems to be a recurring issue from some other installs. - Stereo bezel prep – I purchased a non-navi bezel off ebay for $35, (i) so that I could prep it ahead of the install, and (ii) so that the navigation buttons on my existing setup were “filled in.” Use an Exacto knife to remove the plastic screen and a Dremel-type tool to shave down the interior plastic of the bezel.
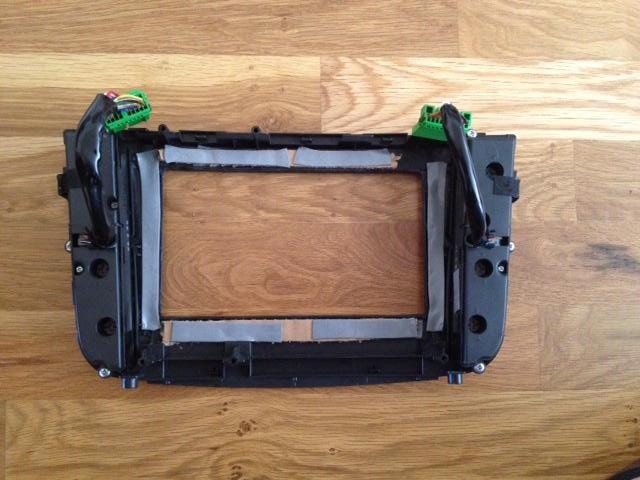
- Tip: The Nexus is a perfect fit – so perfect that I needed to reposition the power plug, and use double-sided tape to brace it. I also used double-sided tape to secure the Nexus to the bezel – this seems to be working well, but I may revisit it in the next few weeks. - Navigation brain – for those with OEM navigation, I believe you still need the “brain" to control air conditioning, etc., so remove that from the OEM bezel, and find a way to stash it behind the Nexus.
- Tip: Be patient. This process took me ~1 hour and caused some frustration, but everything will fit. The OEM bezel attaches to a metal bracket that houses the brain. I tried install the metal bracket+brain to the Nexus together (see picture), but it wouldn’t fit in the dash, so I ended up removing the metal bracket surrounding the brain and then everything fit…barely.


The following 11 users liked this post by triax37:
Anthracite'04 (12-22-2014),
brooklynite (10-22-2014),
BxTrini_TL (07-16-2014),
EvilVirus (06-27-2014),
guitarplayer16 (05-19-2014),
and 6 others liked this post.
05-19-2014 | 11:05 AM
#4
More than happy to contribute! I wouldn't have even thought about this project or known where to start without the threads I linked. My goal for this post is to be a good reference tool for those who are thinking about this project. But I know some references (DAC, Timur's kernel) could still be confusing for those new to the topic. Please feel free to ask questions and I'll do my best to clarify!
Last edited by triax37; 05-19-2014 at 11:10 AM.
The following users liked this post:
EvilVirus (06-27-2014)
05-20-2014 | 01:44 AM
#6
Nexus --> Fiio DAC --> iSimple --> OEM radio (through the XM port)
The Nexus and Fiio volumes are set to their maximum levels, and the OEM stereo is usually between 5-10. Because I'm still routing music through OEM system, the volume controls still work great.
05-20-2014 | 07:29 PM
#7

I think you should add the Isimple to your cost total as not everyone already has one. Also, where did you move your A/C controls to? I've seen some move them to the clock, others below to the storage compartment.
Trending Topics
05-21-2014 | 12:18 AM
#8
As for the A/C, since I had OEM navigation, the A/C display stayed in the clock area and works with the OEM buttons. Those folks with a non-navigation TL do need to move it, and the other threads I linked to show that process.
05-24-2014 | 02:35 PM
#10
Cruisin'
Joined: May 2014
Posts: 24
Likes: 3
From: Montgomery, Alabama
Nice install. I've been considering/researching and gathering a list of supplies to do a Android Mini PC for video install using NavTool. Do you think I get touchscreen to control Android Mini PC? Thanks
05-24-2014 | 11:44 PM
#11
7th Gear
Joined: Sep 2008
Posts: 7
Likes: 2
From the parts list you have, you installed an aftermarket backup camera and then patched the video to display to the N7?
If so, do we know if there is a reliable way to get the built-in backup camera to display on the tablet?
Thanks for any info! This mod is quite impressive!
If so, do we know if there is a reliable way to get the built-in backup camera to display on the tablet?
Thanks for any info! This mod is quite impressive!
05-26-2014 | 02:30 AM
#13
I have the OEM Navi... Would i be able to use the bazel without having to cut it up with an exacto knife? Also which part is the Climate control brain that i would have to disassemble to mount behind the nexus? I just want to make sure i can put things back to stock if needed. thanks in advance!
05-26-2014 | 09:38 AM
#14
This is what wire goes to what,
White wire- power for camera 8V
Red wire -ground for camera
Yellow wire- video ground
Black wire- video signal
Grey wire - shield
Green wire - control signal cameral
So I guess fuse power wire with appropriate 8V fuse and spliced into 12V power wire for the navtool. ground to ground. The video ground and video signal to the composite video connector. That plugs into the navtool "video in" port. And the green signal wire to the reverse light wire. So for the reverse camera to be displayed on the nav screen the navtool must be switched on everytime.
How does that sound Roger?
I have the OEM Navi... Would i be able to use the bazel without having to cut it up with an exacto knife? Also which part is the Climate control brain that i would have to disassemble to mount behind the nexus? I just want to make sure i can put things back to stock if needed. thanks in advance!
 06-03-2014 | 03:47 PM
#16
Music Flow: Nexus --> Fiio DAC --> iSimple --> OEM radio (through the XM port)
Update: still very happy with the unit. In my opinion, the biggest advantages are (i) real-time google maps + traffic (using a cellular data connection), (ii) all of my music and album art loaded into Poweramp, and (iii) streaming Pandora (also req's a data connection). While all of this can be accomplished with a cell phone and Blackberry Gateway bluetooth tied into an iSimple, there is something nice about the OEM-style integration - it's like a refresh to the entire front dash.
06-03-2014 | 04:21 PM
#17

Intermediate
Joined: Nov 2008
Posts: 45
Likes: 1
Good job triax37. Couple of questions
1) Does your clock work on the top display?
2) HFL does that work? Voice commands?
3) What data plan are you using? Since you are using Google maps, I assume you are using a lot of data.
4) How is the glare on the screen?
1) Does your clock work on the top display?
2) HFL does that work? Voice commands?
3) What data plan are you using? Since you are using Google maps, I assume you are using a lot of data.
4) How is the glare on the screen?
06-03-2014 | 06:13 PM
#18
2. HFL works great - no change. Haven't tested voice commands as I never really used them.
3. I'm using a 1 GB plan (Airvoice, $40/month, unlimited voice/texts, pay as you go), but am being pretty selective about using Google Traffic and Pandora. I may upgrade to 3 GB at some point ($50/month). In general, I think it's using about 1 MB/minute for streaming+traffic.
4. Glare is a moderate problem during the day. I wanted a screen cover for protection, but it is not anti-reflective. I'll find the right cover soon.
08-14-2014 | 01:29 PM
#19
Just thought I would post a quick update since I've had a few PMs this week:
1. Overall thoughts/recommendations: I remain very happy with the mod and haven't had any real problems - I absolutely recommend it. Just like any computer, it's a good idea to restart it every so often - I noticed my battery was decreasing 3% day (or more), so I restarted it and am back to a 1% day drain. Also, sometimes it wasn't seeing the USB thumb drive for additional music, but a simple restart fixed this.
2. Favorite App: I seem to use PowerAmp more than any other app - maybe I shouldn't be surprised, as I'm mostly driving to places where I don't need navigation help. It's a great user interface and I love that it shows the album art.
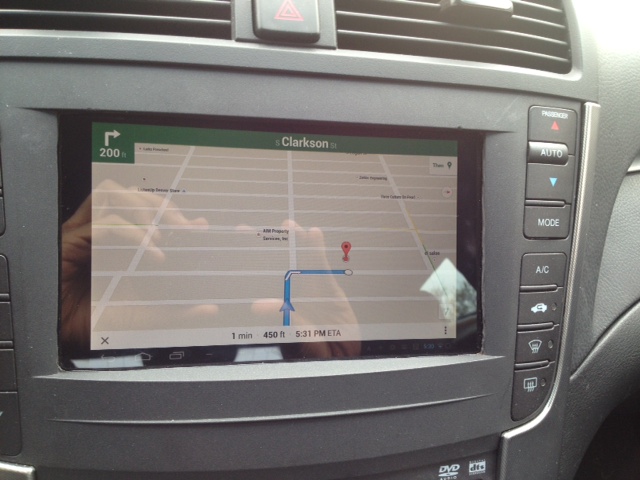
3. Google Maps + Traffic: With the above point noted, having Google Maps+Traffic did save me from a 30-minute traffic nightmare yesterday - a smartphone would do the same trick, but it's nice to see the traffic automatically mapped on my route, which led me to pick a different route.
4. Nexus 2012 vs. Nexus 2013: While I used the Nexus 2012 and don't have any regrets, the Nexus 2013 has a higher resolution screen. The USB-ROM software that provides power-management is free for the 2012, but you need to give a small donation for the 2013. Also, the 2012 version's USB connection port is a little easier to work with than the 2013 version. Just an FYI on this stuff.
1. Overall thoughts/recommendations: I remain very happy with the mod and haven't had any real problems - I absolutely recommend it. Just like any computer, it's a good idea to restart it every so often - I noticed my battery was decreasing 3% day (or more), so I restarted it and am back to a 1% day drain. Also, sometimes it wasn't seeing the USB thumb drive for additional music, but a simple restart fixed this.
2. Favorite App: I seem to use PowerAmp more than any other app - maybe I shouldn't be surprised, as I'm mostly driving to places where I don't need navigation help. It's a great user interface and I love that it shows the album art.
3. Google Maps + Traffic: With the above point noted, having Google Maps+Traffic did save me from a 30-minute traffic nightmare yesterday - a smartphone would do the same trick, but it's nice to see the traffic automatically mapped on my route, which led me to pick a different route.
4. Nexus 2012 vs. Nexus 2013: While I used the Nexus 2012 and don't have any regrets, the Nexus 2013 has a higher resolution screen. The USB-ROM software that provides power-management is free for the 2012, but you need to give a small donation for the 2013. Also, the 2012 version's USB connection port is a little easier to work with than the 2013 version. Just an FYI on this stuff.
08-14-2014 | 09:25 PM
#20
Advanced
Joined: Dec 2011
Posts: 73
Likes: 0
From: Fort Hood, Texas
i wanna do this so bad and i even asked people on the texas regional thread if anyone is down to help me but no one has responded im good with electricals as i work with avionics in helicopters and im great at soldering and wiring but the buttons part is where it confuses me and the step by step instructions you put up are kind of confusing because its only pictures on the bottom and words on top so cant really paint a clear picture on what to do
08-14-2014 | 11:40 PM
#21
i wanna do this so bad and i even asked people on the texas regional thread if anyone is down to help me but no one has responded im good with electricals as i work with avionics in helicopters and im great at soldering and wiring but the buttons part is where it confuses me and the step by step instructions you put up are kind of confusing because its only pictures on the bottom and words on top so cant really paint a clear picture on what to do
The other posts I linked to go through the install, but I hear your point and so here's a quick run-down of the process. It doesn't really require your level of technical knowledge - just patience, ability to install software operating systems, and car stereo/dash removal skills:
1. Nexus - need to "root" the tablet and install a custom software on top of Android (aka a "ROM") that will provide power management and a few other benefits for a car installation.
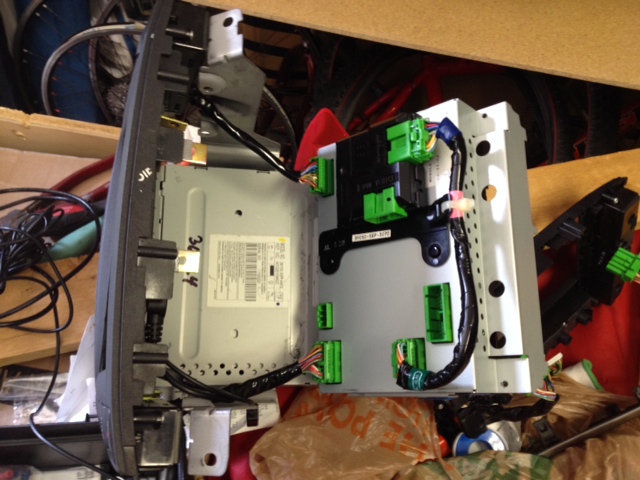
2. You only need to run one cable from the tablet, the mini-USB. However, there isn't enough space in the Acura TL navigation screen area to connect normally - you need to open up the case, move the connection to come through the back case about 0.5" further. This can be at any angle. This is hard to describe, but see my picture of the back case and you'll understand.
3. Remove the Acura TL navigation/stereo. Disconnect harnesses, etc.
4. Separate the navigation screen+brain from the radio.
5. Fit the tablet into the navigation area. I used double-sided tape.
6. You need the navigation brain to control the AC, so reconnect the harnesses and fit it into the dash - it's not easy, but can be done.
7. Reinstall the stereo + tablet as a single piece into the dash. While doing this, route the USB cable from the N7 to (i) the OTG cable, which connects to your 12v power outlet, and (ii) the cable from the OTG into your center console, which connects to the USB hub.
If all that goes well, you should be good to go. Please let us know if we can clarify. Ideally nicely. With punctuation. Good luck!
Last edited by triax37; 08-14-2014 at 11:47 PM.
The following users liked this post:
CTIrish (12-21-2015)
08-15-2014 | 12:20 PM
#24
B-MAC
Joined: Jun 2006
Posts: 186
Likes: 13
From: Tallahassee, FL
Quick question: When you installed the USB ROM on your Nexus did you install the gApps that the Timur Kernel recommended?
I bought a brand new Nexus 7 and am in the process of getting it ready to put into the car.
I bought a brand new Nexus 7 and am in the process of getting it ready to put into the car.
08-15-2014 | 08:18 PM
#25

Advanced
Joined: Jul 2011
Posts: 77
Likes: 2
From: South Florida
Triax37,
Great thread! I have a nexus 7 and am itching to do exactly this. My TL is an 04 but I don't have Navigation.
Which isimple are you using and how well is it working for you?
I purchased and installed an ISIM73 a while ago and had a lot of problems with it. Mainly with the volume. It was just way too low. Thanks.
08-15-2014 | 09:50 PM
#26
Advanced
Joined: Dec 2011
Posts: 73
Likes: 0
From: Fort Hood, Texas
Last time i checked this wasn't grammar class and i don't need any kind of punctuation to get help if someone wants to help grammar shouldn't be a recommendation just because you installed a tablet on your vehicle doesn't make you a genius dude all that shit was very unnecessary fuck out of here with that bullshit if you dont wanna help because there was no punctuation then so be it smh
Impressive - not one period, comma, or any other punctuation. May be part of the reason folks aren't jumping to help you.
The other posts I linked to go through the install, but I hear your point and so here's a quick run-down of the process. It doesn't really require your level of technical knowledge - just patience, ability to install software operating systems, and car stereo/dash removal skills:
1. Nexus - need to "root" the tablet and install a custom software on top of Android (aka a "ROM") that will provide power management and a few other benefits for a car installation.
2. You only need to run one cable from the tablet, the mini-USB. However, there isn't enough space in the Acura TL navigation screen area to connect normally - you need to open up the case, move the connection to come through the back case about 0.5" further. This can be at any angle. This is hard to describe, but see my picture of the back case and you'll understand.
3. Remove the Acura TL navigation/stereo. Disconnect harnesses, etc.
4. Separate the navigation screen+brain from the radio.
5. Fit the tablet into the navigation area. I used double-sided tape.
6. You need the navigation brain to control the AC, so reconnect the harnesses and fit it into the dash - it's not easy, but can be done.
7. Reinstall the stereo + tablet as a single piece into the dash. While doing this, route the USB cable from the N7 to (i) the OTG cable, which connects to your 12v power outlet, and (ii) the cable from the OTG into your center console, which connects to the USB hub.
If all that goes well, you should be good to go. Please let us know if we can clarify. Ideally nicely. With punctuation. Good luck!
08-16-2014 | 11:40 PM
#27
Triax37,
Great thread! I have a nexus 7 and am itching to do exactly this. My TL is an 04 but I don't have Navigation.
Which isimple are you using and how well is it working for you?
I purchased and installed an ISIM73 a while ago and had a lot of problems with it. Mainly with the volume. It was just way too low. Thanks.
Great thread! I have a nexus 7 and am itching to do exactly this. My TL is an 04 but I don't have Navigation.
Which isimple are you using and how well is it working for you?
I purchased and installed an ISIM73 a while ago and had a lot of problems with it. Mainly with the volume. It was just way too low. Thanks.

 10-13-2014 | 09:43 PM
#31
Febon products: SUNRIASE CO., LTD
Contact: SUNRIASE CO., LTD
The following users liked this post:
ReNeGaDe27 (10-13-2014)
10-14-2014 | 09:55 AM
#33
No worries. My best understanding is that if you have a 2004-2006 TL, you need either the iSimple or the GROM units to get the music from the DAC's 3.5mm headphone output to the stereo. DAC --> iSimple/GROM --> OEM Stereo.
The 2007-2008 TL already has a 3.5mm input in the armrest, so you can connect the DAC straight to the stereo without the iSimple or GROM.
UPDATE: BTW, I'm now using the . It's a slightly better DAC, but my main motivation is that it turns on/off with the Nexus, as opposed to e7 which has a battery and required me to turn it on/off. Minor usability improvement, but definitely worth it.
Last edited by triax37; 10-14-2014 at 10:04 AM.
10-15-2014 | 07:11 AM
#34

10th Gear
Joined: Jun 2011
Posts: 11
Likes: 0
From: Mississauga, Canada
I have an 05 so i guess i will need an isimple. Would this suffice?
Isimple Dualink Acura Factory Radio Auxiliary Input Interface FOR Smartphones | eBay
Isimple Dualink Acura Factory Radio Auxiliary Input Interface FOR Smartphones | eBay
10-15-2014 | 09:51 AM
#35
That should work. I used the ISIM73, which is slightly less expensive (link below). I'm told the GROM units allow more functionality, but I haven't dug into the topic. There are some threads on Acurazine if you're curious.
Isimple Gateway ISIM73 | eBay
Isimple Gateway ISIM73 | eBay
10-15-2014 | 02:28 PM
#37
I recalled something about the GROM allowing the steering wheel buttons to move between album tracks, but I can't find a link. Everything works as you would expect if you use the tablet + iSimple.
10-16-2014 | 11:37 PM
#39
Several differences for the units, outlined more quickly in the page linked below (mostly it's better screen resolution in the 2013 unit).
Nexus 7 (2013) vs Nexus 7 (2012): by the numbers
The other big difference is actually in the installation - the 2012 unit is easier because the micro-USB connection is not soldered to the board, so it can be moved around like I illustrated in the thread (see picture of the back of the unit - I cut the back cover so that I could move the USB connection point). This is needed because the Nexus 7 (both 2012/2013) fit so perfectly into the space that there is no room for the USB cable. Folks that have installed the 2013 Nexus 7 drill into the plastic housing for the AC buttons.
Less important: the software kernel that you install on the N7 is free for the 2012 hardware, but you need to message Timur and pay him ($20?) for the 2013 version.
10-17-2014 | 08:04 AM
#40
Advanced
Joined: Oct 2014
Posts: 59
Likes: 19
From: Greenville, North Carolina
triax37: I'm sure you've probably heard of Waze (bought by Google awhile back), but if not, you should give it a try. I've gotten 100's of people into it where I work (most do a lot of traveling), and they've said it's a life saver.
Simply food for thought.
Simply food for thought.
The following users liked this post:
triax37 (10-17-2014)