
DIY Guide: Non-Nav Acer Tablet Install-lots of pics

DIY Guide: Non-Nav Acer Tablet Install-lots of pics
Ive spent the past 3 weeks getting the parts together, researching and fabricating the stuff I needed for this install. I kept a pretty good list because I wanted to write this DIY to help anyone else out on here who wants to do the same thing. I have a lot of experience with electronics and vehicles, so if you haven't done any installs or soldering before, I wouldnt recommend doing this because even with my skills, it was a major bitch. I would like to thank Gryphter for his help and giving me pointers as I did this, as he was the first member to put this tablet in his TL, only difference being his car has factory Nav.
DISCLAIMER: This is merely a guide to show anyone interested how I did this install, I am not responsible if you break your own shit, screw up your car, waste your money, or hurt yourself trying any of this. On a difficulty scale of 1-10, this was a solid 9
Summary: This is an install of an Acer A100 7" tablet in an 04 non-nav TL. I relocated the AC display to the area where the OEM clock was. I also installed a USB adapter and ran a USB cable to the center console. There are a lot of different ways to go about this but I will write how I did it and why, and also other ways you could possibly do it.
Part 1- Getting parts together:
Acer 100 ($180)
Screen protector for A100 (anti glare)
USAspec or DICE adapter with RCA inputs ($100-150)
Spare radio/AC display so you wont have to drive without music for days($30) - What do we have here???
Red LED strip if you relocate the AC display like I did ($15.99 at autozone for a set of two 4" strips that work perfectly)
Micro SD card for memory expansion (I used a 32GB- $30)
Tiny computer fan ($5)
3' ribbon cable w/ at least 27 wires (I used one that goes in PCs to connect the hard drives, got it at radio shack for $5)
6' USB cord
90 degree micro USB to USB 2.0 adapter
3' 3.5mm to 'Y' RCA cable
90 degree 3.5mm headphone jack adapter
Wiring (20' of 16ga, 40' of 22ga, and 1' of 30ga is enough)
Bondo, putty knife, sandpaper and a flat file
Heat shrink, male/female connectors, solder, soldering iron, electrical tape, epoxy (both 1min and 5+min), momentary on/off switch, razor knife, measuring tape, masking tape, common tools like screwdrivers and all that obviously...
Part 2- Preparing and fabricating:
Once you have what you need you can remove your interior, I wont get into that because if you cant figure that out you have no business attempting this... Stow everything somewhere safe except for the radio/AC display screen and the upper AC vents/clock piece. First I relocated the AC display screen (I have to credit Azine member ncutl with the idea to relocate it above, I was originally planning to move the whole AC/radio display below where the flip open compartments are).
You will first need to take the metal back off of the display unit, then remove the screws holding the circuit board to the plastic panel. Pull the AC/radio display board off of the plastic, it will be stuck on with double sided tape around the LCD displays but just pull on it and it'll come off.
On the back of the circuit board (opposite the LCD displays), you will see where the pins come through that go to the AC display. If you have access to a $20,000 soldering station like I do at work go ahead and use that, but since you dont Ill tell you how to do it the regular way...

As you can see, the pins go through the board and all the way to the screen, so get some fine point wire snips and cut each wire, leaving about a half inch sticking up out of the board so you can have something to solder to. In my pics I have the pins desoldered and removed from the board completely, but most people dont have tools to do that. Next you will solder the ribbon cable, one wire at a time, from the board to the display. MAKE SURE THEY ALL MATCH UP or else your display will be all mixed up Im guessing.


Once you have the AC display extended about 3', wrap a towel around the LCD display so it doesnt get scratched. Next you will have to prepare the bezel for the new different sized Acer screen. I had the dimensions written down somewhere but I lost it, I know it was only like 5/16 off each side and about 7 or 9/16 up from the bottom that I cut it. DONT use those measurements, just wait til you get the A100 and measure the screen yourself, mine came out perfect. Once you have it marked, tape it off along the lines with masking tape and score it with a SHARP razor knife, keep cutting along that score line until you think its deep enough, then move on to the next cut, and then the third one. After they are all pretty deep, flip it over and push on it near a corner and it will snap, then you can pull the clear plexi right off. SAVE THE CLEAR PIECE- you will need it when you put the AC display up top.
Also, put a piece of masking tape, with another piece taped to the sticky side underneath so it doesnt stick to the plexi, this is to keep the back of it free of debris. Like in this pic:

Score lines:

After you peel off the plexi, it is easy to finish cutting through the plastic and then tear it off too, leaving you with a cutout the perfect size for the tablet's screen:

Test fit:

Now comes the fun part- filling in the space with body filler to leave a smooth "factory" looking finish. You will need some bondo and a putty knife and I used 400 grit sandpaper and a flat file for the inside edged to keep them square. Oh, I also cut off that dumb ass little plastic ridge sticking up right below the display.


While youre at it, make sure you clean up the back of the area because you want the screen to sit as flush as possible, you will need to cut off all of the annoying little plastic nubs and tabs sticking up every where...


I put 3M Di Noc carbon fiber over it so I didnt have to worry about it being perfect, if you are planning to paint it, this process will take much longer...


Next, since we have the clear plexiglass from the old screen, we can begin to mount the AC display in the opening where the worthless clock used to be. Grab the LED strips you bought, cut one in half on the line where it says you can cut it, and then fit them in the slot on the back of the AC display. It should be a perfect fit like mine. Electrical tape the living shit out of it, so no light escapes.

Test it to make sure there are no dark spots.

Now I dont have pictures, but you will have to fill in the sides of the opening with two plastic pieces because the plexi doesnt reach. Either that or buy a new plexi piece, paint the back where the display doesnt show, and use that. That would look better I think, but I didnt think of it til just now, damn... Then mix up some 5 minute epoxy and once it begins to harden after like 3 minutes, make sure it is EXACTLY centered and hold it there til its dry. Then fill in all around it with more epoxy. You will end up with something like this:


In hindsight, I probably should have put some resistors in because I think the LEDs are too bright, but its good for now:


I mounted the old circuit board with the radio display still on it back in the metal housing it was in, just to protect it and keep it from shorting out. I also made a badass cover for it out of an aluminum baking pan bottom, I taped cardboard to the ear of it incase it got smashed so it wont short out... Im sure there are better ways of doing it, but I dont have many resources living in the barracks on a military base.

If you look closely, you can see where the old board and its metal box go, they cram way up in there under the center speaker (or in my case- radar detector speaker)

Thats about it for the fabricating, you still have some more wiring to do, but nothing like that bastard of an AC display... oh nevermind, you still have to relocate the switch for the tablet... that was the worst part
Part 3- Wiring and mounting of tablet:
Because the old display board is being crammed up in the upper dash, the harnesses from the AC control buttons wont reach (the other 2 do reach thank god). You will need about 40 feet of 20 or 22 gauge wire, cut a shitload of 18" strips, and cut up another shitload of heat shrink sections about an inch long each. Cut the factory harnesses in the middle and start soldering, again- make sure to match them all up correctly. It is easier this time because they are colored. One important thing: Remember to tap an extra wire into the orange wire I have marked in a pic below, that is the one you want to use for the power to the red AC display LEDs, it dims them when you turn the light on.
The orange wire on the driver's side harness is the one you want to use.


I couldnt find any 22 gauge handy so I had to use 18, it was a pain in the ass especially when it came time to run the harnesses in the dash. Do yourself a favor and find some 22 ga wire.


Here comes the critical part- taking apart the A100 and mounting the screen and circuit boards to the dash piece.
Here is the only disassembly video I could find online, sorry its in russian or something but you dont need to know what hes saying:
You dont have to take the main motherboard off at all unless you are going to be putting in the USB adapter like I did, and honestly now that I look back at it, I wouldnt recommend doing it how I did. It was a lot of extra work and Im lucky I didnt break anything. You will have to move the small 'L' shaped board where the on/off switch and the 3.5mm audio jack are, but its only 2 screws. I had to angle the motherboard up enough so the 90 degree micro USB adapter could fit, I just epoxied the tiny fan below it and used it as a bracket to hold the board up. I doubt you really need a fan with a non nav because there is so much open space back there it shouldnt overheat, but in the summer it will help to have it, and I got it for free.
Here is the motherboard, notice the little green wire in the bottom right of the pic- I soldered on this wire because the board wasnt going to have a good ground like it did when it was mounted to the chassis of the tablet, you need to run a ground wire and screw it down with one of the old screws. I did the same thing for the smaller board too.

First you will epoxy the screen part to the bezel, again- once the epoxy starts to harden, make sure its centered perfectly- you only get one shot.

This is it with the board and the battery mounted:


I relocated the GPS antenna here to the top and epoxied it to the plastic:

Closeup of the USB connector and the power cable:

With the power cable I just took the wall charger and cut the cord, leaving the tip on that plugs into the tablet, that way I could test it before I installed it (I have another wall charger), and I just plugged it in and taped over it once I got it in the car.
Right here is the biggest POS out of the whole ordeal. I had to take this tiny ass little momentary on/off power switch off of this tiny ass little circuit board and wire extensions onto it so I could use a normal human sized power button instead of this little fucker in the pic:

Good think I have a $20K solder station at work I can use, but it was still a bitch. Radio shack sells a solder kit with some fine points that might work, you just need really good eyes and be careful fnot to burn the board or overheat it cause the runs will come off. Oh, and good luck finding 30 gauge wire, you're probably going to have to order it online. You need to use 30ga because anything too big will just rip the runs right off the circuit card if they get pulled too hard, and it is hard to get them in there without touching. Just cut three 4" strips of the 30ga and solder them to the runs once you get the switch off. Solder two 5' pieces of 22ga wire to the ends of those (one to the center wire and one to both outer wires together), that will go to your momentary switch.
I think at this point I stopped wasting time taking pictures because I was just trying to get finished and get the hell out of there. I wish I had some pics though to show how it looks. Once you get the wires on there, the two outer ones can be ran together because they are both ground, and the center one needs to stay by itself and go to the other side of the momentary switch. It just needs to be shorted on for a few seconds to tell the tablet to turn on, then you release it until you want to turn off the display or power off the tablet; just like the miniature button that used to be on the circuit board, holy shit!!!!!

Heres a teaser pic, Im exhausted right now so Im gonna fiinish this up tomorrow. Im sure Ill think of some more stuff I missed, and Ill take good daytime pics and maybe a video of it too:

DISCLAIMER: This is merely a guide to show anyone interested how I did this install, I am not responsible if you break your own shit, screw up your car, waste your money, or hurt yourself trying any of this. On a difficulty scale of 1-10, this was a solid 9
Summary: This is an install of an Acer A100 7" tablet in an 04 non-nav TL. I relocated the AC display to the area where the OEM clock was. I also installed a USB adapter and ran a USB cable to the center console. There are a lot of different ways to go about this but I will write how I did it and why, and also other ways you could possibly do it.
Part 1- Getting parts together:
Acer 100 ($180)
Screen protector for A100 (anti glare)
USAspec or DICE adapter with RCA inputs ($100-150)
Spare radio/AC display so you wont have to drive without music for days($30) - What do we have here???
Red LED strip if you relocate the AC display like I did ($15.99 at autozone for a set of two 4" strips that work perfectly)
Micro SD card for memory expansion (I used a 32GB- $30)
Tiny computer fan ($5)
3' ribbon cable w/ at least 27 wires (I used one that goes in PCs to connect the hard drives, got it at radio shack for $5)
6' USB cord
90 degree micro USB to USB 2.0 adapter
3' 3.5mm to 'Y' RCA cable
90 degree 3.5mm headphone jack adapter
Wiring (20' of 16ga, 40' of 22ga, and 1' of 30ga is enough)
Bondo, putty knife, sandpaper and a flat file
Heat shrink, male/female connectors, solder, soldering iron, electrical tape, epoxy (both 1min and 5+min), momentary on/off switch, razor knife, measuring tape, masking tape, common tools like screwdrivers and all that obviously...
Part 2- Preparing and fabricating:
Once you have what you need you can remove your interior, I wont get into that because if you cant figure that out you have no business attempting this... Stow everything somewhere safe except for the radio/AC display screen and the upper AC vents/clock piece. First I relocated the AC display screen (I have to credit Azine member ncutl with the idea to relocate it above, I was originally planning to move the whole AC/radio display below where the flip open compartments are).
You will first need to take the metal back off of the display unit, then remove the screws holding the circuit board to the plastic panel. Pull the AC/radio display board off of the plastic, it will be stuck on with double sided tape around the LCD displays but just pull on it and it'll come off.
On the back of the circuit board (opposite the LCD displays), you will see where the pins come through that go to the AC display. If you have access to a $20,000 soldering station like I do at work go ahead and use that, but since you dont Ill tell you how to do it the regular way...
As you can see, the pins go through the board and all the way to the screen, so get some fine point wire snips and cut each wire, leaving about a half inch sticking up out of the board so you can have something to solder to. In my pics I have the pins desoldered and removed from the board completely, but most people dont have tools to do that. Next you will solder the ribbon cable, one wire at a time, from the board to the display. MAKE SURE THEY ALL MATCH UP or else your display will be all mixed up Im guessing.
Once you have the AC display extended about 3', wrap a towel around the LCD display so it doesnt get scratched. Next you will have to prepare the bezel for the new different sized Acer screen. I had the dimensions written down somewhere but I lost it, I know it was only like 5/16 off each side and about 7 or 9/16 up from the bottom that I cut it. DONT use those measurements, just wait til you get the A100 and measure the screen yourself, mine came out perfect. Once you have it marked, tape it off along the lines with masking tape and score it with a SHARP razor knife, keep cutting along that score line until you think its deep enough, then move on to the next cut, and then the third one. After they are all pretty deep, flip it over and push on it near a corner and it will snap, then you can pull the clear plexi right off. SAVE THE CLEAR PIECE- you will need it when you put the AC display up top.
Also, put a piece of masking tape, with another piece taped to the sticky side underneath so it doesnt stick to the plexi, this is to keep the back of it free of debris. Like in this pic:
Score lines:
After you peel off the plexi, it is easy to finish cutting through the plastic and then tear it off too, leaving you with a cutout the perfect size for the tablet's screen:
Test fit:
Now comes the fun part- filling in the space with body filler to leave a smooth "factory" looking finish. You will need some bondo and a putty knife and I used 400 grit sandpaper and a flat file for the inside edged to keep them square. Oh, I also cut off that dumb ass little plastic ridge sticking up right below the display.
While youre at it, make sure you clean up the back of the area because you want the screen to sit as flush as possible, you will need to cut off all of the annoying little plastic nubs and tabs sticking up every where...
I put 3M Di Noc carbon fiber over it so I didnt have to worry about it being perfect, if you are planning to paint it, this process will take much longer...
Next, since we have the clear plexiglass from the old screen, we can begin to mount the AC display in the opening where the worthless clock used to be. Grab the LED strips you bought, cut one in half on the line where it says you can cut it, and then fit them in the slot on the back of the AC display. It should be a perfect fit like mine. Electrical tape the living shit out of it, so no light escapes.
Test it to make sure there are no dark spots.
Now I dont have pictures, but you will have to fill in the sides of the opening with two plastic pieces because the plexi doesnt reach. Either that or buy a new plexi piece, paint the back where the display doesnt show, and use that. That would look better I think, but I didnt think of it til just now, damn... Then mix up some 5 minute epoxy and once it begins to harden after like 3 minutes, make sure it is EXACTLY centered and hold it there til its dry. Then fill in all around it with more epoxy. You will end up with something like this:
In hindsight, I probably should have put some resistors in because I think the LEDs are too bright, but its good for now:
I mounted the old circuit board with the radio display still on it back in the metal housing it was in, just to protect it and keep it from shorting out. I also made a badass cover for it out of an aluminum baking pan bottom, I taped cardboard to the ear of it incase it got smashed so it wont short out... Im sure there are better ways of doing it, but I dont have many resources living in the barracks on a military base.
If you look closely, you can see where the old board and its metal box go, they cram way up in there under the center speaker (or in my case- radar detector speaker)
Thats about it for the fabricating, you still have some more wiring to do, but nothing like that bastard of an AC display... oh nevermind, you still have to relocate the switch for the tablet... that was the worst part
Part 3- Wiring and mounting of tablet:
Because the old display board is being crammed up in the upper dash, the harnesses from the AC control buttons wont reach (the other 2 do reach thank god). You will need about 40 feet of 20 or 22 gauge wire, cut a shitload of 18" strips, and cut up another shitload of heat shrink sections about an inch long each. Cut the factory harnesses in the middle and start soldering, again- make sure to match them all up correctly. It is easier this time because they are colored. One important thing: Remember to tap an extra wire into the orange wire I have marked in a pic below, that is the one you want to use for the power to the red AC display LEDs, it dims them when you turn the light on.
The orange wire on the driver's side harness is the one you want to use.
I couldnt find any 22 gauge handy so I had to use 18, it was a pain in the ass especially when it came time to run the harnesses in the dash. Do yourself a favor and find some 22 ga wire.
Here comes the critical part- taking apart the A100 and mounting the screen and circuit boards to the dash piece.
Here is the only disassembly video I could find online, sorry its in russian or something but you dont need to know what hes saying:
You dont have to take the main motherboard off at all unless you are going to be putting in the USB adapter like I did, and honestly now that I look back at it, I wouldnt recommend doing it how I did. It was a lot of extra work and Im lucky I didnt break anything. You will have to move the small 'L' shaped board where the on/off switch and the 3.5mm audio jack are, but its only 2 screws. I had to angle the motherboard up enough so the 90 degree micro USB adapter could fit, I just epoxied the tiny fan below it and used it as a bracket to hold the board up. I doubt you really need a fan with a non nav because there is so much open space back there it shouldnt overheat, but in the summer it will help to have it, and I got it for free.
Here is the motherboard, notice the little green wire in the bottom right of the pic- I soldered on this wire because the board wasnt going to have a good ground like it did when it was mounted to the chassis of the tablet, you need to run a ground wire and screw it down with one of the old screws. I did the same thing for the smaller board too.
First you will epoxy the screen part to the bezel, again- once the epoxy starts to harden, make sure its centered perfectly- you only get one shot.
This is it with the board and the battery mounted:
I relocated the GPS antenna here to the top and epoxied it to the plastic:
Closeup of the USB connector and the power cable:
With the power cable I just took the wall charger and cut the cord, leaving the tip on that plugs into the tablet, that way I could test it before I installed it (I have another wall charger), and I just plugged it in and taped over it once I got it in the car.
Right here is the biggest POS out of the whole ordeal. I had to take this tiny ass little momentary on/off power switch off of this tiny ass little circuit board and wire extensions onto it so I could use a normal human sized power button instead of this little fucker in the pic:
Good think I have a $20K solder station at work I can use, but it was still a bitch. Radio shack sells a solder kit with some fine points that might work, you just need really good eyes and be careful fnot to burn the board or overheat it cause the runs will come off. Oh, and good luck finding 30 gauge wire, you're probably going to have to order it online. You need to use 30ga because anything too big will just rip the runs right off the circuit card if they get pulled too hard, and it is hard to get them in there without touching. Just cut three 4" strips of the 30ga and solder them to the runs once you get the switch off. Solder two 5' pieces of 22ga wire to the ends of those (one to the center wire and one to both outer wires together), that will go to your momentary switch.
I think at this point I stopped wasting time taking pictures because I was just trying to get finished and get the hell out of there. I wish I had some pics though to show how it looks. Once you get the wires on there, the two outer ones can be ran together because they are both ground, and the center one needs to stay by itself and go to the other side of the momentary switch. It just needs to be shorted on for a few seconds to tell the tablet to turn on, then you release it until you want to turn off the display or power off the tablet; just like the miniature button that used to be on the circuit board, holy shit!!!!!
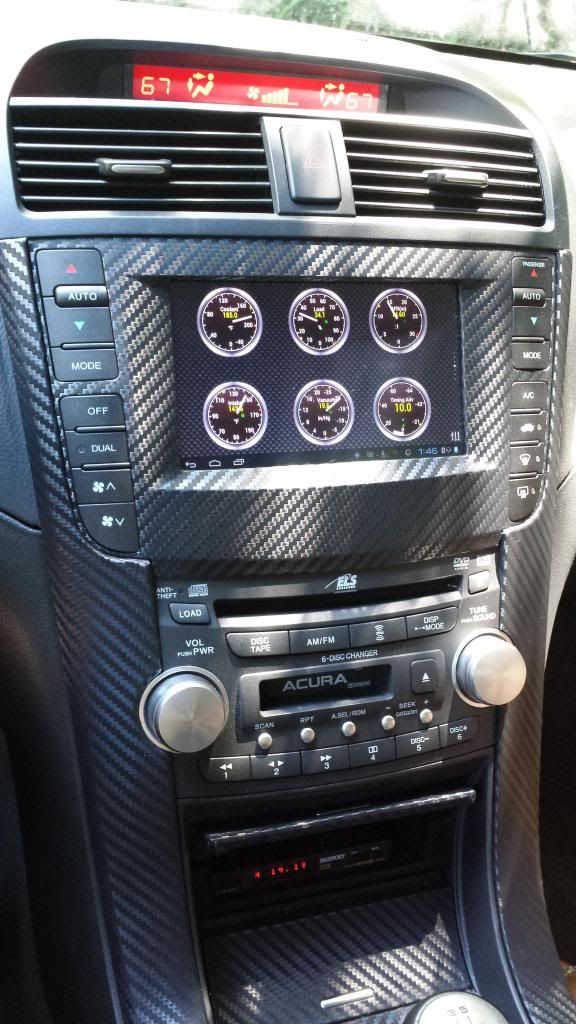
Heres a teaser pic, Im exhausted right now so Im gonna fiinish this up tomorrow. Im sure Ill think of some more stuff I missed, and Ill take good daytime pics and maybe a video of it too:


Thanks for the kind words... Heres a good picture and a vid as promised:

Its just a video of me turning it on and scrolling through the screens, it doesnt do much now because I dont have WiFi yet. You can kinda hear the windows startup noise when it turns on, I set it to play that when the power is connected. I also turned the headlights on so you can see how the AC display dims...

Some of the apps I found very useful are "automateit"- you can set it to automatically do stuff when the power is connected or disconnected, and I set it to automatically dim the brightness when it gets dark, it can also play a tone when you power it on. Google Music is what I use as a media player, Google maps will be my navigation once I get internet, also Pandora and iHeartRadio will work when I get WiFi in there... The rest of the apps are just games and travel apps like yelp and stuff. All worthless without WiFi.
If anyone has any questions about it please feel free to ask, I will do my best to help you out with your install. But I will probably never do one myself again because it sucked so bad.
Its just a video of me turning it on and scrolling through the screens, it doesnt do much now because I dont have WiFi yet. You can kinda hear the windows startup noise when it turns on, I set it to play that when the power is connected. I also turned the headlights on so you can see how the AC display dims...
Some of the apps I found very useful are "automateit"- you can set it to automatically do stuff when the power is connected or disconnected, and I set it to automatically dim the brightness when it gets dark, it can also play a tone when you power it on. Google Music is what I use as a media player, Google maps will be my navigation once I get internet, also Pandora and iHeartRadio will work when I get WiFi in there... The rest of the apps are just games and travel apps like yelp and stuff. All worthless without WiFi.
If anyone has any questions about it please feel free to ask, I will do my best to help you out with your install. But I will probably never do one myself again because it sucked so bad.
Last edited by Turbocoop; Oct 27, 2012 at 05:37 PM.
Id be glad to help with the wiring, but Im leaving for Afghanistan in January. I see youre on Long Island, Ill be up there almost all November on block leave so if you have the parts I could help out. I just wont have the nice solder desk like I do here at the shop...
Trending Topics
KBPftmfw
Joined: Jul 2008
Posts: 409
Likes: 49
From: NE Ohio
Wow, that looks factory. Nice work. I can't help but think how awesome it would be to tether and watch football, Netflix, etc. on long drives. Plus, having google maps, Chrome, etc. This is what the OEMs should be doing!

Yeah, no radio display... I don't need it but it was kinda hard to adjust the bass and treble without being able to see it. The radio still works I just can't see stations, but with internet radio apps I won't need the stock radio at all
KBPftmfw
Joined: Jul 2008
Posts: 409
Likes: 49
From: NE Ohio
^ agreed. Once you tether, you'll be streaming Pandora, iHeartRadio, etc. and there's absolutely no reason to listen to XM or FM. I have the BB Music Gateway in my car and I typically stream Pandora or iHeartRadio. XM was a waste of money and FM is nothing but commercials.
Three Wheelin'
Joined: Sep 2006
Posts: 1,562
Likes: 120
From: Chicagoland
Then you need a processor that you can adjust over blue tooth. I'm not sure what has an android app, but my old 3sixty.2 can be adjusted from the drivers seat via a PC or palm with bluetooth.
Three Wheelin'
Joined: Sep 2006
Posts: 1,562
Likes: 120
From: Chicagoland
Ill give that a try. Updates so far: This tablet does not like the cold, I dont have a garage so once it sits out all night (last night was 50 degrees), in the morning it takes about 10 minutes of heating up in the car with the heat on full blast for the touchscreen to work properly. Same thing goes for the charger too, it wont start charging until its warmed up for some reason... I kinda expected this so its not a big deal, I just leave it off until I have it warmed up in there pretty good, I just listen to the radio. My drive to work is only 2 miles anyway... I got tired of messing with the jailbroken iPhone trying to get a free WiFi app to work, nothing works with this POS new iOS 6 that my dumb ass downloaded. I just gave in and paid verizon an extra $20 to have my personal hotspot for this month as a test run. So far its badass, I read that internet radio only uses about 60MB per hour, and my plan is for 2GB. That equals about 34 hours of internet radio which should be plenty.
Racer
Joined: Dec 2011
Posts: 469
Likes: 154
From: Jacksonville, FL
Very cool! I have 2 questions for you.
1. What are the dimensions of the tablet you installed (I'm wondering if I could use other tablets, like an iPad mini).
2. Do you think it would be possible to use an OEM navi sub display with this, rather than relocating the stock temp display? I think the Navi sub display looks nicer, plus it can show audio/bluetooth data, and it seems like you could avoid a lot of difficult soldering.
To use the OEM navi radio/HVAC display you would need a bunch of the extra circuitry that comes with the navi TLs. I didnt even bother checking to see what all I would need because I figured it would cost a lot. Im sure its possible though


 thanks tons for the pics if your still around.

The Acer tablets are cheap and when the touchscreen is cold, like after sitting overnight at 40 degrees or less, or for a couple hours at <20 degrees, it wont work properly. I just need to run the heat on full blast for like 15 minutes and then it works fine. Other people have said that they dont have this problem with the galaxy tablets, so one day I might upgrade to one of them.


Advanced
Joined: Mar 2014
Posts: 53
Likes: 1
From: Ontario, Canada
so would any 7" tablet work ? I have the non navi 04 base... and I think this would be my cheapest solution for having all my fave music in my car.. also when you hooked this up is there any way to keep the steering wheel controls active for volume or changing music on the app somehow?
any chance you have any of the pics still somewhere?
any chance you have any of the pics still somewhere?
I went way more in depth than necessary, you dont even really need to take the tablet apart to do this. MOST 7" tablets fit, but I believe some dont. Some other guys on here have used samsung and nexus tablets as well. I still have steering wheel controls, but not when playing music from the tablet. I only use the tablet for movies really so I dont need the steering wheel controls. I deleted the pics but there are other writeups on this site
takin care of Business in
iTrader: (5)
Joined: Jan 2008
Posts: 30,994
Likes: 4,733
From: Kansas City, MO
I did not have to take my tablet apart but then again since I am on a weight loss it was more for that point of view to replace the whole screen/CD changer assembly with a tablet and a processor....
if this ever becomes my dedicated track car, the tablet will stay but the whole processor and factory amp/speaker setup will be out
if this ever becomes my dedicated track car, the tablet will stay but the whole processor and factory amp/speaker setup will be out


Thread
Thread Starter
Forum
Replies
Last Post
MrHeeltoe
1G TSX Tires, Wheels, & Suspension
20
Feb 23, 2023 01:54 PM
MrHeeltoe
2G TSX Tires, Wheels & Suspension
3
Sep 29, 2015 10:43 PM