
Help with Vsolkov nav box(pics 56K warning)


Thread Starter
Instructor
Joined: Dec 2004
Posts: 108
Likes: 0
From: Tucson, Az
Help with Vsolkov nav box(pics 56K warning)
Hey guys,
I need some help with installing Vsolkov's nav box. The quality of this box is great from what I can tell. However the instructions are the worse I have ever seen. I have no idea where to install this box. If you look at the last picture you will see 9 wires. Where are the wires I need to splice into? Are they behind the nav screen? Are they in the trunk next to the dvd rom? I also got the service manual to help me out but untill I know where to start I am lost. Please help guys, and thank you.


I need some help with installing Vsolkov's nav box. The quality of this box is great from what I can tell. However the instructions are the worse I have ever seen. I have no idea where to install this box. If you look at the last picture you will see 9 wires. Where are the wires I need to splice into? Are they behind the nav screen? Are they in the trunk next to the dvd rom? I also got the service manual to help me out but untill I know where to start I am lost. Please help guys, and thank you.
Team Anthracite Member
Joined: Oct 2004
Posts: 1,333
Likes: 1
From: Montreal, QC
Xelvic, do you have the electrical troubleshooting manual? In the manual, the pinouts for the navi unit in the trunk are very clearly shown.
I don't have the manual with me, but when I do I'll tell you which wires go to what. It's really straightforward.
I don't have the manual with me, but when I do I'll tell you which wires go to what. It's really straightforward.
Thread Starter
Instructor
Joined: Dec 2004
Posts: 108
Likes: 0
From: Tucson, Az
I just got the regular service manual. So you are saying this box hooks up in the trunk to the rom unit? I guess that is good because I was thinking I had to rip up my consule to do this. Wait, I will have to anyway because I have to install my powered fm modulator. ugggggggggg

Team Anthracite Member
Joined: Oct 2004
Posts: 1,333
Likes: 1
From: Montreal, QC
Yup, I see your pictures. 
I'll scan the relevant page in the electrical service manual for you. It'll clearly show you where to go.
Taking apart the front console is lots of fun. I found it quite difficult. Especially the center HVAC vents. I finally put my dash back together this weekend after being apart for a couple months while I do everything.
As for powered FM modulator. You might want to investigate the Blitzsafe adapter. The sound quality is much better.
Trending Topics
Thread Starter
Instructor
Joined: Dec 2004
Posts: 108
Likes: 0
From: Tucson, Az
Zax123, Thank you for your help. I checked into the blitzsafe deal but I would have to lose my XM radio. I love my XM and can't go without it. I see your in Canada. I think you guys don't have XM so you could do that. So if I have to hook the unit up in the trunk I will have to run the RCA video to the dash where my DVD player will be. That switch for the nav box is only a couple of feet long so I guess I will have to cut it and add some more wire. I wish I knew how to get to the back of the radio so I could get to the antenne without taking the console totally apart.
Pro
Joined: Oct 2003
Posts: 652
Likes: 2
From: Edison, NJ
Isn't sokolov coming out with a "plug-and-play" unit soon? Last time I called them, they said that they are trying to replicate the 20-pin solution behind our receiver, so you just have to plug it in behind the receiver and it should be all good... ...
...
does anyone know whether they have completed the production of that unit?
becuase if they have come out with it, then you really don't need to do all the splicing of the wires and stuff (correct me if i am wrong)...
...does anyone know whether they have completed the production of that unit?
becuase if they have come out with it, then you really don't need to do all the splicing of the wires and stuff (correct me if i am wrong)...
Thread Starter
Instructor
Joined: Dec 2004
Posts: 108
Likes: 0
From: Tucson, Az
I have heard from many people on here that he has a plug and play unit. However, I have called him and he says no. I just got this yesterday from him so I would think it would be the latest and greatest one out. I wish he did though. And Vsolkov if your listening, I Luv ya man, but you have got to come out with some better directions. Sorry for messing up your name, but I can never remember how to spell it.
Team Anthracite Member
Joined: Oct 2004
Posts: 1,333
Likes: 1
From: Montreal, QC
Here are some pics to help you out xelvic:
This is what the back of the navi unit looks like. The unit in the trunk:
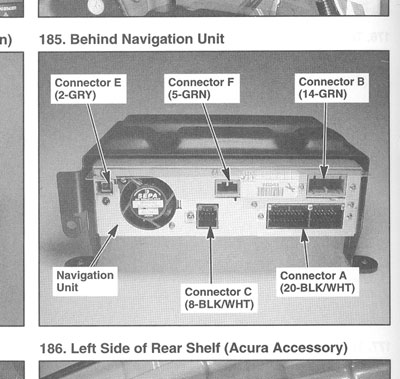
You are concerned with what is labelled as connector A.
Here's the schematic of the connector coming out of the Navi unit:
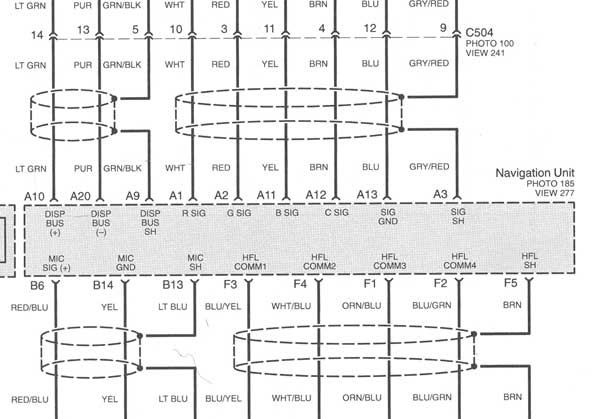
Note the wires labelled: "R SIG", "G SIG", "B SIG" and "C SIG".
And finally, here's a diagram of the connector and exactly where you tap into each wire:
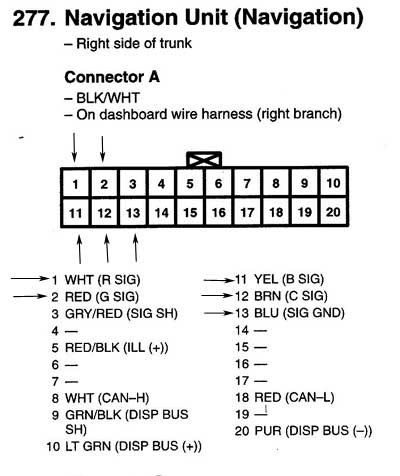
Splice the R SIG wire and then follow instruction for Sokolov RED wire.
Splice the B SIG wire and then follow instruction for Sokolov BLUE wire.
Splice the G SIG wire and then follow instruction for Sokolov GREEN wire.
Splice the C SIG wire and then follow instruction for Sokolov SYNC wire.
You can connect GROUND to pin 3 where it says "SIG GND". I forgot to put an arrow in the JPG. Sorry.
That's about it dude. Works like a charm first try. Good luck!
This is what the back of the navi unit looks like. The unit in the trunk:
You are concerned with what is labelled as connector A.
Here's the schematic of the connector coming out of the Navi unit:
Note the wires labelled: "R SIG", "G SIG", "B SIG" and "C SIG".
And finally, here's a diagram of the connector and exactly where you tap into each wire:
Splice the R SIG wire and then follow instruction for Sokolov RED wire.
Splice the B SIG wire and then follow instruction for Sokolov BLUE wire.
Splice the G SIG wire and then follow instruction for Sokolov GREEN wire.
Splice the C SIG wire and then follow instruction for Sokolov SYNC wire.
You can connect GROUND to pin 3 where it says "SIG GND". I forgot to put an arrow in the JPG. Sorry.
That's about it dude. Works like a charm first try. Good luck!

Thread Starter
Instructor
Joined: Dec 2004
Posts: 108
Likes: 0
From: Tucson, Az
Zax123,
I notice in the 3rd picture it says "on dashboard wire harness". I just want to make sure that I splice into the wires comming from the DVD rom unit in the trunk and not behind the dash. Also a couple other questions for ya. Do I use the power source from the DVD ROM unit to power the nav box? Or do I just run a hot wire from the fuse box using an add-a-circuit? I also want to get the definition of splice or tap into a wire. Do I make a slit in the wire and soder together? Or am I cutting the wire in half? Thanks.
I notice in the 3rd picture it says "on dashboard wire harness". I just want to make sure that I splice into the wires comming from the DVD rom unit in the trunk and not behind the dash. Also a couple other questions for ya. Do I use the power source from the DVD ROM unit to power the nav box? Or do I just run a hot wire from the fuse box using an add-a-circuit? I also want to get the definition of splice or tap into a wire. Do I make a slit in the wire and soder together? Or am I cutting the wire in half? Thanks.
Thread Starter
Instructor
Joined: Dec 2004
Posts: 108
Likes: 0
From: Tucson, Az
Originally Posted by spyfish007
xelvic: Be sure and use the SMALL red and white wires in the harness instead of the LARGE red and white wires. Notice in the pic they are all grouped together. It is an easy mistake to make.

Team Anthracite Member
Joined: Oct 2004
Posts: 1,333
Likes: 1
From: Montreal, QC
Uh oh!! I scanned the wrong picture for you!!!
Ignore that third pic. I'll put the right one up this evening. Sorry dude!
Yes, you can take power from the navi unit. Some people do that. I ran a new power line straight from the fusebox using an add-a-circuit on the two free slots, #29 and #31 I believe. I actually ran two lines. One for my PS2, and the other powers the navi conversion box as well as my AV switcher. I figured why not.
Sorry, for splice I mean, cut the wire and attach the appropriate sokolov wire to one side and to the other side. The ground wire you don't need to cut, you can just expose some wire and solder to that.
Thread Starter
Instructor
Joined: Dec 2004
Posts: 108
Likes: 0
From: Tucson, Az
Zax123,
I am glad you have done this project before because you are helping me a lot. I don't think I could have done this without your help. I am going to do this all on Saturday and Sunday so I am trying to get as much info as I can. I also will be installing my comptech sway bar. Its going to be a very fun weekend. Imagine.... me going down a twisty mountain highway 100 mph breaking in my new sway bar and doing all this while watching the Matrix on my nav screen!!!!!!!!!!!! MuuuuuHaaaaaa muuuhaaaaaaa!!
JUST KIDDING!!!!!!!! Come on guys I know better then that!
Team Anthracite Member
Joined: Oct 2004
Posts: 1,333
Likes: 1
From: Montreal, QC
The law says you're supposed to connect the ground wire of the selector switch to yoru parking brake so you can only watch movies when you're parked, but I doubt there's a single person on this site that did it that way.
I'll get that pic for you tonight dude, no worries!
I'll get that pic for you tonight dude, no worries!
Suzuka Master
Joined: Jan 2005
Posts: 7,438
Likes: 1
Take some instalation pictures, that'll help all future installs. How much does this Unit cost. If its not too much money and work maybe I'd install it for my dads birthday(when he finally goes down and gets the car).

Advanced
Joined: Jul 2003
Posts: 68
Likes: 0
From: SI NY
call sokolov he has very easy install instructions he tells you the colors and which pin very easy call him 718-851-4817 or 718-909-2192 he can email them or fax it with his instructions it will be done in thirty minutes.

Racer
Joined: Oct 2001
Posts: 310
Likes: 0
From: Brooklyn, NY
Sorry guys, I didn't put the instructions for the tl install. My shipping clerk doesnt know where its going I have two numbers 718-851-4817 and 718-909-2192 at which you can get 24 hour support. Follow the instructions below. Thank You guys
Behind navi unit in the trunk you should find the Black 20 pin plug. The wires are next to each other.
1.cut WHITE wire coming from navi unit, wires from module connect red toward screen and yellow towards navi unit
2. cut RED wire coming from navi unit, wires from module connect blue toward screen and green towards navi unit
3. cut YELLOW wire coming from navi unit, wires from module connect violet toward screen and orange towards navi unit
4. cut brown wire coming from navi unit, wires from module connect black toward screen and brown towards navi unit
5. take BLUE coming from navi unit, wires from module connect black with letters into blue of navi screen
Please solder all connections.
DO NOT WATCH WHILE DRIVING, CHECK LOCAL LAWS.
INTENDED ONLY FOR OFF ROAD USE
WE ARE NOT RESPONSIBLE FOR ANY DAMAGE TO YOUR NAVIGATION FROM IMPROPER INSTALLATION.
Thread Starter
Instructor
Joined: Dec 2004
Posts: 108
Likes: 0
From: Tucson, Az
I am confused with step 5 . "Take BLUE coming from navi unit, wires from module connect black with letters into blue of navi screen". Are you saying I just cut the blue wire from the nav unit and solder the modules black wire to the screen side? What does the blue comming out of the nav unit hook to then? Do you just leave it lay there?
Team Anthracite Member
Joined: Oct 2004
Posts: 1,333
Likes: 1
From: Montreal, QC
As I mentioned in my instructions, just strip some of the ground (BLUE) wire, don't cut it, and solder the ground wire from the Sokolov connector. That's the one with the heat-shrink tubing around it (black with wire letters).
Thread Starter
Instructor
Joined: Dec 2004
Posts: 108
Likes: 0
From: Tucson, Az
Thanks Zax123. I think I got it all down now. You guys have been a great help to me. I will take many pics and post it for everyone to see. I know this thread will help a lot of people who are going to do this themselves. If the modorator doesn't mind. I will post all of the pics in this thread to keep it all together. Zax123, I forgot to ask earlier but do I have to do anything special to make this play while moving?
Team Anthracite Member
Joined: Oct 2004
Posts: 1,333
Likes: 1
From: Montreal, QC
Nope, if you don't wire it to your handbrake, it'll "just work". The toggle switch will let you choose what image appears on your Navi screen, either the composite video in, or the Navi/audio info.

Thread
Thread Starter
Forum
Replies
Last Post
SidhuSaaB
3G TL Problems & Fixes
18
May 30, 2020 12:40 AM
Rob144
2G RL (2005-2012)
7
Sep 21, 2015 08:18 AM
alan_rich
3G TL Audio, Bluetooth, Electronics & Navigation
3
Sep 9, 2015 11:38 AM