
Help needed regarding change NAV welcome screen.


Thread Starter
10th Gear
Joined: Aug 2011
Posts: 10
Likes: 0
From: Vancouver
Help needed regarding change NAV welcome screen.
Here is my situation, I got my nav disk working fine, but the welcome screen didn't change.
The welcome screen was alreayd changed (something about Odyssey/Tron), but i want to use my own. I followed this two links https://acurazine.com/forums/2g-rl-audio-bluetooth-electronics-navigation-90/changing-navigation-splash-screen-500411/
http://www./forums/showthread.php?p=803443
I made the image exactly 224,712 bytes with 480x234 pixels, using command "bysin 09Jog2.bin update Opening1.bmp Opening1.bmp" then replace 09JOG2.BIN with ULTRAISO. Burned a disc, works! but wasnt my picture, why? I saw a message " updating 09jog2.bin..." now i am lost... could someone tell me what did i do wrong?
2008 ACURA TL......
THX!
Thread Starter
10th Gear
Joined: Aug 2011
Posts: 10
Likes: 0
From: Vancouver

Advanced
Joined: Jul 2003
Posts: 70
Likes: 8
From: Ft. Lauderdale, FL
I haven't tried this mod on the '11 navi dvd yet (because I've been too lazy to finish the .bmp lol), but I remember reading about this issue when writing up my installation notes. I'm trying to pull up the thread now.
You have to modify both 09Touch2.bin and 09Jog2.bin. In both .bin files there is an OpeningBase.bmp file in addition to Opening1.bmp... two different files of the same picture.
Replace both Opening1.bmp and OpeningBase.bmp with your target picture, and update both files in both 09Touch2.bin and 09Jog2.bin, and you should have your startup screen.
Nice .bmp btw.
I'm still trying to dig up the post.... I'll update here if I find it. It had more detailed information for the '11 navi splash screen, but the above notes are what I wrote down.
Thread Starter
10th Gear
Joined: Aug 2011
Posts: 10
Likes: 0
From: Vancouver
Thank you so much for you reply.
So basicly, now what i need to do is using my image make a copy name to OpeningBase.bmp, so i will have Opening1.bmp and OpeningBase.bmp which is exactly same file and then replace the same files in both 09Jog2.bin and 09Touch2.bin, right?
any idea why they program it this way? a image, 4 copies, in two files......FAINT...
Advanced
Joined: Jul 2003
Posts: 70
Likes: 8
From: Ft. Lauderdale, FL
I'm assuming it's the same DVD for multiple vehicles, and it'll use different files based on whether it's a touch screen or jog wheel.
Re-reading your first post, I think we got our 2011 DVDs from the same source lol... I've had a few people ask what my obsession with Tron is and why it says Oddesey ...man I need to change that picture
Re-reading your first post, I think we got our 2011 DVDs from the same source lol... I've had a few people ask what my obsession with Tron is and why it says Oddesey
...man I need to change that picture
Instructor
Joined: Sep 2011
Posts: 215
Likes: 8
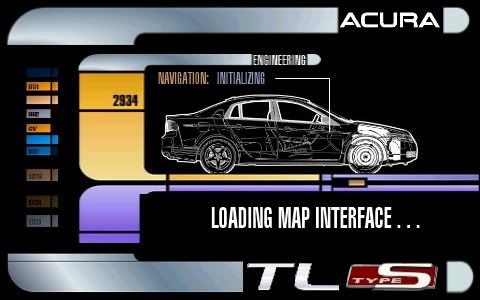
I wanted to update this older thread with the exact instructions needed to change the TRON/Odyssey image that was in the "downloaded" version. I had to piece together instructions from like 4 different threads on 2 sites so I figured I'd save someone else some time with this thread.
I don't want to take credit for these instructions, they are just modified versions of the pioneers before me.
Here are the instructions for changing the Navi Splash Screen (this is the picture that appears before the warning or nag screen). Once you've gone though this once or twice, the whole process can be done in around 15 minutes.
All the instructions below are for MS Windows.
Things you need:
A DVD reader
A CD writer and rewritable CD or CD-R
A suitable image which is 16bit bmp format, 480x234 pixels, 72x72 pixels per inch and 224,712 bytes in size (more on this below)
About 30MB spare disk space
You need to know the version of DVD you have. The instructions below work for 4.62 in the 2008 RL.
A graphics program like Photoshop
'Bysin'(see below)
The Bysin program
Bysin is the user id of the fellow who originally figured out how to extract and exchange the images over on the Acura TSX forum.
He created a program called DumpNavi to do just that. Another fellow, Guicide, modified and tweaked the program to work with the 2006 Civic and called it Bysin.exe. The Bysin program will allow you to replace the splash screen image file contained within one of the BIN files used by the navi system.
I took their work and figured out how to apply it to the RL, which is basically just figuring out a couple of file names. All credit goes to them for doing the hard work. I had the very easy bit.
Obtain the Bysin program by downloading http://seamonkey420.tech-recipes.com...hack/bysin.zip -- Please go to http://www.guicide.com/cars/2006civic/nav/hacks/ if you wish to see Guicide's source page before downloading, or just to pay him due respect for his work.
Create a folder on your PC called Navi_Splash and extract Bysin.exe and CECompressv4.dll from bysin.zip into it.
You should end up with Navi_Splash\Release with the two files inside.
Move the two files into the Navi_Splash folder and delete the Release folder.
Preparing the image
First thing to note for PC users is that Microsoft Paint is not able to produce images in the correct 16bit 72x72pixel per inch format. I used Photoshop.
Second thing to note is that Navi expands the screen image by about 30 percent in the vertical. So initially choose an image that's cropped to about 480x300 pixels and then compress it vertically to 480x234 pixels.
Once you have your image exactly 480x234 pixels in size, you need to save it in the correct format.
The instructions for Photoshop are:
File Menu - Save As
File Name � Create 2 files �Opening1.bmp� and �OpeningBase.bmp�. Save them to the Navi_Splash folder you created above.
Format - BMP
Click Save
Select 16 bit and click Advanced Modes
Select R5 G6 B5 and click OK
Now find the file that you just created and check it's size. It must be exactly 224,712 bytes in size. You need to start over if it is not.
Preparing the CD
1. Remove the Version 4.62 DVD from the navi unit in the trunk.
2. Put it your PC and copy the following files to the Navi_Splash folder:
09Jog.bin
09Jog2.bin
09Jog128SZA.bin
09Jog128TA0.bin
09Touch.bin
09Touch2.bin
11Jog128Acu.bin
11Jog128M.bin
A0000_00.MNG
dca0.evt
DCA0.REG
eca0_mod.evt
EDATA_ENUS.bin
EDATA_FRCA.bin
PRG_INFO.MNG
UPDATE_APL.exe
UPDATE_APL_128M.exe
3. Open a Cmd window (Start / Run / Cmd)
4. Navigate to your Navi_Splash folder (>: cd c:\navi_splash)
5. Switch the image contained within the 09Jog2.bin and the 09Touch2.bin file twice (total of 4 images updated) using the Bysin program: (NOTE: the file names are case sensitive)
bysin 09Jog2.bin update Opening1.bmp Opening1.bmp
bysin 09Jog2.bin update OpeningBase.bmp OpeningBase.bmp
bysin 09Touch2.bin update Opening1.bmp Opening1.bmp
bysin 09Touch2.bin update OpeningBase.bmp OpeningBase.bmp
Press enter and you should see 'Updating <file name>'. Check your typing if you don't.
6. Insert your rewritable CD into your machine.
7. From your Navi_Splash folder, copy/burn the 10 files listed in step 2 to the CD.
Uploading the changes to Navi
1. Turn the ignition to Acc 1. Open the DVD reader's front panel and wait until you get an error message on the Navi screen.
2. Remove the DVD if necessary, insert your CD and close the flap
3. Press and hold Menu, Map/Guide and Cancel simultaneously for about 5 seconds until the Diagnostic menu appears.
4. Select Version
5. Select DownLoad and press the button
If all is ok with your CD the transfer should start. After about 20 seconds you should get a message telling you not to turn off the engine. This is followed by a progress bar.
If you get a Check Disk message, try steps 1 to 5 again. There may be something wrong with your CD if it still fails.
The transfer takes about 3 minutes after which the Navi will reboot. If all has gone well you should see your new image followed by an error saying the wrong disk is inserted. Put the DVD back in and turn the ignition off and back on again.
If you get a blank screen before the nag screen, there is likely something wrong with your image file.
To reset everything leave the DVD in the player and repeats steps 3, 4 and 5 above.

Trending Topics


Thread
Thread Starter
Forum
Replies
Last Post
mada51589
3G TL Problems & Fixes
80
Jan 9, 2025 04:40 PM
Soul_Deamon
Audio, Video, Electronics & Navigation
7
Nov 13, 2018 04:44 PM
Puma Jim
2G RDX Audio, Bluetooth, Electronics & Navigation
3
Sep 26, 2015 01:08 AM
andysinnh
2G RDX Audio, Bluetooth, Electronics & Navigation
1
Sep 5, 2015 11:38 PM