
DIY audio 'aux in'

Team NBP Stealth Fighter
Joined: May 2003
Posts: 860
Likes: 0
From: Atlanta, GA
I'm still not sure where to put the Soundgate. There is no room behind the center console. I'm thinking to put it in the storage bin. Or, I can put it under the seat. But, I still need to put the switch somewhere. I'm afraid of putting holes into anything.
Perhaps I could do something like this under the dash and tuck everything out of the way. Seems like the least visibly destructive option.

or this
Can't be too expensive for a dummy panel if I mess up... Only problem is that I still need to locate the line-out cable for the MP3 player some place.
or...

But, I'd still need to run the RCA cables through there in order for it to work. Not sure where to find a black panel like this to even insert in that slot
Can anyone suggest the easiest route to pass the cable and/or locate the MP3 player?
Thanks.
Perhaps I could do something like this under the dash and tuck everything out of the way. Seems like the least visibly destructive option.
or this
Can't be too expensive for a dummy panel if I mess up... Only problem is that I still need to locate the line-out cable for the MP3 player some place.
or...
But, I'd still need to run the RCA cables through there in order for it to work. Not sure where to find a black panel like this to even insert in that slot
Can anyone suggest the easiest route to pass the cable and/or locate the MP3 player?
Thanks.

7th Gear
Joined: May 2005
Posts: 7
Likes: 0
From: TN
I have the Soundgate AUX3 installed in the trunk where the XM reciever is. There is plenty of room back there. I also have my navi converter back there as well. I spliced into the XM line from the rear and got my power from the navi unit. Seemed to me the best way to do it.
I'm Baaack!
Joined: Sep 2004
Posts: 1,281
Likes: 0
From: Newark, Delaware
Originally Posted by rbf351
it costs 1.42 for the dummy switch cover
Registered User
Joined: Jan 2002
Posts: 2,298
Likes: 2
From: NY
Originally Posted by Brewmaster
Yeah, I looked at that for switch placement too, but the back is a honeycomb arrangement which makes it tough to drill out and I couldn't fit two rocker switches in. (at least two switches I like)

Intermediate
Joined: Aug 2004
Posts: 27
Likes: 0
From: Farmington, NM
Originally Posted by Brewmaster
What will you be running up to the center? DVD player?? additional Aux In??? I'm not running an extra Aux in yet, I'm just splitting for the DVD (6 disk changer which is also in the trunk) so, aside from power the only run up the middle I have is the IR eye.
Still looking for a good place for that thinking maybe up by the sunroof controls.
Any suggestions?
Still looking for a good place for that
thinking maybe up by the sunroof controls. Any suggestions?
IR eye by the sunroof controls is the best spot if you can get it there!
Intermediate
Joined: Aug 2004
Posts: 27
Likes: 0
From: Farmington, NM
Originally Posted by ryan c
I have the Soundgate AUX3 installed in the trunk where the XM reciever is. There is plenty of room back there. I also have my navi converter back there as well. I spliced into the XM line from the rear and got my power from the navi unit. Seemed to me the best way to do it.
I'm Baaack!
Joined: Sep 2004
Posts: 1,281
Likes: 0
From: Newark, Delaware
Originally Posted by NewMexiCat
If your AUX3 is in the trunk, where did you put your switch? If it's in the dash, how did you extend the cable to get it there?
Another option is to run under the carpet then up the center console and place switches in one of the two boxes under the head unit.
Registered User
Joined: Jan 2002
Posts: 2,298
Likes: 2
From: NY
Originally Posted by NewMexiCat
I'm just running AUX-in, so I have to run audio cables from the tunk to the center console, and then cables back to complete the circuit for XM.
IR eye by the sunroof controls is the best spot if you can get it there!
IR eye by the sunroof controls is the best spot if you can get it there!
I'm Baaack!
Joined: Sep 2004
Posts: 1,281
Likes: 0
From: Newark, Delaware
Originally Posted by rbf351
putting the IR eye up there is a great idea, you can put it where the map lights are, just gotta be careful you don't melt anything

Dude it's a remote control not a laser!

Registered User
Joined: Jan 2002
Posts: 2,298
Likes: 2
From: NY
Originally Posted by Brewmaster
Dude it's a remote control not a laser!
I'm Baaack!
Joined: Sep 2004
Posts: 1,281
Likes: 0
From: Newark, Delaware
Originally Posted by rbf351
DUH, what i mean is if you put the eye in where the lights are you need to be careful you don't melt it from the heat of the light

I wasn't going to bury it up there I was just going to stick it on .. it's smaller than a dime and black w/ a green led. I'll probably hide the wire until I get up there and then just pop out on the bottom somewhere around the homelink buttons. I'll have to check length though (it's got a long way to go back to the trunk).
Registered User
Joined: Jan 2002
Posts: 2,298
Likes: 2
From: NY
Originally Posted by Brewmaster
Ohhhh ...
I wasn't going to bury it up there I was just going to stick it on .. it's smaller than a dime and black w/ a green led. I'll probably hide the wire until I get up there and then just pop out on the bottom somewhere around the homelink buttons. I'll have to check length though (it's got a long way to go back to the trunk).
I wasn't going to bury it up there I was just going to stick it on .. it's smaller than a dime and black w/ a green led. I'll probably hide the wire until I get up there and then just pop out on the bottom somewhere around the homelink buttons. I'll have to check length though (it's got a long way to go back to the trunk).
i took it apart last night and found out there is 2 spots for the mic, but only 1 is used and it's on the passenger side, the driver side is a dummy hole
Guinea Pig
Joined: Apr 2005
Posts: 4,104
Likes: 2
From: At home
Originally Posted by chusteveb
I've had a lot of success with this version of an audio 'aux in' so I'll share it with you all.

Installing an �aux in:�
Obtain 4 relays all of them need to be 5 pole. You can find them at any car audio/ alarm install shop.
Also obtain a RCA cord with at least one side being a female end for both left and right channels (the other end will be cut off and discarded) long enough to go from your relay pack in the trunk to the desired location of your �aux in� connection (up front under the glove, center console, etc.).
Don�t forget about the switch so get one of those if you haven�t already.
You will need to install a switch up front with one side of the switch coming from a 12V source (be safe and fuse it) and the other side going to the set of 4 relays in the trunk.
On the relays you will see numbers adjacent to each of the 5 prongs respectively: 85, 86, 87, 87a, and 30.
Take all 4 relays and jump all of the 86�s together and tie in the wire coming from the switch containing the 12V source.
Take all 4 relays and jump all of the 85�s together and tie in a wire that runs to ground.
On the backside of the right rear quarter panel in the trunk is the XM unit. Remove the trunk liner to access this unit and remove the 3 10mm bolts that hold this unit to the trunk support.
The XM unit will have 2 plugs, one is an antenna plug, and the other is the main harness. Remove or cut open a section of the black flex-lume and expose the wires connected to the main harness.
Using the schematics I�ve attached find and cut the appropriate 4 signal wires containing positive and negative for both left and right channels: red, green, white, and black.
Red is the left positive channel, attach the end coming from the XM harness to 87a on the first relay; take the other end of the red wire going into the car and attach it to 30 on the first relay.
Green is the left negative channel, attach the end coming from the XM harness to 87a on the second relay; take the other end of the green wire going into the car and attach it to 30 on the second relay.
White is the right positive channel, attach the end coming from the XM harness to 87a on the third relay; take the other end of the white wire going into the car and attach it to 30 on the third relay.
Black is the right negative channel, attach the end coming from the XM harness to 87a on the fourth relay; take the other end of the black wire going into the car and attach it to 30 on the fourth relay.
Take the RCA cord and from the relay pack route the female end of the RCA cord to where you want your �aux in� to be located.
Cut off the end of the RCA cord by the relay pack to expose the positive and negative of both the left and right channels of the RCA cord.
Carefully strip both the positive and negative of the left and right channels on the cord to expose the bare wire.
Attach the left positive channel of the RCA cord to 87 on the first relay (relay with the red XM wires).
Attach the left negative channel of the RCA cord to 87 on the second relay (relay with the green XM wires).
Attach the right positive channel of the RCA cord to 87 on the third relay (relay with the white XM wires).
Attach the right negative channel of the RCA cord to 87 on the fourth relay (relay with the black XM wires).
Reattach the harness to the XM unit and carefully reinstall everything.
Testing your �aux in:�
With the source selected to XM and the switch in the �off� position, XM radio should play as normal.
With the switch in the �on� position, whatever is connected to your aux in should be heard.
I'm Baaack!
Joined: Sep 2004
Posts: 1,281
Likes: 0
From: Newark, Delaware
Originally Posted by rbf351
i just did it tonight, moved the remote sensor to inside the passenger map light, you can't see it and it works perfectly though the clear plastic
I've looked at mine and don't think I have enough lead .. DVD's in the trunk and I only have about 15' of ir lead to play with. Guess I'm coming up in the center console someplace.
Registered User
Joined: Jan 2002
Posts: 2,298
Likes: 2
From: NY
Originally Posted by Brewmaster
Slick .. nice solution .... did you take the light out? (You were worried about heat a couple of replies back) I suppose if you've already gone to LEDs it wouldn't be a big deal.
I've looked at mine and don't think I have enough lead .. DVD's in the trunk and I only have about 15' of ir lead to play with. Guess I'm coming up in the center console someplace.
I've looked at mine and don't think I have enough lead .. DVD's in the trunk and I only have about 15' of ir lead to play with. Guess I'm coming up in the center console someplace.
what i did find out is if i have the light on then it will not let the remote work properly, just there is too much interference.
if you want just extend the cable and it will reach

Banned
Joined: Dec 2004
Posts: 188
Likes: 0
From: two zero one
I'm having a problem with my setup. First of all, I want to hook up a Icon DVD100. I have Vsokolov plug and play system.
The video works fine.
I bought a 4pdt relay http://www.jameco.com/webapp/wcs/st...roductId=183011 and this is how i have the wires hooked up. 1-4 - XM receiver, 5-8 - Headunit, 9-12 - RCA wires , 13-14 - ground and power. The rca wires Im using are 2 single stereo wires http://www.radioshack.com/product.as...t%5Fid=42-2493. My dvd player has 1 opening for a speaker wire. So I ran a stereo splitter http://www.radioshack.com/product.as...5Fid=42%2D2496. 1 wire coming from the back splitting into 2 wires. I only get background sound from the dvd player (background music in movies) and I can't hear people talking. If I put the stereo wire half way I get vocals.
When I switch back to XM I can't hear anything. Is my relay hooked up wrong.
I need HELP... PLEASE...
Banned
Joined: Dec 2004
Posts: 188
Likes: 0
From: two zero one
Sorry, this should work... http://www.jameco.com/webapp/wcs/sto...oductId=183011
Registered User
Joined: Jan 2002
Posts: 2,298
Likes: 2
From: NY
Originally Posted by AcuraTL2k4
Sorry, this should work... http://www.jameco.com/webapp/wcs/sto...oductId=183011
Banned
Joined: Dec 2004
Posts: 188
Likes: 0
From: two zero one
Originally Posted by rbf351
that does work, now what pins are what?
Banned
Joined: Dec 2004
Posts: 188
Likes: 0
From: two zero one
rbf351 your PM box is full.
Has anyone used the Jameco relay http://www.jameco.com/webapp/wcs/sto...oductId=183011 . What wires did you hook up to what pins.
Has anyone used the Jameco relay http://www.jameco.com/webapp/wcs/sto...oductId=183011 . What wires did you hook up to what pins.
Burning Brakes
Joined: May 2005
Posts: 1,222
Likes: 5
From: IE Baby
I'm not sure of the pin numbers but here is what I did. I think you have your RCA and HU mixed.
There are three sets of 4 pins on this switch and one set of two pins.
The first set of two pins is the power and ground
The next set of four pins goes to the HU
The middle set of four pins goes to the XM
The last set of four pins goes to the aux
These are the wires on the XM that need to be cut and spliced
Red is the left positive channel,
Green is the left negative channel,
White is the right positive channel,
Black is the right negative channel
It is important to add the wires to the switch in the same sequence or you get your channels mixed up.
The power needs to have a toggle switch and fuse.
I did this last weekend and it works great. Mine is an aux in for my ipod, 1,500 songs at my fingertips.
I took some pictures fo the installation. I will try to post some pixs when I get home today or pm me and I can email them to you.
i do not understand any of this............ i do need that AUX input for my rca rd2780 mp3/mp4 player and dont understand all this complex' instructions. i believed that the XM unit was just a reciever and transmitter and it plugged in....... please help

Intermediate
Joined: Aug 2004
Posts: 27
Likes: 0
From: Farmington, NM
Originally Posted by bryanb
Were you able to get the cable? Just wondering how it worked out.
Bryan
Bryan
Burning Brakes
Joined: May 2005
Posts: 1,222
Likes: 5
From: IE Baby
Here are some pixs of my DIY aux in. Some people decide to do from behind the HU: I decide to do it at the trunk. There was plenty of room and running the cable to the storage area was pretty easy. I hopes this helps answer any questions
Here is the relay switch
[IMG] [/IMG]
Here is the switch with the wires soldered on. I added molex connectors for easy plugin and If I decide not to keep XM I can connect the RCAs directly to the HU cables.
[IMG] [/IMG]
Here is my RCA connection mod. The molex connectors are usually for computers. I purchased them at Radioshack
[IMG] [/IMG]
Here the trunk location where I put the wires and relay. I have cut the wires and it's ready to be installed
[IMG] [/IMG]
Here is everything hooked up. Notice the 3 molex connectors,one for the XM, one for the RCAs and one for the HU
[IMG] [/IMG]
Here is the cable run to the center storage console. Under the carpet and up through the center console. The red cable is for the switch which will go where the little light is in the storage compartment.
[IMG] [/IMG]
Here is the center console storage bin with the wires coming out.
[IMG] [/IMG]
Here is the Belkin Ipod charger and audio out for the ipod. The belking unit connects to the bottom of the Ipod and give me audio out too. The switch is in place. If I decide to dump the XM the switch can be replaced with the original light.
[IMG] [/IMG]
Here is the finished project. The belkin wire comes up from the console area near the seat and goes up the neck.
[IMG] [/IMG]
[IMG] [/IMG]
Here's the my Baby
[IMG] [/IMG]
Here is the relay switch
[IMG]
[/IMG] Here is the switch with the wires soldered on. I added molex connectors for easy plugin and If I decide not to keep XM I can connect the RCAs directly to the HU cables.
[IMG]
[/IMG] Here is my RCA connection mod. The molex connectors are usually for computers. I purchased them at Radioshack
[IMG]
[/IMG] Here the trunk location where I put the wires and relay. I have cut the wires and it's ready to be installed
[IMG]
[/IMG] Here is everything hooked up. Notice the 3 molex connectors,one for the XM, one for the RCAs and one for the HU
[IMG]
[/IMG] Here is the cable run to the center storage console. Under the carpet and up through the center console. The red cable is for the switch which will go where the little light is in the storage compartment.
[IMG]
[/IMG] Here is the center console storage bin with the wires coming out.
[IMG]
[/IMG] Here is the Belkin Ipod charger and audio out for the ipod. The belking unit connects to the bottom of the Ipod and give me audio out too. The switch is in place. If I decide to dump the XM the switch can be replaced with the original light.
[IMG]
[/IMG] Here is the finished project. The belkin wire comes up from the console area near the seat and goes up the neck.
[IMG]
[/IMG] [IMG]
[/IMG] Here's the my Baby
[IMG]
[/IMG]
Team Anthracite Webmaster
Joined: Mar 2004
Posts: 644
Likes: 0
From: Los Angeles, CA (USC)
king of pain,
very nice writeup. going to try this monday, but i'm going to do it behind the headunit (gotta tune some stuff wiht my video module). will post my pics too
very nice writeup. going to try this monday, but i'm going to do it behind the headunit (gotta tune some stuff wiht my video module). will post my pics too

Advanced
Joined: Sep 2004
Posts: 73
Likes: 0
From: Passaic, NJ
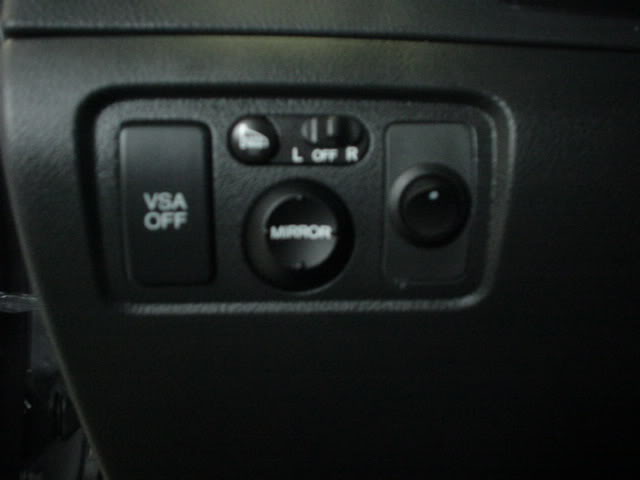
is there an alternative way to do this without cutting any of the car's wires? Also how can i put a switch on the dummy panel next to the side mirror controls, i need details on how to remove panels and instructions to access the panel to install.
Advanced
Joined: Sep 2004
Posts: 73
Likes: 0
From: Passaic, NJ
anyone???
Originally Posted by jerzeygroove
is there an alternative way to do this without cutting any of the car's wires? Also how can i put a switch on the dummy panel next to the side mirror controls, i need details on how to remove panels and instructions to access the panel to install.
I'm Baaack!
Joined: Sep 2004
Posts: 1,281
Likes: 0
From: Newark, Delaware
Originally Posted by jerzeygroove
i need details on how to remove panels and instructions to access the panel to install.
If your looking for trim panels etc, either give 'em a tug and see if they pop off, or search. There's a bunch of threads besides this one that all have great directions. there's also a couple of links inside this thread ... take the time to learn ....

Pro
Joined: May 2004
Posts: 534
Likes: 8
From: Southern Cali.
Originally Posted by VtecMW
I think I might be able to get it with a little patience and luck. The key is to get the screw driver on top of the connector release button. I was thinking of putting a tie-strap around the existing writing and pulling on the tie strap as I have the release button on the connector held down.
I've already experiemented with it on the Y-harness and it seems to work. The only problem is that the space is so small in the TL. I'll get it one way or another. But, I'm not going to take apart the console to do it.
I've already experiemented with it on the Y-harness and it seems to work. The only problem is that the space is so small in the TL. I'll get it one way or another. But, I'm not going to take apart the console to do it.
Would it not just be easier to go to the XM receiver in the trunk attach the harness adapter there ?
It is the same thing right?
Pro
Joined: May 2004
Posts: 534
Likes: 8
From: Southern Cali.
Originally Posted by DeathtoToasters
Would it not just be easier to go to the XM receiver in the trunk attach the harness adapter there ?
It is the same thing right?
It is the same thing right?
Ok forget my last post....I was halfway through the thread when I decided to respond to that post.
Sorry.
Does anyone have a writeup on using that extra harness from Honda?
Are the colors the same?
Pro
Joined: May 2004
Posts: 534
Likes: 8
From: Southern Cali.
Geez...no edit functions for posts huh? lol
read
Anyway my question should read above.
Does that extra Y harness that is used upfront on the head unit work for the XM hookup in the trunk at the XM receiver?
If not, is there a extention that does?
Thanks
read
Anyway my question should read above.
Does that extra Y harness that is used upfront on the head unit work for the XM hookup in the trunk at the XM receiver?
If not, is there a extention that does?
Thanks
Intermediate
Joined: Aug 2004
Posts: 27
Likes: 0
From: Farmington, NM
Originally Posted by DeathtoToasters
Geez...no edit functions for posts huh? lol
read
Anyway my question should read above.
Does that extra Y harness that is used upfront on the head unit work for the XM hookup in the trunk at the XM receiver?
If not, is there a extention that does?
Thanks
read
Anyway my question should read above.
Does that extra Y harness that is used upfront on the head unit work for the XM hookup in the trunk at the XM receiver?
If not, is there a extention that does?
Thanks