
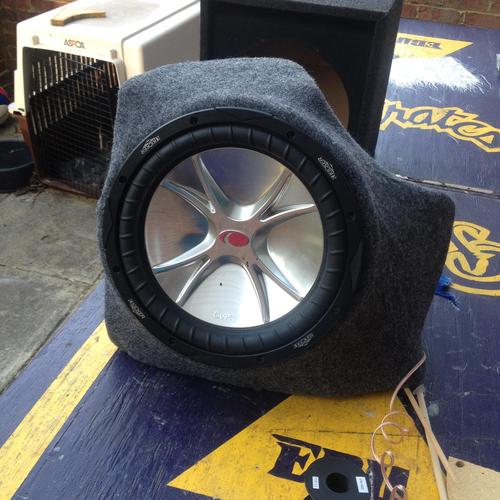
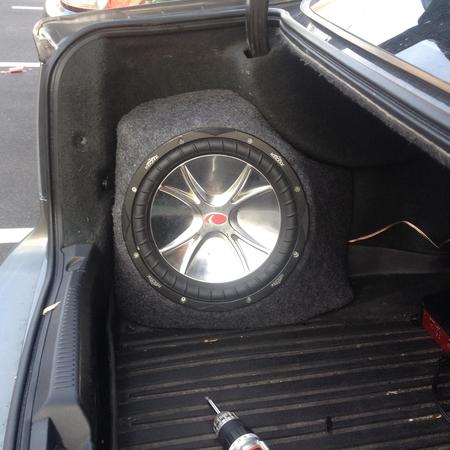
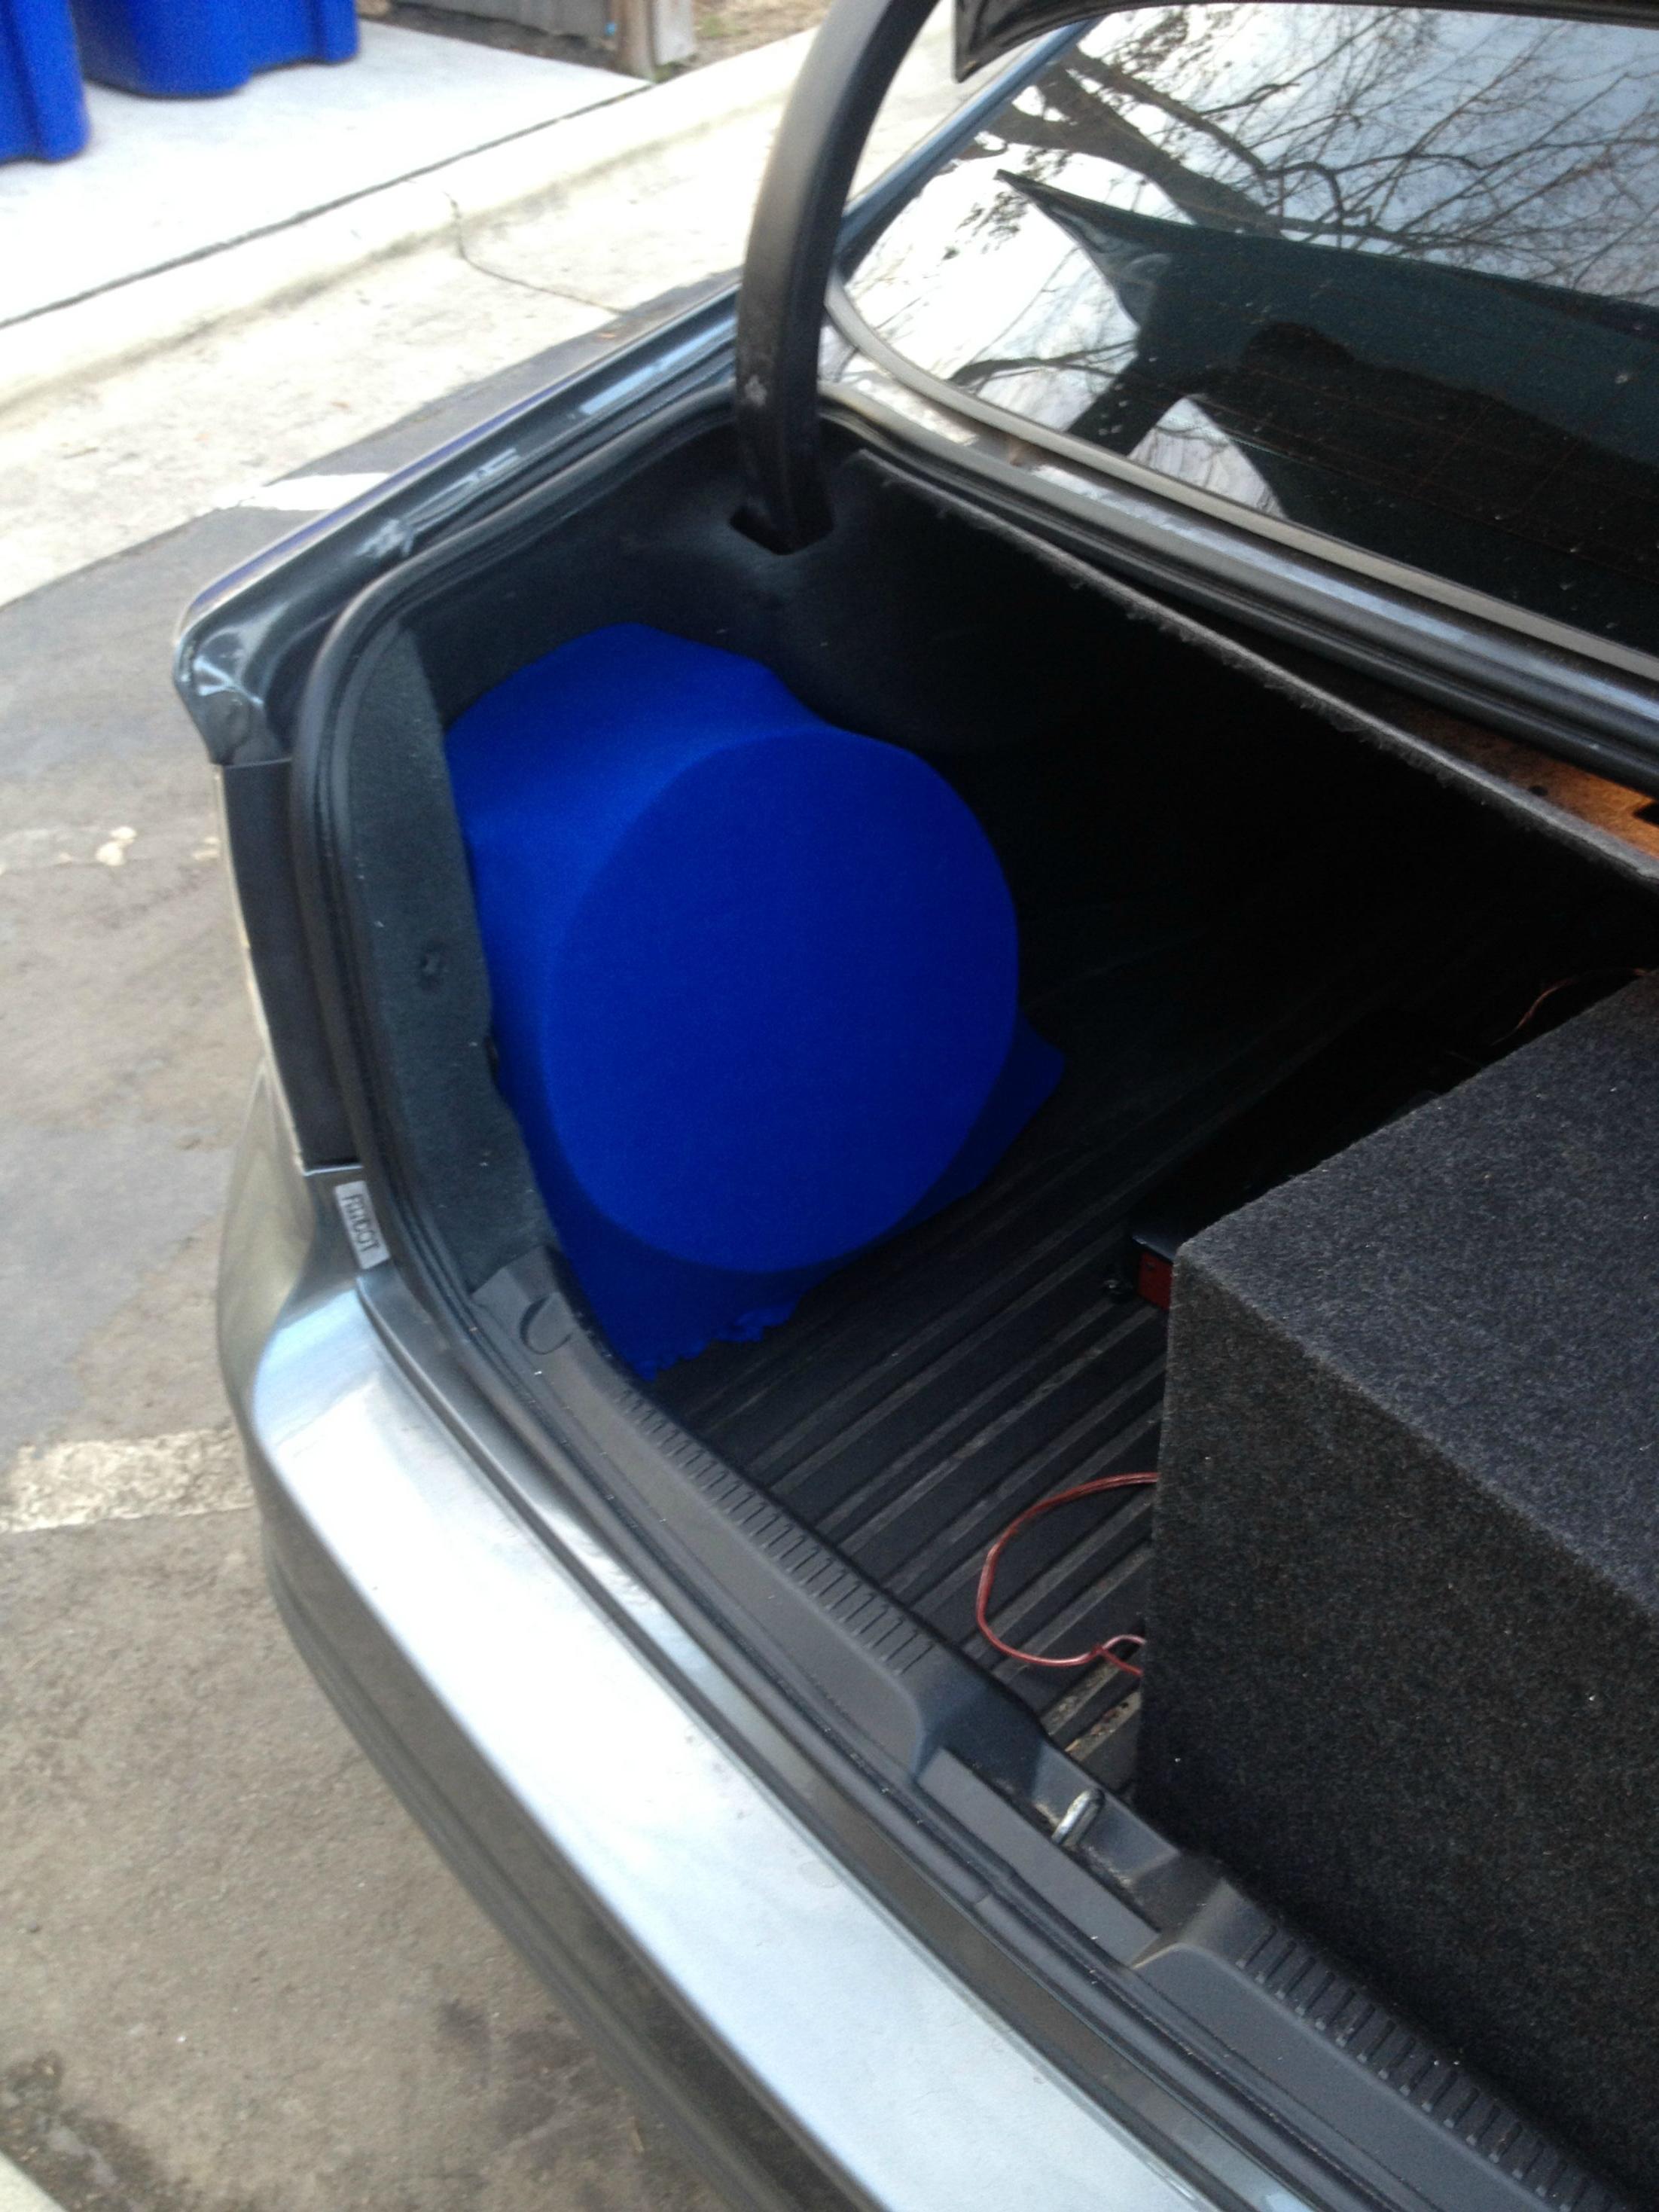
Custom Sub Enclosure for 3G trunk

with North Carolina's weather being so unpredictable it took longer than expected to finish but finally did. More than happy with the finished product now i just need to buy a new compact amp that i can mount somewhere 


Trending Topics
Thanks guys.
well the build process is pretty simple. i watched youtube videos and followed the guide from here: http://www.instructables.com/id/Cust...ofer/?ALLSTEPS It has all the materials needed,etc
And took tips and techniques from different places.
the steps are all the same except your doing it in your trunk space.
Line the corner or working area with quality Painters tape and i also used aluminum foil for extra protection. might even wanna put a old sheet or dropcloth over the rear bumper and trunk area just in case. The fiberglass resin is some nasty stuff pretty much ruins anything it touches that you dont want it to. IF it does end up somewhere unwanted ive read Acetone or strong fingernail polish remover can help clean it up.
Once the protective layer is down, add your first few layers of resin and fiberglass. try not to have air bubbles. supposedly those are very bad. once its sturdy enough remove mold from the car and continue building layers of resin and fiberglass. i did about 8 layers total.
i used a jigsaw to cut off the excess around the edges and then palm sander to sand the edges. I made my own speaker ring out of plywood since the audio store store wasnt open when i was ready for that step. wasnt perfect but it worked for me. Test fit the sub and ring to ensure its flush. apparently plywood is better than MDF in this case since it absorbs more resin. Use wooden dowels and hot glue gun to somehow make the speaker ring float in the position you want the speaker to sit. this part was kind of tricky but it worked out. make sure the ring is stable and can withstand pressure without moving.
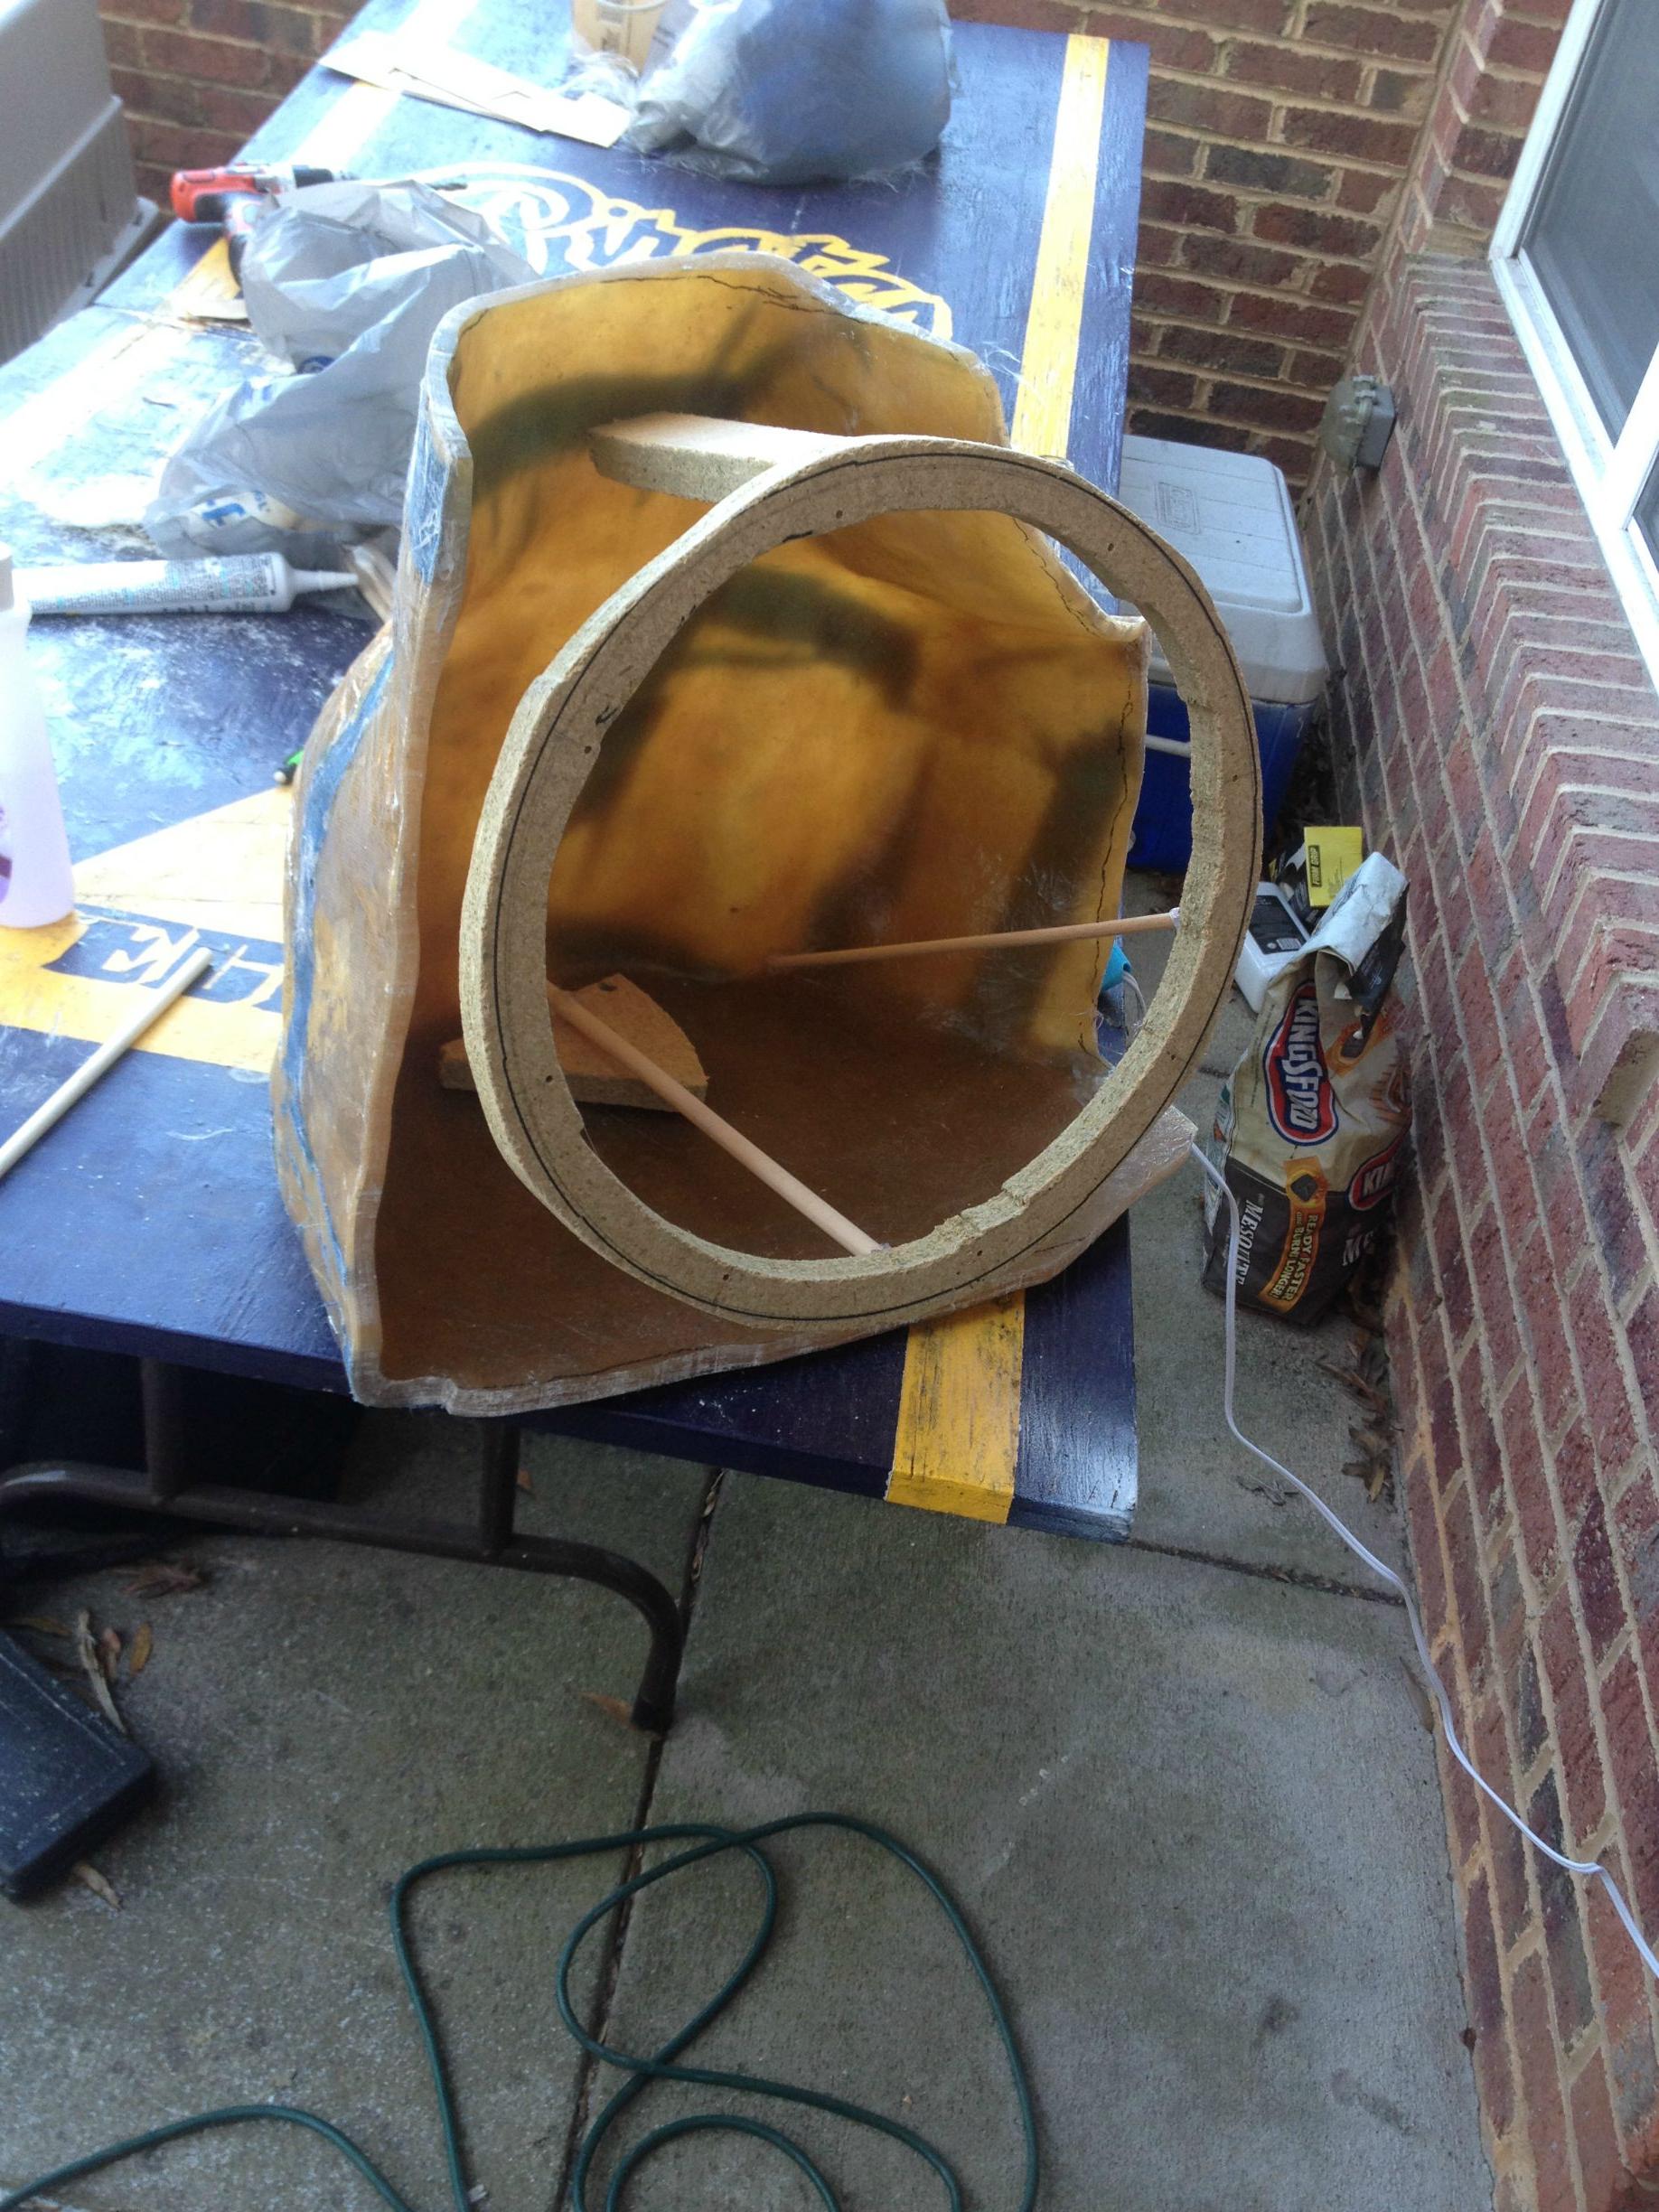
once the ring is positioned, use the hot glue gun and stretch the fleece material over the enclosure and ring. make sure its tight so the fleece doesnt sag when the resin is applied to it. i used a combination of both hot glue and spray adhesive ( i used Loctite High Performance 200) to make sure the fleece stayed in place. It should be smooth with no wrinkles.
after that apply just resin for the first layer and let it harden. Then come back and do your resin/fiberglass, about the same amount of layers as the outer shell. no need to apply resin over speaker hole. just make it harder to cut out.
once you have finished layering, use dremel (oh yea dont use a cordless dremel, they suck. get a wired dremel lol) cut out fleece and resin inside the speaker hole and excess fiberglass around edges, sand down all over. At this point dont forget to reach inside and remove the support dowels or whatever you used to steady the speaker ring! drill a small hole in the back for your speaker wire, run wire and i used silicone caulk to seal the speaker wire hole. Test fit your sub to make sure it still sits flush in the ring. Apply Carpet with spray adhesive.
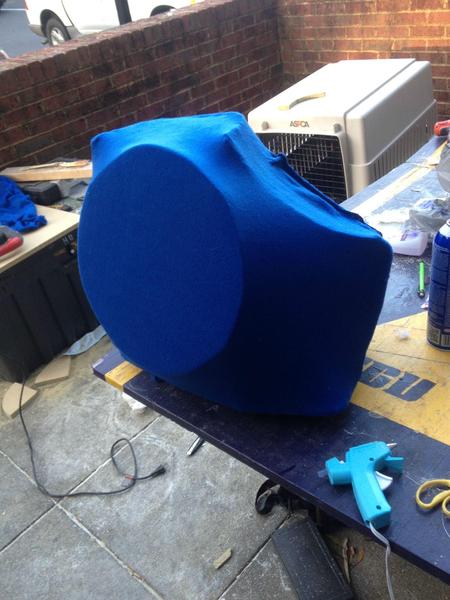
I thought about going this route but if you want to paint your enclosure, then get some Bondo and apply that and sand down for a smooth all around finish and then Paint it the color of your choice!
wire sub and insert into enclosure. Very important to pre-drill your speaker mounting holes. Screw in sub with WOOD screws and your done.

well the build process is pretty simple. i watched youtube videos and followed the guide from here: http://www.instructables.com/id/Cust...ofer/?ALLSTEPS It has all the materials needed,etc
And took tips and techniques from different places.
the steps are all the same except your doing it in your trunk space.
Line the corner or working area with quality Painters tape and i also used aluminum foil for extra protection. might even wanna put a old sheet or dropcloth over the rear bumper and trunk area just in case. The fiberglass resin is some nasty stuff pretty much ruins anything it touches that you dont want it to. IF it does end up somewhere unwanted ive read Acetone or strong fingernail polish remover can help clean it up.
Once the protective layer is down, add your first few layers of resin and fiberglass. try not to have air bubbles. supposedly those are very bad. once its sturdy enough remove mold from the car and continue building layers of resin and fiberglass. i did about 8 layers total.
i used a jigsaw to cut off the excess around the edges and then palm sander to sand the edges. I made my own speaker ring out of plywood since the audio store store wasnt open when i was ready for that step. wasnt perfect but it worked for me. Test fit the sub and ring to ensure its flush. apparently plywood is better than MDF in this case since it absorbs more resin. Use wooden dowels and hot glue gun to somehow make the speaker ring float in the position you want the speaker to sit. this part was kind of tricky but it worked out. make sure the ring is stable and can withstand pressure without moving.
once the ring is positioned, use the hot glue gun and stretch the fleece material over the enclosure and ring. make sure its tight so the fleece doesnt sag when the resin is applied to it. i used a combination of both hot glue and spray adhesive ( i used Loctite High Performance 200) to make sure the fleece stayed in place. It should be smooth with no wrinkles.
after that apply just resin for the first layer and let it harden. Then come back and do your resin/fiberglass, about the same amount of layers as the outer shell. no need to apply resin over speaker hole. just make it harder to cut out.
once you have finished layering, use dremel (oh yea dont use a cordless dremel, they suck. get a wired dremel lol) cut out fleece and resin inside the speaker hole and excess fiberglass around edges, sand down all over. At this point dont forget to reach inside and remove the support dowels or whatever you used to steady the speaker ring! drill a small hole in the back for your speaker wire, run wire and i used silicone caulk to seal the speaker wire hole. Test fit your sub to make sure it still sits flush in the ring. Apply Carpet with spray adhesive.
I thought about going this route but if you want to paint your enclosure, then get some Bondo and apply that and sand down for a smooth all around finish and then Paint it the color of your choice!
wire sub and insert into enclosure. Very important to pre-drill your speaker mounting holes. Screw in sub with WOOD screws and your done.

Team Owner
Joined: Mar 2006
Posts: 20,172
Likes: 1,818
From: Bakersfield
Looks nice, I wish I could do fiberglass work. However, if I were going to do a box I would go ported to take advantage of the efficiency of a ported box. When going sealed, IB might have been less work and taken up less room and it's much more efficient in the lower bass.
Something like this allows you to run lots of cone area while maintaining near flat response while retaining efficiency and trunk space.

How much airspace does that sub have? I'm not trying to be a downer but that enclosure looks way too small for that sub.
Something like this allows you to run lots of cone area while maintaining near flat response while retaining efficiency and trunk space.

How much airspace does that sub have? I'm not trying to be a downer but that enclosure looks way too small for that sub.
It used to be in a ported box before i made this and to tell you the truth i cant really tell the difference between the two. That or i just dont pay that much attention to it. If i can feel the bass, im happy.
Since i got the hang of working fiberglass and stuff I may make another one thats ported somewhere down the road if i get bored.

Team Owner
Joined: Mar 2006
Posts: 20,172
Likes: 1,818
From: Bakersfield
I would like to see it if you do a ported one in the future. With all else being equal, a single sub ported will give the output of two of the same subs with double the power sealed and sound just as good.
My only point was that if doing a box, it would make sense to exploit the advantages of a ported box. If going sealed, IB might be easier and it has a number of advantages.
Your enclosure looks great, I could only dream of making something that nice. I'm sure the poly fill will help as will lots of power and a little EQ. Let us know how it sounds.
Oh yeah if I get around to making a new one I'll defintely post it up.
Yea it does. I went from 2 12s in a Bandpass box to this single kicker in ported box and now sealed. But when it went to the single ported box I could def tell the difference. It hit a lot harder and sounded better than 2 12s. I mean making it sounds like something very challenging but take a chance and get ya hands dirty it'll be easier than you think
Yea it does. I went from 2 12s in a Bandpass box to this single kicker in ported box and now sealed. But when it went to the single ported box I could def tell the difference. It hit a lot harder and sounded better than 2 12s. I mean making it sounds like something very challenging but take a chance and get ya hands dirty it'll be easier than you think

Thread
Thread Starter
Forum
Replies
Last Post
rp_guy
Member Cars for Sale
9
Jul 16, 2017 07:33 AM
Yumcha
Automotive News
1
Sep 25, 2015 06:14 PM
justin.w13.walker
Car Parts for Sale
0
Sep 22, 2015 02:21 PM