When you click on links to various merchants on this site and make a purchase, this can result in this site earning a commission. Affiliate programs and affiliations include, but are not limited to, the eBay Partner Network.
Hello all. I was looking for info on adding a backup camera to my 04 TL with nav. I know I would need a add on like the one from tvandnav2go. The problem is all the tutorial I came across by searching the site are from years ago and the pictures aren't live any more. I didn't have much luck on youtube either. Can anyone post me in the right direction? Thanks in advance.
I have a 2006 Acura TL that I added a back-up camera utilizing the Navtool Interface. This interface connects in the rear trunk area to the Navigation.I have included the link as a starting point in your search to find what's best for your budget. The back-up camera in the photo is the Esky EC-170-07. In addition to the back-up camera, the Navtool interface allows me to add an external video source to display on the OEM screen. The 3rd picture is a displayed to the OEM Screen via a Media Player. The video source connects via the Navtool, however, the audio is another issue that requires additional equipment.
I have a 2006 Acura TL that I added a back-up camera utilizing the Navtool Interface. This interface connects in the rear trunk area to the Navigation.I have included the link as a starting point in your search to find what's best for your budget. The back-up camera in the photo is the Esky EC-170-07. In addition to the back-up camera, the Navtool interface allows me to add an external video source to display on the OEM screen. The 3rd picture is a displayed to the OEM Screen via a Media Player. The video source connects via the Navtool, however, the audio is another issue that requires additional equipment.
Hi wlbolton,
Nice set up! Thanks for sharing the pictures and the link. The thing I'm not clear on is how everything is powered? Navtool say's it's plug and play. Does that mean the Navtool connects to Nav unit in the trunk and the Nav unit supplies power to the Navtool and in turn supplies power to the camera?
The Navtool Interface provides the Video source to the display.
Please note, the Navtool Interface is not true plug and play. It will require require connection for a 12V Accessory (Red), Ground (Black), and Reverse (Orange) wires. The back-up camera has a Power (Red) and Ground (Black) wire along with a RCA Video connection. The RCA Video cable connects to the Video source on the Navtool, specifically the Back-up camera input (Video 2). The Black wire is ground to the vehicle and the Red wire is attached to the Orange on the Interface. It is an extremely simple install.
The website states that no wires need to be cut so I'm confused how the wires you mentioned above get connected? Are they the type that you just have to push into one of the little squares? Thanks again for your help and sorry to be a bother.
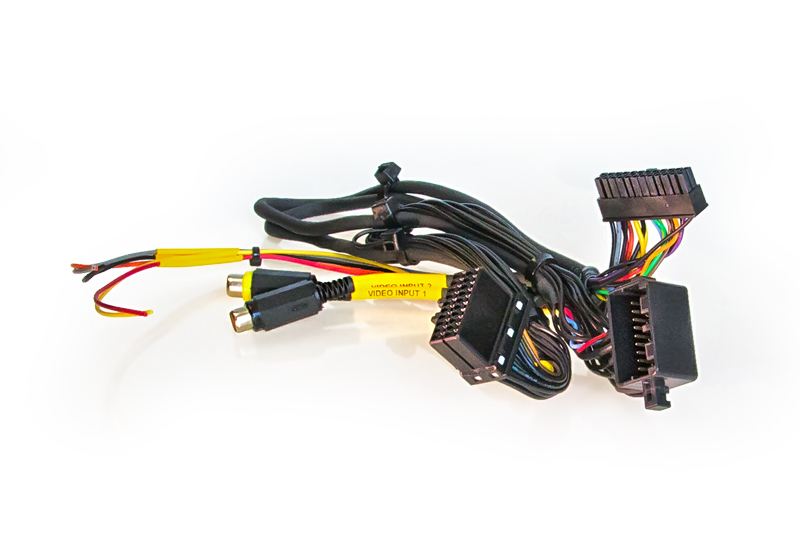
Below iis a photo of the Navtool wiring harness that will connect to the Navigation unit in the rear of your truck. Please note, there are -5- wires (Red, Black, Gray, Yellow, and Orange). Those are the wires I am referring to that requires separate connection. Also, there are -2- RCA Video inputs, Video 1 is for an external video source. I added a Media Player which allows me to play music videos that at displayed on the screen. Video 2 is for the back-up camera. Lastly, the are -3- Wire harnesses that connects as follows
(1) Unplug matching connector from the Navigation DVD-ROM, connect male connector of Navtool Interface
plug & play harness into Navigation Unit DVD-ROM
(2) Connect previously disconnected factory male connector into the female connector of the Navtool Interface
plug & play harness
(3) Connect -24- Pin harness to the Navtool Interface
Okay wlbolton that was very helpful and I thing I get it now!
Just to confirm in my use case when it comes to the five separate wires since I only want the backup camera, I would just need to make a connection between the orange from the harness and the red wire from the camera. I would also connect both the black wire from the harness and the black wire from the camera to the chassis as ground. The other 3 wires from the harness (red, grey, yellow) would go unused. Correct?
If you purchase the Navtool Interface soley for the purpose of adding a back-up camera, you only need to be concerned with the Red, Black, and Orange wires. The Red and Black wires are power and ground respectively.That's a must.. If the Red wire is not attached to a switch 12V (switch) power source, the Navtool Interface will not work. Now what you probably are not wanting to hear. You will need to get a 12V (switch) power source to the trunk area. A good source for that is Fuse Box (Fuse #32) located on the Driver side under the dash. near the foot rest pedal. Again, it's not a difficult installation, but you will need to have some knowledge of stereo wiring. You are not cutting or tapping into any existing wires. Also, when I refer to switch, that means power that is on when the ignition key is in the on position and off when the ignition key is in the off position. Hopefully I did not confuse you any further.
If you purchase the Navtool Interface soley for the purpose of adding a back-up camera, you only need to be concerned with the Red, Black, and Orange wires. The Red and Black wires are power and ground respectively.That's a must.. If the Red wire is not attached to a switch 12V (switch) power source, the Navtool Interface will not work. Now what you probably are not wanting to hear. You will need to get a 12V (switch) power source to the trunk area. A good source for that is Fuse Box (Fuse #32) located on the Driver side under the dash. near the foot rest pedal. Again, it's not a difficult installation, but you will need to have some knowledge of stereo wiring. You are not cutting or tapping into any existing wires. Also, when I refer to switch, that means power that is on when the ignition key is in the on position and off when the ignition key is in the off position. Hopefully I did not confuse you any further.
Nope you didn't confuse me further I think it clarified some things. I've been doing more researching here's where I'm at.
I would need to connect the red wire to fuse 32 under the dash. I could do so with a Add-a-circuit Mini ATM APM like this one
Is that correct?
If it is, the things I don't know is 1) What Amp fuse I would need for the second slot on the Add-a-circuit. and 2) What AWG the wire is to know what size Terminal Ring and Posi-Lock to get.
Thanks again for your help and patience. I know I could go somewhere to have someone do the install for me but I really enjoy learning how to do things myself when I can.
You are on the road to success. Those add a circuits are great.I have not used the Posi connects, but if that is your preferred method, It will work, I prefer to solder when possible.. There is an existing "Ground" point located near the Navigation Unit. The terminal ring should fit directly on the screw. Good luck and enjoy the use of your back-up Camera.
You are on the road to success. Those add a circuits are great.I have not used the Posi connects, but if that is your preferred method, It will work, I prefer to solder when possible.. There is an existing "Ground" point located near the Navigation Unit. The terminal ring should fit directly on the screw. Good luck and enjoy the use of your back-up Camera.
I�m sure you have already decided on using the nav tool but I would like to add another options for others viewing this thread. I used and autovox rear view mirror backup camera they are easy to use because they come with all the wiring and a tool and they are only $125 on amazon and probably cheaper on eBay.
Hi wlbolton,
Navtool say's it's plug and play. Does that mean the Navtool connects to Nav unit in the trunk and the Nav unit supplies power to the Navtool and in turn supplies power to the camera?
Yes it is plug & pray. The Navtool is activated when the backup lights come on. I have to admit though I'm not happy with the Esky EC-170 camera. It glares out at least half the time in all lighting conditions making the image a joke. Writing a note to all the eBay sellers of that camera has yielded NO responses, which tells me they know its a piece of crap.
.
.
WOW. I feel fortunate not to have any problems with the Esky EC-170 back-up camera. The photo in my earlier post is everyday with no glare, except at night when the lighting condition are not the brightest. Overall, I'm pleased.
I�m sure you have already decided on using the nav tool but I would like to add another options for others viewing this thread. I used and autovox rear view mirror backup camera they are easy to use because they come with all the wiring and a tool and they are only $125 on amazon and probably cheaper on eBay.
does this mirror is also auto dimming like original one ?
Mirror from this link doesn't seem to have auto dimming feature. Description says "Auto Adjusting Brightness". They mean that the display's brightness is auto adjusted. There is no info about auto dimming of the mirror itself, so assume it doesn't have it.
Also:
The driver can see if children, adults, pets or objects are in the "danger" zone.
Mirror from this link doesn't seem to have auto dimming feature. Description says "Auto Adjusting Brightness". They mean that the display's brightness is auto adjusted. There is no info about auto dimming of the mirror itself, so assume it doesn't have it.
Also:
for me its a must to have auto dimming mirror especialy when You driving a lot in the night or coming back from work when traffic is heavy especialy in winter when day is short it makes driving better when dumb ass is behind You with high beams ... which is usual here jn NY/NJ...
TL is not 10meter Limo , so I can live without camera thats what i ve note = backing up cameras turning off thinking...soon they will sell cars without mirrors... in NYC they could sell cars without blinkers..heheh but this jungle is different story
I've been using an aftermarket camera on my 06, and I want to make it look more stock, so I was thinking about getting a camera from a 07-08. Would it be possible to use the camera somehow and send the output to the RCA input of my Naviks unit?
wlbolton,I ran across this thread and was wondering how you mounted your camera? The 04-06 base models do not have a third hole in the license plate bezel for a camera, so how did you do this? Do you have any pictures? I am in the process of installing a Nexus 7 tablet into my 2005 base and purchased/tested the following Esky camera:
I was ALMOST ready to pull the trigger on a 07-08 Type-S license plate bezel, but was informed that the clips do not line up exactly with the 04-06 models. I looked at a few images and it does indeed look like they are different, so itwont snap into place without re-drilling some holes in my trunk lid (which I do not want to do).
Yes it is plug & pray. The Navtool is activated when the backup lights come on. I have to admit though I'm not happy with the Esky EC-170 camera. It glares out at least half the time in all lighting conditions making the image a joke. Writing a note to all the eBay sellers of that camera has yielded NO responses, which tells me they know its a piece of crap.
.
.
Have you found/replaced your backup cam with a better one?
Do you have an aftermarket stereo unit? I want to install a back up camera in my 06 TL and I would like for you to educate me how this is done. It looks like I have to get this "Navtool" and the back up camera. Any info will be greatly appreciated...
Originally Posted by wlbolton
Zarlco,
I have a 2006 Acura TL that I added a back-up camera utilizing the Navtool Interface. This interface connects in the rear trunk area to the Navigation.I have included the link as a starting point in your search to find what's best for your budget. The back-up camera in the photo is the Esky EC-170-07. In addition to the back-up camera, the Navtool interface allows me to add an external video source to display on the OEM screen. The 3rd picture is a displayed to the OEM Screen via a Media Player. The video source connects via the Navtool, however, the audio is another issue that requires additional equipment.


 thats what i ve note = backing up cameras turning off thinking...soon they will sell cars without mirrors... in NYC they could sell cars without blinkers..heheh but this jungle is different story


