
Trunk LED or Cathode Light
 02-03-2011 | 09:55 PM
#1

Thread Starter
Instructor
Joined: Sep 2010
Posts: 175
Likes: 2
From: FL
Trunk LED or Cathode Light
Hi can someone tell me what type of bulb the inside trunk light is? Please let me know if you would go with a led bulb or the cold cathode.
Also a link to a thread with instructions on how to change all LED bulbs on the car out would be very helpful. I've done quite a few of them but would like instructions before doing the rest to make sure I don't break anything while removing.
Thank you.
Also a link to a thread with instructions on how to change all LED bulbs on the car out would be very helpful. I've done quite a few of them but would like instructions before doing the rest to make sure I don't break anything while removing.
Thank you.
02-03-2011 | 10:32 PM
#3
The cathodes look really great, I have them installed to illuminate my rear plate.
BUT
They take awhile to warm up and get bright. When you're going in the trunk, its probably going to be a quick in-and-out. You're not going to open the trunk and be digging around in there for 10 minutes while the lights come up. I think the CCFL might be a poor choice for illuminating the trunk. Works fine for the plate, because once they warm up they are going to stay on bright until you're done driving.
02-03-2011 | 11:47 PM
#4
um, not true. there's different types of leds. I had cathodes before and i took them out and switch to leds and i haven't seen any cathodes out brighten my license plates light before.
02-04-2011 | 04:56 AM
#5
i've also had both. im sure there might be some LEDs that are super high powered that emit more light than cathodes. however, dont forget that a lot of times leds LOOK bright because it comes from a concentrated spot. cathodes on the other hand, emit light evenly all around a larger area. an example is when people use LEDs for foglights. that thing gives you nearly zero visibility but looking into the led it will still appear bright due to its intensity.
02-04-2011 | 09:21 AM
#6
Did you even look in the 3G Service Department? I'll give you a hint instead of spoon feeding it. It's in section "G Lighting"!
Last edited by ggesq; 02-04-2011 at 09:23 AM.
Trending Topics
02-04-2011 | 10:47 AM
#9
Plastic schmastic
Joined: Dec 2010
Posts: 305
Likes: 7
From: DFW
 02-04-2011 | 11:27 AM
#10
^ yours is neatly packed. Mine is just a mess. 2 years ago I helped my boss paint his house, still got stuff in the trunk from that day. Tranny fluid bottles from 2 years ago. Random articles of clothing that are not even mine. Shoes, Steel toe boots that are not mine or anyone's that I know. Security camera, like a big one. a bunch of water bottles filled with alcohol and pop, a year old. And some tennis rackets haha I hate cleaning out my trunk so I just never look in there.
02-04-2011 | 01:34 PM
#12
Senior Moderator
Joined: Mar 2005
Posts: 11,995
Likes: 361
From: St. Cloud, FL
02-04-2011 | 03:09 PM
#13
Make it so
Joined: Oct 2009
Posts: 482
Likes: 59
From: Austin, Texas
Either way, could you provide the model and item number for that LED unit, and install instructions (if you have them)?
Many thanks!
 02-04-2011 | 05:08 PM
#14
Drifting
Joined: Oct 2006
Posts: 2,683
Likes: 212
From: CA
unfortunately it wasnt plug and play.
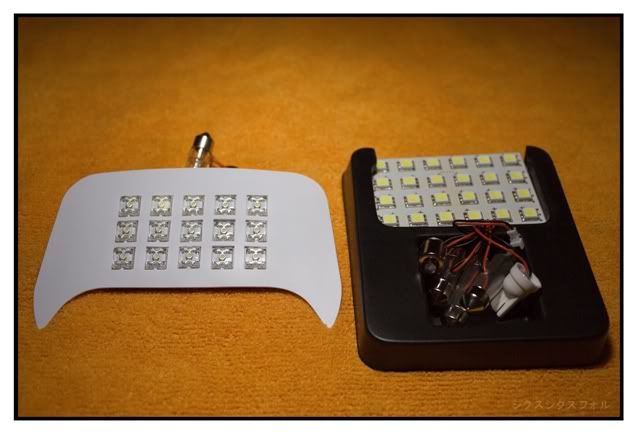
the connector is plug and play. its a typical 194 wedge type connector (same socket as the front door courtesy light). the actual bulb housing in the trunk is identical to the pain-in-the-ass vanity mirror light. but it pops off easily.
what i did was pop that off, connect the socket, ran the wire outside the light housing, put back the housing and then stuck the LED board ON the outer lens of the housing.
the size of the LED board is just enough to cover the trunk light housing. i used double stick tape to hold it there.
the LED board itself is generic. I got mine from a friend. its a 50/50 LED board or something like that, which is super bright. not sure where he got it from. the socket used by the connector again is a 194-type wedge socket.
02-04-2011 | 05:10 PM
#15
Drifting
Joined: Oct 2006
Posts: 2,683
Likes: 212
From: CA
02-04-2011 | 05:19 PM
#16
02-04-2011 | 06:34 PM
#17
Make it so
Joined: Oct 2009
Posts: 482
Likes: 59
From: Austin, Texas
unfortunately it wasnt plug and play.
the connector is plug and play. its a typical 194 wedge type connector (same socket as the front door courtesy light). the actual bulb housing in the trunk is identical to the pain-in-the-ass vanity mirror light. but it pops off easily.
what i did was pop that off, connect the socket, ran the wire outside the light housing, put back the housing and then stuck the LED board ON the outer lens of the housing.
the size of the LED board is just enough to cover the trunk light housing. i used double stick tape to hold it there.
the LED board itself is generic. I got mine from a friend. its a 50/50 LED board or something like that, which is super bright. not sure where he got it from. the socket used by the connector again is a 194-type wedge socket.
Although it sounds goofy to do so, putting the LED board outside of the lens cover is no big deal at all. I'm just not ambitious enough to want to run extra electrical wires throughout my car, and your solution sounded perfect either way. Did you have to cut any holes in the fabric to run the wire outside of the housing? Or did you cut into the housing itself?
Lastly, have you had any problems with anything knocking into the LED board? It sounded like you just stuck it up there and left it like that.
Sorry for all the questions, but I do appreciate your willingness to share. One love.
02-04-2011 | 08:57 PM
#18
Just to make sure I follow, the actual install doesn't require any further hookups besides the electrical connection for the existing light, right?
Although it sounds goofy to do so, putting the LED board outside of the lens cover is no big deal at all. I'm just not ambitious enough to want to run extra electrical wires throughout my car, and your solution sounded perfect either way. Did you have to cut any holes in the fabric to run the wire outside of the housing? Or did you cut into the housing itself?
Lastly, have you had any problems with anything knocking into the LED board? It sounded like you just stuck it up there and left it like that.
Sorry for all the questions, but I do appreciate your willingness to share. One love.
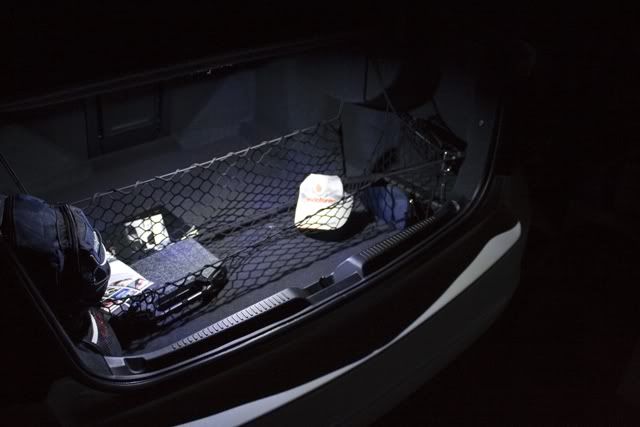
there wasnt any need to cut anything or cutting the housing. the board came with 3m tape on the back. What i did was use the 168 connector pluged it in run the wire out and put back on the lens cover. after that i pulled off the tape and stuck it onto the lens cover. its been on there for a good 6 month and everyone always commented on how bright it is.
 02-05-2011 | 04:23 AM
#20
Instructor
Joined: Jul 2010
Posts: 220
Likes: 7
From: San Jose
 o and I used a LED plate for my trunk light. and it's more than enough to light the trunk, simple plug n play
02-05-2011 | 04:42 AM
o and I used a LED plate for my trunk light. and it's more than enough to light the trunk, simple plug n play
02-05-2011 | 04:42 AM
#21
Registered TL Owner
Joined: Oct 2006
Posts: 1,487
Likes: 95
From: California
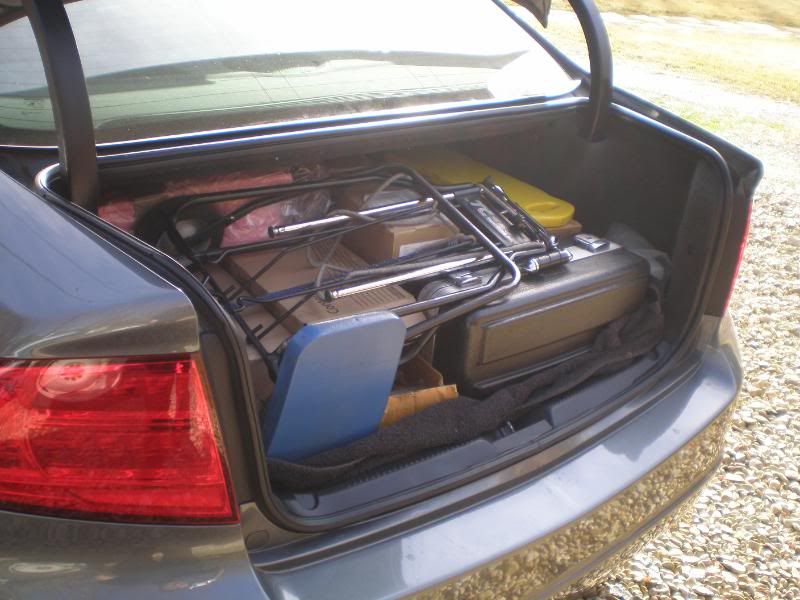
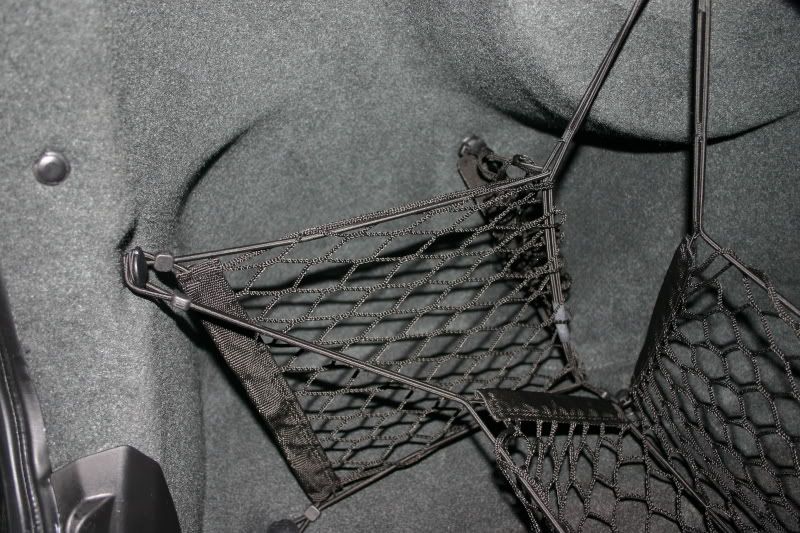
This is how the net is supposed to go. Took these about to a year ago to help someone else figure it out. Hope they help
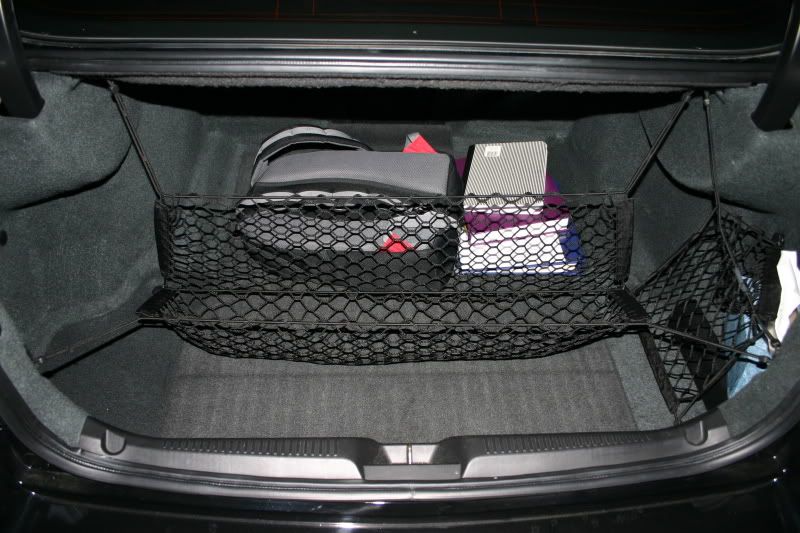
Option 1 (How I always have it)
Option 2, Over the Navi Drive
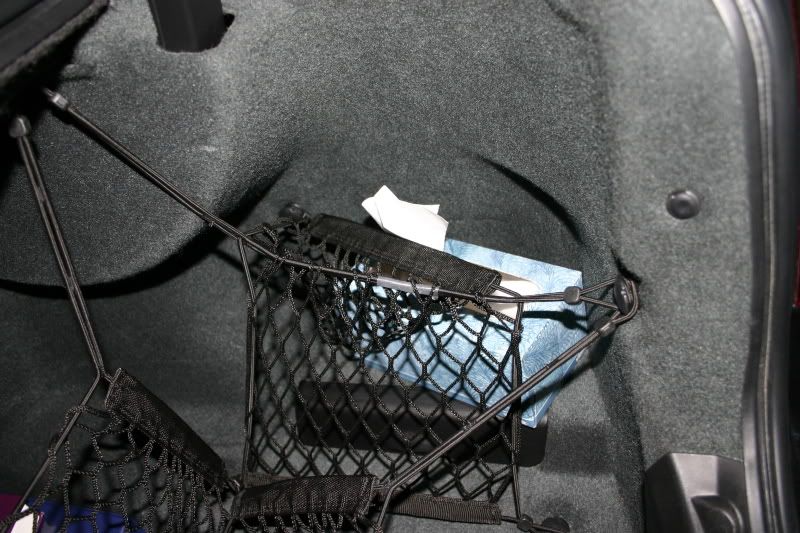
Notice how this option makes a little pocket thing on the top, not sure if it would actually be usable though.
Option 1 (How I always have it)
Option 2, Over the Navi Drive
Notice how this option makes a little pocket thing on the top, not sure if it would actually be usable though.
Last edited by pnoi521; 02-05-2011 at 04:45 AM.
02-05-2011 | 11:53 AM
#22
02-05-2011 | 12:56 PM
#23
Drifting
Joined: Oct 2006
Posts: 2,683
Likes: 212
From: CA
Just to make sure I follow, the actual install doesn't require any further hookups besides the electrical connection for the existing light, right?
Although it sounds goofy to do so, putting the LED board outside of the lens cover is no big deal at all. I'm just not ambitious enough to want to run extra electrical wires throughout my car, and your solution sounded perfect either way. Did you have to cut any holes in the fabric to run the wire outside of the housing? Or did you cut into the housing itself?
Lastly, have you had any problems with anything knocking into the LED board? It sounded like you just stuck it up there and left it like that.
Sorry for all the questions, but I do appreciate your willingness to share. One love.
Although it sounds goofy to do so, putting the LED board outside of the lens cover is no big deal at all. I'm just not ambitious enough to want to run extra electrical wires throughout my car, and your solution sounded perfect either way. Did you have to cut any holes in the fabric to run the wire outside of the housing? Or did you cut into the housing itself?
Lastly, have you had any problems with anything knocking into the LED board? It sounded like you just stuck it up there and left it like that.
Sorry for all the questions, but I do appreciate your willingness to share. One love.
and Ive had mine set up this way for over three years now, nothing's ever hit it or any of the LEDs go out.
I pretty much confirm thait's response.
sixsix four is running the exact same thing i have =]
there wasnt any need to cut anything or cutting the housing. the board came with 3m tape on the back. What i did was use the 168 connector pluged it in run the wire out and put back on the lens cover. after that i pulled off the tape and stuck it onto the lens cover. its been on there for a good 6 month and everyone always commented on how bright it is.
there wasnt any need to cut anything or cutting the housing. the board came with 3m tape on the back. What i did was use the 168 connector pluged it in run the wire out and put back on the lens cover. after that i pulled off the tape and stuck it onto the lens cover. its been on there for a good 6 month and everyone always commented on how bright it is.
02-05-2011 | 05:27 PM
#24
Make it so
Joined: Oct 2009
Posts: 482
Likes: 59
From: Austin, Texas
yup. exactly. the only thing electrical you have to "mess" with is plugging the connector. then you just put everything back into place, run the wire outside the light housing and tape the LED board on the cover. no modifications to the housing itself. i pop the LED board off, its back to what it was.
and Ive had mine set up this way for over three years now, nothing's ever hit it or any of the LEDs go out.
I pretty much confirm thait's response.
and Ive had mine set up this way for over three years now, nothing's ever hit it or any of the LEDs go out.
I pretty much confirm thait's response.
http://www.superbrightleds.com/cgi-b...cblamp_T10.htm
T10s- the connector type looks the same, but there are two different styles: the 36 and 24 LED styles, $5 difference between the two.
My brain is telling me that buying the 36 LED would give more light output, but then again the same voltage is going into it so I'm not sure that would make sense.
I don't know of any other websites that sell these (you all probably do), but I'm also curious as if there's a difference between the ones that have the LED bulbs exposed, and the ones with just the yellow sticker-type bulbs. Any thoughts?
My apologies for being clueless, I've never bought these before so I figure I might as well ask.
02-05-2011 | 10:10 PM
#25
trying to do my license plate lights and those 3M wire taps are terrible. They don't pierce the wire so now I have to strip the wire and use the electrical tape. Such a hassle
02-06-2011 | 12:20 PM
#27
Drifting
Joined: Oct 2006
Posts: 2,683
Likes: 212
From: CA
Again, thank you for the info! I think I found something very similar (if not the same) as what you've both got in your trunks:
http://www.superbrightleds.com/cgi-b...cblamp_T10.htm
T10s- the connector type looks the same, but there are two different styles: the 36 and 24 LED styles, $5 difference between the two.
My brain is telling me that buying the 36 LED would give more light output, but then again the same voltage is going into it so I'm not sure that would make sense.
I don't know of any other websites that sell these (you all probably do), but I'm also curious as if there's a difference between the ones that have the LED bulbs exposed, and the ones with just the yellow sticker-type bulbs. Any thoughts?
My apologies for being clueless, I've never bought these before so I figure I might as well ask.
if you can see if the 36LED will fit. mine is only a 24 and its just the same size as the lens housing and opening. the 36 might be too big to properly fit.
02-06-2011 | 09:42 PM
#28
Make it so
Joined: Oct 2009
Posts: 482
Likes: 59
From: Austin, Texas
Again, a million thanks for your answers. Very grateful, I will definitely have this baby installed by the end of the week at this rate.
02-06-2011 | 10:01 PM
#29
didn't have a dremel so I just stripped the wires and electric tape wrapped them together. It works well and if i have to go back to stock, I just take the wires off and wrap it back up with electric tape. Nothing fancy but it works. And I finally got my trunk net the way it's suppose to be because of this thread haha
02-06-2011 | 11:54 PM
#30
Drifting
Joined: Oct 2006
Posts: 2,683
Likes: 212
From: CA
Hmmm you bring up a good point. Are the dimensions on the one I found the same as the one you have? If not I'll have to find somewhere else online whose dimensions are closer to the size you recommend.
Again, a million thanks for your answers. Very grateful, I will definitely have this baby installed by the end of the week at this rate.
Again, a million thanks for your answers. Very grateful, I will definitely have this baby installed by the end of the week at this rate.
glad to help.
02-10-2011 | 08:12 AM
#32
mine takes a few seconds to warm up but I am also in - 30c weather at the moment so it's expected. In the summer I don't think there should be any problems

Thread
Thread Starter
Forum
Replies
Last Post
benny_jdm
Car Parts for Sale
12
01-31-2016 06:15 AM
handsom-hustla
Car Parts for Sale
70
11-13-2015 05:04 PM
oyayjoe
Member Cars for Sale
1
09-12-2015 04:40 PM