
How-To: Remove carpet/interior
 01-12-2013, 08:52 PM
#1

How-To: Remove carpet/interior
So I just picked up an '06 TL 2 days ago with 19k on the clock. Got a deal I couldn't pass up. Carpet is a bit dingy so I figured I would just go ahead and replace it. I looked around a bit and couldn't find a how to on removing carpet so I made my own...here goes:
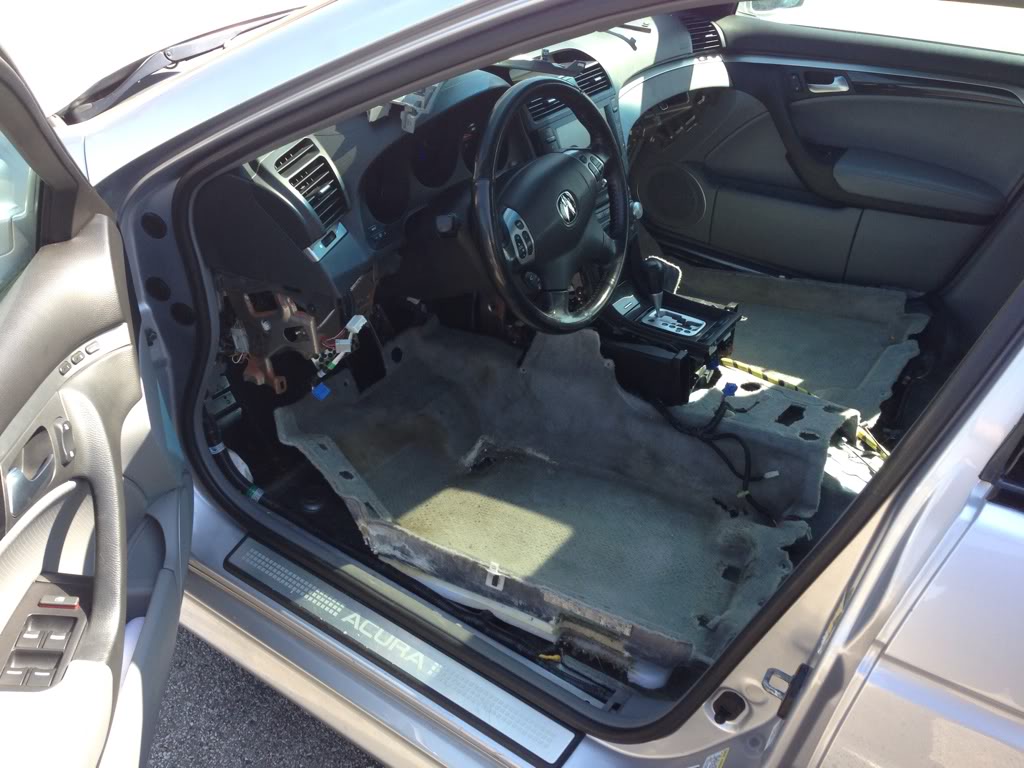
The patient:

Start by removing front seats. 4 bolts on each. No pics for that as I think most everyone is able to locate the bolts and remove seats.
The passenger seat belt is attached to the seat (driver side is not) remove cover

next press this little peg to release the seat belt

belt released

Rear Seat bottom:
Pull the release that is located in the center of each seat. If you were sitting in the rear seat it would be right between your legs. There are 2 of these releases. One on each side

A little bit better shot with seat cushion released

Next unbolt 1 bolt at the back of the seat cushion and you can remove it (on the passenger side)

On to the backrest:
Remove headrests and remove 2 bolts one on each side in this location

Finally remove 2 bolts at the bottom of the back rest on each edge toward the door. I forgot to take a picture here, but you can't miss it. Then unbolt seatbelts and leave them up in the rear window
Next up interior trim:
Remove Fusebox trim. Carefully pry it loose. It;s only held on by x-mas tree clips

If you're not sure what the clips look like

work your way down each side by removing driver doorsil trim then lower b-pillar trim, rear passenger doorsil trim and finally the most rearward trim next to rearseat cushion. All are held on by x-mas tree clips. Repeat on other side
driver doorsil

Lower B-pillar

rear driver side doorsil

and lastly the seat trim (the rearmost piece)for lack of a better description

Center console:
Start by removing these 2 screws on each side (4 total)

2 more screws in the console cubby under the rubber piece

Next remove the metal trim pieces on each side of the console. Carefully pry them loose. They are held in by metal clips

Clips look like this

Next unscrew the shift handle...it simply twists off

Remove cupholder, forgot pics here. But pretty selfexplanatory
Remove these 2 screws on each side (4 total) and you should be able to slide the rear portion of the consle after you unplug connections

Next remove the bottom cover under the steering wheel. Again, these are held on by metal clips so gently pulling will release. There is one plastic clip here you need to remove

Move over to the passenger side and remove glove box by gently pulling on each corner

and the other corner

gently push this plastic bracket and it will release

and finally remove 2 bolts (1 on each side) and set the glove box aside

Remove the trim piece behind the glove box. Held on by 2 screws. Here's one, you'll see the other

then push the center of this clip in (2 total) and pull out

Gently pull and metal clips will release

Next remove the side console trim piece on driver side or passenger. There are 3 screw and metal clips. Remove the screws and gently pry the piece off. Repeat for passenger side


Next remove the trim ring around the shifter

remove 2 screws and you can remove this part of the console. Gently pull back and up and it will release. Disconnect plugs


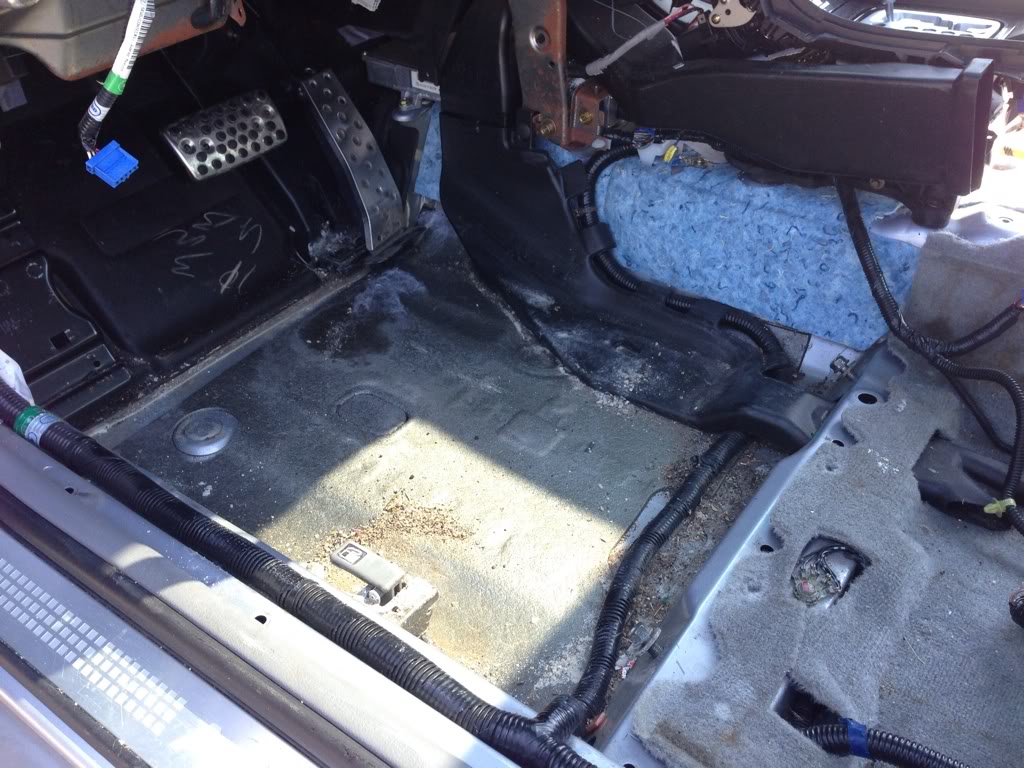
Almost there. Next release the gas pedal. There is a little pushclip in the back of the gas pedal at the bottom. Push it in and lift pedal straight up. Hopefully you can tell in this shot what the clip looks like

Next remove foot rest, dead pedal or whatever you like to call it.


Next remove this bolt and the 2 other bolts holding this bracket. You can see one of the bolts in the background

Next remove 4 bolts that is holding the shifter in place. 2 in the back and 2 in the front


Now you should be able to lift the shifter assembly out of the way and remove carpet.

You can go a step further and disconnect linkage and remove handbrake, but since my carpet is trash. I just decided to cut slits in it and slide it around the handbrake....That's it.
Hopefully someone can find this guide useful.
The patient:
Start by removing front seats. 4 bolts on each. No pics for that as I think most everyone is able to locate the bolts and remove seats.
The passenger seat belt is attached to the seat (driver side is not) remove cover
next press this little peg to release the seat belt
belt released
Rear Seat bottom:
Pull the release that is located in the center of each seat. If you were sitting in the rear seat it would be right between your legs. There are 2 of these releases. One on each side
A little bit better shot with seat cushion released
Next unbolt 1 bolt at the back of the seat cushion and you can remove it (on the passenger side)
On to the backrest:
Remove headrests and remove 2 bolts one on each side in this location
Finally remove 2 bolts at the bottom of the back rest on each edge toward the door. I forgot to take a picture here, but you can't miss it. Then unbolt seatbelts and leave them up in the rear window
Next up interior trim:
Remove Fusebox trim. Carefully pry it loose. It;s only held on by x-mas tree clips
If you're not sure what the clips look like
work your way down each side by removing driver doorsil trim then lower b-pillar trim, rear passenger doorsil trim and finally the most rearward trim next to rearseat cushion. All are held on by x-mas tree clips. Repeat on other side
driver doorsil
Lower B-pillar
rear driver side doorsil
and lastly the seat trim (the rearmost piece)for lack of a better description
Center console:
Start by removing these 2 screws on each side (4 total)
2 more screws in the console cubby under the rubber piece
Next remove the metal trim pieces on each side of the console. Carefully pry them loose. They are held in by metal clips
Clips look like this
Next unscrew the shift handle...it simply twists off
Remove cupholder, forgot pics here. But pretty selfexplanatory
Remove these 2 screws on each side (4 total) and you should be able to slide the rear portion of the consle after you unplug connections
Next remove the bottom cover under the steering wheel. Again, these are held on by metal clips so gently pulling will release. There is one plastic clip here you need to remove
Move over to the passenger side and remove glove box by gently pulling on each corner
and the other corner
gently push this plastic bracket and it will release
and finally remove 2 bolts (1 on each side) and set the glove box aside
Remove the trim piece behind the glove box. Held on by 2 screws. Here's one, you'll see the other
then push the center of this clip in (2 total) and pull out
Gently pull and metal clips will release
Next remove the side console trim piece on driver side or passenger. There are 3 screw and metal clips. Remove the screws and gently pry the piece off. Repeat for passenger side
Next remove the trim ring around the shifter
remove 2 screws and you can remove this part of the console. Gently pull back and up and it will release. Disconnect plugs
Almost there. Next release the gas pedal. There is a little pushclip in the back of the gas pedal at the bottom. Push it in and lift pedal straight up. Hopefully you can tell in this shot what the clip looks like
Next remove foot rest, dead pedal or whatever you like to call it.
Next remove this bolt and the 2 other bolts holding this bracket. You can see one of the bolts in the background
Next remove 4 bolts that is holding the shifter in place. 2 in the back and 2 in the front
Now you should be able to lift the shifter assembly out of the way and remove carpet.
You can go a step further and disconnect linkage and remove handbrake, but since my carpet is trash. I just decided to cut slits in it and slide it around the handbrake....That's it.
Hopefully someone can find this guide useful.

The following users liked this post:
hondeducation (11-22-2016)
01-12-2013, 09:50 PM
#3
How come the carpet is trashed at only 19k miles? :/
 01-13-2013, 08:39 AM
#6
New carpets were about $300. But that's not the point. Of course if I wanted to pinch pennies I could have done any number of things and still had sand and other funky smells in that carpet. I really dont know how he managed to get the carpet so filthy when the rest of the car is pristine.
Besides I'm ripping out all the sound deadening material and laying down a combo of fatmat/acoustic foam to quiet down the ride and keep the music in the car. Nothing screams rice as when someone pulls up next to you and all you hear is heavy base and crazy rattle.
Besides I'm ripping out all the sound deadening material and laying down a combo of fatmat/acoustic foam to quiet down the ride and keep the music in the car. Nothing screams rice as when someone pulls up next to you and all you hear is heavy base and crazy rattle.
Trending Topics
01-13-2013, 12:01 PM
#9
Team Owner
iTrader: (2)
Join Date: Jan 2008
Location: Kansas City, MO (Overland Park, KS)
Posts: 36,545
Received 6,470 Likes
on
5,162 Posts
Very well done write-up.
 01-13-2013, 01:03 PM
#11
Suzuka Master
just make sure you re-thread those upper bolts in partially behind the headrests before trying to install the rear seatback. They did not need to be removed completely.
04-05-2013, 07:55 AM
#15
Race Director
iTrader: (1)
^Order from any one of the OEM forum vendors. Last I looked they were about what he said, $117 each for the front and back.
They are listed in the "Floor Mat" section.
I too plan on going with a different color. I want to replace my grey with black.
They are listed in the "Floor Mat" section.
I too plan on going with a different color. I want to replace my grey with black.


 04-09-2013, 04:23 PM
#18
Advanced
hey mille_3,
if you cut your old carpet and slid it around the hand brake, how did you put in the replacement carpet without removing the handbrake? but awesome thread! im glad i stumbled across this because i really need to replace my carpet. now i have the motivation and ill be able to run my speaker wire under the carpet instead of it hanging out around the center console.
if you cut your old carpet and slid it around the hand brake, how did you put in the replacement carpet without removing the handbrake? but awesome thread! im glad i stumbled across this because i really need to replace my carpet. now i have the motivation and ill be able to run my speaker wire under the carpet instead of it hanging out around the center console.
04-09-2013, 11:01 PM
#19
hey mille_3,
if you cut your old carpet and slid it around the hand brake, how did you put in the replacement carpet without removing the handbrake? but awesome thread! im glad i stumbled across this because i really need to replace my carpet. now i have the motivation and ill be able to run my speaker wire under the carpet instead of it hanging out around the center console.
if you cut your old carpet and slid it around the hand brake, how did you put in the replacement carpet without removing the handbrake? but awesome thread! im glad i stumbled across this because i really need to replace my carpet. now i have the motivation and ill be able to run my speaker wire under the carpet instead of it hanging out around the center console.
04-10-2013, 08:09 PM
#20

awww, no "Dynamat" ?
04-29-2013, 09:09 AM
#22
Advanced
Hey guys I was curious to know where you purchased your replacement carpet from. I was planning on Rosing mine from Honda parts unlimited. But then I went to checkout it said that shipping was $190! That's ridiculous. That's more than half the cost of the replacement carpet.
11-22-2016, 08:43 AM
#23
Instructor
your how-to saved me a headache from figuring out how to remove that damn gas pedal! that was the last step I was missing, until I found your thread. thanks for sharing, and i hope the car has been treating you well!
The following users liked this post:
justnspace (11-22-2016)
11-22-2016, 09:53 AM
#24
Instructor
Excellent write up bro. Our TL just hit 110k and we've sprung for new leather for the front seats and console. Plan on doing the seats in a few months when the weather is warmer so will look at replacing carpet as well. Maybe cleaning depending on cost. Thanks for the pics and step-by-step.
 09-21-2019, 01:47 PM
#26


Thread
Thread Starter
Forum
Replies
Last Post
dainmezron
4G TL (2009-2014)
16
10-16-2015 06:56 PM
detailersdomain
Wash & Wax
3
10-09-2015 10:13 PM