

DIY: Reverse light/tailgater switch without running line to trunk
 04-21-2011, 12:43 AM
#1
2007 TL Type-S NBP
Thread Starter
Join Date: Jan 2011
Location: Rexburg, Idaho
Age: 49
Posts: 317
Likes: 0
Received 7 Likes
on
6 Posts
DIY: Reverse light/tailgater switch without running line to trunk
First off, thanks to bzyrice and his awesome compilation of others fine work.
This thread is for people who may already have an amp or some other power line going to the trunk and don't feel like tearing apart their interior to run a line just for the tailgater switch. I basically just used bzyrice's thread and modified it to use power straight off the fuse box and tap into the reverse light wire in the bundle of wires in the drivers side kick panel instead of the trunk lid. Here's the instructions with pics. Enjoy!
Parts needed: "Add-A-Circuit" ($7), Rocker switch ($4), Splice Quick-connectors($3), wire, quick-connectors ($3)
Tools needed: Phillips screwdriver, trim tool or broad flat head screwdriver, wire stripper/crimper/cutter, drill and knife
1. First, remove your drivers side kick panel, exposing your fuse block and the big wiring bundle that drops down from above and heads towards the trunk along the door sill.


2. Slice open the electrical tape holding together the wire bundle. Needless to say, be careful not to damage any wires while slicing the tape.
3. Dig around in the bundle and find the two wires that are green with two silver dots on them. There will be one small wire, I think it's 18 gauge, and one even smaller wire, I think 20 gauge. In my wiring bundle they were near the back of the bundle, as Sir Murphy requested.


4. Next, take the smaller of the two wires (green with two silver dots) and either splice in using a quick-splice connector or simply cut the wire and use a barrel connector to crimp it back together adding in the wire to your switch. Wire is cheap enough so I'd recommend cutting your wire longer than you think you'll need or leave it on the spool until you've run it from your desired switch location to the wire bundle. My wires are a bit uglier than needed due to my "short" sightedness. Pun intended. Forgive the ugliness, I learned there were two identically marked wires the hard way.


5. Power line: I used a handy mini add-a-circuit from the auto parts store for a mere $7. Simply plug it into an existing switched fuse socket. I chose to use the ACC slot since it had open blank spots on either side and blocked the least number of other fuses. Add enough wire to get it from the fuse block to your chosen switch location. See pic above.
6. Ground line: Choose anything that's solid. In my case there was a preexisting ground bolt about six inches to the left of where I mounted my switch in the dash. I drilled a hole in the blank pate next to my mirror controls and then used a pocket knife to whittle it out to the size of my $4 switch from "The Shack". Once the hole was big enough I screwed the switch into place and tightened down the backing nut. Due to the curve of the plate I opted to mount the switch horizontally to minimize the gap between switch and dash plate.
7. Hook the three wires (ground/+12V pwr/wire to reverse light wire) up to your switch. Test your setup to make sure it actually works BEFORE putting the dash back together. I had a switch with a short between the load side and the ground wire for the light in the switch. I blew a fuse for my instrument panel so the only time my gauges would work was when I had the switch on for the reverse lights AND the car in reverse. After initial panic at the thought of having fried my computer I found the problem with the switch. I recommend getting one with and LEDlight instead of the big red incandescent light but it's up to you, either should work.


8. Put your dash back together and enjoy your new tailgater/backup camera switch!

This thread is for people who may already have an amp or some other power line going to the trunk and don't feel like tearing apart their interior to run a line just for the tailgater switch. I basically just used bzyrice's thread and modified it to use power straight off the fuse box and tap into the reverse light wire in the bundle of wires in the drivers side kick panel instead of the trunk lid. Here's the instructions with pics. Enjoy!
Parts needed: "Add-A-Circuit" ($7), Rocker switch ($4), Splice Quick-connectors($3), wire, quick-connectors ($3)
Tools needed: Phillips screwdriver, trim tool or broad flat head screwdriver, wire stripper/crimper/cutter, drill and knife
1. First, remove your drivers side kick panel, exposing your fuse block and the big wiring bundle that drops down from above and heads towards the trunk along the door sill.
2. Slice open the electrical tape holding together the wire bundle. Needless to say, be careful not to damage any wires while slicing the tape.
3. Dig around in the bundle and find the two wires that are green with two silver dots on them. There will be one small wire, I think it's 18 gauge, and one even smaller wire, I think 20 gauge. In my wiring bundle they were near the back of the bundle, as Sir Murphy requested.
4. Next, take the smaller of the two wires (green with two silver dots) and either splice in using a quick-splice connector or simply cut the wire and use a barrel connector to crimp it back together adding in the wire to your switch. Wire is cheap enough so I'd recommend cutting your wire longer than you think you'll need or leave it on the spool until you've run it from your desired switch location to the wire bundle. My wires are a bit uglier than needed due to my "short" sightedness. Pun intended. Forgive the ugliness, I learned there were two identically marked wires the hard way.
5. Power line: I used a handy mini add-a-circuit from the auto parts store for a mere $7. Simply plug it into an existing switched fuse socket. I chose to use the ACC slot since it had open blank spots on either side and blocked the least number of other fuses. Add enough wire to get it from the fuse block to your chosen switch location. See pic above.
6. Ground line: Choose anything that's solid. In my case there was a preexisting ground bolt about six inches to the left of where I mounted my switch in the dash. I drilled a hole in the blank pate next to my mirror controls and then used a pocket knife to whittle it out to the size of my $4 switch from "The Shack". Once the hole was big enough I screwed the switch into place and tightened down the backing nut. Due to the curve of the plate I opted to mount the switch horizontally to minimize the gap between switch and dash plate.
7. Hook the three wires (ground/+12V pwr/wire to reverse light wire) up to your switch. Test your setup to make sure it actually works BEFORE putting the dash back together. I had a switch with a short between the load side and the ground wire for the light in the switch. I blew a fuse for my instrument panel so the only time my gauges would work was when I had the switch on for the reverse lights AND the car in reverse. After initial panic at the thought of having fried my computer I found the problem with the switch. I recommend getting one with and LEDlight instead of the big red incandescent light but it's up to you, either should work.
8. Put your dash back together and enjoy your new tailgater/backup camera switch!

The following users liked this post:
IntactACK (06-21-2013)
04-21-2011, 02:00 AM
#3
^yes thats the purpose of the switch, to be able to turn on the camera on demand.
If i would like to use a diode, where do i put it? Lastly if my switch doesnt have a led then i dont need the ground, right?
If i would like to use a diode, where do i put it? Lastly if my switch doesnt have a led then i dont need the ground, right?
04-21-2011, 09:33 AM
#4
2007 TL Type-S NBP
Thread Starter
Join Date: Jan 2011
Location: Rexburg, Idaho
Age: 49
Posts: 317
Likes: 0
Received 7 Likes
on
6 Posts
Yes, the ground line is only for the light in the switch. For cars with Navi the lighted switch is kind of redundant, if you don't notice the nav screen has the back up cam image on it you're definitely not going to notice a little red light. I've only got the Haynes Manual wiring diagrams but I didn't see any need for a diode since all the power is +12V from the same source. What circuit are you trying to protect with the diode?
04-21-2011, 09:50 AM
#5
2007 TL Type-S NBP
Thread Starter
Join Date: Jan 2011
Location: Rexburg, Idaho
Age: 49
Posts: 317
Likes: 0
Received 7 Likes
on
6 Posts
To Vietxquangstah: Yes, the switch turns on the reverse lights as well as the back up camera when you're not in reverse. Most people do this mod when they add the super bright HID reverse lights so they can blast tailgaters and/or people behind them with their high beams on.  I've got my rear window tinted so I could really care less if someone behind me has their high beams on, never mind the auto-dimming rear view mirror.
I've got my rear window tinted so I could really care less if someone behind me has their high beams on, never mind the auto-dimming rear view mirror.
04-21-2011, 10:53 AM
#7
My "tailgater" switch is a lever that's located on the right hand side of steering column. It's operated by pulling that lever toward the driver.
Also comes in handy when your winshield is dirty.
Also comes in handy when your winshield is dirty.
Trending Topics
 ... now if someone could just wire the reverse lights to turn on with that as well ... that would be a double whammy
04-21-2011, 04:57 PM
... now if someone could just wire the reverse lights to turn on with that as well ... that would be a double whammy
04-21-2011, 04:57 PM
#9
2007 TL Type-S NBP
Thread Starter
Join Date: Jan 2011
Location: Rexburg, Idaho
Age: 49
Posts: 317
Likes: 0
Received 7 Likes
on
6 Posts
Now that you mention it, it wouldn't be that hard to rig up. Just splice into the power line for the washer motor and run a line into the same spot I've got my switch wired into. Or better yet, see if the lines through the stalk are carrying full current to the motor or just a relay. If they're full current we could splice into the wires behind the steering column. Great, another project to research!
04-21-2011, 06:04 PM
#10
Moderator
iTrader: (7)
i have the dvd nav2go thing on my car. i have a switch in the same location as in the OP. when i flip the switch, it goes to my dvd player so i can watch it anytime. i guess this is like the same thing, i can hook up anything to the rca video source, for example a backup camera(even though mine alrdy has one stock)
 04-21-2011, 07:15 PM
#13
okay so what im reading is power wire is from the fuse. then the smaller green wire with 2 silver dot, i can just add a T tabe to connect to the switch. last just find a ground wire anywhere correct.
04-21-2011, 07:38 PM
#15
2007 TL Type-S NBP
Thread Starter
Join Date: Jan 2011
Location: Rexburg, Idaho
Age: 49
Posts: 317
Likes: 0
Received 7 Likes
on
6 Posts
NC916: Yes. Power from fuse block to switch, switch to green with silver dots wire. The ground wire is only needed if you have a switch with an "on" light built into it. Not really needed IMO but the style switch I liked had one so I opted to hook it up. I would imagine that using it while driving may be illegal. I don't what law exactly it would be breaking since people have headlights from oncoming traffic in their eyes all the time but who knows. If anyone knows what law this would break please let us know. Keep in mind, it's only illegal if you get caught.
05-13-2011, 12:34 PM
#16
Maybe a stupid Question but is there a way to do this so that the Rev lights don't come on? I was thinking while driving id rather leave the cam on to make sure people to get too close to me to rear-end me when at a red light or something but without the Rev lights being turned on.
05-13-2011, 04:12 PM
#17
2007 TL Type-S NBP
Thread Starter
Join Date: Jan 2011
Location: Rexburg, Idaho
Age: 49
Posts: 317
Likes: 0
Received 7 Likes
on
6 Posts
I'd have to look at the wiring diagram but you should be able to just add power to the line for the Nav system that connects to the reverse light line along with a diode to prevent current flow to the reverse lights. I don't know where or what color that line is but it would be fun to find out.
05-25-2011, 04:22 PM
#19
I found another thread about this... I read that you need run a wire to the Nav with a diode so that it tricks the Nav from thinking its in rev. The trick is that you catch the Nav wire before it hits the Rev lights. This way the lights dont turn on but your camera does. heres the Thread Link https://acurazine.com/forums/3g-tl-audio-bluetooth-electronics-navigation-94/oem-reverse-camera-mod-%2Adone%2A-637387/
05-25-2011, 06:40 PM
#20
Very clever. Those 2 wires are the same wires that run into the trunk that provide power to the bulbs. Good find. 
And piece of advice.. my recommendation .. add a momentary switch and not a regular one.. so that this way you can avoid leaving it on the switched position by accident. Not so harmful for regular reverse lights.. but pretty bad for us HID reverse folks.
I wired mine a few years ago already so I'm not redoing all this... but I would like to add a diode so that my dam mirrors don't tilt everytime I hit the button. I know I can always move the mirror switch to the middle position.. but then that wouldn't be a mod now would it?
Last edited by Elegant TYPE S; 05-25-2011 at 06:43 PM.
05-30-2011, 12:20 AM
#22
Good stuff...I know BZ but this improves on it and seems to make it even easier. I will give this a go tomorrow. I actually wired up a disconnect switch for my amps (since I'm super sensitive to any buzzing etc and when I want silence in the car I wanted that option) with blue led to match the "mood lighting" the car came with. Opted to wire it to the plastic kick panel underneath my knees...also because if I change my mind, I'll never see the hole 
BUT that said, I wanted to do a light on the passenger side and figure I'd kill 2 birds with one stone...wire up my reverse lights too (as I have HID's on the way ).
J.
Thanks for the DIY!!!
BUT that said, I wanted to do a light on the passenger side and figure I'd kill 2 birds with one stone...wire up my reverse lights too (as I have HID's on the way
). J.
Thanks for the DIY!!!
10-27-2011, 05:46 PM
#26
Instructor
I have virtually no experience with wiring. Is a 10amp max fuse tap enough for this? And is there any specifics on the switch or wire I need? I suppose I'm going to need a crash course in wiring between this and installing flashlights.....
10-28-2011, 08:15 AM
#27
Senior Moderator
OP, do you have specs on the parts? Part number, two pole switch, wire gauge, where you bought them, etc.?
Parts needed: "Add-A-Circuit" ($7), Rocker switch ($4), Splice Quick-connectors($3), wire, quick-connectors ($3)
Thanks
Parts needed: "Add-A-Circuit" ($7), Rocker switch ($4), Splice Quick-connectors($3), wire, quick-connectors ($3)
Thanks
10-29-2011, 04:32 PM
#28
2007 TL Type-S NBP
Thread Starter
Join Date: Jan 2011
Location: Rexburg, Idaho
Age: 49
Posts: 317
Likes: 0
Received 7 Likes
on
6 Posts
I got all my stuff at Radio Shack, except the add a circuit, that was at Autozone. It's been a while but I think I used 18 gauge wire. Whatever amp rating is on the circuit for the back up light fuse is what you should use in the add a circuit. You might be able to get away with a lower amp fuse if you use a relay though. The splice quick connectors are just whatever size matches the gauge of wire you use. If the connector is too big I just strip some more wire and fold it in half to make sure it gets a good grip. As for the switch, any 12V DC switch should work. Mine had three prongs on it for the indicator light, switches without an indicator light would only have two.
10-29-2011, 07:38 PM
#29
Instructor
I got all my stuff at Radio Shack, except the add a circuit, that was at Autozone. It's been a while but I think I used 18 gauge wire. Whatever amp rating is on the circuit for the back up light fuse is what you should use in the add a circuit. You might be able to get away with a lower amp fuse if you use a relay though. The splice quick connectors are just whatever size matches the gauge of wire you use. If the connector is too big I just strip some more wire and fold it in half to make sure it gets a good grip. As for the switch, any 12V DC switch should work. Mine had three prongs on it for the indicator light, switches without an indicator light would only have two.
06-21-2013, 12:46 AM
#30

Thread Resurrection, YAY!
I attempted this mod today and followed the OP's instructions very carefully. I even used the same Add a Circuit, Rocker Switch, and ground bolt. I put the Add a Circuit in fuse holder #32 with two 7.5 amp fuses in it, and used a splice connector for the reverse light wire. After i got it all wired (power, load, ground), everything worked great. However, as soon as I put the car into reverse just to make sure the lights still came on normally, I knew something was wrong. The lights did NOT come on when I put the car into reverse with the switch off. The switch needed to be on. In addition, my instrument panel lights went out just like the OP's did as soon as i put it into reverse. Unlike him though, i cannot get them to come on at all now... even when the switch is on and the car is in reverse, the lights stay off. I'm going to check all my wiring tomorrow, but does anyone have any suggestions? And which fuses should I check for the instrument panel?
I attempted this mod today and followed the OP's instructions very carefully. I even used the same Add a Circuit, Rocker Switch, and ground bolt. I put the Add a Circuit in fuse holder #32 with two 7.5 amp fuses in it, and used a splice connector for the reverse light wire. After i got it all wired (power, load, ground), everything worked great. However, as soon as I put the car into reverse just to make sure the lights still came on normally, I knew something was wrong. The lights did NOT come on when I put the car into reverse with the switch off. The switch needed to be on. In addition, my instrument panel lights went out just like the OP's did as soon as i put it into reverse. Unlike him though, i cannot get them to come on at all now... even when the switch is on and the car is in reverse, the lights stay off. I'm going to check all my wiring tomorrow, but does anyone have any suggestions? And which fuses should I check for the instrument panel?
06-21-2013, 08:45 AM
#31
2007 TL Type-S NBP
Thread Starter
Join Date: Jan 2011
Location: Rexburg, Idaho
Age: 49
Posts: 317
Likes: 0
Received 7 Likes
on
6 Posts
Thread Resurrection, YAY!
I attempted this mod today and followed the OP's instructions very carefully. I even used the same Add a Circuit, Rocker Switch, and ground bolt. I put the Add a Circuit in fuse holder #32 with two 7.5 amp fuses in it, and used a splice connector for the reverse light wire. After i got it all wired (power, load, ground), everything worked great. However, as soon as I put the car into reverse just to make sure the lights still came on normally, I knew something was wrong. The lights did NOT come on when I put the car into reverse with the switch off. The switch needed to be on. In addition, my instrument panel lights went out just like the OP's did as soon as i put it into reverse. Unlike him though, i cannot get them to come on at all now... even when the switch is on and the car is in reverse, the lights stay off. I'm going to check all my wiring tomorrow, but does anyone have any suggestions? And which fuses should I check for the instrument panel?
I attempted this mod today and followed the OP's instructions very carefully. I even used the same Add a Circuit, Rocker Switch, and ground bolt. I put the Add a Circuit in fuse holder #32 with two 7.5 amp fuses in it, and used a splice connector for the reverse light wire. After i got it all wired (power, load, ground), everything worked great. However, as soon as I put the car into reverse just to make sure the lights still came on normally, I knew something was wrong. The lights did NOT come on when I put the car into reverse with the switch off. The switch needed to be on. In addition, my instrument panel lights went out just like the OP's did as soon as i put it into reverse. Unlike him though, i cannot get them to come on at all now... even when the switch is on and the car is in reverse, the lights stay off. I'm going to check all my wiring tomorrow, but does anyone have any suggestions? And which fuses should I check for the instrument panel?
Last edited by jpgayan; 06-21-2013 at 08:47 AM.
06-21-2013, 08:59 AM
#32
I actually had the same problem with my first attempt. It scared the crap out of me when I thought I had fried my instrument panel!!! After blowing about five bucks worth of fuses troubleshooting it turns out there was a short in the switch. Check the resistance of the switch from the hot side to the ground for the red led indicator light circuit. If it's really low that's probably your problem. I went back to the Shack and got a new switch, replaced the fuse, and everything worked great. Hopefully it's that easy for you.
Did you plug your Add a circuit into fuse holder #32? And which fuse was blown for the instrument panel? Thanks.
The following users liked this post:
08TList (06-21-2013)
06-22-2013, 03:39 PM
#34
Intermediate
01-05-2014, 07:28 PM
#35
I never posted back in here until now, but I did get my issues resolved. It was a combination of a bad ground + a bad rocker switch. New ground and new switch fixed the issue and it's been great ever since. But I just thought of something today, and I can't believe I didn't think of this in the first place: why don't we use the OEM accord fog switch which is made to fit in that spot? That would look so much better than this radio shack switch! I'm just not exactly sure how it would be wired because there's 5 connections on the back of it, and only 3 on the back of my current switch. I'm sure it could be done though. 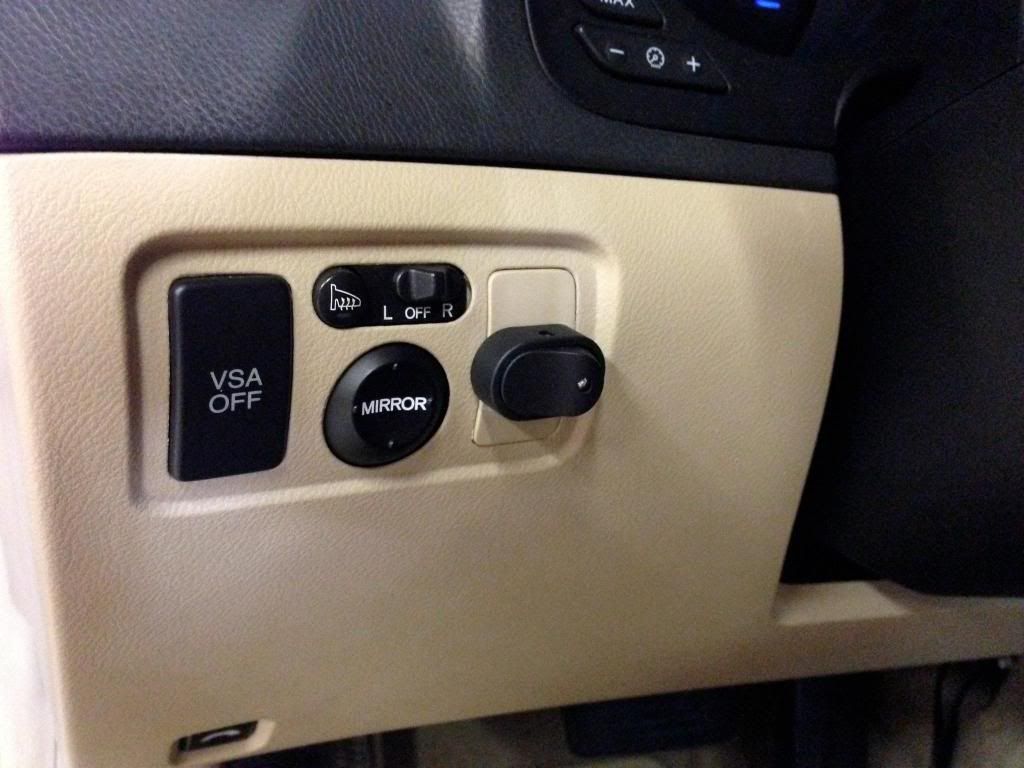

Thread
Thread Starter
Forum
Replies
Last Post
mada51589
3G TL Problems & Fixes
79
05-03-2022 08:54 PM
Soul_Deamon
4G TL Problems & Fixes
8
11-02-2015 04:32 PM