
DIY: Replacing Cabin Air Filter 3G Garage DIY F-130

 03-08-2009, 10:29 AM
#203
Instructor

Join Date: Aug 2006
Age: 45
Posts: 176
Likes: 0
Received 0 Likes
on
0 Posts
Finally got around to replacing this and it was pretty easy. I broke a clip pulling the cover off but doesn't seem to have any ill affects so far. It feels good to save $$$$!!!
03-29-2009, 07:04 PM
#205
No, that ↓ is not me...
Join Date: Jan 2009
Location: SmELl Paso, TX
Posts: 41
Likes: 0
Received 0 Likes
on
0 Posts
I just replaced mine earlier today in my 2006 TL with 46K miles. It took me around 5 minutes and no more than 10.
Here are pictures of the old cabin filter and with that many miles the dirt/dust accumulation was no surprise...
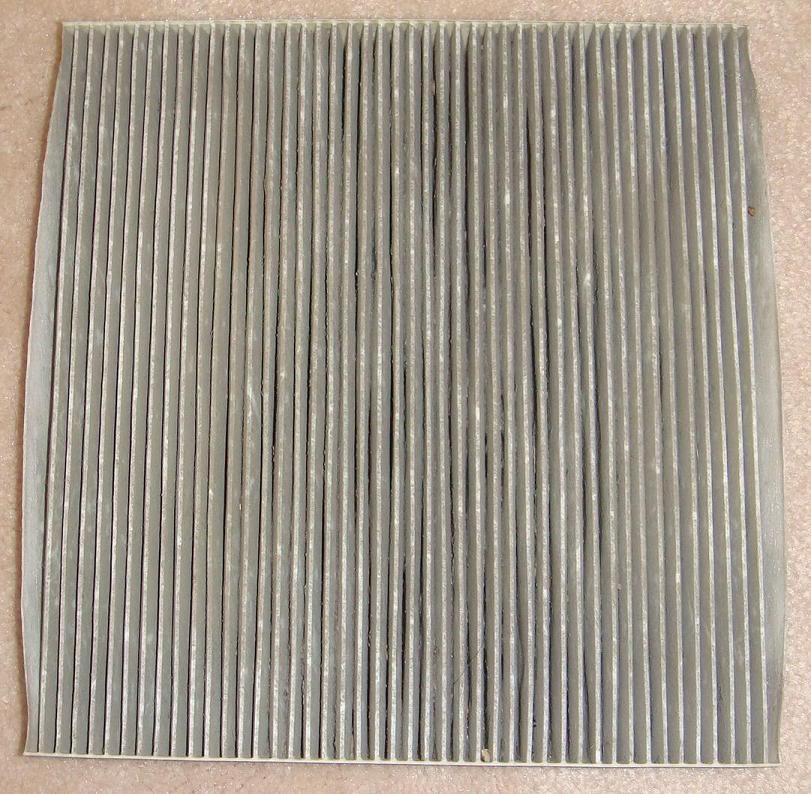

Here are pictures of the old cabin filter and with that many miles the dirt/dust accumulation was no surprise...
04-09-2009, 12:16 PM
#206
Just changed mine at 32000, could not have done it without this thread.
Take the glove box off was a breeze.
Dislodging the inner panel took a bit of brute force; I didn't want to break any of the clips.
My filter was about 3-4 times filthier than the one above.
Now that I know how it should be done it will probably only take me 10-15 minutes in the future.
Thank you AZ for all the info.
 04-25-2009, 12:55 PM
#208
Advanced

Fram Fresh Breeze, Access Hole
Hey Guys, a couple quick additions here:
1) Fram Fresh Breeze Filter
I've got a 2006 TL with 58k on it, and am replacing the filter for the 2nd time. The first time, I just drove to Advance Auto and picked up the regular paper filter for like $28+. This time I really wanted to get a better filter with the charcoal / carbon filtration. I agonized over whether to get the WIX, bosch, etc, etc, and saw some conflicting information about part numbers. Then, I found the Fram Fresh Breeze filter, which I think is somewhat new because there aren't too many posts here about it. (I'm not normally a Fram user, but the Fresh Breeze is very good)
I can 100% say the correct part number for my 06 TL is: CF10134 This fit perfectly, and you can really see the charcoal in the filter media, and there is supposed to be some baking soda as well for odor elimination.
I ordered it from Amazon with free shipping, and the price was around $15. After much research, I think this is the best way to go.
2) Cutting an access hole.
Thanks to TBone and the others for the idea of cutting an access hole with a dremel. (see earlier in this thread) I did this, and this will save much time, and potential broken clips down the road! Doing this does reduce some of the structural rigidity of the piece, but there are so many anchor points, that it really has no impact.


 05-17-2009, 05:26 PM
#214
8th Gear

Join Date: Apr 2009
Location: Iowa
Posts: 8
Likes: 0
Received 0 Likes
on
0 Posts
Just replaced mine on my 07 TL-S. I echo the many kuddo's...and for anyone new to this procedure...heed the advice of staring from the right hand side & pull towards yourself...that made it much easier. I'm seriously thinking of the "dremel mod". All this info was a big help. I'm thinking I'll tackle my CL-S & Accord in the future. (our local dealer wanted $30 buck labor...just to replace this).
06-21-2009, 07:13 AM
#216
4th Gear

Join Date: Jun 2009
Posts: 4
Likes: 0
Received 0 Likes
on
0 Posts
I just replaced mine in about 30 minutes. Agreed with all that the complexity is ridiculous, especially with clips that could break (or the clip holders.
I did break a clip on the top left hand side so hopefully no rattle. I wedged in a bit of tape in between as a buffer. Anyone else seeing rattles? Seems like no from the posts here.
Thx for the instructions again!
I did break a clip on the top left hand side so hopefully no rattle. I wedged in a bit of tape in between as a buffer. Anyone else seeing rattles? Seems like no from the posts here.
Thx for the instructions again!
06-21-2009, 08:22 PM
#218
Intermediate

Join Date: Aug 2003
Location: Grand Island
Age: 83
Posts: 47
Likes: 0
Received 0 Likes
on
0 Posts
06-21-2009, 08:28 PM
#219
Cruisin'
Join Date: Apr 2009
Posts: 18
Likes: 0
Received 0 Likes
on
0 Posts
I just did mine. Pulled out the whole assembly - even took off the glove box. Nothing broke - went back together after some convincing.
Question - I really want to do the dremel mod, but I don't want the right side of the opening to be "completely unattached". Is there any way to do this without making the hole too big. Another thing, can you do the dremel mod without actually taking off the compartment?
Question - I really want to do the dremel mod, but I don't want the right side of the opening to be "completely unattached". Is there any way to do this without making the hole too big. Another thing, can you do the dremel mod without actually taking off the compartment?
06-22-2009, 05:28 AM
#220
Registered Member
I just did mine. Pulled out the whole assembly - even took off the glove box. Nothing broke - went back together after some convincing.
Question - I really want to do the dremel mod, but I don't want the right side of the opening to be "completely unattached". Is there any way to do this without making the hole too big. Another thing, can you do the dremel mod without actually taking off the compartment?
Question - I really want to do the dremel mod, but I don't want the right side of the opening to be "completely unattached". Is there any way to do this without making the hole too big. Another thing, can you do the dremel mod without actually taking off the compartment?
I absolutely hate changing the cabin filter in my two 3G TL's, though I do it once a year in the spring. Acura really fell down with this crappy design, that's for sure.
 06-30-2009, 10:37 AM
#225
9th Gear

Join Date: Jul 2008
Age: 43
Posts: 9
Likes: 0
Received 0 Likes
on
0 Posts
Just FYI, I just ordered the ATP #HA5 filter from RockAuto for my 04 TL, and the price now is $16.22 each. I went ahead and ordered two while I was at it.
And as others have mentioned, great write-up and all the pics and suggestions are greatly appreciated!! Can't wait to get these filters and get em changed out, as I doubt mine has ever had it done with 48k on the clock.
And as others have mentioned, great write-up and all the pics and suggestions are greatly appreciated!! Can't wait to get these filters and get em changed out, as I doubt mine has ever had it done with 48k on the clock.
07-12-2009, 05:28 PM
#227
This was such an easy part to replace, it's ridiculous. After reading everything that I could find about replacing these, getting myself all worked up, and scared that I might break something, I finally went out to the car and just did it. It took me all of 10 mins. total, to drop the glovebox, remove the inner liner, replace the filter, and put it all back together again. Easy peasy.
For those of you asking about cutting holes in the liner, don't do it. How much time is it actually going to take you to pop out two clips, remove two screws, and pull it all down. Another 2-3 mins., maybe? All in all, easy, easy, easy. Don't worry, and just go do it. Ahh, fresh air again
For those of you asking about cutting holes in the liner, don't do it. How much time is it actually going to take you to pop out two clips, remove two screws, and pull it all down. Another 2-3 mins., maybe? All in all, easy, easy, easy. Don't worry, and just go do it. Ahh, fresh air again
07-12-2009, 05:36 PM
#228
Advanced
sinistr, glad to hear everything went smoothly. I am a proponent of cutting a hole in liner, simply because if you plan to be driving your TL for many years and miles, that means you could possibly need to replace the air filter 4-6 times. Yanking the entire glove box housing in and out that many times could really end up screwing up the metal and plastic clips that hold everything together. Cutting the hole eliminates this. This is really a design flaw on Acura's part. Those clips are not designed to be yanked out and put back together at the frequency at which Acura recommends replacing the cabin filter.
07-12-2009, 07:57 PM
#229
3rd Gear
Join Date: Oct 2004
Location: Flower Mound, TX
Age: 55
Posts: 3
Likes: 0
Received 0 Likes
on
0 Posts
Replacing filters - #2 service
I replaced both the cabin filter (behind the glove compartment) and the air filter under the hood. Roughly $30 and 30 minutes to do both. I found removing the cover to the air filter harder than the entire procedure behind the glove box.
08-16-2009, 12:28 PM
#230

Thanks for the writeup, did mine this morning. Bought the filter at orielly on a whim, but boy did it need it. Just got an '04 with 75k on it and trying not to spend too much $$$ getting back to new, but this was well worth the $15.
 08-16-2009, 08:23 PM
#232
NBP REPRESENT
iTrader: (3)
Join Date: Jun 2007
Location: Maryland
Age: 38
Posts: 392
Likes: 0
Received 0 Likes
on
0 Posts
did it today and it was very easy, took 15-20 mins...hadnt changed it since i bought the car, now with 31K on it, the old filter was nasty, had caked up dust and bird feathers and bugs...
DEF worth the 15$ filter...prob going to change it every year since its so easy...
DEF worth the 15$ filter...prob going to change it every year since its so easy...
09-06-2009, 03:49 PM
#233
I just did the filter today, and thanks to the OP's pictures, it was pretty easy - under 10 minutes.
The filter was changed about a year ago when I bought the car, and I was surprised how filthy the filter was after one year.
Anyways, props to the OP for the pics and walkthrough. Very helpful!
The filter was changed about a year ago when I bought the car, and I was surprised how filthy the filter was after one year.
Anyways, props to the OP for the pics and walkthrough. Very helpful!
 09-09-2009, 05:14 PM
#237
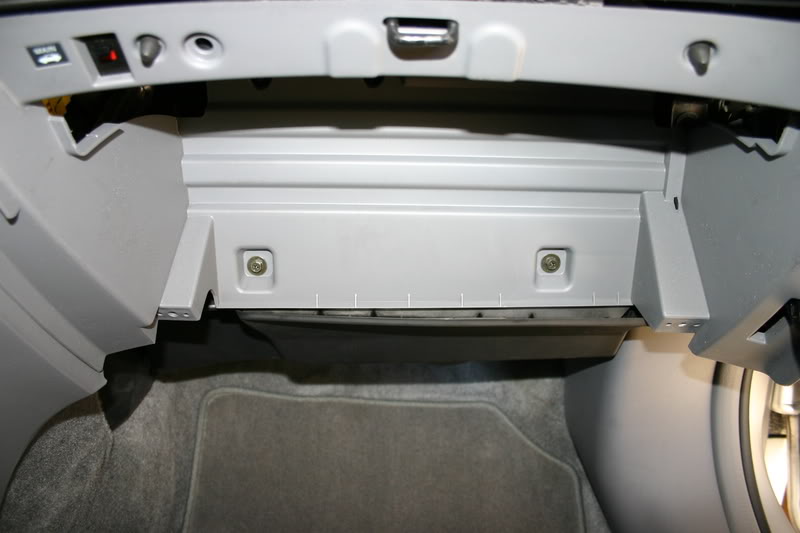
Here's something I felt was missing from this thread. This is the official procedure for removing the Glove-Box-Housing. Compared to some of the other detailed writeups in this thread, it's not super amazing or anything. It also doesn't mention the two push-pins found on some of the earlier models, but it does illustrate how the housing can be removed with the glove-box still in place:

Last edited by 94eg!; 09-09-2009 at 05:17 PM.
09-11-2009, 01:22 AM
#238
DAMNIT!!!
I thought I read this thread well enough, but it turns out I missed something for the 05 model. Don't blindly follow my post above (or the DIY at the beginning) w/ the pic from the shop manual. Drop the Glove-box down and check for two big screws behind. I tried removing my housing with the glove-box still in place (as shown in the manual) and nearly tore the metal brace right out of the car. Took me damn near a half hour to bend it back properly so the glove-box sit straight against the dashboard again. At least these two screws replace half of the clips on found on the 04...
Here's someone's pic (that I missed) from earlier in the thread that shows the two screws:
Last edited by 94eg!; 09-11-2009 at 01:24 AM.
10-02-2009, 04:56 PM
#239
Team SSM Queen
Join Date: Dec 2003
Location: The Beautiful Hudson Valley
Posts: 982
Likes: 0
Received 146 Likes
on
75 Posts
I just changed the filter myself for the first time. It was putrid. It's amazing I don't have TB from what I was breathing in.
It took about 45 minutes because I was working in less than ideal surroundings. I park in a dim garage and had to balance a flashlight on my lap. I also couldn't open my passenger side door all the way because of the car parked next to me.
I couldn't re-attach the lever on the right hand side that prevents the glove box from falling down. I'll try again once I have the car outside and can open the door wide. Do I really need this attached? The clips seem to be holding the glove box snugly in place, it doesn't fall down when I open it.
When I pulled out the housing, it wouldn't budge so I gave it a hard tug. A large panel underneath, that I didn't see in the DIY photos, came loose and fell down. No big deal, it just snapped back into place when I put everything back together.
Now that I finally got this done, I'm definitely going to be doing it more often. AZ rocks!
10-02-2009, 08:09 PM
#240
[quote=thassett;10820530]Hey Guys, a couple quick additions here:
1) Fram Fresh Breeze Filter
I've got a 2006 TL with 58k on it, and am replacing the filter for the 2nd time. The first time, I just drove to Advance Auto and picked up the regular paper filter for like $28+. This time I really wanted to get a better filter with the charcoal / carbon filtration. I agonized over whether to get the WIX, bosch, etc, etc, and saw some conflicting information about part numbers. Then, I found the Fram Fresh Breeze filter, which I think is somewhat new because there aren't too many posts here about it. (I'm not normally a Fram user, but the Fresh Breeze is very good)
I can 100% say the correct part number for my 06 TL is: CF10134 This fit perfectly, and you can really see the charcoal in the filter media, and there is supposed to be some baking soda as well for odor elimination.
I ordered it from Amazon with free shipping, and the price was around $15. After much research, I think this is the best way to go.
+1 on the Fram Fresh breeze air filter.