
DIY: Replacing Cabin Air Filter 3G Garage DIY F-130

 04-05-2008, 09:04 AM
#122
Intermediate

Join Date: Nov 2004
Location: Long Island, NY
Posts: 31
Likes: 0
Received 0 Likes
on
0 Posts
Thanks for the EXCELLENT DIY. I love not paying the dealer for stuff like this. I picked up a Beck/Arnley replacement filter p/n 042-2023 for $16. Snapped a couple of clips on the left side of box but all went back together pretty tightly so I'm good for now. Lesson learned. I saved what broke off in case of rattles (to add to the nice rattle collection my '04 has now) and can always try to exopy them back on if needed.
04-08-2008, 06:56 AM
#123
My TL can do this, too!
This is a great DIY! I changed my filter last month at about 21,000 miles. That OEM filter was filthy! I should purchase several more filters up front for future changeouts.
Did anyone have problems with snapping the support arm on the right side of the glovebox housing? I never reconnected mine - don't want to have to take the whole thing off again just to snap it back in...
Did anyone have problems with snapping the support arm on the right side of the glovebox housing? I never reconnected mine - don't want to have to take the whole thing off again just to snap it back in...
04-08-2008, 04:33 PM
#124
Instructor

Join Date: Oct 2005
Location: Plainfield, IL
Posts: 108
Likes: 0
Received 0 Likes
on
0 Posts
this is a great write up, i changed my cabin filter for the first time in ages, and it was disgusting! the whole filter was pretty much black 
unfortunately, i did snap 3 of the clips and one of the other plastic insertion points i tried to do it without removing the glove box, which may have made it harder for me to take out. next time i will remove the glove box first. I snapped the housing back in, but because it was missing a few of the clips, it wasn't fitting as snuggly as before. I'm the type that wants everything perfect, so I went to the hardware store and bought some epoxy glue. It was a fast-acting one (sets in 1 minute or so, and is ready to handle within 10 minutes). I let it sit for 30-45 mins, just to be safe, and it seemed like everything was fairly secure, but as soon as I tried putting the housing back in, a couple of the clips snapped off again =\. I guess I'll just have to live with it not being as flush against the rest of the dash as before, or get a more heavy duty epoxy (although I'm not sure that would make a huge difference) and try reattaching the clips again. I'm just praying that there are no rattles
Despite the broken clips, I did successfully change the filter and saved some money, which is always nice. Thanks again!
unfortunately, i did snap 3 of the clips and one of the other plastic insertion points
i tried to do it without removing the glove box, which may have made it harder for me to take out. next time i will remove the glove box first. I snapped the housing back in, but because it was missing a few of the clips, it wasn't fitting as snuggly as before. I'm the type that wants everything perfect, so I went to the hardware store and bought some epoxy glue. It was a fast-acting one (sets in 1 minute or so, and is ready to handle within 10 minutes). I let it sit for 30-45 mins, just to be safe, and it seemed like everything was fairly secure, but as soon as I tried putting the housing back in, a couple of the clips snapped off again =\. I guess I'll just have to live with it not being as flush against the rest of the dash as before, or get a more heavy duty epoxy (although I'm not sure that would make a huge difference) and try reattaching the clips again. I'm just praying that there are no rattles Despite the broken clips, I did successfully change the filter and saved some money, which is always nice. Thanks again!
04-08-2008, 04:36 PM
#125
Instructor
Join Date: Oct 2005
Location: Plainfield, IL
Posts: 108
Likes: 0
Received 0 Likes
on
0 Posts
Originally Posted by rksokol
This is a great DIY! I changed my filter last month at about 21,000 miles. That OEM filter was filthy! I should purchase several more filters up front for future changeouts.
Did anyone have problems with snapping the support arm on the right side of the glovebox housing? I never reconnected mine - don't want to have to take the whole thing off again just to snap it back in...
Did anyone have problems with snapping the support arm on the right side of the glovebox housing? I never reconnected mine - don't want to have to take the whole thing off again just to snap it back in...
It took me a minute or two to figure out how to disconnect it, but to reattach it, I just lined up the end of the support arm in the little groove on the glove box pushed from the back of the support arm towards me and it snapped back into place.
04-08-2008, 09:02 PM
#126
WDP Director of R & D

Originally Posted by mikey4226
this is a great write up, i changed my cabin filter for the first time in ages, and it was disgusting! the whole filter was pretty much black
unfortunately, i did snap 3 of the clips and one of the other plastic insertion points i tried to do it without removing the glove box, which may have made it harder for me to take out. next time i will remove the glove box first. I snapped the housing back in, but because it was missing a few of the clips, it wasn't fitting as snuggly as before. I'm the type that wants everything perfect, so I went to the hardware store and bought some epoxy glue. It was a fast-acting one (sets in 1 minute or so, and is ready to handle within 10 minutes). I let it sit for 30-45 mins, just to be safe, and it seemed like everything was fairly secure, but as soon as I tried putting the housing back in, a couple of the clips snapped off again =\. I guess I'll just have to live with it not being as flush against the rest of the dash as before, or get a more heavy duty epoxy (although I'm not sure that would make a huge difference) and try reattaching the clips again. I'm just praying that there are no rattles
Despite the broken clips, I did successfully change the filter and saved some money, which is always nice. Thanks again!
unfortunately, i did snap 3 of the clips and one of the other plastic insertion points
i tried to do it without removing the glove box, which may have made it harder for me to take out. next time i will remove the glove box first. I snapped the housing back in, but because it was missing a few of the clips, it wasn't fitting as snuggly as before. I'm the type that wants everything perfect, so I went to the hardware store and bought some epoxy glue. It was a fast-acting one (sets in 1 minute or so, and is ready to handle within 10 minutes). I let it sit for 30-45 mins, just to be safe, and it seemed like everything was fairly secure, but as soon as I tried putting the housing back in, a couple of the clips snapped off again =\. I guess I'll just have to live with it not being as flush against the rest of the dash as before, or get a more heavy duty epoxy (although I'm not sure that would make a huge difference) and try reattaching the clips again. I'm just praying that there are no rattles Despite the broken clips, I did successfully change the filter and saved some money, which is always nice. Thanks again!
Why not just spend a few bucks and get replacement clips from Acura??? That would get you closer to that "perfect" result.

Then again, I still don't see why Acura hasn't engineered an access hole like I / several of us made for our TL's. I change my cabin filter every six months and have yet to remove anything from the glove box area. In and out in 45 seconds.
04-12-2008, 12:00 PM
#127
10th Gear

Join Date: Apr 2008
Age: 61
Posts: 10
Likes: 0
Received 0 Likes
on
0 Posts
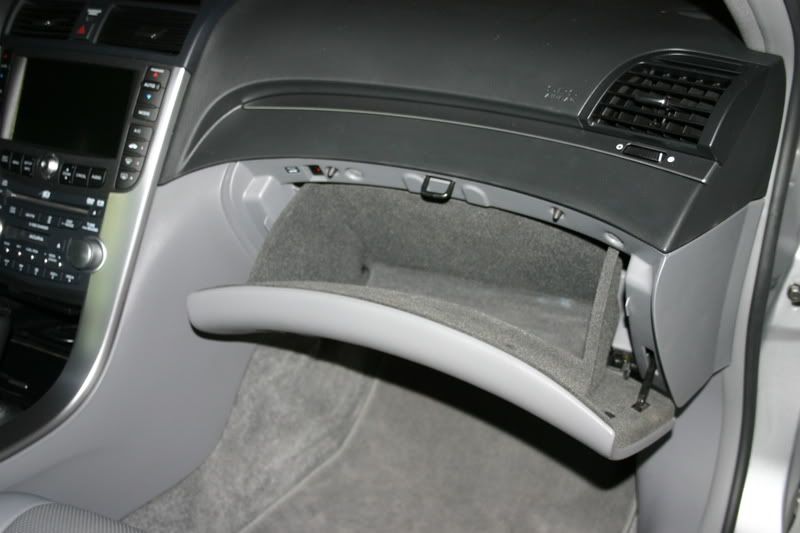
Wow! I can not thank you guys enough. I am sitting here in the garage with the laptop having just put the glovebox back in. Success. In less than 30 minute I changed the filter. I used these threads to understand how to make the modification rather than what I certainly would have done - take the right side of the dash apart.
I used the photos to decide precisely where to cut with the dremel tool. The hole is a snug perfect size. The filter is replaced. All appears to be well. Now to vacuum up the plastic particles from the cutting and I will try it out.
I am a servere allergy sufferer in the middle of a horendous pollen season here in the ATL. Thank you again and again!!!
04-21-2008, 07:53 AM
#128
AZ Community Team
I changed my 2005 6MT filter yesterday. I noticed that it looks like there were quite a few design changes from the 04 to the 05 in the glove box mounting area. One thing is I found out the source of a rattle in the glove box area. The brakcet for the "U" yoke for the glove box latch was missing a screw. There are three, the front two (near the "U") were there, but the screw in the back (where it attached to the ~2" diameter pipe was missing. I added a screw and rattle went away. Also one of the "A" clips was missing.
I'm annoyed at the lack of two fasteners here since the car has never been to the dealership for any interior work and I've never had the glove box out before so I presume it was missing from the factory . I searched in the area under the glove box for the screw (in case it worked loose) but could not see either any screw or the "A" clip.
FWIW, I recently changed the cabin filter on my wife's 2003 Pilot and it takes ~1/2 the time of the TL due to getting not needing to remove the entire glove box housing (only the door on the Pilot).
I'll post a picture tonight on the missing screw so if you have a glove box rattle and are replacing the filter take a look.
I'm annoyed at the lack of two fasteners here since the car has never been to the dealership for any interior work and I've never had the glove box out before so I presume it was missing from the factory
. I searched in the area under the glove box for the screw (in case it worked loose) but could not see either any screw or the "A" clip. FWIW, I recently changed the cabin filter on my wife's 2003 Pilot and it takes ~1/2 the time of the TL due to getting not needing to remove the entire glove box housing (only the door on the Pilot).
I'll post a picture tonight on the missing screw so if you have a glove box rattle and are replacing the filter take a look.
 04-29-2008, 05:47 PM
#130
Registered VTEC junkie
I changed mine out yesterday with the ATP HA-5. Here's what my old filter looks like after 36k miles:

While I was at it, I took out the plate that was in the glove compartment to save weight (thanx Innacurate for the idea).

While I was at it, I took out the plate that was in the glove compartment to save weight (thanx Innacurate for the idea).
05-15-2008, 06:35 PM
#131
2nd Gear

Join Date: May 2008
Posts: 2
Likes: 0
Received 0 Likes
on
0 Posts
Success in 30 minutes
Total Noob when it comes to doing car stuff but managed this in 30 minutes - could have done it in 10 minutes if i didn't stare at the housing for 15 minutes looking for damn push pins. my '04 TL did not have pushpins, once you removed the glove box, you just have to pull out the housing (there are no screws to unscrew). The filter, which i don't think i've changed for the past 80K miles, was caked in black soot.
yum. fresh air.
yum. fresh air.
 05-16-2008, 07:54 AM
#135
2nd Gear
Join Date: May 2008
Posts: 2
Likes: 0
Received 0 Likes
on
0 Posts
Bosch carbon activated is more than twice the price of the ATP carbon.
Bosch also sells their non-carbon filter, model P3875 - available at your local rip-off auto-conglomerate for $29.95.
Get the ATP - it's solidly built and frankly, i'd get two at a time as shipping from rockauto is the same $8 for one or two.
Bosch also sells their non-carbon filter, model P3875 - available at your local rip-off auto-conglomerate for $29.95.
Get the ATP - it's solidly built and frankly, i'd get two at a time as shipping from rockauto is the same $8 for one or two.
Originally Posted by THTL
what is the different between the ATP HA-5 and the Bosch filter. I though i read some where on here that the Bosch filter does not fit.
05-17-2008, 04:15 AM
#136
Advanced
Join Date: Jan 2007
Age: 34
Posts: 83
Likes: 0
Received 0 Likes
on
0 Posts
any1 have pics of doing this w/o cutting or taking the glove box off. or is taking it off a better option? can any1 can post pics of this push button pin thing that every1 is breaking.
05-17-2008, 10:41 AM
#137
Banned
Join Date: Apr 2008
Location: Hell Angeles
Age: 47
Posts: 135
Likes: 0
Received 0 Likes
on
0 Posts
if you own a 2006 (and up?), its pretty damn easy. Dont stress about the push pins, to me, they dont seem to break easy. Total time for me to replace was probably 10 mins. Its very easy
05-17-2008, 03:35 PM
#138
信是寶
Join Date: Feb 2005
Location: Lancaster/Downingtown/Philly, PA
Age: 54
Posts: 256
Likes: 0
Received 0 Likes
on
0 Posts
Originally Posted by ACURAFANANTIC
any1 have pics of doing this w/o cutting or taking the glove box off. or is taking it off a better option? can any1 can post pics of this push button pin thing that every1 is breaking.
Funny, mine just came today from Rock Auto. Just take the glove box off, the entire change took me less than 10 min (third time doing it) there is a DIY in here somewhere with detailed pics. Oh and another tip, put a little grease on those metal tabs (inside of case) for ease of future removal.

Shot with CYBERSHOT at 2008-05-17
05-17-2008, 10:54 PM
#139
Safety Car
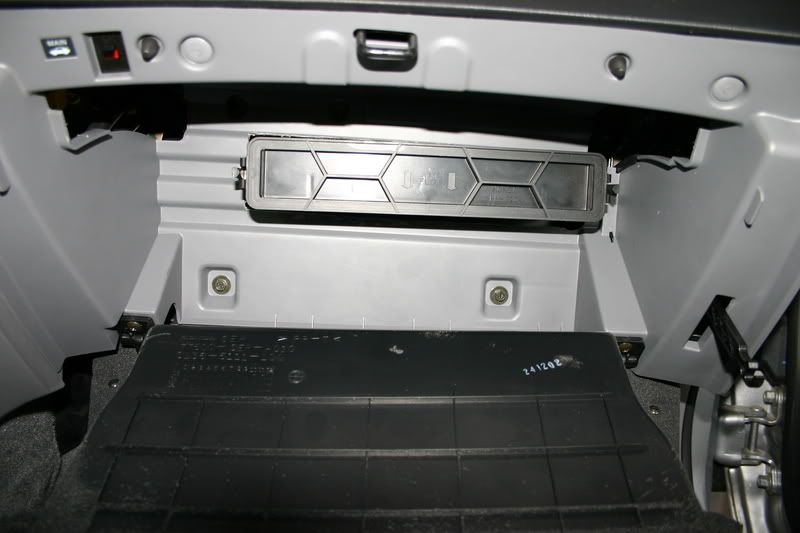
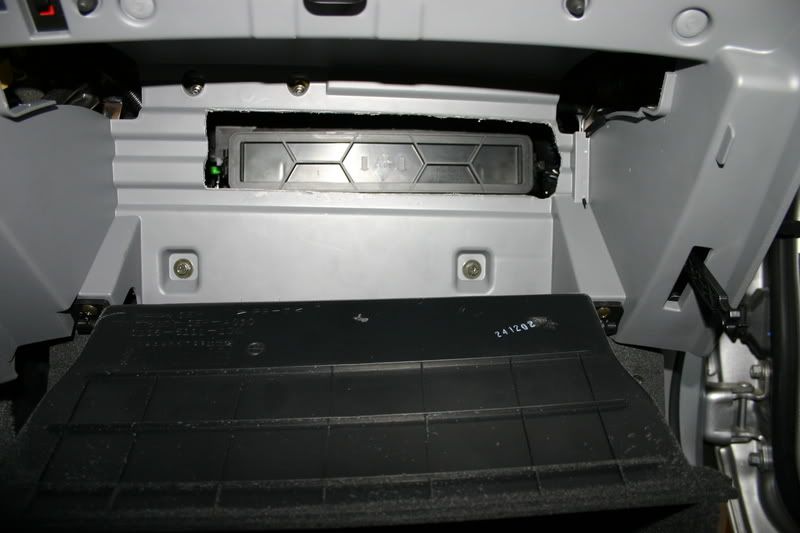
O.K., I decided it was time to do this as well. So I ordered my filter and went ahead and prepared it for an easy install(aka cut an access hole).
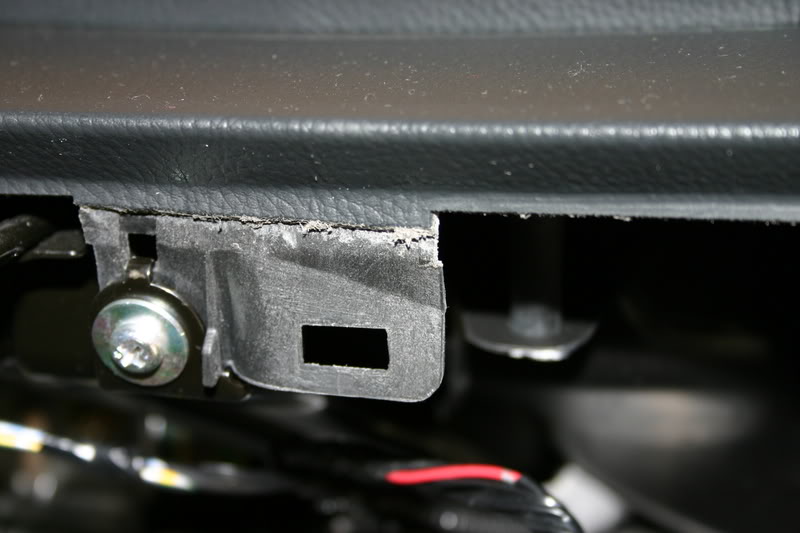
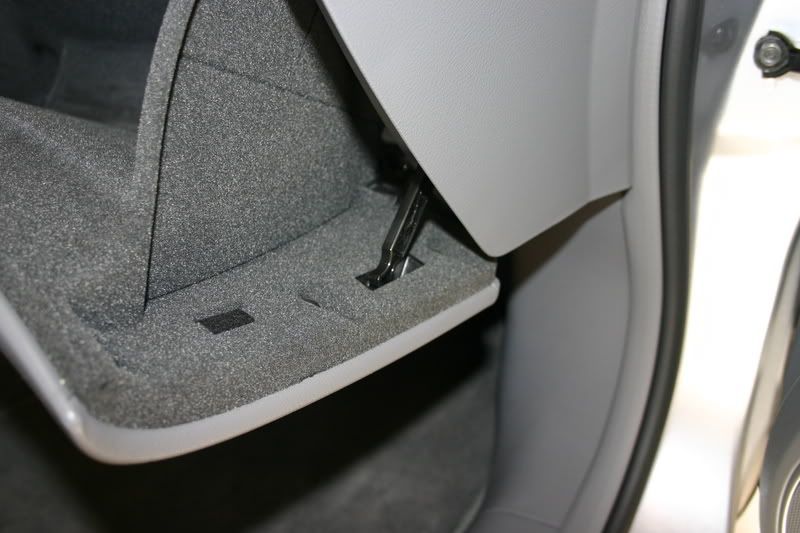
To help with some of the confusion................
IF you don't have the clips on the inside of your glove box, you simply push in on the sides until the tab clears.
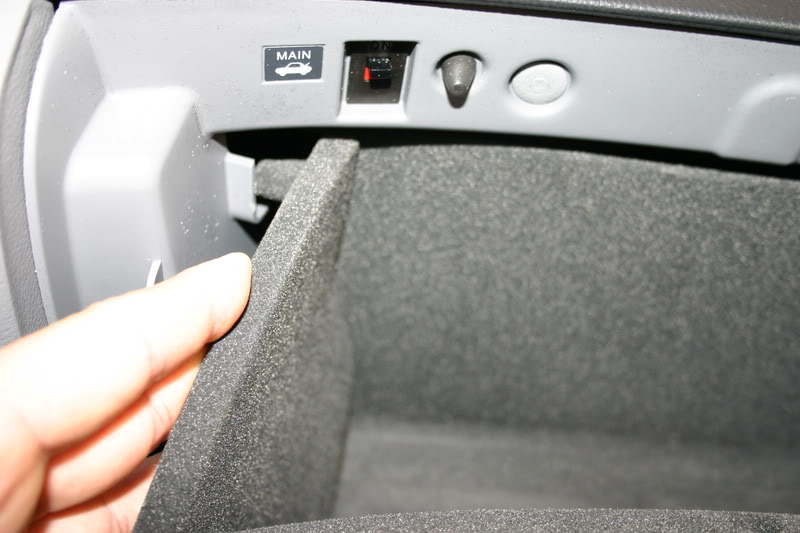
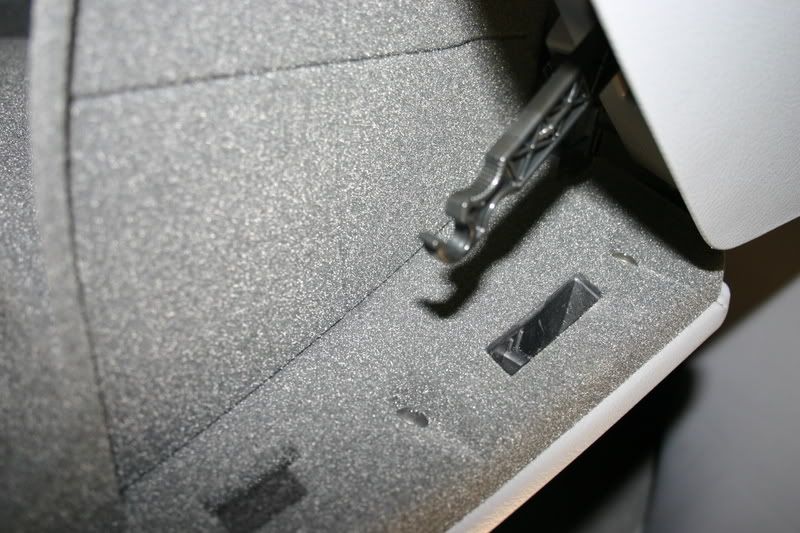
To remove this hook, just push on it where the grooved notch is.

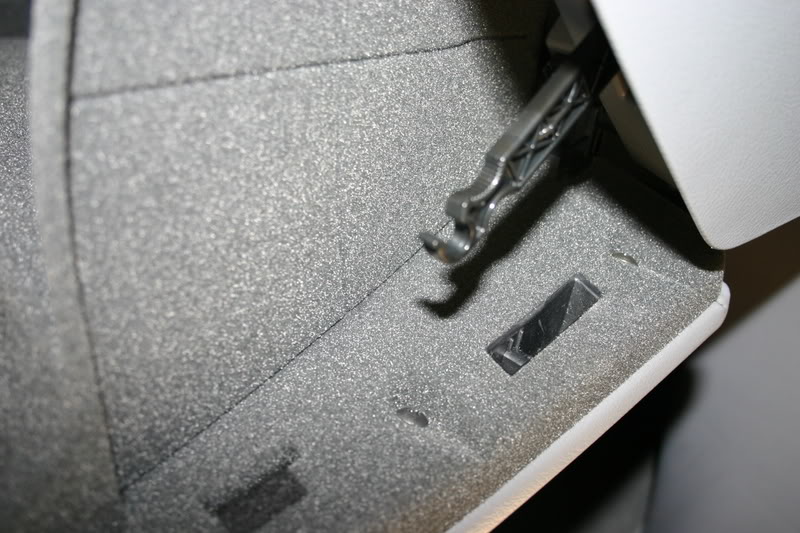
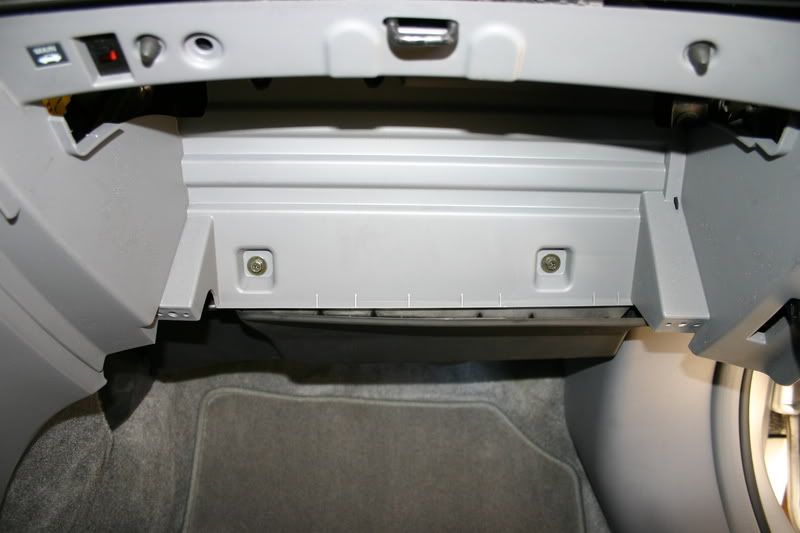
Something I didn't see mentioned is to remove these 2 screws ( if you have them) to get the back panel off.

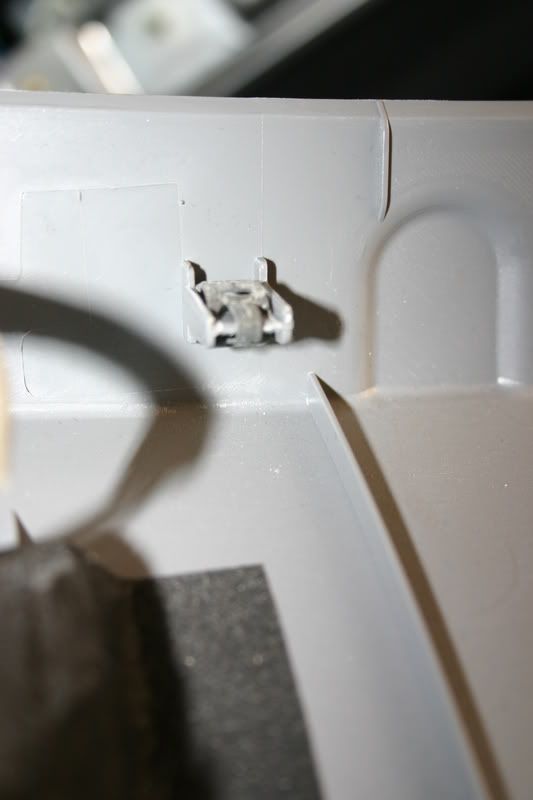
Here are the clips that are holding the back panel on. Someone said to remove these horizontally, I thought that meant start on the far right of the back piece and work horizontally across. I think it makes more sense to say they come straight out towards you.
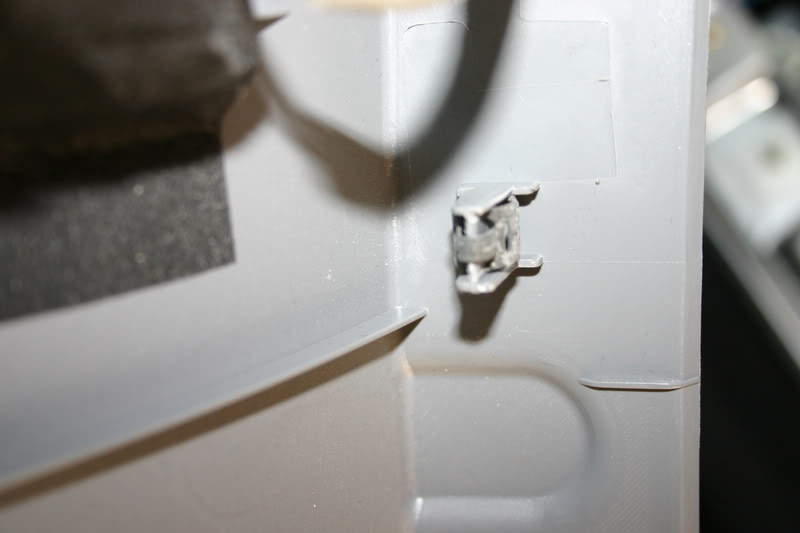
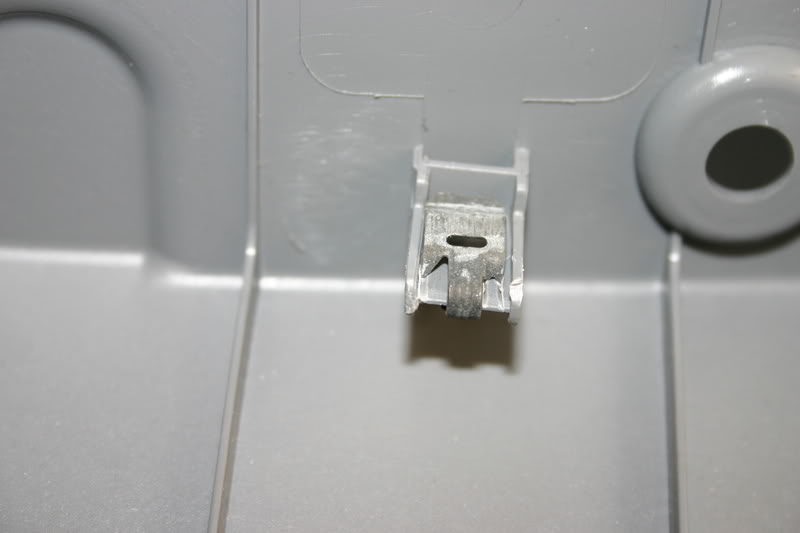
Here is what they pop into
This is everything put back together after cutting the access hole. Here the filter is hanging out.
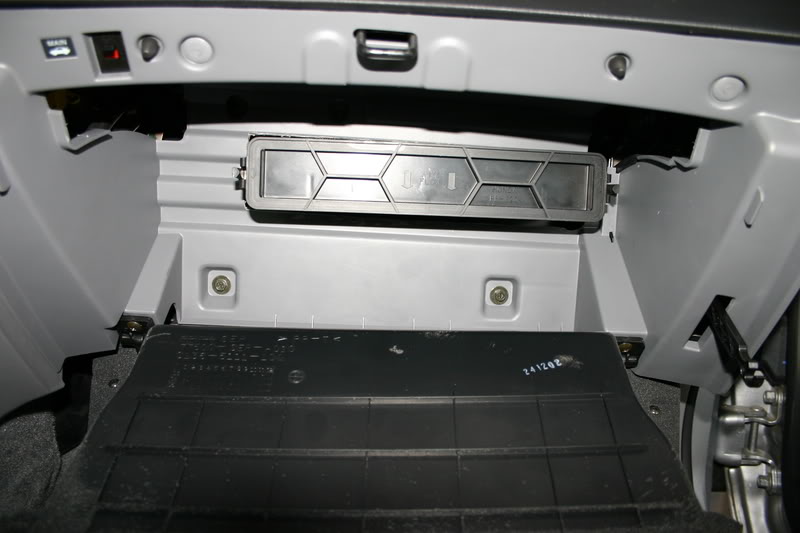
Here it is pushed in and easily removable
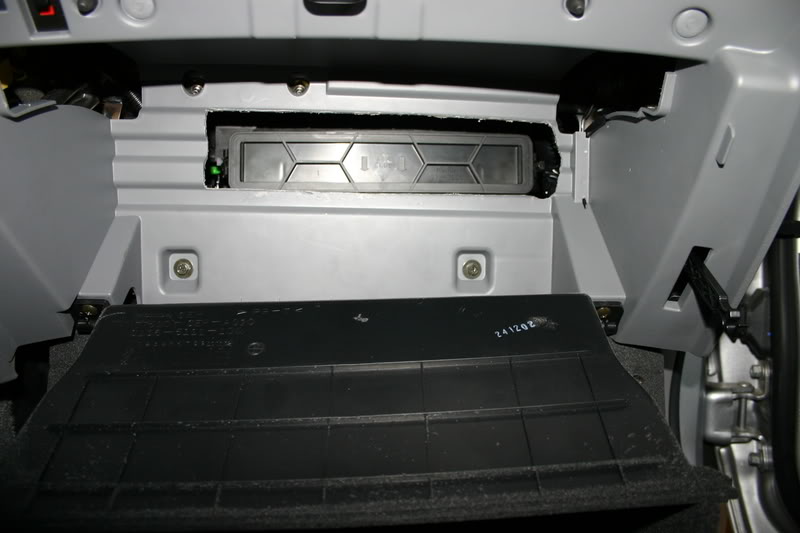
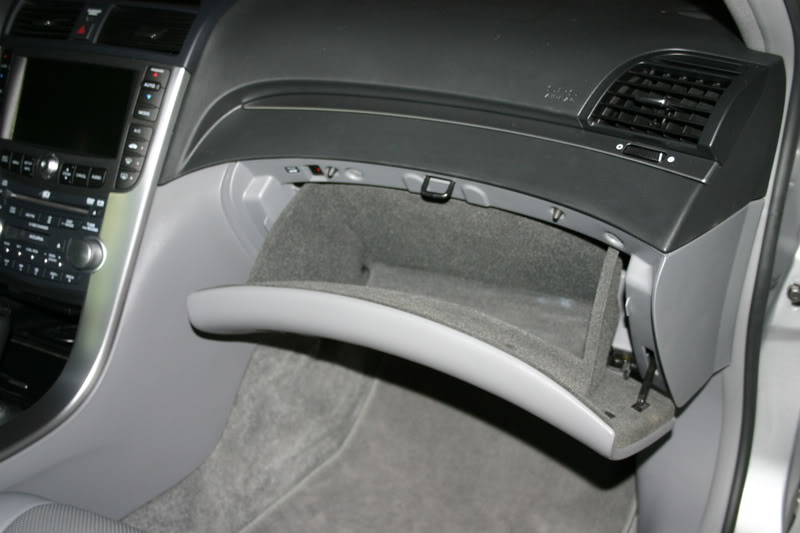
And the finished product
Now when my filter arrives, it should be a quick swap
To help with some of the confusion................
IF you don't have the clips on the inside of your glove box, you simply push in on the sides until the tab clears.
To remove this hook, just push on it where the grooved notch is.
Something I didn't see mentioned is to remove these 2 screws ( if you have them) to get the back panel off.
Here are the clips that are holding the back panel on. Someone said to remove these horizontally, I thought that meant start on the far right of the back piece and work horizontally across. I think it makes more sense to say they come straight out towards you.
Here is what they pop into
This is everything put back together after cutting the access hole. Here the filter is hanging out.
Here it is pushed in and easily removable
And the finished product
Now when my filter arrives, it should be a quick swap
05-18-2008, 12:46 AM
#140
'05 TL - Anthracite w/nav
Join Date: Apr 2007
Location: NYC.....
Age: 42
Posts: 13
Likes: 0
Received 0 Likes
on
0 Posts
Originally Posted by A SiQ TL
O.K., I decided it was time to do this as well. So I ordered my filter and went ahead and prepared it for an easy install(aka cut an access hole).
To help with some of the confusion................
IF you don't have the clips on the inside of your glove box, you simply push in on the sides until the tab clears.

To remove this hook, just push on it where the grooved notch is.
Something I didn't see mentioned is to remove these 2 screws ( if you have them) to get the back panel off.
Here are the clips that are holding the back panel on. Someone said to remove these horizontally, I thought that meant start on the far right of the back piece and work horizontally across. I think it makes more sense to say they come straight out towards you.

Here is what they pop into
This is everything put back together after cutting the access hole. Here the filter is hanging out.
Here it is pushed in and easily removable
And the finished product
Now when my filter arrives, it should be a quick swap
To help with some of the confusion................
IF you don't have the clips on the inside of your glove box, you simply push in on the sides until the tab clears.
To remove this hook, just push on it where the grooved notch is.
Something I didn't see mentioned is to remove these 2 screws ( if you have them) to get the back panel off.
Here are the clips that are holding the back panel on. Someone said to remove these horizontally, I thought that meant start on the far right of the back piece and work horizontally across. I think it makes more sense to say they come straight out towards you.
Here is what they pop into
This is everything put back together after cutting the access hole. Here the filter is hanging out.
Here it is pushed in and easily removable
And the finished product
Now when my filter arrives, it should be a quick swap
Good idea making that hole...removing the housng was a bitch.
05-18-2008, 07:51 PM
#141
Advanced
Join Date: Jan 2007
Age: 34
Posts: 83
Likes: 0
Received 0 Likes
on
0 Posts
thks for the well illustration with pics siq tl. however, where r clips that are holding the back panel on.
it seems to me if u r planning on removing the back panel w/o cutting the hole, the glove box doesn't need to be completely off.
it seems to me if u r planning on removing the back panel w/o cutting the hole, the glove box doesn't need to be completely off.
05-19-2008, 06:28 PM
#143
AZ Community Team
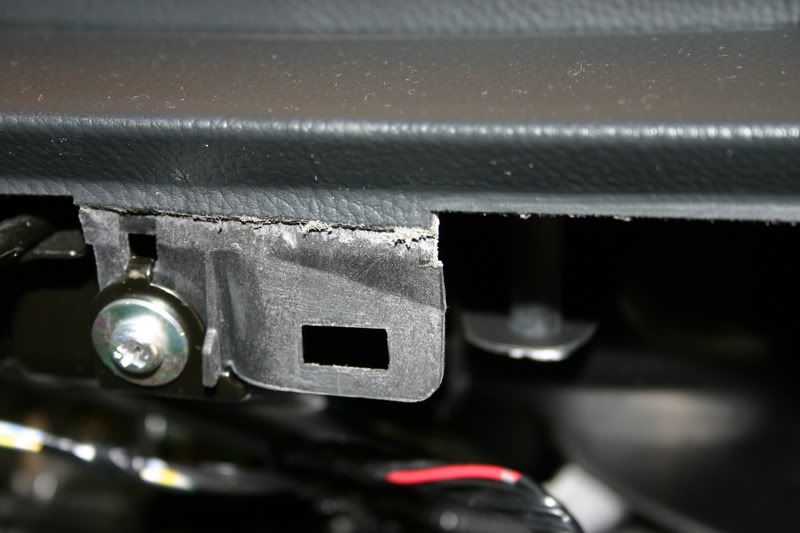
When I replaced my cabin filter I noticed the glovebox latch on the dash side was missing a bolt (and I also had a rattle behind the glovebox go figure). So when replacing check for the bolt being there. It was a 8mm diameter with 0.8mm threads (most of the time these bolts have 10mm hex heads). You can see the missing bolt hole from the middle of this photo.

05-19-2008, 07:49 PM
#145
AZ Community Team
Originally Posted by THTL
thanks for the heads up, why is it missing a bolt there.
 . I looked for it in the lower part of the dash and didn't find anything.
It did solve my right side rattle
05-22-2008, 06:18 PM
#147
After reading this thread (and not closely enough at that), changed the filter in about 5 minutes this morning. The part I missed was the push pins on top of the box: one broke and the other shot off to somewhere in the neighbor's yard. However, since they're only about 50 cents each, I figure well worth it instead of whatever the dealer would charge.
BTW, I think someone mentioned not needing to take off the glovebox. I just pushed the sides in, popped the retaining arm off, then let it hang down while I pulled the panel. I found it easier to pull starting on the left side by the center console (straight away from the dash, then work toward the right side.
BTW, I think someone mentioned not needing to take off the glovebox. I just pushed the sides in, popped the retaining arm off, then let it hang down while I pulled the panel. I found it easier to pull starting on the left side by the center console (straight away from the dash, then work toward the right side.
05-27-2008, 07:24 AM
#150
My TL can do this, too!
Originally Posted by kfhughes
The part I missed was the push pins on top of the box: one broke and the other shot off to somewhere in the neighbor's yard. However, since they're only about 50 cents each, I figure well worth it instead of whatever the dealer would charge.
05-27-2008, 11:52 AM
#151
Originally Posted by rksokol
I broke one of my pushpins. Where did/can you get replacements for $0.50?

Illustration No. Part Number Description Required Qty. Year Model List Price Our Price
028 91550-S50-000ZU CLIP, TAILGATE ( MOON LAKE GRAY ) 2 2006 TL 0.30 0.24
028 91550-S50-000ZW CLIP, TAILGATE ( LIGHT TAN ) 2 2006 TL 0.28 0.22
028 91550-S50-000ZL CLIP, TAILGATE ( GRAPHITE BLACK ) 2 2006 TL 1.77 1.42
028 91550-S50-000ZV CLIP, TAILGATE ( LIGHT CREAM IVORY ) 2 2006 TL 0.30 0.24
I haven't replaced mine (yet) but the local Acura dealer I use for parts usually charges me retail for the parts.
Note; these are for a 2006 TL. I think different years have different part numbers (the 04 doesn't use the pins, IIRC).
05-27-2008, 12:33 PM
#152
Quiet, Rika Neenja!
I changed my filter out to the ATP one from rockauto about a month ago, and the A/C still smells like foot sometimes. Is there anything I can spray in there/somewhere to kill the mold or whatever is causing the smell? it goes away after a minute but I'd rather it not be there at all.
Thanks!!
Thanks!!
05-30-2008, 09:45 AM
#155
Oderint dum metuant.
Join Date: Mar 2005
Location: Lake Wylie
Age: 46
Posts: 12,496
Likes: 0
Received 534 Likes
on
446 Posts
After disappointing results trying to find a good filter at a brick-and-mortar store Wednesday, I ordered one from RockAuto yesterday. My original plan was to do my oil change, cabin filter, and tire rotation Saturday, but with ordering the filter on Thursday, I figured I'd end up doing that part next weekend after it showed up some time next week. Well, my schedule worked out that I'm going to the oil change and tire rotation today. I just checked my e-mail and saw not only had Rock Auto shipped my filter yesterday, they had sent me a FedEx tracking number , which when I clicked on it, said it was being delivered today  . Great service and I got a good filter for less than the local stores were charging for a cheap one (if they even had one)...I'm happy.
, which when I clicked on it, said it was being delivered today . Great service and I got a good filter for less than the local stores were charging for a cheap one (if they even had one)...I'm happy.
05-31-2008, 11:26 AM
#156
Stacking chips.
I ordered one as well yesterday bout 4pm. To my surprise my door bell rang this morning, Fed-Ex. Wow, now thats fast. Just installed mine in about 5 minutes. I just took off the clips on the glove box walls, unlatched the suspension rod, took out the two push clips, and pulled the whole thing out from right to left. No need to undo glovebox!! Easiest mod ever.
 ...still only took about 10 minutes.
06-13-2008, 12:36 PM
...still only took about 10 minutes.
06-13-2008, 12:36 PM
#159
3GTLS
Join Date: Jan 2008
Location: Bay Area, CA
Age: 47
Posts: 101
Likes: 0
Received 0 Likes
on
0 Posts
Hi, I am trying to find the carbon filter for 2008 TL. RockAuto doesn't seem to have one for 2008 TLs but they do for 2004. Is that filter going to fit the 2008?
07-01-2008, 03:25 PM
#160
Instructor

Join Date: Jun 2007
Age: 41
Posts: 152
Likes: 0
Received 0 Likes
on
0 Posts
I'm planning to change my filter and was wondering if anyone sprayed a product to eliminate odors directly to where the filter is. I'm thinking of getting a can of "BG Frigi-Fresh" and spray it with the filter out and the A/C running.
Do you guys think it will be effective?
Do you guys think it will be effective?