
Attempting Headlight Mod

Thread Starter
Instructor
Joined: Feb 2010
Posts: 215
Likes: 1
From: Portland, OR
Attempting Headlight Mod
Well, tomorrow is finally the day for my headlight mod.
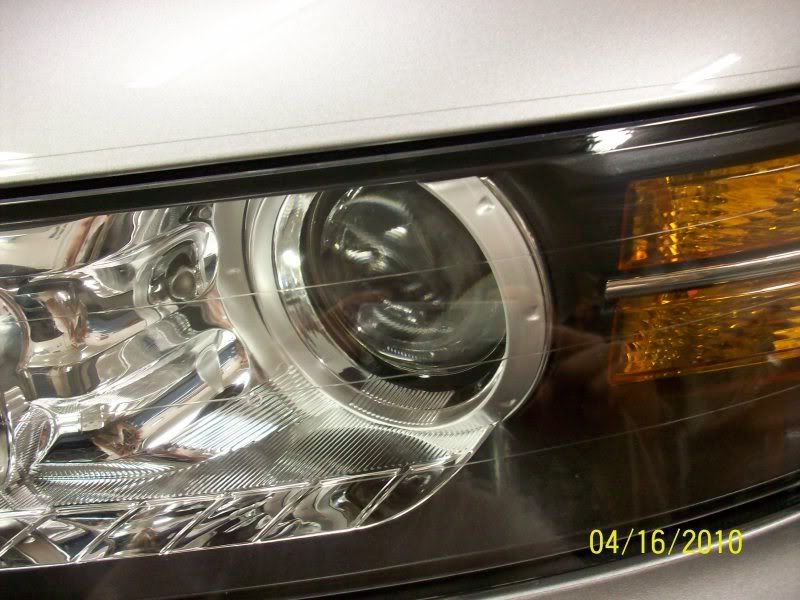
I have gone over the DIY and hopefully can make mine look as good as everyone elses. However, I would like some input, as I am still contemplating whether to blackout completely or leave the chrome exposed where my blinker is. I love the complete black look, but I just don't know how bright it will be since pictures don't justify lighting very well. Also who prefers Gloss or Flat black better. So if anyone would have done theirs differently or what not please eloborate.
I think I have everything, but would like to run it with all you aziners first.
Butyl rubber
Clamps
Epoxy
Gloves
Paint (will pick up tomorrow once decision is made)
Silicate packets
Tools (obviously)
Beer (obviously)
Switchbacks/resistors
Thanks, Pics will be up when completed.
Last edited by LoveMyTL-S; May 19, 2010 at 06:22 AM.

AZ Community Team
Joined: May 2007
Posts: 32,488
Likes: 7,771
From: N35�03'16.75", W 080�51'0.9"
If you've got Butyl Rubber, not sure what the epoxy is for. If it's part your re-sealing, you'll see when you get 'em apart that you probably won't need it.
Roll the Buytl Rubber out to fill the groove (you'll see). Then when you fit the two peices back together, they'll almost snap together. As long as the bead of sealant fills the groove and you get the "snap" feel, you're good to go.
I tried Flat Black AND Gloss Black and can't see a difference.
Be careful if you remove the amber reflectors. They snap in, but it's easy to break the tabs.
If you paint the chromed strip that runs long-ways, make sure to scuff it and wipe it down good with alcohol. Otherwise the paint won't want to stick.
BEFORE you re-assemble the lights make sure that you've wiped out the inside of the headlight lens (the clear front of the headlight) with a LINT FREE cloth. It's easy to get finger prints and/or lint in there and can look bad if you're not careful. A good glass cleaner is probably better than alcohol to avoid streaking - maybe even some eye-glasses cleaner - something sure to be streak free.
Pics when you're done.
AZ Community Team
Joined: May 2007
Posts: 32,488
Likes: 7,771
From: N35�03'16.75", W 080�51'0.9"

I just got my lights back from JnC. I was originally going to go with his v1 which is completely blacked out. I wasnt planning on upgrading the the turn signal bulb to an led bulb. JnC told me that if there was no chrome surface and your NOT going to use and led turn signal then go with his v2 (some of the chrome surface left chrome) so the light will show better.
so if you dont plan on ugrading to a led turn signal then leave that area chrome
so if you dont plan on ugrading to a led turn signal then leave that area chrome
Trending Topics
I would wait. I now have zkw-r lenses and the light output looks so much better then stock. Order them here http://www.theretrofitsource.com/pro...roducts_id=136
I received mine in 4 days
I received mine in 4 days
Thread Starter
Instructor
Joined: Feb 2010
Posts: 215
Likes: 1
From: Portland, OR
I would wait. I now have zkw-r lenses and the light output looks so much better then stock. Order them here http://www.theretrofitsource.com/pro...roducts_id=136
I received mine in 4 days
I received mine in 4 days

Intermediate
Joined: Apr 2010
Posts: 35
Likes: 0
you dont need epoxy.. i put some black silicon on the back of it and it held on just fine.. then again i used black silicon to seal it back together too so yeah it was already there for me to use

Racer
Joined: Jan 2009
Posts: 291
Likes: 6
From: Phila PA
one thing that def helped me was cheap pairs of chopsticks from a chinese restaurant...you want to get out as much of the old honda butyl stuff from the grooves of the headlights...that way when you lay down your new butyl it'll sit in there well.
Burning Brakes
Joined: May 2007
Posts: 867
Likes: 37
From: Anchorage, Alaska
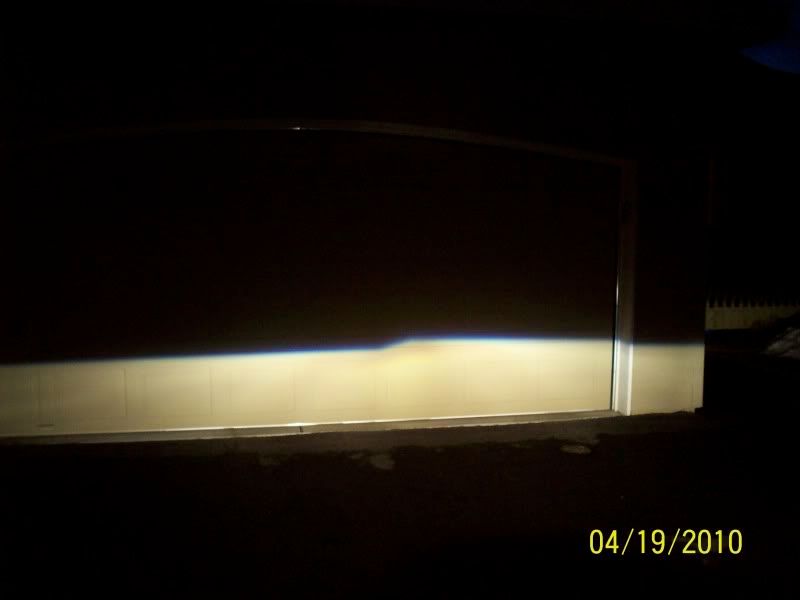
To me, the best part is that the beam is so focused it appears as if it goes so much further. Also, it appears to be significantly wider. AND, this width is also super sharp. Cars passing me on both sides have a sharp cut off. Lots of color too! But let the pics do the talking...
Before ZKWr:

ZKWr on my TL:

Before ZKWr:
ZKWr on my TL:
an air compressor is nice to blow out and debris or dirt. new micro fiber towels and streak free glass cleaner is a must when cleaning the inside parts and lens. careful not to rub the chrome strip too much. the chrome has a tendency to rub or flake off. as for the reflector area id leave it chrome. it will help the light output of the corner bulb.
for extra coverage as far as leaks and moisture getting in. some clear silicone all around is not a bad idea. dont overdo it just a nice bead where the two parts meet and spread it flat.
for extra coverage as far as leaks and moisture getting in. some clear silicone all around is not a bad idea. dont overdo it just a nice bead where the two parts meet and spread it flat.
Burning Brakes
Joined: May 2007
Posts: 867
Likes: 37
From: Anchorage, Alaska
Sondinh, look at the cut off pics above. Basically they are clear lenses that create a sharper cut off. The stock lenses reduce light output because they are are not perfectly clear. I bought mine at theretrofitsource.com for $65.
I think OEM ones are like this to reduce the appearance of the TL driver flashing their brights at oncoming traffic. A lot of people with projectors think they are getting flashed because their lights are too bright. I think it's because when you hit bumps, it appears that you are flashing someone. They get upset and flash back to show you they don't have their brights on.
The OEM cloudy lens creates a blurry cut off and reduces this "flicker" effect. HID nerds however love how the sharp cut off looks from the driver's seat and to oncoming traffic. It also allows the light to travel further since it is unrestricted. With these lenses, I not only have a sharp focused step, but also a sharp peripheral cut off. So, I see this cut off on everything.
I was going for a sharper cut off but I ended up getting a lot of color too. This color also extends into the peripheral as well. I have blue/purple on guard rails, cars and signs as I pass. It's really cool looking.
Stock:
ZKWr:
Thread Starter
Instructor
Joined: Feb 2010
Posts: 215
Likes: 1
From: Portland, OR
Thanks for everyone's input.
Since I am not doing my headlights today, I have decided to debadge and gunmetal my Acura emblem in the rear. Maybe put in my TL-s tails if I get around to it as well.
Since I am not doing my headlights today, I have decided to debadge and gunmetal my Acura emblem in the rear. Maybe put in my TL-s tails if I get around to it as well.
Sondinh, look at the cut off pics above. Basically they are clear lenses that create a sharper cut off. The stock lenses reduce light output because they are are not perfectly clear. I bought mine at theretrofitsource.com for $65.
I think OEM ones are like this to reduce the appearance of the TL driver flashing their brights at oncoming traffic. A lot of people with projectors think they are getting flashed because their lights are too bright. I think it's because when you hit bumps, it appears that you are flashing someone. They get upset and flash back to show you they don't have their brights on.
The OEM cloudy lens creates a blurry cut off and reduces this "flicker" effect. HID nerds however love how the sharp cut off looks from the driver's seat and to oncoming traffic. It also allows the light to travel further since it is unrestricted. With these lenses, I not only have a sharp focused step, but also a sharp peripheral cut off. So, I see this cut off on everything.
I was going for a sharper cut off but I ended up getting a lot of color too. This color also extends into the peripheral as well. I have blue/purple on guard rails, cars and signs as I pass. It's really cool looking.
Stock:
ZKWr:
I just installed my JnC headlights this weekend. I got the V2 blackout, ZKW-Rs and 85122+ bulbs from retrofitsource, partially cleared amber with CF overlays. I also installed V-LEDs Type 1 48LED switchbacks.
The blackout really makes the car look aggressive---I love it. The ZKW lenses provide quite a sharp cutoff and just look better than the OEM lenses. Difficult to explain, but I have only had them in for a day now. More time and I'll describe it better.
The Phillips 85122+ bulbs need some burn in time, but are a lot yellower than I thought for a 4300K bulb.
As to the chrome in the turn signal---Mine are partially blackened. The scalloping is left chrome and the rest is blackened. Losing the diffuser takes a lot away from these lights. Leaving the chrome scallops disperses and throws the light to the front of the car very nicely, but the effect drops off rapidly when viewed from the side. The 48LED switchbacks throw some decent light to the side, but I need to see it in bright sunlight to see how washed out it is. I may have to try the 60LED units from autolumination.
Thread Starter
Instructor
Joined: Feb 2010
Posts: 215
Likes: 1
From: Portland, OR
I just installed my JnC headlights this weekend. I got the V2 blackout, ZKW-Rs and 85122+ bulbs from retrofitsource, partially cleared amber with CF overlays. I also installed V-LEDs Type 1 48LED switchbacks.
The blackout really makes the car look aggressive---I love it. The ZKW lenses provide quite a sharp cutoff and just look better than the OEM lenses. Difficult to explain, but I have only had them in for a day now. More time and I'll describe it better.
The Phillips 85122+ bulbs need some burn in time, but are a lot yellower than I thought for a 4300K bulb.
As to the chrome in the turn signal---Mine are partially blackened. The scalloping is left chrome and the rest is blackened. Losing the diffuser takes a lot away from these lights. Leaving the chrome scallops disperses and throws the light to the front of the car very nicely, but the effect drops off rapidly when viewed from the side. The 48LED switchbacks throw some decent light to the side, but I need to see it in bright sunlight to see how washed out it is. I may have to try the 60LED units from autolumination.
The blackout really makes the car look aggressive---I love it. The ZKW lenses provide quite a sharp cutoff and just look better than the OEM lenses. Difficult to explain, but I have only had them in for a day now. More time and I'll describe it better.
The Phillips 85122+ bulbs need some burn in time, but are a lot yellower than I thought for a 4300K bulb.
As to the chrome in the turn signal---Mine are partially blackened. The scalloping is left chrome and the rest is blackened. Losing the diffuser takes a lot away from these lights. Leaving the chrome scallops disperses and throws the light to the front of the car very nicely, but the effect drops off rapidly when viewed from the side. The 48LED switchbacks throw some decent light to the side, but I need to see it in bright sunlight to see how washed out it is. I may have to try the 60LED units from autolumination.
I have them already, so I'm going to give it a try. I'll keep you all posted if they fail on me.
Last edited by LoveMyTL-S; May 19, 2010 at 06:30 AM.
Thread Starter
Instructor
Joined: Feb 2010
Posts: 215
Likes: 1
From: Portland, OR
I could be misinterpreting, but does adding a ZKW lense create "color" as in a blue or a purple look? I dislike the traditional yellow color that you get from most headlights, and I really like the "white" look that the stock HID's seem to give out (at least mine seem to). Does adding a ZKW lens create more "white" or more "blue/purple"? Or does the bulb make the difference and the ZKW just controls the amount of light you see? Just trying to learn here...
Burning Brakes
Joined: May 2007
Posts: 867
Likes: 37
From: Anchorage, Alaska
Jsonkimz: A byproduct of the projector lens does give you color due to its prism effect. What most people see on the road is color from a projector's cut off, not the color output of the bulb. Bulbs that have a higher Kelvin color temp will reduce light output, and project a blueish color onto the road.
I run stock bulbs and throw purple everywhere from my cut off. The light on the ground is usable white light. Look at all the purple/blue along this cut off pic below. Get the philips bulbs!
I run stock bulbs and throw purple everywhere from my cut off. The light on the ground is usable white light. Look at all the purple/blue along this cut off pic below. Get the philips bulbs!
Thread Starter
Instructor
Joined: Feb 2010
Posts: 215
Likes: 1
From: Portland, OR
So this is all I could find on ZKW install. https://acurazine.com/forums/showthr...ht=zkw+install
It leads me to a couple of questions considering I thought they would just drop in and thats it.
What kind of power source would I use to test these? Don't wanna fry anything. I can't use my car cuz I live in condos and would be a pain to do it with the ballast connected to the car.
Also, JnC says to move the cutoff shield back, but the other person says use spacers. Anyone have any input on this?
Thanks
Thread Starter
Instructor
Joined: Feb 2010
Posts: 215
Likes: 1
From: Portland, OR
I did my headlights. know need help with issues
So I opened up my headlights and everything was going smooth until installed.
The first issue I am having is that when I tried out my high beams only the passenger side is responding. If anyone knows why or how i can fix this plz chime in.
The second issue started when I ordered ZKW-Replicas from Retrofit Source and this is what they sent me...

Retrofits ZKW on the left and my stock fresnel on the right

Retrofits ZKW on the left and my stock fresnel on the right

So the problem is that these are original ZKW and not the replicas that I was planing on just popping in. The originals need spacers, so I made some cereal box spacers and tested.
when testing I only did on at a time and they looked good. After install tho the passenger side cut off is way higher than the driver side and it's also kind of tilted counter clockwise a little bit. It looks bad and I am sure it's blinding people.
So, just wondering if anyone can through down some input on this, and if there's a way to adjust without opening back up, which I doubt. Please let me know.
Thanks
The first issue I am having is that when I tried out my high beams only the passenger side is responding. If anyone knows why or how i can fix this plz chime in.
The second issue started when I ordered ZKW-Replicas from Retrofit Source and this is what they sent me...
Retrofits ZKW on the left and my stock fresnel on the right
Retrofits ZKW on the left and my stock fresnel on the right
So the problem is that these are original ZKW and not the replicas that I was planing on just popping in. The originals need spacers, so I made some cereal box spacers and tested.
when testing I only did on at a time and they looked good. After install tho the passenger side cut off is way higher than the driver side and it's also kind of tilted counter clockwise a little bit. It looks bad and I am sure it's blinding people.
So, just wondering if anyone can through down some input on this, and if there's a way to adjust without opening back up, which I doubt. Please let me know.
Thanks
Well, tomorrow is finally the day for my headlight mod.
I have gone over the DIY and hopefully can make mine look as good as everyone elses. However, I would like some input, as I am still contemplating whether to blackout completely or leave the chrome exposed where my blinker is. I love the complete black look, but I just don't know how bright it will be since pictures don't justify lighting very well. Also who prefers Gloss or Flat black better. So if anyone would have done theirs differently or what not please eloborate.
I think I have everything, but would like to run it with all you aziners first.
Butyl rubber
Clamps
Epoxy
Gloves
Paint (will pick up tomorrow once decision is made)
Silicate packets
Tools (obviously)
Beer (obviously)
Switchbacks/resistors
Thanks, Pics will up when completed.
Burning Brakes
Joined: May 2007
Posts: 867
Likes: 37
From: Anchorage, Alaska
Wow, that's crazy Pharonocon! I had problems, but not this many. Well, it looks like you have a few issues:
1) Spacers
2) No High beam
3) Tilted cut off
I attempted to focus mine with spacers but was unsuccessful. The lens holder was way too tight for any adjustment so basically I just dropped them in. OEM ZKWs should have better output so I'd try and make them work! Call Matt and he should be able to tell you how to create a spacer.
If you didn't remove the projector from the housing to do the lens install, there really isn't any reason that your high beams wouldn't work. I'd try unplugging then replugging the connectors again just to make sure everything is hooked up. Lenses have nothing to do with electrical.
Again, if you didn't remove the projector from the housing, there is no reason your cut off is tilted. Unless you really jerked on the lens holder and it somehow rotated the whole projector, but I doubt it. Also, now that you have focused lenses, flaws in the projector could be showing much more now.
Please post pics so we can see what you are talking about. Oh, and the height is adjustable. I had to adjust mine a lot because the cut off was way too high.
Last edited by Mug; May 19, 2010 at 10:59 AM.
Burning Brakes
Joined: May 2007
Posts: 867
Likes: 37
From: Anchorage, Alaska
You can adjust the headlights with a philips head screw driver. There are holes in the engine bay behind the lights on both sides. Here is the link to the 3G Garage:
https://acurazine.com/forums/3g-tl-2004-2008-93/re-aiming-headlights-3g-garage-g-007-a-558380/
https://acurazine.com/forums/3g-tl-2004-2008-93/re-aiming-headlights-3g-garage-g-007-a-558380/
