
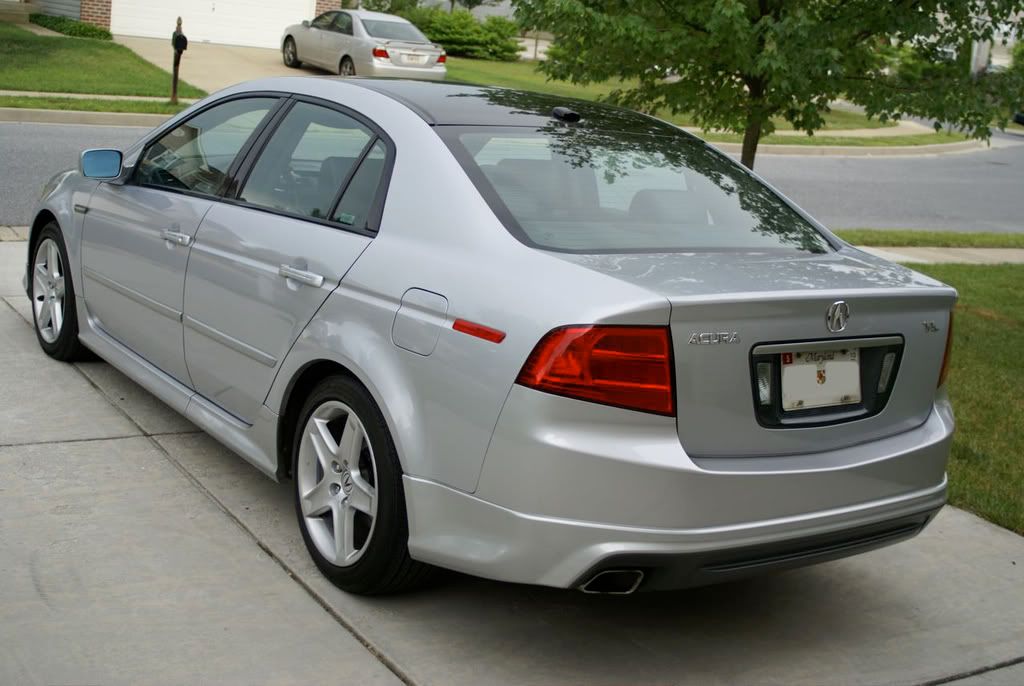
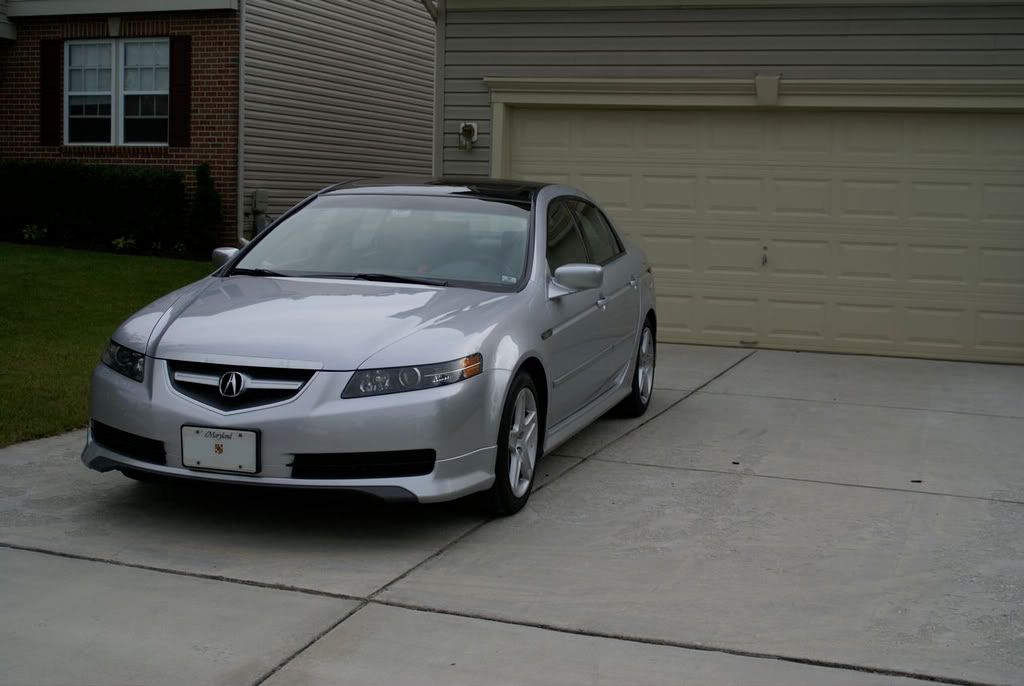
Another Headlight Black out Journal w/ partial orange reflector
 09-08-2008 | 01:02 AM
#44
Intermediate
Joined: Jul 2008
Posts: 33
Likes: 0
After debating it for a long long time I am determined to black out my lights. The only thing I am worried about is the process of re-sealing the lights. Did you add some silicone (silicone you purchased) before re-sealing the lights and baking them, or did you seal them back up just using the same silicone (the black silicone you took off with the razor) that came with the lights?
09-08-2008 | 05:43 AM
#45
Thread Starter
Racer
Joined: Mar 2007
Posts: 404
Likes: 3
From: Baltimore, MD
I did both, I resealed them with the old silicone then I put a bead on new silicone around the outside. I did my civic lights back in 1996 where I took the old silicone off and put new in, that works too but it takes forever.
 09-09-2008 | 11:08 AM
#50
Planning one day to do the headlights as well. My question is what are those clips you are talking about (you mentioned you broke one clip). Are those clips inside the headlights that you have to clip/unclip when dissembling or reassembling the headlights ?
Also I was thinking of going to a wreck yard and picking up some headlights to practice on. Are all headlights sealed that way ? any headlights I could find that are real close to ours ?
Also I was thinking of going to a wreck yard and picking up some headlights to practice on. Are all headlights sealed that way ? any headlights I could find that are real close to ours ?
09-09-2008 | 11:59 AM
#51
Thread Starter
Racer
Joined: Mar 2007
Posts: 404
Likes: 3
From: Baltimore, MD
The clips are on the outside, they are easy to see. It was just my carelessness that broke one, but it didn't affect anything. I believe most headlights are build around the same idea. I did the same thing with my old civic.
09-24-2008 | 03:04 PM
#52

Intermediate
Joined: Jul 2008
Posts: 38
Likes: 0
I am using SMT Tower II LED's from Autolumination.com. They are white while running and orange for the blinker. Unless you use a resistor the lights will blink fast. I like the fast blink. As for the bumper I did use the DIY. The only tricky part is where the bumper is clipped in above the grill on either side of the headlight. A flathead screwdriver will fit in there and you can pry it out. The only other part that made me second guess are the clips under the light. You have to pull pretty hard to get them out. Hope all goes well.
Running Lights

Blinker
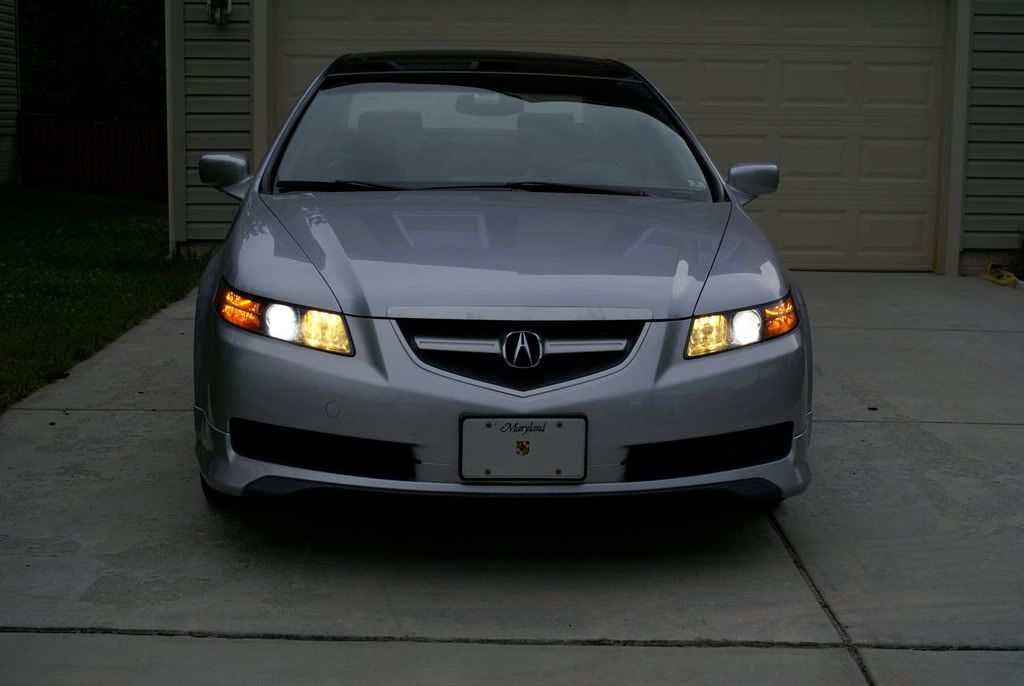
Running Lights
Blinker
09-24-2008 | 04:52 PM
#53
Racer
Joined: Mar 2005
Posts: 347
Likes: 0
From: Mass
I'm guessing he took a picture of his hazards on mid-blink in the second picture.
09-24-2008 | 08:21 PM
#55
Intermediate
Joined: Jul 2008
Posts: 38
Likes: 0
you stated that it blinked orange... even with the SMT TOWER II's will it blink orange even though the bulb is white?
i'm sorry but i'm damn confused because i have no knowledge with headlights and other lights
"They are white while running and orange for the blinker" what did you do in order to make that happen?
i'm sorry but i'm damn confused because i have no knowledge with headlights and other lights
"They are white while running and orange for the blinker" what did you do in order to make that happen?
09-24-2008 | 08:30 PM
#56
Intermediate
Joined: Jul 2008
Posts: 38
Likes: 0
you stated that it blinked orange... even with the SMT TOWER II's will it blink orange even though the bulb is white?
i'm sorry but i'm damn confused because i have no knowledge with headlights and other lights
"They are white while running and orange for the blinker" what did you do in order to make that happen?
09-25-2008 | 06:16 AM
#57
Thread Starter
Racer
Joined: Mar 2007
Posts: 404
Likes: 3
From: Baltimore, MD
They are two color LED's when you have your parking lights/headlights on they are white. When you use your blinker either with your parking lights on or off they are orange. Here is a link to see how they work and where you can get them. Its better to ask until you understand than do something you don't. Hope this helps
http://autolumination.com/switchback.html
It's the middle light that I have. It will fit in your blinker without having to modify the hole.
http://autolumination.com/switchback.html
It's the middle light that I have. It will fit in your blinker without having to modify the hole.
Last edited by voigt; 09-25-2008 at 06:18 AM.
09-25-2008 | 07:18 PM
#60
Intermediate
Joined: Jul 2008
Posts: 38
Likes: 0
They are two color LED's when you have your parking lights/headlights on they are white. When you use your blinker either with your parking lights on or off they are orange. Here is a link to see how they work and where you can get them. Its better to ask until you understand than do something you don't. Hope this helps
http://autolumination.com/switchback.html
It's the middle light that I have. It will fit in your blinker without having to modify the hole.
http://autolumination.com/switchback.html
It's the middle light that I have. It will fit in your blinker without having to modify the hole.
i apologize because i know i'm asking for a lot, but like you said... better ti ask until i understand.
ex. some people put on silicone, heat it again, apply more silicone, nd then heat AGAIN. those kind of small details.
it would be MUCH appreciated. nd if you need my contact info. PLEASE let me know
thanks a lot
 09-26-2008 | 06:07 AM
#62
Thread Starter
Racer
Joined: Mar 2007
Posts: 404
Likes: 3
From: Baltimore, MD
It doesn't cost anything. There is a black spacer in the projector that holds the highbeam/lowbeam shield away from the stop. If you remove this then you change the edge of the light. I liked it because instead of there being a sharp line which some like. The light between darkness fades a little more. The transitions seem easier on the eyes. By doing this it makes the outside edge of the light blue/purple. So as you are driving you will see blue between the black and the white. I found a DIY along time ago.
09-26-2008 | 08:30 PM
#65
Thread Starter
Racer
Joined: Mar 2007
Posts: 404
Likes: 3
From: Baltimore, MD
Wow i FINALLY found the necessary bulb for what i'm trying to. thanks so much. hey if you don't mind... i understand there are a LOT of DIY's about clearing headlights, but no one has really given me information that i sure confirm other than the video of how to pull off my bumper. Is there ANY WAY that you can walk me through it? so i can in a way set up a plan nd the amount of time needed to change the bulb, AND cut the amber, nd let the silicone dry?
i apologize because i know i'm asking for a lot, but like you said... better ti ask until i understand.
ex. some people put on silicone, heat it again, apply more silicone, nd then heat AGAIN. those kind of small details.
it would be MUCH appreciated. nd if you need my contact info. PLEASE let me know
thanks a lot
Sorry I didn't see your comment.
Refer to Ron A post halfway down this thread
https://acurazine.com/forums/3g-tl-2004-2008-93/how-do-i-remove-headlights-install-angel-demon-eyes-3g-garage-e079-568836/
Now I will try to explain what I did and with maybe it will help, I am not an expert so take this use this with commonsense (disclaimer).
Start by taking off the Front Strake piece, the black thing under the bumper. There should be 9 bolts (four of one kind five of another, remember where they came from) holding it up. Once you have the three pieces down you have some more screws and clips to take off.
[A-spec removal. If you have an A-spec lip you don't need to take it off the bumper if you drill a hole in the lip inside the wheel well to let you access the screws behind it. I'll take a picture if someone is interested.]
To remove the bumper there are 10 clips, 2 bolts, and 2 screws. Pop your hood and remove the two clips at the front by each headlight. Then in each wheel well there are two clips and a screw to take out. Under the bumper in front of each wheel there should be another clip and a bolt. This just leaves two more clips they are up the back of the bumper in the center.
Once you have all the clips, screws, and bolts removed you have the fun part. It is going to feel like you are going to break the bumper but pull on the top of the bumper starting at the wheel well. There are clasps under the headlight that are holding it in place. Start soft and pull harder until they come loose. I had to use a lot of force. get both sides loose and you will see the bumper is attached in by two more clasps. These are right at the top of the grill. The bumper is kind of tucked up underneath (You will understand when you see it). I got a small screwdriver and pushed the bumper down freeing it from the clasp. The bumper should now be completely free. Place the bumper on your significant others best blanket so you don't scratch it, or better yet an old blanket.
Now to remove the headlight you have to start by taking off the plastic piece under the blinker. Two screws are holding it in place (I seem to recall that you need to give it a little pull because it also clasps in there). Next there are four bolts holding on the metal strip (with the clips) take them off. There are four more bolts two up top and two on a bracket attached to the frame. The two down bottom require some effort, not much. On the passenger side you might need to remove some of the screws holding the washer fluid to get to the bracket. On the other side I think there were some wires you had to work around. Once all the bolts are free you need to detach the wires at the back. There are four, one for the fog's, one for the blinker, and two for the HID's. The headlight will come out with some turning and twisting.
Now its time to clear/blackout.
I believe the whole process took me 10 hours. I didn't rush the job and watched football as the coats of paint dried. Take your time and have fun. Hope this helps.


Thread
Thread Starter
Forum
Replies
Last Post