When you click on links to various merchants on this site and make a purchase, this can result in this site earning a commission. Affiliate programs and affiliations include, but are not limited to, the eBay Partner Network.
Hi Guys, Long time reader, first-time contributor.
It's common that most of us get all the steering wheel controls work work with aftermarket HU with exception of the bluetooth answer call and end call.
As a previous poster has mentioned in a different thread the PAC SWI-CP5 does work 100% with all the steering wheel buttons. Even allowing you to create double functions for each button (short press and long press).
While the SWI-CP5 does work their wiring instructions they included are horrible. Please use the wiring instructions for the SWI-RC unit for the wiring behind the stereo. (SWI-CP5 also wires 12volt constant yellow wire which is not required in the SWI-RC)
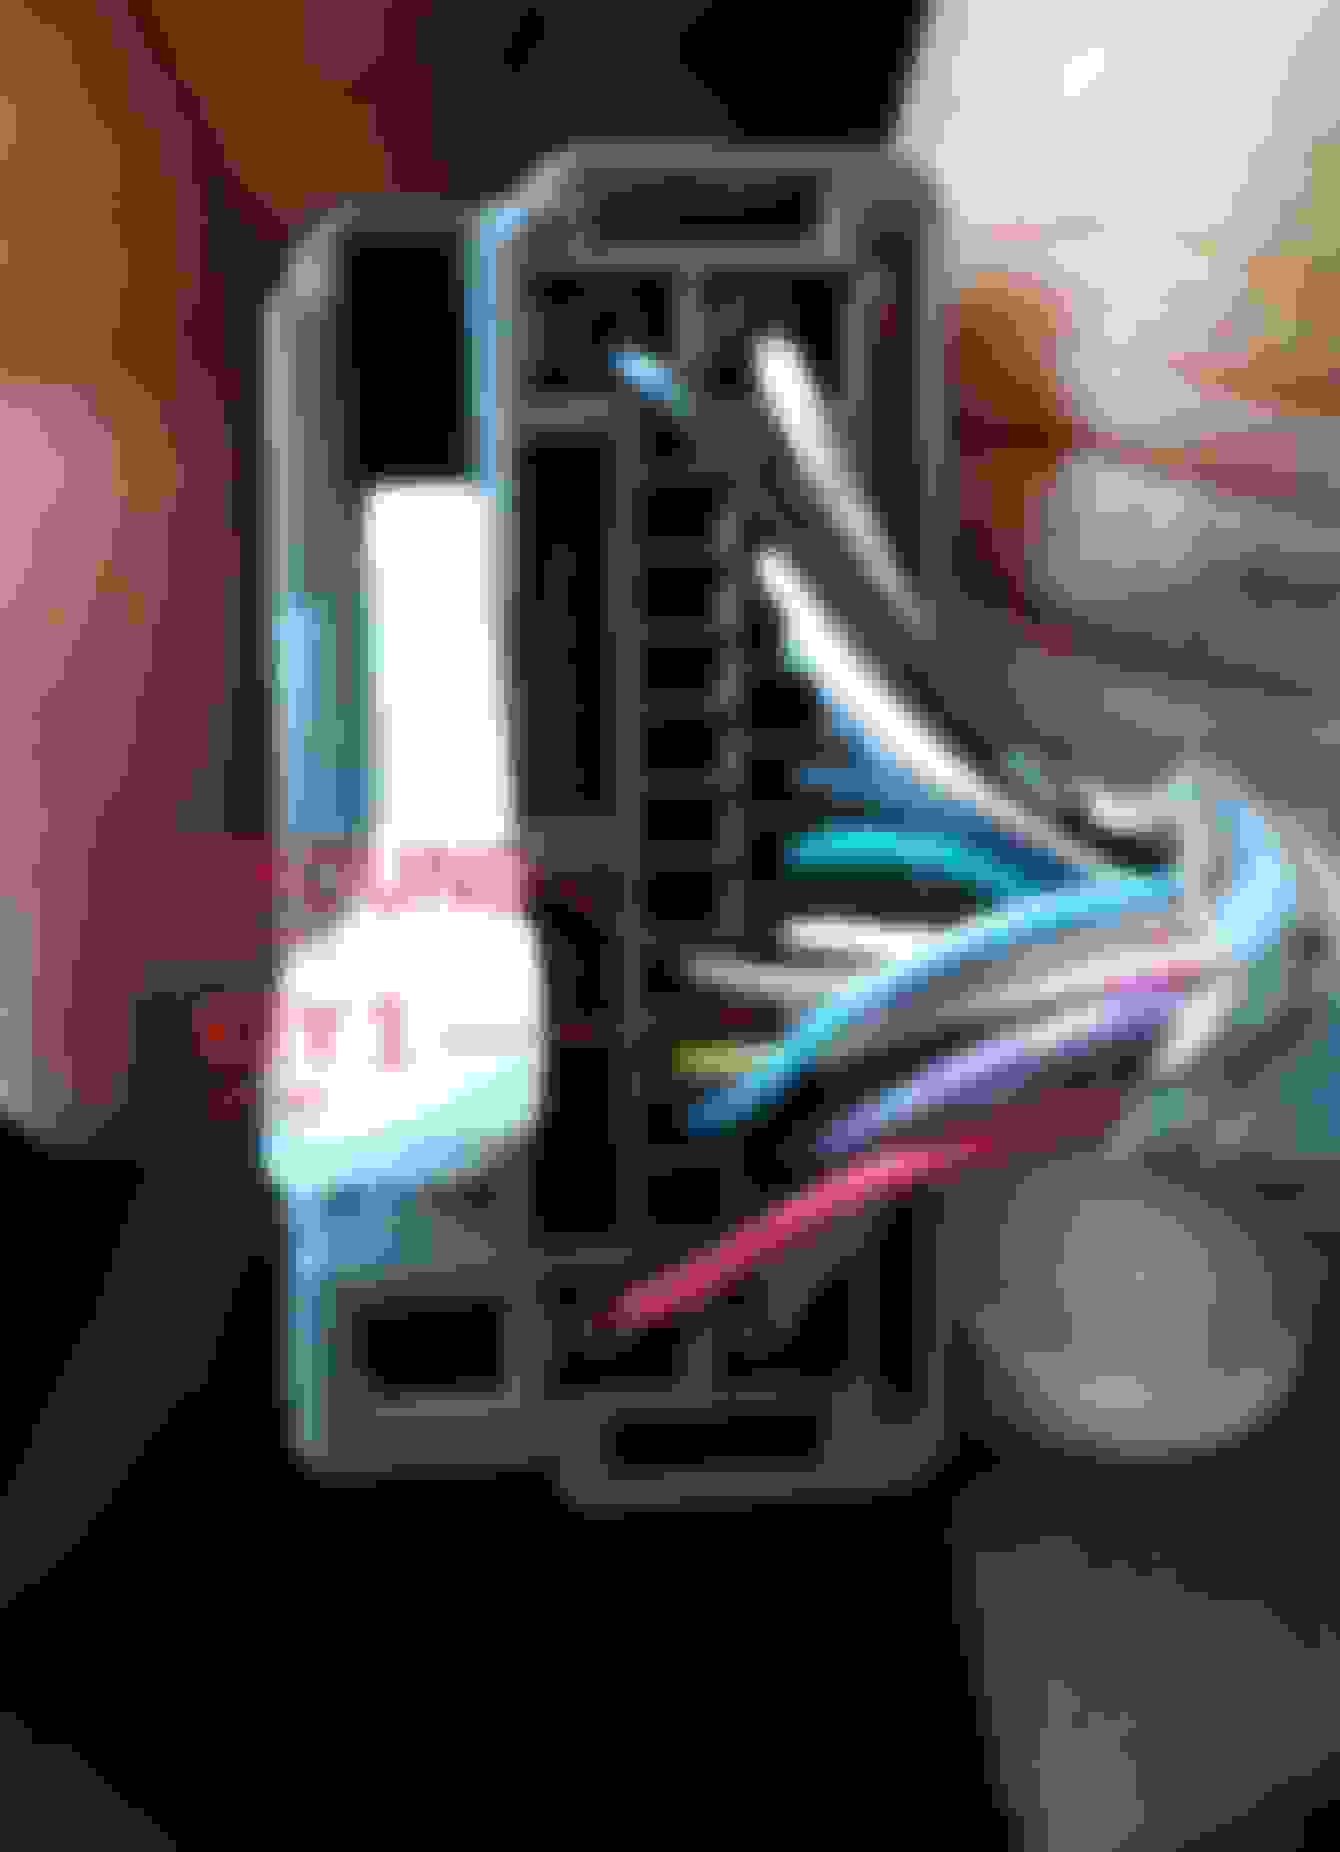
For the two bluetooth buttons you need to run a wire (White/black) from the SWI-CP5 to the bluetooth HFL module which is under the passenger kick panel directly below the glove compartment. I left my HFL module unplugged. the SWI-CP5 instructions said to tap into pin 2. This did not work, after painful trial and error I found the correct wire in PIN 27 which is one of the purple wires. It's 28pin connector. See attached picture where I temporarily hooked up the wire.
Great to see that you got it working as well. I was a bit skeptical that the buttons would work since no one had done it before, but my installer got it working after lots of trial and error. For anyone who is going to try this, it's important to note that you must leave the HFL module unplugged.
Damn, nice installs here. I am now installing a 2din Android 4.4 Quad Core. I am almost done and testing now. Adding steeringwheel control unit later. Back up wireless cam not working but dashcam works well. So working here on. I have a premium audio system with subwoofer (and amp?) after installation i got only audio from front speakers and it is kind a poor.. What could be the reason?
An extra information:
I have an European Accord (2009 Accord Tourer 2.0 i V-TEC)
I have to run a wire from 28pin Bluetooth HFT connector to my radio KEY control wire but not the same color like you on the pictures.
I am quiet sure it is the same pin but on my cra it is lightblue cable. I am saying lightblue because there is also another blue wire on the connector and purples too..
Honda Accord Tourer VIII Euro version 2008-2014.
Please see the attached picture, I can confirm it's the light blue wire.
For Chinese android headunits which has two steering wheel control input wire (+ground) you don't have to use any further adapter, you can connect directly both from the original radio connector and the bluetooth connector, because it uses simple resistor matrix not canbus.
this is my first install with a pac-swi-rc and from what you saying i don't need the PAC Great, Can you confirm you have all the left side buttons working,.
=mode,
=up =down vol
=up =down channel,
and =answer call and = hang up. as my Chinese radio has the following which i'm trying to figure out.
key ground =BLK
Key 1=BR
Key 2=BR/W
back = Pink - No clue what this is.
Brake=GR - I Assume this is for that pesky video,
and the usual rest Orange yellow, red, blue and black but even figured out how to use my factory roof liner mic. took some research but found will post pictures after i complete this install its going to be a big one as i'm installing all the tech i don't have.
-back up cam,
-front cam,
-1080P 10" monitor, android stereo octa core 4 X32, dvd/cd/cdrw USB ports, Bluetooth. ODB2 reader, Mirror link, SD, TPMS,DVR,EQ,GPS 4G, Wifi
- Evo-one with long distance 2 way remote start,
Any help would be greatly appreciated.
2009 Acura TSX
thermal iss solved by heat sink and fan There were complaint of users have heat issues. So I installed a fan and heat sink . thermal issue resolved by fan and heat sink There were complaint of users have heat issues. So I installed a fan and heat sink . wired to metra harness to accessories that way when car is on so is fan otherwise fan is always on. exhaust port There were complaint of users have heat issues. So I installed a fan and heat sink . civic 24 and 20 pin audio connector 28Pin HFL connector jumpers needed Black wire is pin 1 Pin to pin 2 PUR - 3 PUR 14 RED - 25 RED 13 GRN - 11 GRN Once I confirmed the correct ports in the plug I used bailing wire with heat shrink to create jumpers for the correct ports leaving just enough bare wire to ensure an excellent connection. Used a picece of splitloom to ensure if wires ever got hot they would not come into contact with anything. That would cause issues. 28Pin HFL connector jumpers needed Black wire is pin 1 Pin to pin 2 PUR - 3 PUR 14 RED - 25 RED 13 GRN - 11 GRN Once I confirmed the correct ports in the plug I used bailing wire with heat shrink to create jumpers for the correct ports leaving just enough bare wire to ensure an excellent connection. Used a picece of splitloom to ensure if wires ever got hot they would not come into contact with anything. That would cause issues. 28Pin HFL connector jumpers needed Black wire is pin 1 Pin to pin 2 PUR - 3 PUR 14 RED - 25 RED 13 GRN - 11 GRN Once I confirmed the correct ports in the plug I used bailing wire with heat shrink to create jumpers for the correct ports leaving just enough bare wire to ensure an excellent connection. Used a picece of splitloom to ensure if wires ever got hot they would not come into contact with anything. That would cause issues. center console install of usb ports usb port
well it's been a fun project, and for those who said there was too much work to do to keep the
mode , vol+, Vol - , Channel +, Channel -, Phone and hang up
That's right i kept all the buttons, here are the pictures of my install. Even managed to keep some of the other features as well like the OEM microphone for phone calls.
I did also figure out a few things like not having to clear out the Bluetooth connector for the Acura [HandsFreeLink TM] and how to repurpose the existing harnesses and connectors, so if I ever wanted {for what ever reason} to reinstall the OEM equipment, everything was still in place. And there was minimal damage to wiring and harnesses. The list of equipment used.
10.1''2 Din Universal Android 8.0 PX5 Car DVD Player Radio GPS Navigation Bluetooth USB Head unit
4G+32G 1024*600
There were complaint of users have heat issues. So I installed a fan and heat sink .
I had a few heat sinks laying around so I cut one up and used thermal epoxy glue seeing as vibrations are a concern.
What sucks is that acura dash is curved in a manner that the cd rom is pointless so it�s gone to provide room for the
heat sink and new fan
Crimp on new power connector in case you have to swap it out and tap into the metra harness.
Code your connectors so you know what to plug in.
20pin harness connector
1/8" heatshrink tubing
1/2" heatshrink tubing
3/4" heat shrink tubing
1/32� bailing wire perfect for jumping ports on terminals.
Metra wiring harness I purchased 1 of each kit figured it was easier then buying and trying to find connectors, when the second kit was connector ready.
heat shrink (do it right the first time =solder and heat shrink )[ Never use marettes -AKA twist on connectors, they fall off under vibration of the car and great way to cause in dash fires]
from everything I read everyone keeps is two sided on the opinion of wiether or not to use the pac units. If your using the Chinese head end and or what ever stereo has the following dedicated wires,
KEY Ground
KEY 1
KEY 2
That means this unit has a built in pac unit already no point to create extra head aches and draw more power then needed.
I can never say this enough RTFM, read the instruction manual if you under stand it great, perfect, if you don�t find out and confirm every single wire you need to use once you have that understanding, like myself I like a clean install no wires unless necessary if it�s not used, it�s removed,
map it out, that�s right pen paper,
then lay out the wires like your ready to wrap them up with split loom take your time and remember you have to fit it in the hole your other deck is coming out of.
Now bench test it. Make sure everything works before jamming it the car and finding out nothing works as planned.
Now there are a ton of photos for how to remove the console and trim to get the old head end out. So I�ll leave that alone.
The connectors that I will be interested in will be the civic 24, the 20pin the antenna cable and the 8 pin, everything else you can leave alone or cover with tape. Wires I used from the Metra 70-1729 kit I used for jumpers for the roof mic and for the aux connector.
I color coded all my wires, so it makes for an easy install. The connectors you will make changes to will be the all connectors are viewed the same way colored wire
-28pin HFL connector, Black wire is #1
-Audio unit 20pin connector red wire is #1 pink wire is #11
-Civic24 24pin connector. (any work you need to do should be done on the metra harness)
Wires that will get plugged into will be
-Civic24 ,(metra stereo harness with RCA connectors. )
-Antenna
-8pin connector (its your sub speaker)
For testing I used Arduino jumper wires, making life a little easier
The goal on the 28Pin HFL connector is to connect pins 2-3 for KEY2 line which is available on pin 20{ on the 20Pin connector}
28Pin HFL connector jumpers needed Black wire is pin 1
Pin to pin
2 PUR - 3 PUR
14 RED - 25 RED
13 GRN - 11 GRN
Once I confirmed the correct ports in the plug I used bailing wire with heat shrink to create jumpers for the correct ports leaving just enough bare wire to ensure an excellent connection.
Used a picece of splitloom to ensure if wires ever got hot they would not come into contact with anything. That would cause issues.
20 pin Audio unit connector Pin 1 RED
Pin to connects
3 - Aux Ground
9 - Mic-
13 - Aux � L channel
14 - Aux � R channel
19 - Mic+
20 - KEY 2- Pur
Everything is wired as if it can be replaced if there is an issue. The harness below is reverse signal and backup lines on one camera and the other is backup lines and camera + , with aux connector, KEY 2, and mic + mic -
Plug in your 8pin that came with your metra harness it�s for the sub
Save yourself the long term aggravation if you have a wire and its passing anywhere in the vehicle it�s worth doing it with splitloom as you will never have issues with being worn down to the wires causing shorts, every wire I run gets the split loom as I learned my lesson with one dash fire. Never again.
in this set I ran the AV cable for the backup cam and an additional wire for the reverse light and camera power
Splitloom even on the connectors I never want to touch them again. One trick I do is alternating with tape colors, typically I will have one color of tape for the run of the split loom then different colors for the ends then I know the run is at the end. Or with zip tyes.
You can see in the picture below I was just starting to wire up my 20pin
Fishin the gps antenna through the center speaker cavity.
I installed my usb cable in the center console as it seemed intuitive. And the second in the glove box. That way if I want to add the 4g stick and antenna I have space.
The GPS antenna I coiled the cable in the center speaker pocket and then mounted the antenna itself on the center speaker cover
Finally go into your car settings and then factory settings, the code should be 126
Once your there confirm you have the right things completed.
Then this is the important part be sure to select 84 accord, low and if your in north America or you have a left side drive the select left rudder otherwise if you have a right side drive then select right rudder
And now program your buttons. everything should work just fine and your screen will look like this
Didnt even look at costs because i was installing my wish list in total I think it was about 1000 security system head end and remote start with long-distance remotes (Good for 2 km). I had to run new wires for the cameras because the camera harnesses were not there . But good other then that. And resolved any would be issues with over heating but retaining all steering wheel controls was the only acceptable option . And thank you
Hey brotha, is there a way you can run me through how you were able to keep the oem microphone?
don't remember the pins but for the handsfree link the jumpers actually run the lines from the mic to the HFL to the rear of the where the oem deck i can look for my pin out spreadsheet but you will find the answer looking at the schematics
don't remember the pins but for the handsfree link the jumpers actually run the lines from the mic to the HFL to the rear of the where the oem deck i can look for my pin out spreadsheet but you will find the answer looking at the schematics
please explain why I can�t get the phone pick up and hang up working.. I tried all that you said.