
The Graphite Ghost: TSX Wagon


Former Sponsor
Joined: Apr 2012
Posts: 20
Likes: 50
Hey there Rob got your shirt all done. Sorry it took a bit. You should have received a tracking number via email. It looks dope though. Here are some pics if you dont mind me posting them in here. Thanks again for the business, let me know if you need anything else screenprinted.


yes i took them apart.
i put the ring inside the upper chrome ring so it didnt interfere with the aiming of the lamp.
here are the 3 pieces
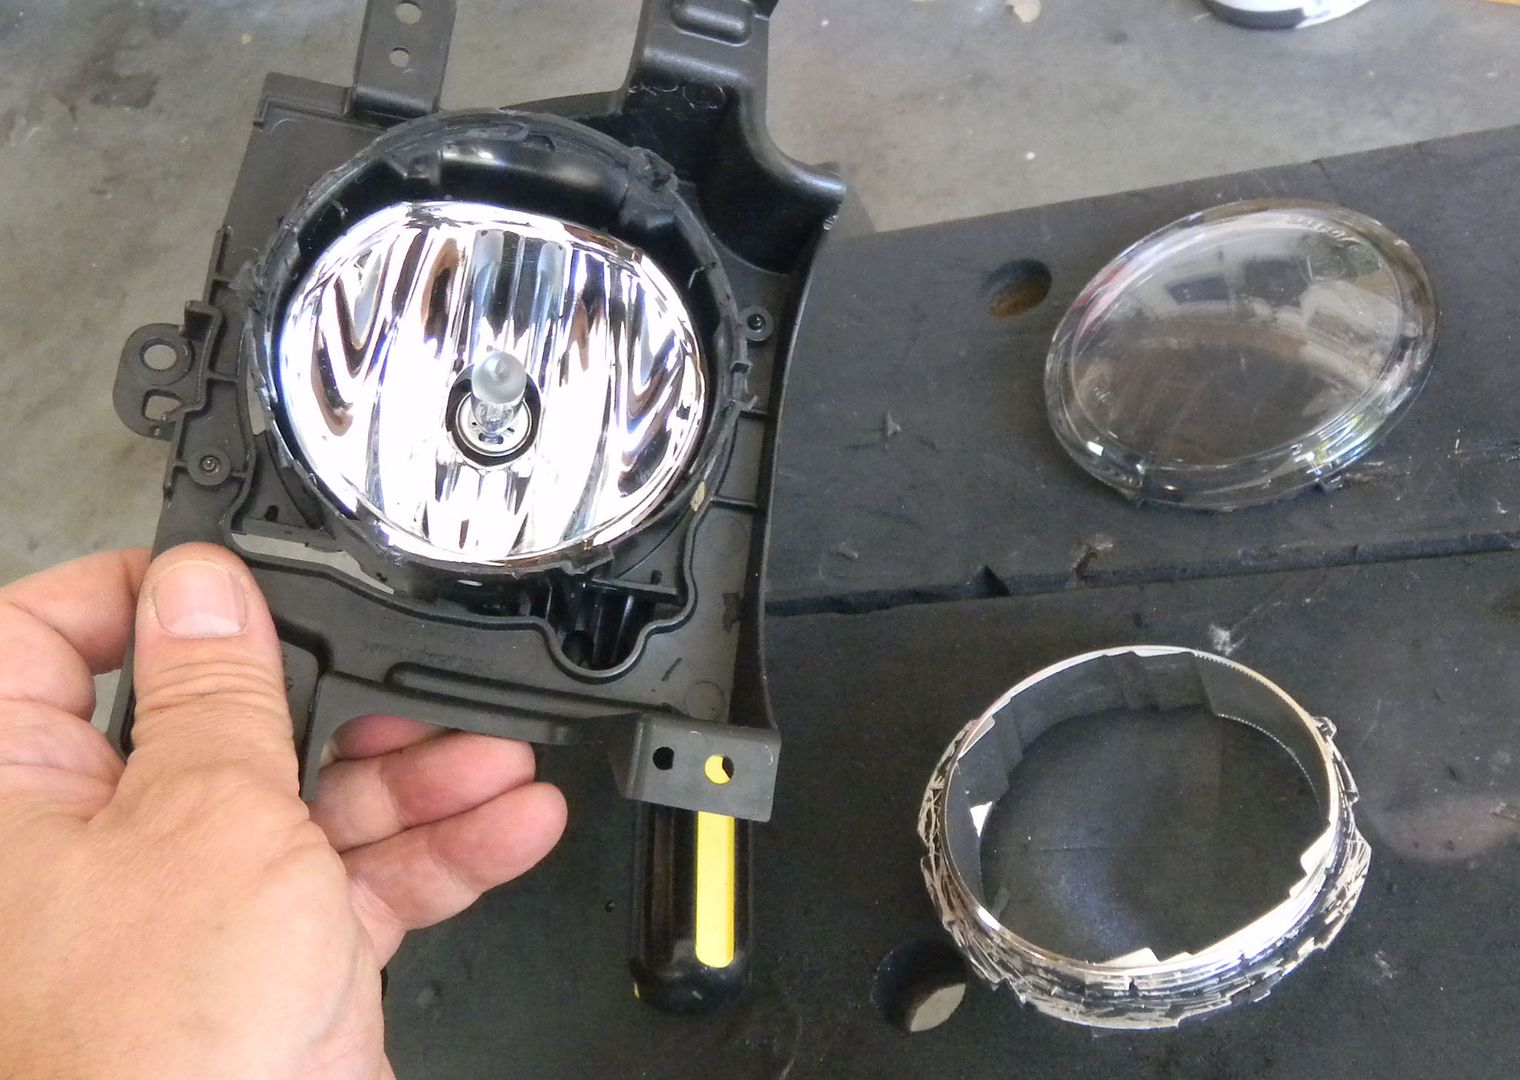
here is the ring mounted in that part. then i just glue it all back together.
i missed my edit window 
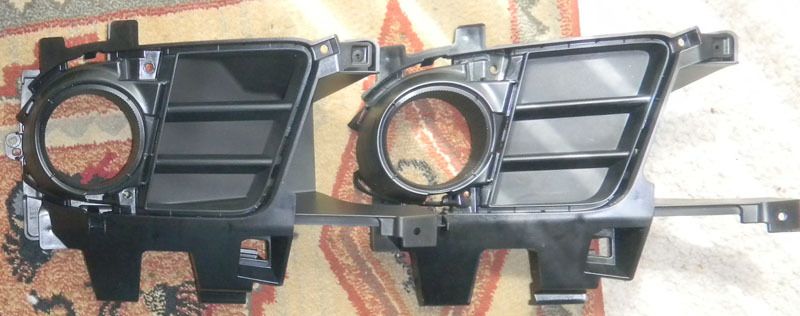
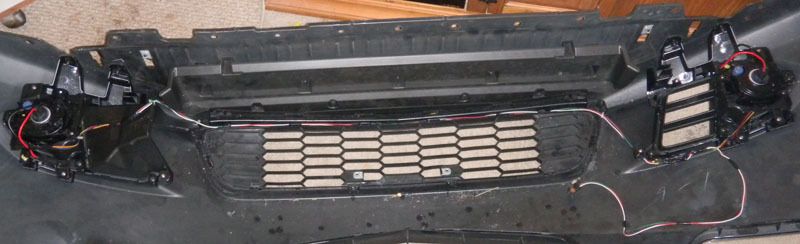
here is close of the back of the grille. on this side I removed the baffle. I left it on the pass side.
here is before mounting bumper.
both grilles have open vents but drivers side I removed the baffle so its wide open /
here is close of the back of the grille. on this side I removed the baffle. I left it on the pass side.
here is before mounting bumper.
both grilles have open vents but drivers side I removed the baffle so its wide open /
Hey there Rob got your shirt all done. Sorry it took a bit. You should have received a tracking number via email. It looks dope though. Here are some pics if you dont mind me posting them in here. Thanks again for the business, let me know if you need anything else screenprinted.
Thanks
I'll post up some pics modeling it LOL
NOW PLEASE ADD ON SOME ROOF RACK ENDS SO OUR WAGONS CAN BE 100% repped PLEASE
robbbbbbb
can you tell me what paint you used for your grille? the exact cans and shit. yours looks damn good. i dont plan on taking off my bumper and i have no garage so i'd most likely just spray and wait. how long did you wait for each coat and what not? small diy please?
can you tell me what paint you used for your grille? the exact cans and shit. yours looks damn good. i dont plan on taking off my bumper and i have no garage so i'd most likely just spray and wait. how long did you wait for each coat and what not? small diy please?
Burning Brakes
Joined: Sep 2012
Posts: 867
Likes: 84
robbbbbbb
can you tell me what paint you used for your grille? the exact cans and shit. yours looks damn good. i dont plan on taking off my bumper and i have no garage so i'd most likely just spray and wait. how long did you wait for each coat and what not? small diy please?
can you tell me what paint you used for your grille? the exact cans and shit. yours looks damn good. i dont plan on taking off my bumper and i have no garage so i'd most likely just spray and wait. how long did you wait for each coat and what not? small diy please?
you can just put in your color code or your car and get a can.
theyre like $30+ shipped though.
ive had great results with them in the past but their CBP doesnt match that well.
their customer service is great.
i had a can crap out on me and spraying very weird.. they sent me a new can the next day.
robbbbbbb
can you tell me what paint you used for your grille? the exact cans and shit. yours looks damn good. i dont plan on taking off my bumper and i have no garage so i'd most likely just spray and wait. how long did you wait for each coat and what not? small diy please?
can you tell me what paint you used for your grille? the exact cans and shit. yours looks damn good. i dont plan on taking off my bumper and i have no garage so i'd most likely just spray and wait. how long did you wait for each coat and what not? small diy please?
1. dawn and water to clean the part
2. 600 grit wet sanding
3. rinse dust, then Dupli-Color� - Grease And Wax Remover
4. dupli-color flexible primer or some other adhesion promoter (for plastic)
5. 600 grit wet sanding
6. Color- I used the automotivetouchup.com for the color. 2-3 coats of color.
7. 2K Clear - use no other clear. its a 2 part system and only good for 48 hours once MIXED. but the finish is just as good as a body shop. 2 coats and done.
lint and dust was my biggest challenge. I didnt plan it but DO THINK about the part drying. if you can hang it UPSIDE down so no dust on the face....
here is a link to the clear......only use this kind. i hear automotivetouchup NOW sells this.
http://www.repaintsupply.com/pd_2_part_2k_aerosol.cfm
got to actually drive the ghost over the last few days......
i have the cte icebox and the p2r tb spacer. the throttle response is much crisper. shifts seem a little smoother. there is hardly any notice of the intake as far as noise until you get it spooled up......and even stock it gets noisy upper rpms so its really not noticeable as far as NOISE.
BUT IT IS just a bit more fun to drive
and the progress rear sway and links make it steer as if on tracks......i need to go re-torque all that stuff soon but it makes a huge difference.
am heading on a family vaca to marco island fla at the end of the week. my route is a bit strange but should be fun.
i fly to EWR.
my bro picks me up on his way from work fri.
saturday we head to marco island by car LOL, he refuses to fly
get there sun evening.
leave fla on thursday.
home to NJ on Sat....maybe early Sunday.
fly back to Colorado Mon morning/
oh i didnt realize the middle grille was also different. have to check the price.
it amazed me how CHEAP the open vents are. I think with shipping and using one of them cheap online dealers it was like $ 70 for both sides shipped/
did you take off the back piece behind the fog grille? I took only drivers side off for my icebox and left the other side on.......
you really cant notice so leave like that for now.
Racer
Joined: Apr 2004
Posts: 386
Likes: 79
From: Tulsa, OK
Racer
Joined: Apr 2004
Posts: 386
Likes: 79
From: Tulsa, OK
Instead of blacking my car out, I'm going to try embracing the silver and aluminum vinyl wrap my mirrors for that Audi/Volvo sport look. We'll see how it goes. My tint/shield guy asked me to wait until this next month when he's supposed to get some new product, but I'm getting tired of waiting and about to just order some vinyl online and try my hand at it.
Racer
Joined: Apr 2004
Posts: 386
Likes: 79
From: Tulsa, OK
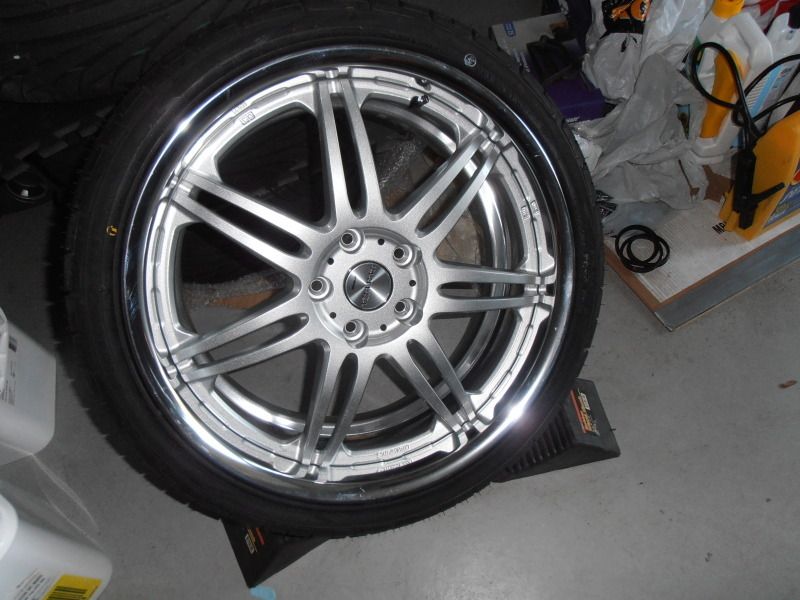
No, 245/35/19 is the proper size. On mine you can see 235/35/19 on the 19x8 RDX wheels, 235/35 on the 19x8.5 Volk and 245/35 on the 19x8.5 Volk. That 10mm width definitely makes a difference. I first was looking at Work T1S? Varianza wheels like that. Excellent choice.
Racer
Joined: Apr 2004
Posts: 386
Likes: 79
From: Tulsa, OK
BTW you might want to consider spacers 10mm front and 10-20 rear. 8" +48 is the same as RDX wheels and it could really use the extra. 10mm would put it like my current setup with 8.5" +38. 20mm rears would need the lip rolled but 10mm wouldn't.

Thanks for all the details. I also went look at your pics
I gonna try 245/35/19
Anyone recommend a tire
Need a good 3 season tire. I like perf but I also like long life LOL
TIA
Burning Brakes
Joined: Sep 2012
Posts: 867
Likes: 84
i was on a budget so i got some achilles ATR sport.
theyre cheap, Tread rating is 400 and theyre pretty grippy.
Speed rating is W
i paid $400 (shipped) for a set of 4 brand new tires from tires-easy.com
ive only had them for like 2 weeks but theyre solid so far.
as much noise as the stock michelins. grips better and theyre cheap.
theyre cheap, Tread rating is 400 and theyre pretty grippy.
Speed rating is W
i paid $400 (shipped) for a set of 4 brand new tires from tires-easy.com
ive only had them for like 2 weeks but theyre solid so far.
as much noise as the stock michelins. grips better and theyre cheap.

missed my edit window ARGHHHHHH
for the 9 and 10's I would need a broken one to figure it out.
i just found some rings that LOOK like CCFL but are LED. white or amber. theretrofitsource.com is sending me amber and white for testing and such.
i need more fogs LOL///

Safety Car
Joined: Feb 2011
Posts: 3,668
Likes: 682
i believe the housing is the same for 09-12. the 11-12 just has a different bezel. how much did this cost? i would love to DIY the LED rings and remote. even if its a bit different for the 10(which i have) i can do it
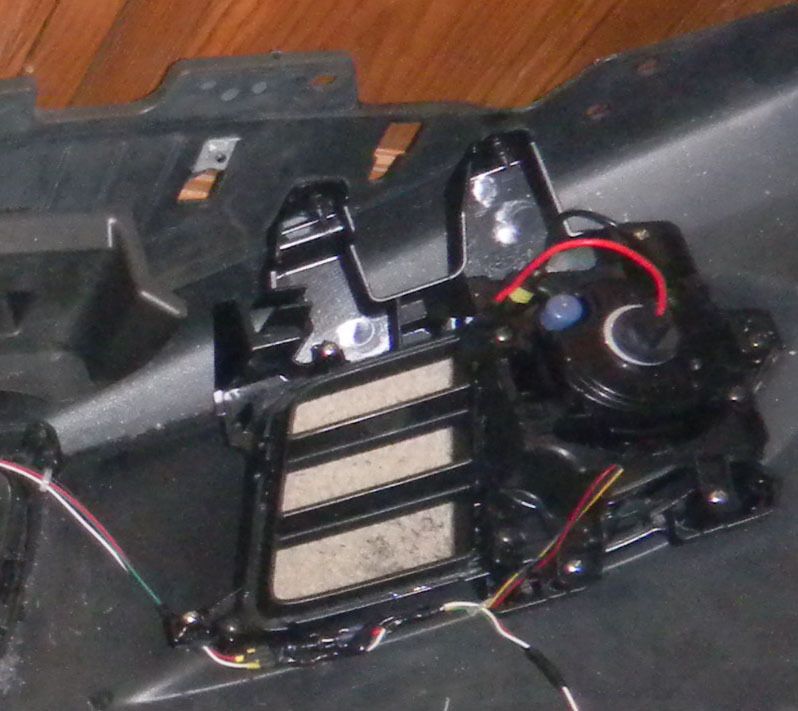
they are COMPLETELY DIFFERENT. i bought a 10 thinking it was the same....its NOT CLOSE.
here it is without the mounting bracket. the 11+ have the adjuster built into the fog lamp itself.
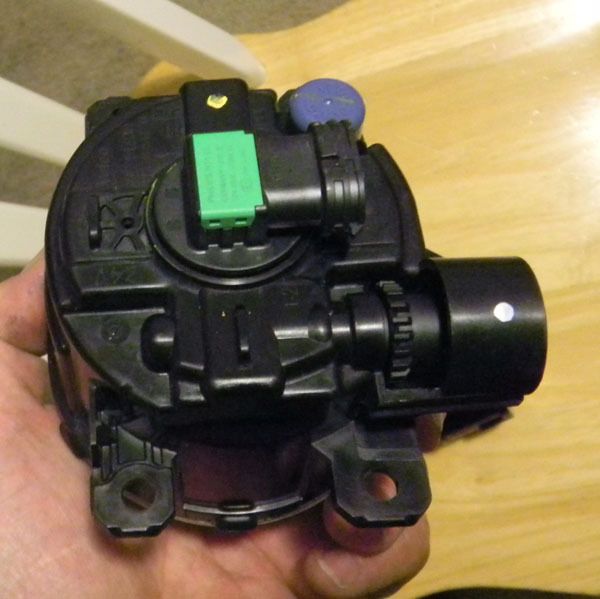
its not expensive. i bought rings from exled. i think they were 30 something each. and a controller I had but that would be about 40 bux.
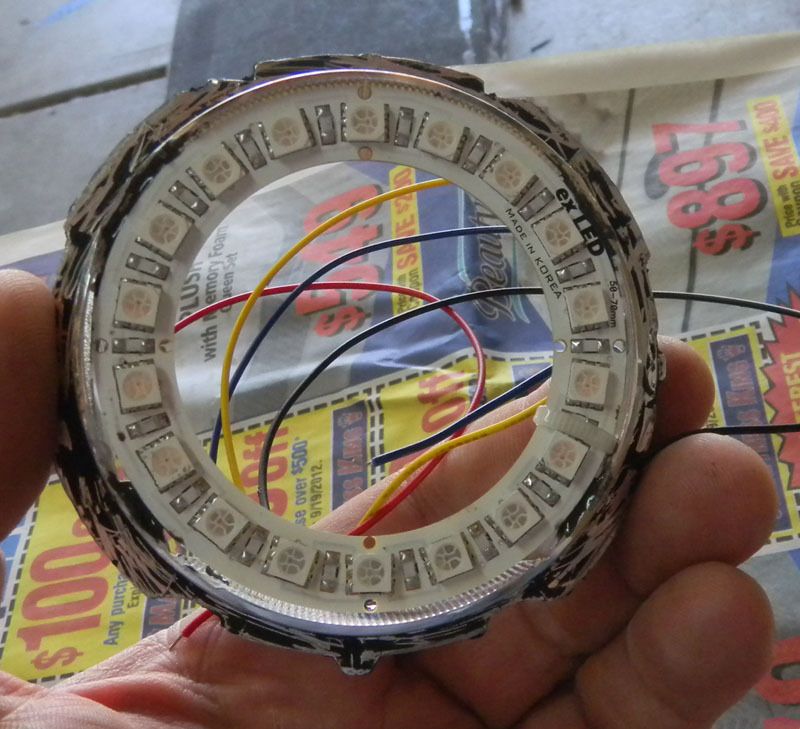
i used 70mm outside diameter rings. they just fit inside the fog housing ring.
here is the led mounted to the chrome ring. i used jb kwik.
i put the controller in a project box from radio shack to keep it out of the elements.
in this pic the box is Taped into place just to position it with the horn from the icebox.
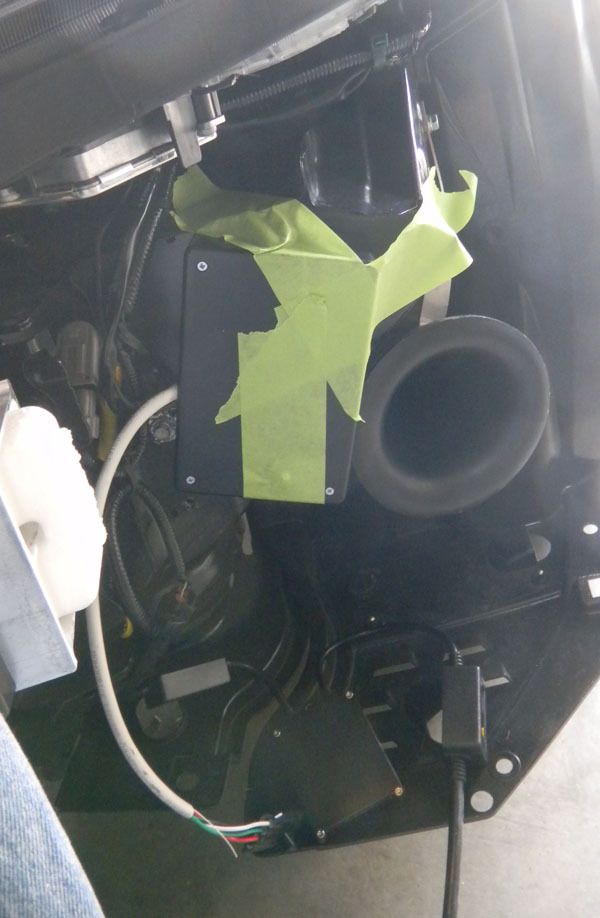
here is one in the bumper. the rings have 4 wires. RGB and Grd. I just wired them together with some pull aparts. then i made a 4 wire metripak for when i install the bumper to the controller.
here it is without the mounting bracket. the 11+ have the adjuster built into the fog lamp itself.
its not expensive. i bought rings from exled. i think they were 30 something each. and a controller I had but that would be about 40 bux.
i used 70mm outside diameter rings. they just fit inside the fog housing ring.
here is the led mounted to the chrome ring. i used jb kwik.
i put the controller in a project box from radio shack to keep it out of the elements.
in this pic the box is Taped into place just to position it with the horn from the icebox.
here is one in the bumper. the rings have 4 wires. RGB and Grd. I just wired them together with some pull aparts. then i made a 4 wire metripak for when i install the bumper to the controller.
Safety Car
Joined: Feb 2011
Posts: 3,668
Likes: 682
and what guage wire did you use? im not amazing with electrical shit but helped my friend wire his emergency lights and shit, so i think i can wing it
it uses really small gauge wire for the lights to the controller. like 20 gauge is fine. them you need to ground and power the controller. that should be maybe 18 Ga. wire. i also put a fuse inline and ran from battery as I wanted on all the time.
i threw the 10 away once I saw it was the wrong one sorry. ask around for someone with a broken lens or something. that what I did. the biggest thing is to see what size ring will work on the 9/10.
the electrical is simple. its 4 wires for the rings to controller, and power/ground from controller to battery and ground.