2011 Wagon Pads & Rotors Replacement + Excellent Dealings w/ Excelerate
 03-22-2016, 08:18 AM
#1
Burning Brakes
Thread Starter
2011 Wagon Pads & Rotors Replacement + Excellent Dealings w/ Excelerate
I bought the Excelerate Performance Acurazine brake package and have the fronts installed thus far. I thought I'd log a few notes that might be helpful for others.
Here's the package I got:
http://hoa.excelerateperformance.com...i-1922819.aspx
First off, I wanted to pay my compliments and say a public thanks to Excelerate Performance, a long time forum sponsor/vendor. I dealt with Josh (owner?) way back when I got my Konis and even back then after significant delays from Koni, he overnighted me all the parts once they got in. This time I worked with Tom, who is their sales rep, and he is prompt and courteous with communication. He confirmed what I needed for my wagon, I placed my order, and received shipping tracking immediately. Front rotors and pads were shipped separately via USPS and rear rotors were via Fedex, but all were 2-day shipping. Rear rotors arrived as scheduled, but the USPS delivery was delayed with the typical lack of updates in the USPS tracking system. I was in no rush, but thought I'd let Tom know, and once I did, he immediately got Nikki in their shipping department to call USPS for me to figure things out. Long story short, it was a brief delay, and I got my parts on Saturday. I was most impressed with the responsiveness their customer service, and the brake parts aren't too shabby either. Everything looks quality and was packaged well. I definitely recommend dealing with Tom and team over at Excelerate. This was totally unsolicited, they didn't ask me to do this, I'm simply impressed and happy with their customer service and products.
The brake package I got is made up of Centric parts; blank rotors with a nice black finish on the hats and edges, as well as Posiquiet pads. Not the flashiest, but that's all I need for my driving conditions.
This isn't a step by step write up, but I'll point out some items that might help anyone looking to do this too.
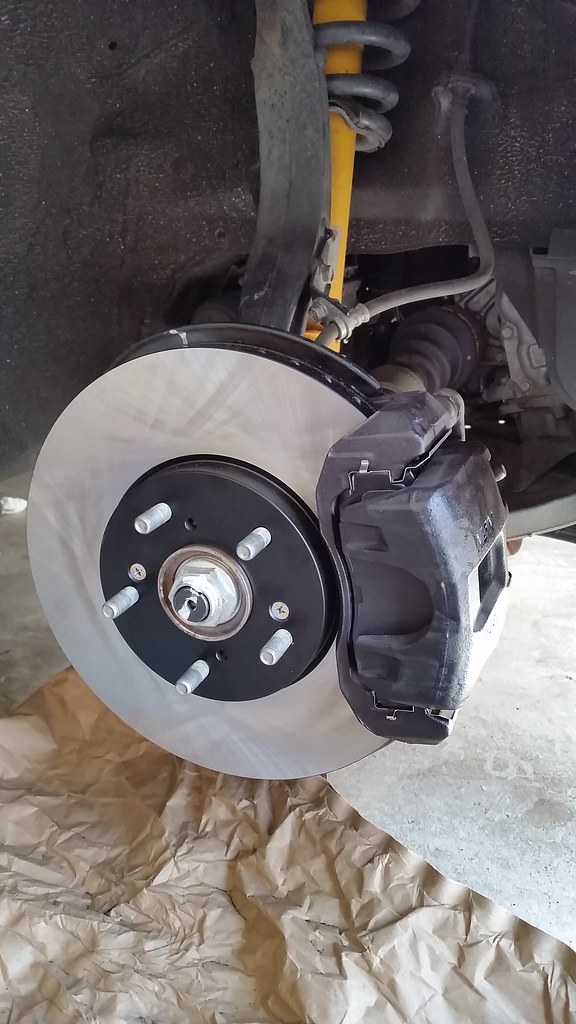
Here's what my stock brakes looked like after 53,000 miles. The pads had a little life left on them, but they felt like absolute junk. This was more so during high speed braking, where you can not only feel that judder/vibration but also had to stomp on it for the pads to really bite. At moderate to low speeds, my brakes were squealing so much it was embarrassing.

For the first set of 14mm bolts to remove the caliper, you'll need a 3/8 open end handy to hold the caliper pin (the one against the little boot) from spinning while you crack the bolt loose. It takes a quick tug/bump to get the 14mm loose, then you should be able to unscrew it by hand.
The set of 17mm bolts to the caliper bracket might require a breaker bar or something like the handle of a garage jack to break loose. I couldn't fit my breaker bar in the space (I guess I could have raised the car more) but used the jack handle and it worked fine.
This was the key to the entire job, an impact screwdriver. My screws holding the rotor to the hub were on very tight, not sure I'd ever have gotten those screws off without it. $20 from Advanced Auto, but you could probably get one from Harbor Freight for less than half that. Make sure you use the correct bit so as to not strip the screws.

Old vs new rotor.

Pads and rotors installed. And I sprayed some high temp black paint on the outer surfaces of the bracket and caliper while I had them out (obviously masking the appropriate areas and allowing the paint to dry). Not a refined job at all, but better than the dirty silver/grey the stock finish had become.
Most importantly, the braking power is significantly improved, totally different feel from before. Bedded in the pads and the new pad/rotor combo has a very smooth, linear feel while producing effective stopping. Completely silent too. Again, this was only after installing the front pads and rotors, rears will be on at a later date when I get more time. Following that, I'll probably replace the brake fluid. I know, it's easier doing it all at once but 1) I don't have time and 2) I hate doing all fluid jobs, brakes, oil, trans, etc.
Here's the package I got:
http://hoa.excelerateperformance.com...i-1922819.aspx
First off, I wanted to pay my compliments and say a public thanks to Excelerate Performance, a long time forum sponsor/vendor. I dealt with Josh (owner?) way back when I got my Konis and even back then after significant delays from Koni, he overnighted me all the parts once they got in. This time I worked with Tom, who is their sales rep, and he is prompt and courteous with communication. He confirmed what I needed for my wagon, I placed my order, and received shipping tracking immediately. Front rotors and pads were shipped separately via USPS and rear rotors were via Fedex, but all were 2-day shipping. Rear rotors arrived as scheduled, but the USPS delivery was delayed with the typical lack of updates in the USPS tracking system. I was in no rush, but thought I'd let Tom know, and once I did, he immediately got Nikki in their shipping department to call USPS for me to figure things out. Long story short, it was a brief delay, and I got my parts on Saturday. I was most impressed with the responsiveness their customer service, and the brake parts aren't too shabby either. Everything looks quality and was packaged well. I definitely recommend dealing with Tom and team over at Excelerate. This was totally unsolicited, they didn't ask me to do this, I'm simply impressed and happy with their customer service and products.
The brake package I got is made up of Centric parts; blank rotors with a nice black finish on the hats and edges, as well as Posiquiet pads. Not the flashiest, but that's all I need for my driving conditions.
This isn't a step by step write up, but I'll point out some items that might help anyone looking to do this too.
Here's what my stock brakes looked like after 53,000 miles. The pads had a little life left on them, but they felt like absolute junk. This was more so during high speed braking, where you can not only feel that judder/vibration but also had to stomp on it for the pads to really bite. At moderate to low speeds, my brakes were squealing so much it was embarrassing.
For the first set of 14mm bolts to remove the caliper, you'll need a 3/8 open end handy to hold the caliper pin (the one against the little boot) from spinning while you crack the bolt loose. It takes a quick tug/bump to get the 14mm loose, then you should be able to unscrew it by hand.
The set of 17mm bolts to the caliper bracket might require a breaker bar or something like the handle of a garage jack to break loose. I couldn't fit my breaker bar in the space (I guess I could have raised the car more) but used the jack handle and it worked fine.
This was the key to the entire job, an impact screwdriver. My screws holding the rotor to the hub were on very tight, not sure I'd ever have gotten those screws off without it. $20 from Advanced Auto, but you could probably get one from Harbor Freight for less than half that. Make sure you use the correct bit so as to not strip the screws.
Old vs new rotor.
Pads and rotors installed. And I sprayed some high temp black paint on the outer surfaces of the bracket and caliper while I had them out (obviously masking the appropriate areas and allowing the paint to dry). Not a refined job at all, but better than the dirty silver/grey the stock finish had become.
Most importantly, the braking power is significantly improved, totally different feel from before. Bedded in the pads and the new pad/rotor combo has a very smooth, linear feel while producing effective stopping. Completely silent too. Again, this was only after installing the front pads and rotors, rears will be on at a later date when I get more time. Following that, I'll probably replace the brake fluid. I know, it's easier doing it all at once but 1) I don't have time and 2) I hate doing all fluid jobs, brakes, oil, trans, etc.
 03-22-2016, 08:36 AM
#2
Burning Brakes
Thread Starter
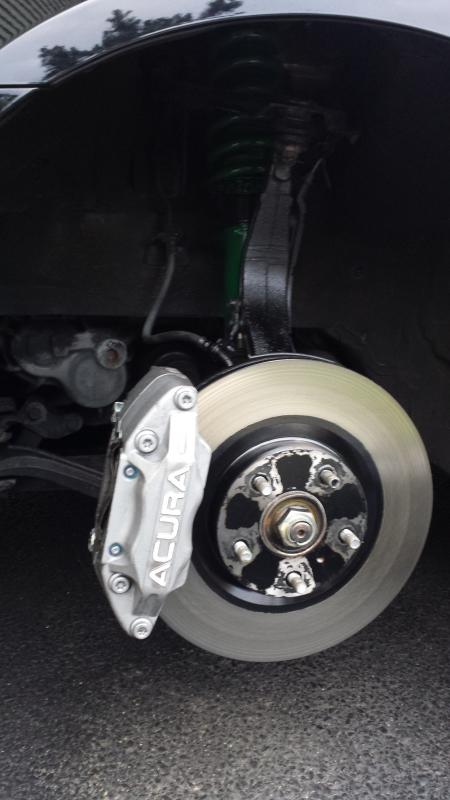
This was the other side behind a stock wheel. Looks like I needed another coat of paint on that caliper, oops. Maybe I'll do it when I put my summers on.

 03-22-2016, 09:44 AM
#4
Burning Brakes
Thread Starter
Good point, thanks. I remember my old Centric cryo-treated and Brembo blanks doing that on previous cars. Even the hats on the Brembos rusted like crazy, I thought they could have at least painted/coated the hats.
03-22-2016, 09:51 AM
#5
VTEC just kicked in, yo!
Looks great Puppetmaster! Thanks for the writeup too. Are your pads/rotors fully bedded-in yet? I'm guessing the bedding procedure is a series of continuous high-speed stops with no cool down or alike.
How do you do this with precision? I hate that rusty ring on my current rotors.
How do you do this with precision? I hate that rusty ring on my current rotors.
03-22-2016, 10:02 AM
#6
Burning Brakes
Thread Starter
Looks great Puppetmaster! Thanks for the writeup too. Are your pads/rotors fully bedded-in yet? I'm guessing the bedding procedure is a series of continuous high-speed stops with no cool down or alike.
How do you do this with precision? I hate that rusty ring on my current rotors.
How do you do this with precision? I hate that rusty ring on my current rotors.
For painting the ring, the quick way is to using masking tape on the entire braking surface, then use a good knife to cut along the edge or a little beyond the rust ring. If you want to get more precise, measure the diameter you need, get a compass (aka the circle drawing tool from school), and create a template on a paper plate or sturdy paper. Cut out template, tape to rotor, spray/paint away. Any over run will be taken out by the pads quickly. If you already have rust on it, the key will be to clean the rusted areas thoroughly before painting, if not the paint won't last.
The following users liked this post:
xtcnrice (03-22-2016)
03-22-2016, 02:20 PM
#7

You could just paint the whole outer surface...and then use the pads to cut through it. There are quite a few rotors that are e-coated or zinc plated after machining. Only the pad surface is exposed that way.
The following users liked this post:
xtcnrice (03-22-2016)
Trending Topics
03-22-2016, 04:23 PM
#9
I can't lie and tell you that its 100% scientifically proven to cause or not to cause an issue. I will say that I've been doing it for years without issue...and that lots of rotors come in a fully coated condition.
I guess maybe to be safe, use your old pads to scrub the rotors...and then swap to new pads and then bed them in.
But I've always been fine with just scrubbing the rotors using the new pads while I'm bedding them in.

I guess maybe to be safe, use your old pads to scrub the rotors...and then swap to new pads and then bed them in.
But I've always been fine with just scrubbing the rotors using the new pads while I'm bedding them in.
The following users liked this post:
xtcnrice (03-22-2016)
03-22-2016, 05:21 PM
#10

Thanks. Don't forget to give us a braking review after you install the rears. If the PosiQuiets are equal to OEM, that makes strongly considering them over the Akebonos.
P.S. What are the shocks, Koni Sports?
P.S. What are the shocks, Koni Sports?
03-23-2016, 06:55 AM
#11
Burning Brakes
Thread Starter
Will definitely update you guys once the rears are on. Driven the car a couple days now on my usual commute and am loving the new brakes, maybe a little too much. To me, the PQ feel like an OEM replacement pad should, maybe with a slightly improved effectiveness over the OEMs. Obviously, it's been a long time since I drove the car with new OEM pads, but the brakes were not a high point at any time while owning this car. Maybe the bar was set so low that any pad would be an upgrade, so either way, these PQ pads are nice.
Yes, I have Koni Sports.
Yes, I have Koni Sports.
03-23-2016, 02:09 PM
#13
Going to try to attempt this without an impact on saturday. Maybe I'm crazy.
Thanks for the tips though!
Thinking Im gonna paint my calipers before the swap so I can over-spray my old rotors and pads. And make sure to do more than one coat.
This rust ring concerns me though and how to address it. Maybe tape off the front rotors before install and hope I get the measurement right. Anyone know how big the gap is?
03-23-2016, 04:55 PM
#14
Moderator
Join Date: Aug 2014
Location: Dirty H-Town, Amerikkka
Posts: 28,432
Received 7,772 Likes
on
5,045 Posts
Going to try to attempt this without an impact on saturday. Maybe I'm crazy.
Thanks for the tips though!
Thinking Im gonna paint my calipers before the swap so I can over-spray my old rotors and pads. And make sure to do more than one coat.
This rust ring concerns me though and how to address it. Maybe tape off the front rotors before install and hope I get the measurement right. Anyone know how big the gap is?
Thanks for the tips though!
Thinking Im gonna paint my calipers before the swap so I can over-spray my old rotors and pads. And make sure to do more than one coat.
This rust ring concerns me though and how to address it. Maybe tape off the front rotors before install and hope I get the measurement right. Anyone know how big the gap is?
And like Bluntzeszez's said, you can just spray the whole rotor and let the brake pads burn off the contact patch.
03-24-2016, 02:46 PM
#16
Burning Brakes
Thread Starter
I'm telling you, spend the $20 (or less) and get the impact screwdriver. That was one of those potential job wreckers if I didn't have one. Well worth the time saved and frustration avoided.
The following users liked this post:
V-tecAc (03-24-2016)
The following users liked this post:
cu2wagon (03-24-2016)
03-25-2016, 06:40 PM
#18

Hitting the impact screwdriver with a dead blow mallet is much more pleasant than using a regular hammer or small sledge or drilling hammer.
Helps to pre load the cheap ones by turning them the correct direction before you hit them too.
Rubber mallets are just plain scary.
Helps to pre load the cheap ones by turning them the correct direction before you hit them too.
Rubber mallets are just plain scary.
The following users liked this post:
V-tecAc (03-26-2016)