
Headlight Adjusting


Thread Starter
Advanced
Joined: Feb 2013
Posts: 73
Likes: 0
]Hi, just bought an 02 3.2TL without an owners manual. Anyone know how I can adjust the headlight angles? I just want to throw the beam a little higher/farther out on the street. I haven't done it in 20+years. Had an olds that I just tightened some Phillips head screws from the outside of the housing. Anyone know if I have to go from the back of the housing or the front?Thanks! ![/B]

Suzuka Master
Joined: Oct 2007
Posts: 5,296
Likes: 784
The TL headlamps are adjustable from the rear.
The top adjuster mechanism is for horizontal, while the lower one is for vertical.
Ya wanna be careful if ya don't fully understand the procedure, as poorly aimed lights can blind oncoming drivers.
Our HID low beams are plenty bright to start with !!!!
The top adjuster mechanism is for horizontal, while the lower one is for vertical.
Ya wanna be careful if ya don't fully understand the procedure, as poorly aimed lights can blind oncoming drivers.
Our HID low beams are plenty bright to start with !!!!
Drifting
Joined: Feb 2005
Posts: 2,153
Likes: 57
I thought the cap screw from the top is for Vertical adjustments. Before removing the grill plastic cover, you should look carefully on the plastic and find the imprinted directions of how to adjust the beam up and down. Remove the grill plastic cover, then use a philip screwdriver to adjust; you dont need to remove anything else besides the grill black plastic cover; the long one accross the front of the car, right in front of the radiator.
Last edited by acutee; Feb 18, 2013 at 12:28 PM.
Thread Starter
Advanced
Joined: Feb 2013
Posts: 73
Likes: 0
Thanks I'll give it a try.actually the ccar is slightly damaged. The front drivers side light housing/bumper has been knocked out of place. There is about a one inch seperation between the good and the light housing. Just a bit out of whack, but the lights aim just a hair lower than they should.
Thread Starter
Advanced
Joined: Feb 2013
Posts: 73
Likes: 0
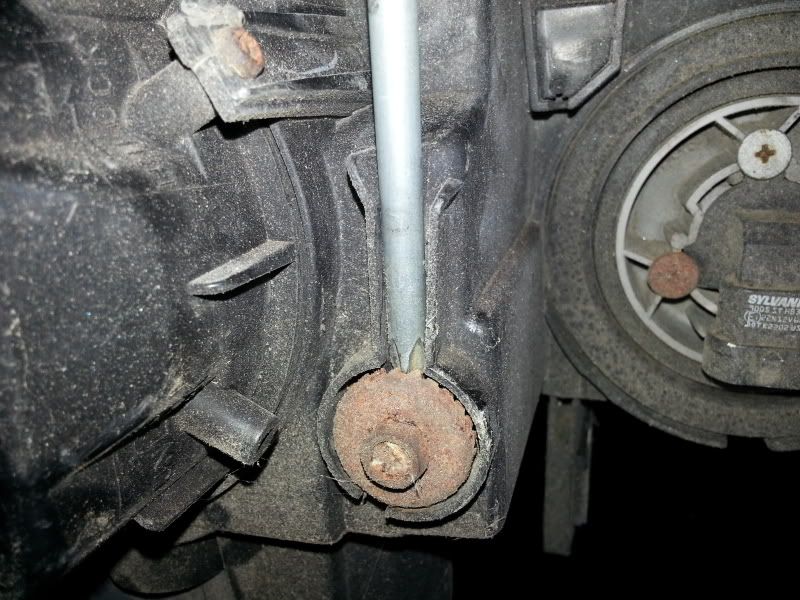
I'm lost! Does anyone have a photo of the assembly? Behind the lamp, there seems to be a screw that looks like it's the one I need to adjust. Does it look like a bottle cap with Sharper teeth? Out am I looking at the wrong thing altogether? Do yo think of I done it to my local dealer a friendly service person would simply show me where the screw is, or should they tell me to make an appointment? So frustrating! !!!!
Suzuka Master
Joined: Oct 2007
Posts: 5,296
Likes: 784
Yeah, there's an arrow pointing up/down or left/right on the plastic piece above the metal crossbar support.
The innermost adjusters closest to the rad are under the support and will move the headlamp assembly up or down.
They are plastic and may need some WD40 to help free the mechanism to adjust.
The innermost adjusters closest to the rad are under the support and will move the headlamp assembly up or down.
They are plastic and may need some WD40 to help free the mechanism to adjust.
Trending Topics
Thread Starter
Advanced
Joined: Feb 2013
Posts: 73
Likes: 0
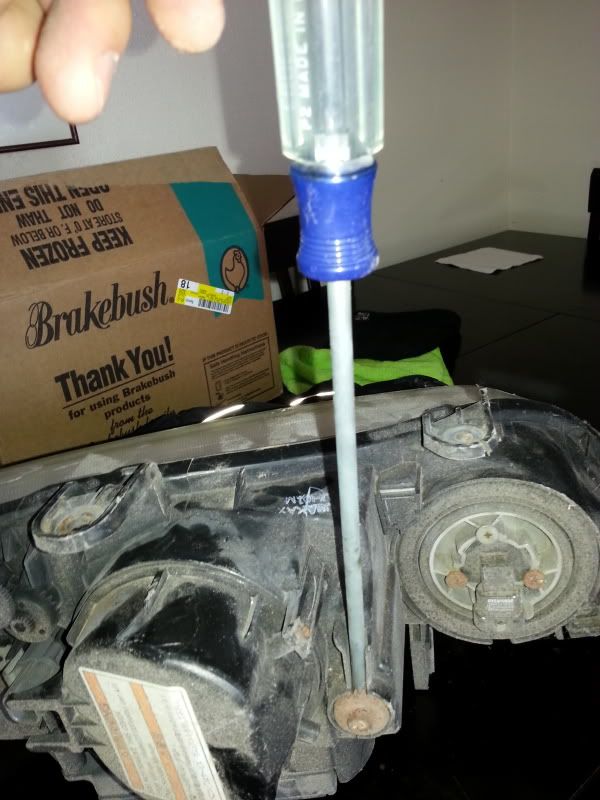
Well, I took a look and I still cant get it! Do i try to turn the teeth on the bottle cap looking screw, or do I first loosen the phillips screw that holds the whole thing in.If i have to turn the teeth, I just cant see how to turn the screw.i took a look at a chiltons manualand it shows the screwdriver touching those teeth at an angle.Do i just push the teeth as opposed to actually screwing the screw. I know its confusing, i will try to take a photo and post it tonight.
Thanks
Thanks
Drifting
Joined: Feb 2005
Posts: 2,153
Likes: 57
Yes, you turn the bottle cap-screw. Stick the philip screwdriver to the cap-screw, look at the imprinted arrows, twist screwdriver left for Down, Right for Up. Dont look at your hand, look at the arrow and twist your hand accordingly.
If you are not using the cap-screw, then Left (counter clockwise) is Down. Right (clockwise) is Up. Another way is to understand how the headlight mechanisms move up and down; once you understand that, then you will know how to adjust it. Think of if like the light is hanging like a monkey hanging on a bar, you pull it back, they eyes point down. You push it forward, the eyes point up.
If you are not using the cap-screw, then Left (counter clockwise) is Down. Right (clockwise) is Up. Another way is to understand how the headlight mechanisms move up and down; once you understand that, then you will know how to adjust it. Think of if like the light is hanging like a monkey hanging on a bar, you pull it back, they eyes point down. You push it forward, the eyes point up.
Last edited by acutee; Feb 26, 2013 at 10:31 AM.
Senior Moderator


Joined: Aug 2002
Posts: 81,385
Likes: 3,068
From: Appleton WI

Drifting
Joined: Feb 2005
Posts: 2,153
Likes: 57
Unfortunately, their scope is not to think how to design things better. They are made to think how get more money out of the consumers. If things went wrong or better, the meetings are always about, 'money lost or money gain'. Almost all businesses are about money and cutting costs. If they have to decide between better designs with less money gain and poor design with less costs; you guess what the upper management will choose.
Thread Starter
Advanced
Joined: Feb 2013
Posts: 73
Likes: 0
Thanks! Great pics ftts! I wasn't able to see the imprints of the arrows but I was able to get to the passenger side one. I was able to firm it a complete 360, however it didn't seem to do much. Ill try turningit in the other direction. Just can't find the drivers side one. I'm afraid I will have to remove some plastic to get to it. By, they really cram things into that area! I can see labor costs exceeding the cost of parts on alot of fixes by a mechanic! I'm going to try my best to do what I can on my own.
Thank you all!
Thank you all!
Senior Moderator
Joined: Aug 2002
Posts: 81,385
Likes: 3,068
From: Appleton WI
The arrows are on the black trim piece (#40 in the pic) Not the headlight. Are you trying to adjust these in the dark around 20 feet from a wall with the lights on? If not stop doing what you are doing and do it like i just mentioned so you can tell how much you are adjusting them. Also dont go higher than recommended, all you will be doing is blinding on coming traffic.


Last edited by fsttyms1; Mar 1, 2013 at 06:53 AM.
Suzuka Master
Joined: Oct 2007
Posts: 5,296
Likes: 784
Shields, covers and shrouds......etc.
Just can't find the drivers side one. I'm afraid I will have to remove some plastic to get to it. By, they really cram things into that area! I can see labor costs exceeding the cost of parts on alot of fixes by a mechanic! I'm going to try my best to do what I can on my own.
 Yeah, they seem to like to find ways of hiding things under all these misc. plastic pieces. Maybe it's for a more tidy appearance or improved aerodynamics, who really knows....except that it can make some otherwise simple repairs seem a bit more like hide & seek !
 I guess if they think that they can intimidate the average "Joe" into taking it back to the dealer for repairs and hopefully also to entice the person with the new models while there.
Thread Starter
Advanced
Joined: Feb 2013
Posts: 73
Likes: 0
Fsttyms 1, Your awesome! I just got home and am looking at your diagram and photo on my phone. I'm going out there and going to try again! Yes, was doing it in the dark with the distance.in sure I can now find the up/down direction.the photo is an immense help! Relating to the photo and the diagrsm, would the hood stopper be covering part #26 or 48, or am I just way off on this? Just trying to get my bearings.
I'll let you know how I make out.
Thanks again! !
I'll let you know how I make out.
Thanks again! !
Suzuka Master
Joined: Oct 2007
Posts: 5,296
Likes: 784
Yeah, you'll probably be in the dark again.....but if ya look at Fsttyms1's pics, you'll see that the stoppers are located close to the fender's edge corner where the hood comes down upon. About 6" inboard, you'll notice the arrows imprinted on the top plastic panel going across the front of the rad. Right below these arrows is where you need to access the headlamp adjuster with a long handle phillips screwdriver. You may want to spray a bit of penetrating oil on the adjuster as it may be tight.
Be sure to have a flat surface in front of your car when making the adjustment. This will help show the height and pattern of the headlamp's lighting.
Be sure to have a flat surface in front of your car when making the adjustment. This will help show the height and pattern of the headlamp's lighting.
Last edited by 3.2TLc; Mar 1, 2013 at 06:02 PM.


Thread
Thread Starter
Forum
Replies
Last Post
rp_guy
Member Cars for Sale
9
Jul 16, 2017 07:33 AM