
'99 TL Failed Emissions - P0420, P0401, and P1457 OBD codes


Thread Starter
Intermediate
Joined: Apr 2010
Posts: 32
Likes: 0
'99 TL Failed Emissions - P0420, P0401, and P1457 OBD codes
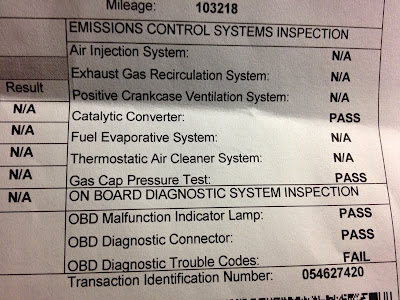
Got a '99 TL with 103k miles. Failed emissions with the following OBD Trouble Codes:
P0420 Catalyst System Efficiency Below Threshold (Bank1)
P0401 Exhaust Gas Recirculation Flow Insufficient Detected
P1457 (no description but I have been told it is an EVAP leak?)
I started seeing the Check Engine Light about 4 years ago when I put in regular gas (prices hit almost $5/gallon). I've had it checked numerous times in different states and stations. I've been told everything from "loose gas cap" to "nothing is wrong, we'll reset the code." 2 years ago, I had my neighbor take it to his shop, replace my AC compressor, replace the Cat with an aftermarket one and reset the light. I passed emissions, but the light came on about a week later. Strangely, my Cruise Control started to work again after they replaced the compressor and one of the engine fans.
Also, just replaced the timing belt/water pump and changed the spark plugs. I also did a 3x3x3x3 Honda ATF fluid replacement with a bit of Seafoam trans lube (was scared from all the horror stories here, but she is running real smooth now).
Anyway, I could ask my neighbor to reset the light and have it re-inspected, but I've been thinking of passing her along to my dad and getting a new ride so I want to take care of it correctly. I've seen the suggestions for replacing the O2 sensor for the P0420 code, but based on the other 2 codes, it seems like there really is a leak. I've got a shop I use, but usually I order the parts and take it to them. I'm not sure about their diagnostic abilities and I really don't want to go the the dealer and sit in their leather chairs while they overcharge me for giving me free donuts and ice cream.
If I do take it to my regular shop, what things should I suggest they check other than the O2 sensor? His first suggestion was the Cat but I told him I replaced it 2 years ago and the CEL light was on the entire time. The mechanic said it would probably be expensive to diagnose/fix ($500-800) and that he couldn't find any leaks. He suggested to reset the light and drive it 40 miles and then redo the emissions test before the CEL comes back on, but it came back on within 15 miles of leaving the shop. I don't mind dropping $800 if I know it will be gone for good, but I've already dropped close to a $1000 over the last 4 years and it's never fixed the problem.
Suggestions would be greatly appreciated.
Pro
Joined: Jun 2011
Posts: 657
Likes: 173
And don't forget to remove the IACV from the throttle body and clean it with carb cleaner. Also remove the EGR valve (held by 2 bolts) and open the pin at the bottom with a screwdriver and spray lots of cleaner to flush all the crap out. Get a new egr gasket.

Team Owner
Joined: Sep 2006
Posts: 33,535
Likes: 1,142
2 throttle body spacer gaskets and 1 iacv cover gasket
1 can deep creep (seafoam aerosol) = 3 cans carb clean
1 wire coat hanger required to poke length of passage clear
Find a honda racer/ricer shop or private owner repair shop familiar with the TL egr problem
if the tech has no idea what you want,,,dont go there!
its a 1 hour job for skilled tech -including break
if they have done it more than once- its 45 minutes tops
YOU can diy it in less than 2 hours
did they install the correct ngk iridium or platinum spark plugs--they retail for about 8$ each
anything else is making your car run funny!!!
get 2 cans seafoam liquid under 10 bucks each. parts stores- walmart
add 1 can to just under a half tank of fuel -run down by driving and refill to half tank
add 2nd can
that will clear up the crud from low octane,,cleans o2 sensor and cat, fuel and combustion systems etc
stop running 87, its costing you in mpg and more,
Team Owner
Joined: Sep 2006
Posts: 33,535
Likes: 1,142
once you clean the egr system and ck on those plugs, reset the ecu via clock fuse method
It often gives false codes along with real clues
will require some driving= 1 hour special or a week or two normal drive,
lots of on-warm-off of engine/ starts stop- freeway, stop and go city,,
to make the engine go thru all its possible cycles and store data,
before it will allow smog test where they plug into the obdi port=
it will say `not enough info`--
Would you believe some people try to kill a red dash light by resetting the ecu,
then drive around the corner,, with fingers crossed,, for inspection?
So the car gives itself up! it rolls on you... as it were
Thread Starter
Intermediate
Joined: Apr 2010
Posts: 32
Likes: 0
Thanks for the replies! I was just reading the Seafoam DIY thread.
I actually changed the plugs myself using these forums... used the NGK Iridium NX or whatevers (the ones that people recommended). This was 18 months ago and I did the seafoam in the oil-oil change and seafoam in the gas tank at 1/4 tank method. I'll try the suction method into the intake/new tube that is suggested in your DIY thread.
Seems like I should do the "proper" seafoam method, then the manifold/EGR clean, then another seafoam treatment? Or is that overkill?
Hah, probably asking the wrong person - I think 01tl4tl washes his supper down with a glass of Seafoam!
The outlaw kit comes with all the gaskets and bolts from what I read - this IACV, is its cleaning covered in the manifold/EGR cleaning DIY? While I am handy with tools, I know nothing about cars or the acronyms. Guess I'll just clean whatever looks cruddy while I'm doing the EGR DIY.
Oh and yes, I only use 93+ gas now. People were telling me it's bullshit, but seems like it gunked up my fuel/exhaust system faster.
Trending Topics
Moderator
Joined: Jan 2009
Posts: 6,509
Likes: 1,021
From: Baja, M�xico.
You dont need to do the Seafoam twice if your planning on Cleaning the Manifold + EGR... The Seafoam should clean the runners + Valves/Seats the first run, Then when you manually clean the Manifold + EGR it should get as Clean as Possible.
Nope theres no DIY on IACV Cleaning but its pretty stright forward, When you Undo the IACV you should see 2 parts; The Electronic bit holded by 2 (5 Torx Special Honda Screw) and the Metallic part that has a little shaft. You can remove the 2 Special Screws with a bit of work OR Just clean the Shaft carefully trying not to get the electronic part soaked it should work!
Thats my
Team Owner
Joined: Sep 2006
Posts: 33,535
Likes: 1,142
seafoam in gas 1/2 tank of gas to 1 can = 2 oz foam per gal gas
thats CLEANING dose- per seafoam (1 oz per gal is maitenance dose, done mid-year)
better to do half tank than just 1/4..more cleaning time with heat in the engine
seafoam likes heat!
the master vac port at TB works instantly on certain parts, but not all,
the gas method gets everything- just slower
but needs to be done twice for max effect
One time of each method will do fine if thats your preferance
not everyone is comfortable with the vac port method, so twice in the gas is for them
oil method seafoam has nothing to do with rest of the engine--only cleans oil passages and ports= right before oil change
Its very important to do,,just not the same areas as engine treatment
outlaw kit has all you need for the job and its install
seafoam does NOT get the intake runners as well as we would like
so carb cleaner or deep creep while its apart- will do a lot of good
I have a 3 foot long straw with 360 degree spray head (from seafoam) to reach all the way to each runner and actually clean them with engine running,,very cool
IACV: there are pics posted by fsttyms1 on how to remove and clean the slit in rod and its chamber (not in the diy yet)
do remove and clean fully,,flip over throttle body on workbench to see the round cover--thats the iacv = idle air control valve- its round cover gasket MIGHT tear, so have a spare
when clogged, idle jumps from 1000-1500-1000
carb cleaner, or I prefer deep creep (seafoam aerosol-you can make a spray bottle of your own) to clean the big round air plate inside TB throat- get both sides and the edges really good--toothbrush it if you have to!
clean and lube throttle return springs
remove throttle cables and lube inside,,DC, silicone, WD40 all good for that
harbor freight tools sells a cool thing for 3 bucks to lube cables
bike shops have them too,,`cable lube tool` (motorcycle shop wanted 15!!!)
I dont wash dinner down with seafoam,,
everyone knows it best served as a dessert wine,,slightly warmed
Last edited by 01tl4tl; Apr 10, 2012 at 10:35 AM.
Team Owner
Joined: Sep 2006
Posts: 33,535
Likes: 1,142
note!!
99s have only 1 egr port in the manifold--it should have a `recall installed` smooth bore inserted into the hole--attempt to ease clogging but doesnt solve prob
00 and later years have 6 egr ports,,make sure to get them all, and the entire length of the passage-- from underneath the egr valve itself--to the opposite end of manifold
wire coat hanger or welding rod are your tools to poke crud loose,,soften with cleaner then poke poke poke--rinse with cleaner or water (remove all sensors first)
NOTE: safety issue of rinsing with water,,manifold must have NO water in it when installed
use compressed air, leaf blower, hair dryer etc- and rotate manifold to get fluid out of corners
water doesnt compress like fuel, and will cause a very expensive problem when your compression ratio is suddenly 20 to 1
Thread Starter
Intermediate
Joined: Apr 2010
Posts: 32
Likes: 0
I picked up 2 cans of Seafoam, 1 can of Deep Creep (for cleaning the EGR when my kit arrives) and I also picked up a can of Seafoam Spray (http://www.seafoamsales.com/sea-foam-spray.html). Figured this would be better for the plate/shaft - or is it just seafoam with a fancy tube? If I use this up against the throttle plate from where the air intake boot connects, does it essentially do the same thing as putting seafoam into the vacport?
EDIT: Okay, it is seafoam just with a fancy tube. I imagine it would help clean the plate so I have less cleaning to do when I do the EGR clean DIY. Still not sure if I need to do the vac port method though because it seems like this is doing the same thing.
EDIT: Okay, it is seafoam just with a fancy tube. I imagine it would help clean the plate so I have less cleaning to do when I do the EGR clean DIY. Still not sure if I need to do the vac port method though because it seems like this is doing the same thing.
Last edited by DaHadster; Apr 10, 2012 at 01:11 PM.
Thread Starter
Intermediate
Joined: Apr 2010
Posts: 32
Likes: 0
Now I understand why you need to use a clear bottle - hard to tell when the vac tube is in/near the seafoam solution until it's too late - sucked up half a can in 3-4 minutes. Used the aerosol version right into the tube - worked much better. Got heavy smoke maybe first quarter mile of driving and during vac tube injection. It was also the first time I've used manual shifting mode on the transmission - was pretty damn fun!
Team Owner
Joined: Sep 2006
Posts: 33,535
Likes: 1,142
return the seafoam spray--we dont need that one
We can use deep creep thru the throttle body throat no prob
there are advantages to the vac port which really vaporizes the stuff
and spraying thru the throat which gets the small area the vac may miss
I usually do a bit of both, along with some 2000 rpm while adding as fast as the spray will go in,,makes a lot of smoke,,blows out a lot of carbon
Use DC on the throttle air plate with engine OFF--both sides (use throttle to open) and the edge all around
wipe up excess!
DC on throttle return springs
the spray can gives you way better control over the process, for max results
I only use liquid for the fuel
Last edited by 01tl4tl; Apr 10, 2012 at 11:17 PM.
Team Owner
Joined: Sep 2006
Posts: 33,535
Likes: 1,142
when using spray can - hold end of straw several inches away from port and watch it make a tornado of the seafoam
if using jar and hose- hold end of hose 1-2 inches above fluid level and watch it swirl up into hose
Low pressure/suction in action
if using jar and hose- hold end of hose 1-2 inches above fluid level and watch it swirl up into hose
Low pressure/suction in action
Thread Starter
Intermediate
Joined: Apr 2010
Posts: 32
Likes: 0
Thanks 01tl4tl.
Getting my outlaw kit tomorrow, going to try cleaning the EGR and install it this weekend. Borrowing the pictures from the DIY thread, I numbered the connections to label so I get it all back together properly. Which numbered hoses do I need to be ready to plug up so coolant doesn't spill on the floor?


Getting my outlaw kit tomorrow, going to try cleaning the EGR and install it this weekend. Borrowing the pictures from the DIY thread, I numbered the connections to label so I get it all back together properly. Which numbered hoses do I need to be ready to plug up so coolant doesn't spill on the floor?
Team Owner
Joined: Sep 2006
Posts: 33,535
Likes: 1,142
the ones that connect to the TB,,its pretty clear when you look at it
a little fluid will be lost--dont sweat it, just refill and burp the system
ck the diy pics for more help,,the product instructions are good too
have a few bolts handy to stick in the hoses
remember a wire coat hanger or similar to poke thru the entire length of the manifold passage for the gasses
a little fluid will be lost--dont sweat it, just refill and burp the system
ck the diy pics for more help,,the product instructions are good too
have a few bolts handy to stick in the hoses
remember a wire coat hanger or similar to poke thru the entire length of the manifold passage for the gasses
Thread Starter
Intermediate
Joined: Apr 2010
Posts: 32
Likes: 0
I see what you mean about the 2 coolant hoses, they leaked for a few seconds and I just used a couple paper towels to catch it until it subsided.
Installed the kit. Everything was pretty much in the DIY. That EGR tube was really jammed up. Coat hanger would only go half way until I loaded it up with carb spray (seemed to cut the carbon faster than deep creep, but I used both as needed). I then folded the end of the coat hanger to make a small spoon and really got a ton of gunk out of the port.
BEFORE:

AFTER:

Cleaned the TB as much as I could - especially around the plate. My razor knife was nicking up the TB gasket area, so after about 45 minutes I took my drimmel detail sander with the finest paper and lightly got it off in a couple minutes. Probably a bad idea, but what was left of the gasket came off so nicely!

Everything started up fine.
Bought me 7 feet of tubing so I could Seafoam her while sitting in the driver's seat keeping the throttle at 2k RPM. Slurped out of a pickle jar and really took my time, heavy smoke near the end of the solution. Rest in gas tank and smoked up the neighborhood 10 mins later doing a 20 min spirited drive. Pulled 13 fuse (8 didn't do it, manual said 13) and CEL is off, hope it stays off come next weekend.
Thanks for all the help.
Installed the kit. Everything was pretty much in the DIY. That EGR tube was really jammed up. Coat hanger would only go half way until I loaded it up with carb spray (seemed to cut the carbon faster than deep creep, but I used both as needed). I then folded the end of the coat hanger to make a small spoon and really got a ton of gunk out of the port.
BEFORE:
AFTER:
Cleaned the TB as much as I could - especially around the plate. My razor knife was nicking up the TB gasket area, so after about 45 minutes I took my drimmel detail sander with the finest paper and lightly got it off in a couple minutes. Probably a bad idea, but what was left of the gasket came off so nicely!
Everything started up fine.
Bought me 7 feet of tubing so I could Seafoam her while sitting in the driver's seat keeping the throttle at 2k RPM. Slurped out of a pickle jar and really took my time, heavy smoke near the end of the solution. Rest in gas tank and smoked up the neighborhood 10 mins later doing a 20 min spirited drive. Pulled 13 fuse (8 didn't do it, manual said 13) and CEL is off, hope it stays off come next weekend.
Thanks for all the help.
Last edited by DaHadster; Apr 14, 2012 at 03:10 PM.

8th Gear
Joined: Apr 2012
Posts: 8
Likes: 0
I have a 2000 TL with 143K miles on it. Bought it with 139k. A slightly different design to the manifold but the same carbon issues. I used six cans of Carb cleaner and a garden hose on mine. The carbon buildup was so bad under the cover plate that the metal gasket stuck to the plate when I pulled it. The channels were loaded. The main EGR chamber on the top of the manifold was loaded. I was getting the misfire on 1, 2, 3, EGR insufficient lift. I bought three coil packs and started moving them around. The clogged manifold EGR problem can manifest itself in a few different ways. As I was reassembling I decided to clean the gum out of the throttle body to complete the job. One the first start after reassembly the Revs bounced up and down at idle. I could hit second driving through town with my foot off the gas. I pulled the negative cable twice. No change. I pulled the plug off the IAC while running. The Rev bouncing turned into a rough idle that produced a code (can't remember what I pulled but it was idle related). Replaced the IAC with what I could get my hands on in a small town on the weekend for around $100. Problem solved. I kept the old IAC and after reading a post somewhere that someone had used a Dremel to disassemble the OEM Denso (which has star screws on it that none of my set work on) I took a hacksaw to mine to get a closer look. The paddle would spin but I continued to hit small rough spots when I moved it at slower speeds. I cleaned it several times (with the last half can of Carb cleaner I still own). No change. I'm glad I replaced mine. If you can get your hands on a BW aftermarket IAC they usually have Denso running gear for 30 -40 cheaper than OEM. My local parts store advertised BW on the site but that was not what they stocked in the store. I needed the car back on the road so I bit. It runs like a Acura should run. No pedal stick at takeoff. No weird stuff that makes you wonder about shift points or surges. It runs like a scalded dog as I like to say. On the 2000 TL's if you pull the injector cover plate and look at the underside (and the EGR chamber) that should give you a pretty good idea of how deep you need to clean. My was pretty severe. I suspect it was never done prior to my cleaning.
Thread Starter
Intermediate
Joined: Apr 2010
Posts: 32
Likes: 0
Well, good news - bad news. CEL came on again, stopped at parts store - 401 EGR code is gon, but P0420 and P1457 (pending) are showing up. I got the cat changed 2 years ago - guess I'll try the O2 sensor and look into the 2 antifoulers tip from another thread. Not sure if the AM cat was high flow or not.
Catalyst System Efficiency Below Threshold (Bank1) - bank 1 is behind the cat or in front of it?
My TL has a California emissions sticker under the hood - not sure how that changes things.
Catalyst System Efficiency Below Threshold (Bank1) - bank 1 is behind the cat or in front of it?
My TL has a California emissions sticker under the hood - not sure how that changes things.
Thread Starter
Intermediate
Joined: Apr 2010
Posts: 32
Likes: 0
Ordered a new EVAP canister, shut-off valve, and 2x screw from the P1457 DIY thread (https://acurazine.com/forums/2g-tl-1999-2003-98/diy-evap-canister-shut-valve-replacement-729920/).
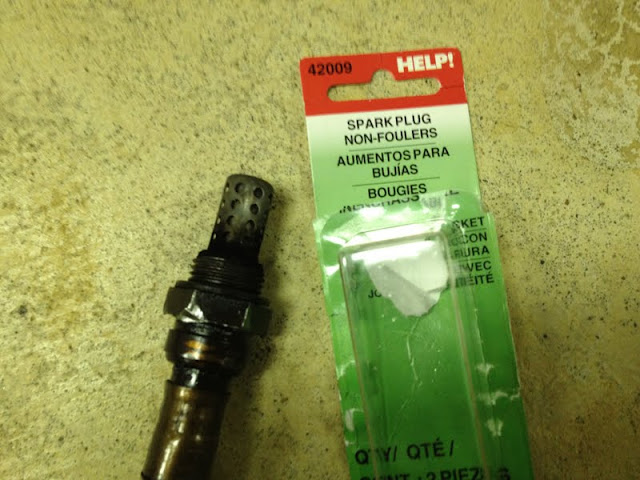
Also ordered a Denso O2 sensor (30" lead), removal tool, anti-seize, and 2 non-foulers as per the P0420 fix for after-market cats (Cost $60 total on Amazon - see http://forums.evolutionm.net/evo-how...cel-light.html).
Will report back my results.
Also ordered a Denso O2 sensor (30" lead), removal tool, anti-seize, and 2 non-foulers as per the P0420 fix for after-market cats (Cost $60 total on Amazon - see http://forums.evolutionm.net/evo-how...cel-light.html).
Will report back my results.
Last edited by DaHadster; Apr 16, 2012 at 04:39 PM.
Thread Starter
Intermediate
Joined: Apr 2010
Posts: 32
Likes: 0
Changed the EVAP canister and valve - took maybe 30 minutes.
Replaced the O2 Sensor on the cat. Man, getting that sucker off was rough! As others have suggested, highly recommend the O2 removal tool. The 30 inch leads were long - think 15" is all you need (I know there are 3 different lengths). I just cinched up the slack put the 2 non-foulers on (used the smaller more expensive model).
Driven about 100 miles so far, no Check Engine Light! Going for my emissions tomorrow. Thanks to all the ziners for the help!
Replaced the O2 Sensor on the cat. Man, getting that sucker off was rough! As others have suggested, highly recommend the O2 removal tool. The 30 inch leads were long - think 15" is all you need (I know there are 3 different lengths). I just cinched up the slack put the 2 non-foulers on (used the smaller more expensive model).
Driven about 100 miles so far, no Check Engine Light!
Going for my emissions tomorrow. Thanks to all the ziners for the help!
Thread Starter
Intermediate
Joined: Apr 2010
Posts: 32
Likes: 0
Cat was changed 2 years ago and light came on about a week after that (had already passed my 2 year emissions by then). This time I failed for the same code, + the EGR code. The emissions report (for the failed test this time) has a separate part for the cat and is reads PASSED. Er, at least I hope that's what it means. I'll find out for sure tomorrow.
Last edited by DaHadster; Apr 24, 2012 at 10:39 PM.
Team Owner
Joined: Sep 2006
Posts: 33,535
Likes: 1,142
the anti foulers are for high flow cats
the O2 sensor isnt getting the info at a rate/speed its designed for
you need to drill out the foulers opening a bit-per the diy, to make it work right
= correct flow rate
the O2 sensor isnt getting the info at a rate/speed its designed for
you need to drill out the foulers opening a bit-per the diy, to make it work right
= correct flow rate

Thread
Thread Starter
Forum
Replies
Last Post