
lower control arm rusted bolts

Thread Starter
HonGod - Nature, Nurtured


Joined: Jan 2005
Posts: 469
Likes: 11
From: Edmonton
lower control arm rusted bolts
hi guys,
this is sort of a double-barrel question. i am trying to remove the rusted bolts securing the shock absorber in the left front lower control arm, but my ratchet's 3/8" didn't fit.
can anyone give me a suggestion as to what headsize i'd need to remove the bolt?
also, if someone could recommend a reasonably priced ratchet that may be useful for removing tough bolts like this?
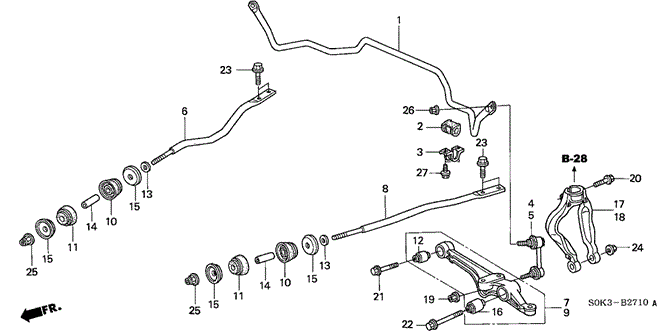
here's the diagram
the service manual says there are two bolts i'd need to remove (i left the brakes etc assembled as it seems i should be able to undo the 2 bolts, hammer it, and it should come off).
any tips on some reasonably priced tools that may be helpful for jobs like this would be appreciated. started to look at torque wrenches (long handles and all) for a "force advantage', but holding off till i get some input from y'all.
thanks.
this is sort of a double-barrel question. i am trying to remove the rusted bolts securing the shock absorber in the left front lower control arm, but my ratchet's 3/8" didn't fit.
can anyone give me a suggestion as to what headsize i'd need to remove the bolt?
also, if someone could recommend a reasonably priced ratchet that may be useful for removing tough bolts like this?
here's the diagram
the service manual says there are two bolts i'd need to remove (i left the brakes etc assembled as it seems i should be able to undo the 2 bolts, hammer it, and it should come off).
any tips on some reasonably priced tools that may be helpful for jobs like this would be appreciated. started to look at torque wrenches (long handles and all) for a "force advantage', but holding off till i get some input from y'all.
thanks.


Thread Starter
HonGod - Nature, Nurtured
Joined: Jan 2005
Posts: 469
Likes: 11
From: Edmonton
no torches allowed.
will read up on pb blaster.
cheater bar (increasing distance from bolt head thereby creating force advantage) good idea, but need to know the bolt size (must be half inch, like i said 3/8 didn't work so i need to be sure)
will read up on pb blaster.
cheater bar (increasing distance from bolt head thereby creating force advantage) good idea, but need to know the bolt size (must be half inch, like i said 3/8 didn't work so i need to be sure)
Pro
Joined: Feb 2014
Posts: 673
Likes: 63
If you don't have a metric socket set, get yourself one, preferably in 1/2" drive with a good sized ratchet or breaker bar for stubborn bolts. I usually use an electric impact wrench on bolts like this, if I can fit it in there.
For ratchets I would highly recommend Gear Wrench, especially their 120xp models as they work great when you don't have a big range of movement available. I got this set but you could buy them individually and just get what you want (really you probably just need the large 3/8" and the 1/2", but the smaller ones come in handy for some jobs): https://www.amazon.com/GearWrench-81230P-Teardrop-Ratchet-4-Piece/dp/B00BTEXPDK/ref=sr_1_1?ie=UTF8&qid=1484269485&sr=8-1. You will be amazed at how much leverage you'll get on a nice ratchet with a long handle like that 1/2" drive in the set.
Would also recommend a dedicated breaker bar too as breaking loose stuck bolts is hard on a ratchet, something like this https://www.amazon.com/Neiko-00206A-Drive-Premium-Breaker/dp/B001222378/ref=sr_1_3?s=power-hand-tools&ie=UTF8&qid=1484269528&sr=1-3

Advanced
Joined: Feb 2013
Posts: 66
Likes: 8
From: Columbus Ohio
Here you go. First, its all metric and I would use 1/2" head for removing suspension bolts. The # 22 and #24 bolt/nut are both 17mm. The #20 is a 14mm. Use PB Blaster it is a penetrant and spray a few times and let it soak in, like 10 minutes. WD 40 is an oil coating, short term lubricant and is thicker, unable to seep thru to the threads like PB Blaster can. Get a 1/2 " Cheater Bar as you need the leverage especially for the 17mm. I would get a 17mm wrench in addition to your sockets. I'm not kidding about the cheater bar, probably half the guys that don't have a cheater bar yet , go to buy one with bloody knuckles.
Thread Starter
HonGod - Nature, Nurtured
Joined: Jan 2005
Posts: 469
Likes: 11
From: Edmonton
Here you go. First, its all metric and I would use 1/2" head for removing suspension bolts. The # 22 and #24 bolt/nut are both 17mm. The #20 is a 14mm. Use PB Blaster it is a penetrant and spray a few times and let it soak in, like 10 minutes. WD 40 is an oil coating, short term lubricant and is thicker, unable to seep thru to the threads like PB Blaster can. Get a 1/2 " Cheater Bar as you need the leverage especially for the 17mm. I would get a 17mm wrench in addition to your sockets. I'm not kidding about the cheater bar, probably half the guys that don't have a cheater bar yet , go to buy one with bloody knuckles.
thanks for your input. yeah buzzman thanks for catching the incorrect bolt diameter . it was not 1/2" that i tried, but a 9/16 (which is as-far as my 1/4" socket drive went).
couldn't find a 1/4"->3/8" adapter, but did score an 11/16" wrench for a few bucks (literally, couldn't pass up the deal and justify buying a bigger-drive socket [as much as i could use it--now isn't the time for that]). hope this will do the trick. it is decently long (maybe the length of a ruler), compared to my dinky 1/4" socket set. thankfully i can use the 9/16 with its extension (sorta a cheater bar, no?) for the 20, and hopefully this wrench for the 22 and 24.
maybe for more leverage with this wrench i can use that hook in the trunk tools or something.
boy i hope this works :P
thanks again boys. any other tips?
Trending Topics

 . You're going to round off all your bolts

Burning Brakes
Joined: Feb 2012
Posts: 870
Likes: 185
Extension is NOT a cheater/breaker bar.
Torque wrenches do NOT break bolts thats what the breaker bar is for
Stop wrenching without the right tools youll cause more problems than you fix
Listen to folks here and at a minimum buy at least a decent metric socket/wrenches
If you plan to continue to wrench buy a case of PB Blaster or Kroil which will likely be better for your location
NOTE: If you cant afford a breaker bar see if you have some old pipe that can sleeve over the handle you can use that for leverage.
Pro
Joined: Feb 2014
Posts: 673
Likes: 63
I can tell you from experience, the wrong tools will make the job take 10x longer and so frustrating.
My brother and I also started doing work with a crappy socket set and one day I said "Dude, why are we working with these poverty tools?" Since then we just go buy what we need when we do the job and now we've got a good collection of tools, so it's rare we need something else. But still, if something comes up we just go buy the tool to do the job immediately, it will always save so much more time than trying to hack at it with the wrong tools. And, every time the job was still cheaper than paying for somebody else to do it plus now you have more tools.
You will have so much more fun doing auto work with a good ratchet/socket set, a set of extensions to cover any length you need, u-joints or swivels, some long wrenches, and a breaker bar.
Last edited by SuperGreg; Jan 13, 2017 at 10:42 AM.

Advanced
Joined: Feb 2013
Posts: 66
Likes: 8
From: Columbus Ohio
The additional advise is to not even attempt this with what you have. You can strip these bolts with the right metric socket if not dead centered, much less the wrong size. I really would go straight to the bar and buy a beer, before you attempt this with the wrong tools.
Moderator
Joined: Jan 2009
Posts: 6,509
Likes: 1,023
From: Baja, M�xico.
Metric Sockets do not fully translate to Standard (For Example 2mm driver in SAE is close to 5/64th yet that is in reality 1.98mm).....
DO NOT TRY TO USE STANDARD! You will round off a Metric Bolt with a Standard Socket.
Japanese Cars in this case Honda & Acura use all Metric Bolts, Get a Metric Socket Kit to work on your car or leave it to the PROs.
EDIT: You live in Canada?????? Why the hell are you using SAE Tools? The only Country in America that uses Standard is the USA, Only American Car Manufacturers use SAE Bolts..
Last edited by Skirmich; Jan 13, 2017 at 06:20 PM.
Thread Starter
HonGod - Nature, Nurtured
Joined: Jan 2005
Posts: 469
Likes: 11
From: Edmonton
i ended up getting some help by a young filipino man, no more than a decade my senior, in removing the bolts.
the kit has both metric and imperial. i didn't really care as long as it fit tbh. i bought the kit like ten years ago and it was what you'd expect.
he used my socket with a hammer (never thought of that, great idea), and it worked. socket wrench is broken now, but whatever it was worth it.
i present to you, gentlemen, the lower left front control arm for TEN FREAKIN DOLLARS! WHAT A DEAL.
you guys are right, the tools i have suck but until i find a good 'kit', it's all i have. broken socket wrench will speed that up now.
btw, got the front left armrest for 5.25!!
here's the armrest before (blame the snow that would fall in through the cracks!), and the one after (FIVE FREAKIN' TWENTY-FIVE. THANK YOU BUCK'S AUTO)
the only downside to today was that i didn't manage to get the hood struts in time. didn't bring my screwdriver on my first trip so i could only get the lower front left shock absorber.
i noticed i needed the hood struts, and thought they'd be there when i came back, but NOPE!
still got the armrest though.
pics are just for fun, obviously nothing new or important here. thought i'd add a bit more community to this thread, you feel me?


before:

after:

broly came to buck's auto, he saw (parts at) buck's auto, and he left buck's auto (a happy person) - Album on Imgur (album link if anyone cares)
Thread Starter
HonGod - Nature, Nurtured
Joined: Jan 2005
Posts: 469
Likes: 11
From: Edmonton
all too thrilled about the money i saved by checking out my local salvage yard.
that armrest would have cost probably 150-175 canadian, the dash bezel (even if i wanted the bezel only) another 400 (due to the switches), and that lower control arm shock absorber another 250-275.
the parts only cost me 30bucks-ish in the end. hoping to install my SS-P coilovers this spring.
all the ss-p wiring is still intact so hoping maybe to get my edfc magic back again ya heard
Moderator
Joined: Jan 2009
Posts: 6,509
Likes: 1,023
From: Baja, M�xico.
That is not the control arm though... That part is Called "Strut Fork" and its pretty dirt cheap.
The control arm in your first Diagram is part #7 and #9
The part you replaced is #17/#18 which is the Strut Fork.
The control arm in your first Diagram is part #7 and #9
The part you replaced is #17/#18 which is the Strut Fork.
Pro
Joined: Feb 2014
Posts: 673
Likes: 63
SaveSave
Thread Starter
HonGod - Nature, Nurtured
Joined: Jan 2005
Posts: 469
Likes: 11
From: Edmonton
respectfully: no it's not part 7 & 9. the entire area is called "lower control arm" (look at an oem part site and see how it breaks down. this part falls in the lower control arm area).
edit: it's called lower arm, so i apologise for that.
yes, it is part 17/18.
i just inserted it on the front left ss-p coilover, similar to how the service manual (consult 18-19 to address any concerns you may have) shows how to remove the "damper fork" (shock absorber)
since the bottom of the damper rests on this part, and it's a fork shape, i am inclined to believe it is indeed the "damper fork" aka the shock absorber shown in the diagram.
edit:dunno what the difference is between a shock absorber/damper fork and a strut fork. it is certainly not dirt cheap if you want an oem part (going by the prices on the oem parts pages, which are usually reasonable)
Last edited by broly; Jan 14, 2017 at 09:05 PM. Reason: read it wrong
Pro
Joined: Feb 2014
Posts: 673
Likes: 63
you'd expect it to be dirt cheap, but it's not.
respectfully: no it's not part 7 & 9. the entire area is called "lower control arm" (look at an oem part site and see how it breaks down. this part falls in the lower control arm area).
edit: it's called lower arm, so i apologise for that.
yes, it is part 17/18.
i just inserted it on the front left ss-p coilover, similar to how the service manual (consult 18-19 to address any concerns you may have) shows how to remove the "damper fork" (shock absorber)
since the bottom of the damper rests on this part, and it's a fork shape, i am inclined to believe it is indeed the "damper fork" aka the shock absorber shown in the diagram.
edit:dunno what the difference is between a shock absorber/damper fork and a strut fork. it is certainly not dirt cheap if you want an oem part (going by the prices on the oem parts pages, which are usually reasonable)
Thread Starter
HonGod - Nature, Nurtured
Joined: Jan 2005
Posts: 469
Likes: 11
From: Edmonton
some "spirited driving" on a generous turn, combined with the sand/rocks left from winter (it was early spring), lead to my front left end hitting the curb *really* (mb 45km) hard.
i guess my left coilover was saved by this part, because it must have been what absorbed all the damage by breaking off
also explains why such a part it would cost 200 dollars, because the accident didn't require much more than a new rim and lower arm. it essentially broke off and reduced further damage.
i guess my left coilover was saved by this part, because it must have been what absorbed all the damage by breaking off
- i only learned it was oem when i asked tein to get it fixed [emailed a pic] some years ago)
also explains why such a part it would cost 200 dollars, because the accident didn't require much more than a new rim and lower arm. it essentially broke off and reduced further damage.
- mechanic didn't know the part was OEM because he saw the coilovers were aftermarket (he didn't install them), and so we had the old ones back in.
Moderator
Joined: Jan 2009
Posts: 6,509
Likes: 1,023
From: Baja, M�xico.
The Strut Fork is cheap because you can get it at ANY Junkyard... That part was shared with an Absurd amount of Honda & Acura Cars, One of which is the Accord and that car can be found anywhere. I reckon that part probably would sell for about 10-20 bucks in a Junkyard so you still go it cheap.
FYI: There are 2 Control Arms each side, The lower A-Arm in your diagram 7/9 and not Pictured is the Upper A-Arm which is the one that surround the Strut Assembly. Usually Control Arms are identified by the BALL JOINTs that carries the Knuckle.. The Strut Fork does not meet this criteria because it only function is to support the Strut to the A-Arm. McPherson setups only have 1 Ball Joint thus only 1 Control Arm, Our TL has a "Performance" Intended Double Wishbone which has as the name Implies 2 Control Arms.
Congrats on fixing it though.
Pro
Joined: Feb 2014
Posts: 673
Likes: 63
some "spirited driving" on a generous turn, combined with the sand/rocks left from winter (it was early spring), lead to my front left end hitting the curb *really* (mb 45km) hard.
i guess my left coilover was saved by this part, because it must have been what absorbed all the damage by breaking off
also explains why such a part it would cost 200 dollars, because the accident didn't require much more than a new rim and lower arm. it essentially broke off and reduced further damage.
i guess my left coilover was saved by this part, because it must have been what absorbed all the damage by breaking off
- i only learned it was oem when i asked tein to get it fixed [emailed a pic] some years ago)
also explains why such a part it would cost 200 dollars, because the accident didn't require much more than a new rim and lower arm. it essentially broke off and reduced further damage.
- mechanic didn't know the part was OEM because he saw the coilovers were aftermarket (he didn't install them), and so we had the old ones back in.
Thread Starter
HonGod - Nature, Nurtured
Joined: Jan 2005
Posts: 469
Likes: 11
From: Edmonton
The Strut Fork is cheap because you can get it at ANY Junkyard... That part was shared with an Absurd amount of Honda & Acura Cars, One of which is the Accord and that car can be found anywhere. I reckon that part probably would sell for about 10-20 bucks in a Junkyard so you still go it cheap.
FYI: There are 2 Control Arms each side, The lower A-Arm in your diagram 7/9 and not Pictured is the Upper A-Arm which is the one that surround the Strut Assembly. Usually Control Arms are identified by the BALL JOINTs that carries the Knuckle.. The Strut Fork does not meet this criteria because it only function is to support the Strut to the A-Arm. McPherson setups only have 1 Ball Joint thus only 1 Control Arm, Our TL has a "Performance" Intended Double Wishbone which has as the name Implies 2 Control Arms.
Congrats on fixing it though.
FYI: There are 2 Control Arms each side, The lower A-Arm in your diagram 7/9 and not Pictured is the Upper A-Arm which is the one that surround the Strut Assembly. Usually Control Arms are identified by the BALL JOINTs that carries the Knuckle.. The Strut Fork does not meet this criteria because it only function is to support the Strut to the A-Arm. McPherson setups only have 1 Ball Joint thus only 1 Control Arm, Our TL has a "Performance" Intended Double Wishbone which has as the name Implies 2 Control Arms.
Congrats on fixing it though.
and yeah the part may be shared by other cars, but i'm not sure if it's based on weight or anything else like that. i agree with you that many of the parts can fit accord v6s (saw some people mentioning using a 06 accord v6 tranny for a swap in a 2g, so again i'm not disagreeing), not sure about the stuff that is related to dimensions though.
thanks for your clarification and i again i apologise for bad terminology.
Thread Starter
HonGod - Nature, Nurtured
Joined: Jan 2005
Posts: 469
Likes: 11
From: Edmonton
i haven't fixed anything on my own yet. i want to re-install the coilovers and edfc on my own. i managed to cobble together the main navigation unit parts today from the salvage yard and now i'm trying to find wiring harnesses. may do it all at once since i have to lift the dash from the beam to check the EDFC stuff when the time comes anyways.
more on the navi bit in another thread. have some questinos about removing the dash and if you need another person as well.