How to add a sub to a 2003 TL
 09-08-2006, 12:47 PM
#1
2nd Gear
Thread Starter

Join Date: Sep 2006
Posts: 2
Likes: 0
Received 0 Likes
on
0 Posts
How to add a sub to a 2003 TL
Does anyone have guidance on the best way to add a sub to the factory system. I'm not looking to replace the factory head unit, but I want a little more thump.
I have a basic 400w amp and 2 12" subs in a bandpass box - how do I get started?
Thanks for any input!
B
I have a basic 400w amp and 2 12" subs in a bandpass box - how do I get started?
Thanks for any input!
B
 09-08-2006, 02:31 PM
#2
Blazin with your Moms in
Join Date: Aug 2004
Location: Mass Histeria
Age: 51
Posts: 1,340
Likes: 0
Received 0 Likes
on
0 Posts
Here are the help paragraphs that I chopped and screwed from a few sources here. The directions assisted me with adding 2 12's and an amp to my stock system.
Running Power Wires
There is a grommet with a wire bundle way up above the emergency brake pedal. It comes out down behind the strut housing in the engine bay. It's a beetch but can be done. You have to make a new hole in the grommet on the engine bay side(very carefully to not cut other wires). Push your finger thru it from the cabin side and gently guide a coat hangar with a small looped end to not cut any wires. Once thru, pull it back with a strong piece of pulling string. Then use the string to pull in your new power cable. Also can use some liquid dish soap for a pulling lubricant.
Removing Rear Seats to access stock amp
The trick is to start with the one bolt holding the bottom seat on. It's located right behind where the seatbelt latches stick out on the driver's side. I think its 11mm, and you'll need a socket extension. Pull seat bottom up from front and remove. There are three more bolts holding the seatback on. (On the bottom, one on each side, and one where the other belt latch is mounted. Slide the seatback up a couple inches and it will come free. This takes a little effort.
Tapping Wire Harness for Remote and signal
Remove rear seat for access to stock amp. Unplug wiring harness to stock amp. Remove stock amp (optional) and stock sub(best practice) - leave wiring harnesses in place. The wiring harness that you unplugged from your stock amp contains an orange wire - this is your remote power turn-on for your new amp, so splice into it and extend it to your new amp. Run new fused power cable from battery to your new amp. Ground new amp to body. Inside the same wiring harness to your stock amp there is a twisted pair wrapped in a puke brown shield, splice into the two wires inside the brown shield with some 22 gauge twisted pair(long enough to reach your new amp) and solder (1) RCA connector to the other end. (Polarity doesn't matter) This RCA is your mono input to your new amp. Connect new amp to new sub and have fun.
Eliminating the LOC (Line Out Conveter box)
You do not need a LOC. Tap into the two wires in the sheath with another twisted pair cable long enough to reach your amp. On the other end of your new cable, solder (1) RCA connector to it. Polarity does not matter- 1 wire to pin, the other to shield. Assuming your amp is bridgeable and having read manual for mono operation, for most amps you connect RCA to your amp's left input and your sub to the outer most speaker outputs, usually L+ and R-. Make sure you amp's switches and such are set for mono/bridged operation and your sub are wired correctly(ohm wise) to match your amps specs.
Hope this helps ya out!
09-18-2006, 06:07 PM
#3
2nd Gear
Thread Starter
Join Date: Sep 2006
Posts: 2
Likes: 0
Received 0 Likes
on
0 Posts
power
Thanks very much for the information - it was very helpful.
All is done except for getting power to the amp. I found the correct grommet on the engine side, but can't seem to find it on the cabin side... it seems like it is so high that I can't see it...
Any thoughts are appreciated.
All is done except for getting power to the amp. I found the correct grommet on the engine side, but can't seem to find it on the cabin side... it seems like it is so high that I can't see it...
Any thoughts are appreciated.
09-18-2006, 07:17 PM
#4
Senior Moderator
a close hanger to poke thru it. Look up by the parking brake with a flash light. you will see where teh main harness goes thru the firewall. Slide it thru there
09-18-2006, 08:19 PM
#6
02 WDP type-S Navi

?????  didn't kno u hav to remove the seat to get to the amp, isn't it rite by the sub mounted rite underneath the third brake area?? looks like this rite? they're 10mm nuts for the seats I guess it makes it easier to get to and run the wires..
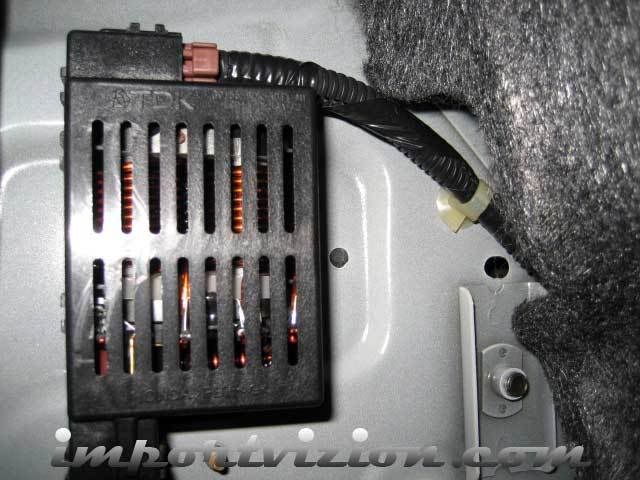
didn't kno u hav to remove the seat to get to the amp, isn't it rite by the sub mounted rite underneath the third brake area?? looks like this rite? they're 10mm nuts for the seats I guess it makes it easier to get to and run the wires..
Trending Topics
09-18-2006, 09:52 PM
#10
B93P TL Owner
Join Date: Sep 2003
Location: Gwinnett County, GA
Age: 47
Posts: 363
Likes: 0
Received 3 Likes
on
2 Posts
Originally Posted by importvizion
????? didn't kno u hav to remove the seat to get to the amp, isn't it rite by the sub mounted rite underneath the third brake area?? looks like this rite? they're 10mm nuts for the seats I guess it makes it easier to get to and run the wires..
didn't kno u hav to remove the seat to get to the amp, isn't it rite by the sub mounted rite underneath the third brake area?? looks like this rite? they're 10mm nuts for the seats I guess it makes it easier to get to and run the wires..
09-19-2006, 12:22 AM
#12
02 WDP type-S Navi
Originally Posted by ThreePointTwoTeeEl
Would those directions be the same for a 99? I think so, I am just not sure.
09-19-2006, 10:28 AM
#13
Originally Posted by importvizion
????? didn't kno u hav to remove the seat to get to the amp, isn't it rite by the sub mounted rite underneath the third brake area?? looks like this rite? they're 10mm nuts for the seats I guess it makes it easier to get to and run the wires..
didn't kno u hav to remove the seat to get to the amp, isn't it rite by the sub mounted rite underneath the third brake area?? looks like this rite? they're 10mm nuts for the seats I guess it makes it easier to get to and run the wires..
09-19-2006, 07:21 PM
#16
02 WDP type-S Navi
I don't kno how u guys got the rear seat out the bottom part of my seat is stuck pretty damn hard in the middle the sides came out with ease......I'll just slice the line that goes into the sub woofer, only takes a minute to do and crimp to some rca's that I'll cut up from some cheap RCA's that i hav....
09-20-2006, 12:04 AM
#17
B93P TL Owner
Join Date: Sep 2003
Location: Gwinnett County, GA
Age: 47
Posts: 363
Likes: 0
Received 3 Likes
on
2 Posts
Originally Posted by importvizion
I don't kno how u guys got the rear seat out the bottom part of my seat is stuck pretty damn hard in the middle the sides came out with ease......I'll just slice the line that goes into the sub woofer, only takes a minute to do and crimp to some rca's that I'll cut up from some cheap RCA's that i hav....
09-20-2006, 01:07 AM
#18
way to go man easy way out and takes minutes.
Originally Posted by importvizion
I don't kno how u guys got the rear seat out the bottom part of my seat is stuck pretty damn hard in the middle the sides came out with ease......I'll just slice the line that goes into the sub woofer, only takes a minute to do and crimp to some rca's that I'll cut up from some cheap RCA's that i hav....
09-20-2006, 03:34 PM
#19
Originally Posted by victorvu
thats not the amp the amp is behind the climate control on mines. or is it because mines a non navi. the amp says bose on it.
09-20-2006, 08:04 PM
#21
Hard Knock Life

Join Date: Jul 2005
Location: Baltimore
Age: 47
Posts: 37
Likes: 0
Received 0 Likes
on
0 Posts
Originally Posted by victorvu
i dont think anyone told you this but you can get the low output from your stock sub line in. just slice the wire and connect the RCA into that. it'll be a lot easier thats what i did. 
09-20-2006, 09:19 PM
#22
02 WDP type-S Navi
I did it all today, took me 3hrs n a trip to autozone to get those wire slicer so I don't have to cut up the cig lighter wire. But in the end the amp wouldn't turn on. Where'd u guys put ur ground at I tried to drill a hole behind the rear seat but thats some hard f***ing metal it broke my drill bit n I didn't even break through the surface.. I took a lot of a pics too, I'll try to post em up this weekend. Where did u guys ground the amp to?
09-20-2006, 10:15 PM
#23
Blazin with your Moms in
Join Date: Aug 2004
Location: Mass Histeria
Age: 51
Posts: 1,340
Likes: 0
Received 0 Likes
on
0 Posts
Originally Posted by importvizion
I did it all today, took me 3hrs n a trip to autozone to get those wire slicer so I don't have to cut up the cig lighter wire. But in the end the amp wouldn't turn on. Where'd u guys put ur ground at I tried to drill a hole behind the rear seat but thats some hard f***ing metal it broke my drill bit n I didn't even break through the surface.. I took a lot of a pics too, I'll try to post em up this weekend. Where did u guys ground the amp to?
09-20-2006, 10:19 PM
#24
05 Acura TL: a-spec

Originally Posted by importvizion
I don't kno how u guys got the rear seat out the bottom part of my seat is stuck pretty damn hard in the middle the sides came out with ease......I'll just slice the line that goes into the sub woofer, only takes a minute to do and crimp to some rca's that I'll cut up from some cheap RCA's that i hav....
 When I attempted to remove the back bench I had to pull really hard and ended up ripping some of the foam off the seat bottom!!! Shit was stuck to the metal of the car, couldnt get the foam off even after the seat bench was out. Looking forward 2 your pics
09-20-2006, 10:23 PM
When I attempted to remove the back bench I had to pull really hard and ended up ripping some of the foam off the seat bottom!!! Shit was stuck to the metal of the car, couldnt get the foam off even after the seat bench was out. Looking forward 2 your pics
09-20-2006, 10:23 PM
#25
when i put a sub in my tls all i did was tag the hi-lo into the factory and only remove the bottom seat to run the 4 guage and rca wire through, and if you tag the sub line you kinda get a little bit of sub control if you have the factory deck through the audio control of deck
09-20-2006, 11:27 PM
#26
Why I watch sci-fi...

Join Date: Jul 2006
Location: Greater Seattle
Age: 44
Posts: 290
Likes: 0
Received 0 Likes
on
0 Posts
Originally Posted by importvizion
I don't kno how u guys got the rear seat out the bottom part of my seat is stuck pretty damn hard in the middle the sides came out with ease......I'll just slice the line that goes into the sub woofer, only takes a minute to do and crimp to some rca's that I'll cut up from some cheap RCA's that i hav....
Rember, if you do this, you must attach it to the speaker level inputs, not the line level inputs. (it is a differance between 2-6 amps [like from a sub output from the deck] or up to 50 amps [the output from the Acura amp]. You can blow the amp if you use the wrong inputs.
09-21-2006, 04:09 AM
#28
theres a great spot to ground it. SPARE TIRE. thats where i have mines. and yes you always need a remote wire. i just tapped into a random 12v line and so its a lot better. I dont drain my battery just listening to music. When i turn my car to the on position then my subs turn on if i have it just to 1 all mids no sub. better that way.
09-21-2006, 09:18 PM
#30
02 WDP type-S Navi
just installed my rotoras wit ebc's so didn't get to play wit the setup today. I guess I farked up cuz my remote wire didn't werk, how'd I know? I took a wire touched it to the 4 gauge power wire I had to the remote wire n the amp light lit up. I guess the white wire wit the red line across it going to the rear cig lighter spot is not an active 12v source?? Well even after it was all plug in n sh*t theres no damn sound I must sliced the wire that goes to the stock sub wrong. The wire that goes to the sub has 4 wires two to each polarity n then they just ended up connecting to a female prong at the end....wtf??? I'm confused now so I cut those 4 wires up twisted two wires of the same polarity together, cut the rca wires stripped it down to the wire stripped the inner wire in the rca connected em all together...wut am I doing wrong, helpp
09-21-2006, 10:30 PM
#31
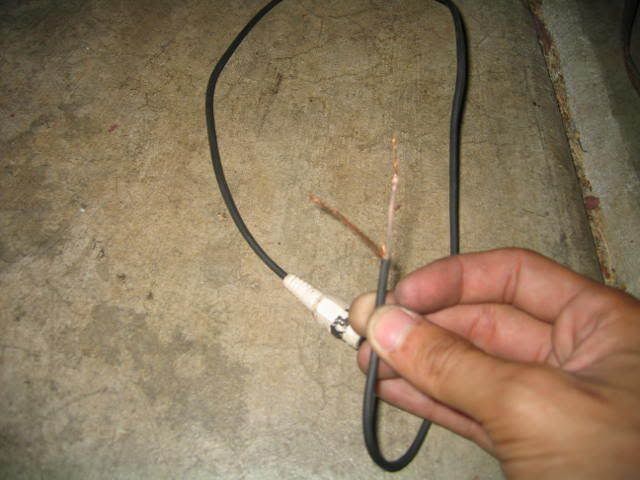
heres my RCA wiring, a little messy in the back of my trunk but im going to fix it later.
first this is what you'll need this piece disconnect it from the sub its easier then working in your trunk.
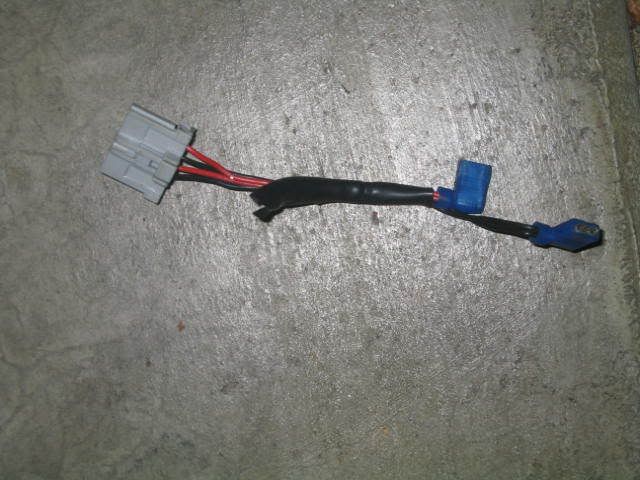
also jointers, connectors, RCA line and some speaker wire to extend the RCA if you need to.
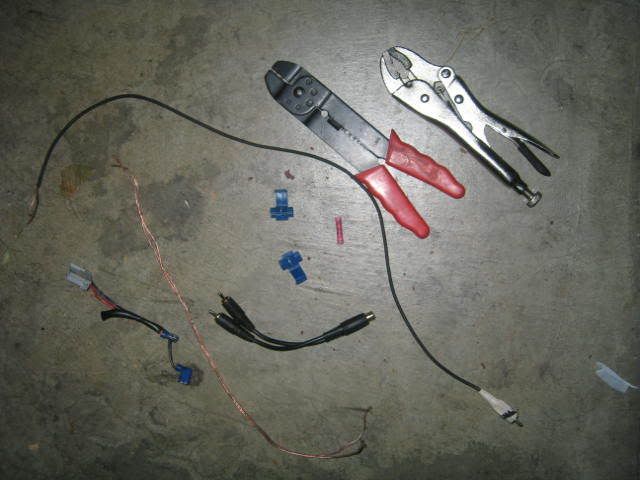
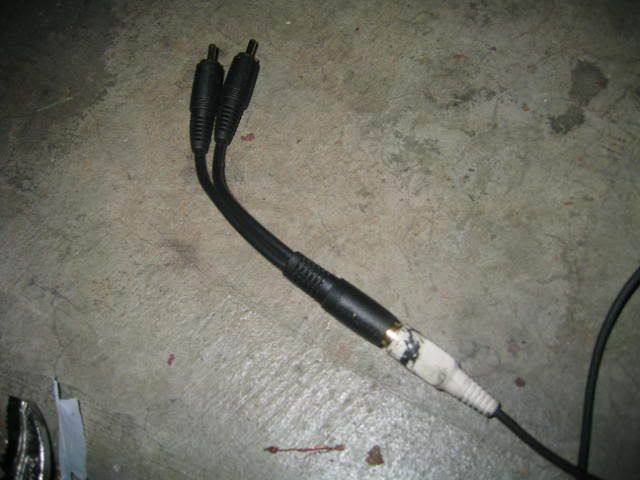
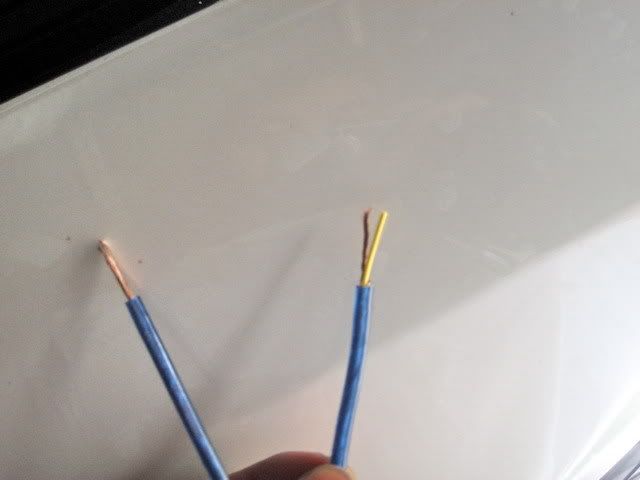
then cut the rca line and strip it. as i did in this i used some speaker wire, you'll need to remember which one is positive which one is negative. When you cut into the RCA the wires that are outside is the neg and the wires inside the other plastic is the positive. neg on the left pos on the right.
here is a picture of me wiring the speaker wire to the RCA line. thats the positive already connected.
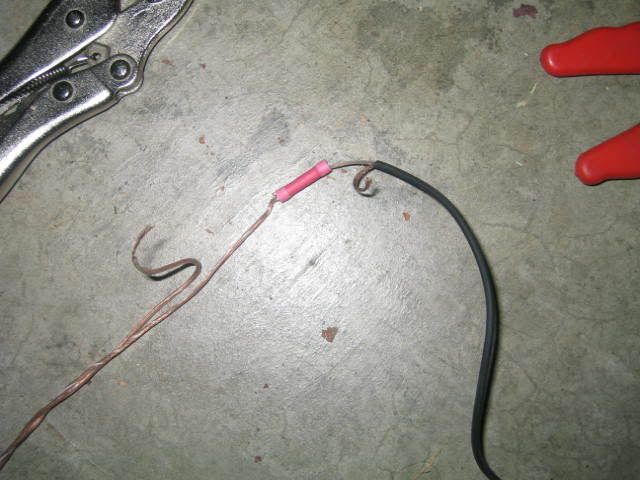
now i use the connectors to tap into the sub harness.

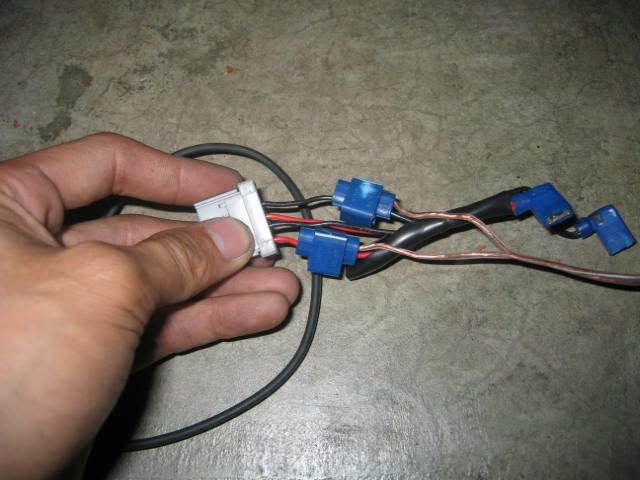
then i went back to the back of the car and plugged the sub harness back
and ran the RCA into my amp. i only used one rca so you'll need this
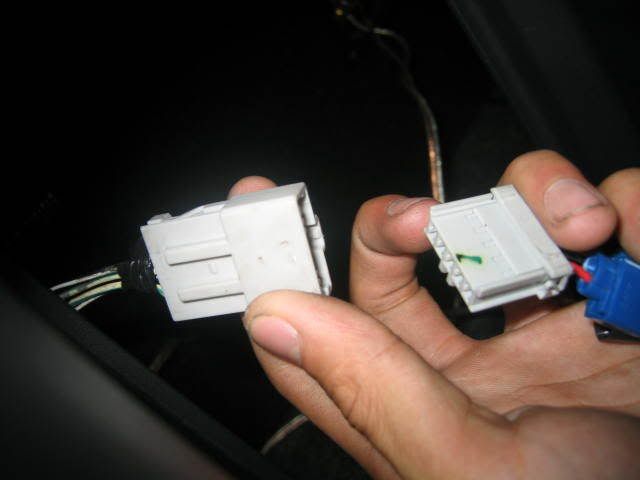
and thats it heres the final picture trunk is messy. and yes i know i need to reorganize.
first this is what you'll need this piece disconnect it from the sub its easier then working in your trunk.
also jointers, connectors, RCA line and some speaker wire to extend the RCA if you need to.
then cut the rca line and strip it. as i did in this i used some speaker wire, you'll need to remember which one is positive which one is negative. When you cut into the RCA the wires that are outside is the neg and the wires inside the other plastic is the positive. neg on the left pos on the right.
here is a picture of me wiring the speaker wire to the RCA line. thats the positive already connected.
now i use the connectors to tap into the sub harness.
then i went back to the back of the car and plugged the sub harness back
and ran the RCA into my amp. i only used one rca so you'll need this
and thats it heres the final picture trunk is messy. and yes i know i need to reorganize.
09-22-2006, 12:12 AM
#32
02 WDP type-S Navi
thanx victor that clears it up, no wonder my crap didn't work I just ended up twisting the positive and the neg together in the rcas  no wonder my crap didn't work
no wonder my crap didn't work
09-22-2006, 07:22 PM
#35
02 WDP type-S Navi
I musta did sumthing wrong I taps the positive shielded to the positive on the sub out and the negative to the negative thing but I used a twin RCA wire so can I just tap into both of them ?
09-22-2006, 09:59 PM
#36
02 WDP type-S Navi
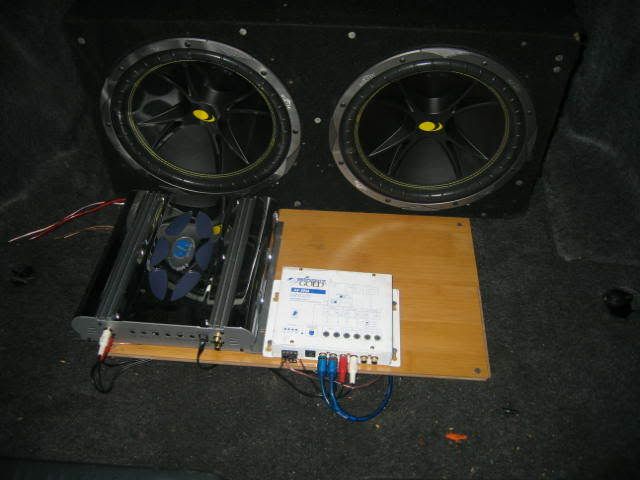
Thanx again vic couldn't hav done it witout u. I'm all done took me awhile to figure out that the wire slicer didn't break through the 12v source that I used to tap into wit the remote wire. Then I realized the freakin amp will only allow me to bridge the sub using certain a channel combination. Here's what it looks like below I tuck in all the wires.
Sony Xplod 4channel 600watt amp/ 12" JL W3v2 in Q-Logic Ported/Sealed box

Sony Xplod 4channel 600watt amp/ 12" JL W3v2 in Q-Logic Ported/Sealed box
09-23-2006, 12:48 AM
#38
Originally Posted by trock
yeah Vic, You definetly cleared things up for me. I see you have a crossover how come? are you running the interior speakers too?