
Headlight wetsanding/polishing problem
 07-21-2009, 04:08 PM
#1
Yup
Thread Starter
Join Date: Jan 2006
Posts: 162
Likes: 0
Received 0 Likes
on
0 Posts
Headlight wetsanding/polishing problem
So today I finally got around to wetsanding and polishing my headlights. They weren't hazy or scratched, but they had a lot of little pits. It wasn't really bad, but I wanted them crystal clear and looking awesome. Well, I picked up a headlight polishing kit which had sandpaper grits of 1000, 1500, 2000, and 2500. I started with the 1000 but it wasn't getting to the pits, so I decided to start at a lower grit and work my way up. I went to Pep Boys and picked up a packet that had 320, 400 and 600 grit sandpaper.
So I sanded up/down then left/right with each grit paper starting with the 320 until I ended up at 2500. I wetsanded using each for about 5 minutes each (took forever). At the end, I tried polishing with three different things: the liquid that came with the kit, 3M Rubbing Compound and Meguiar's ScratchX. None worked great.
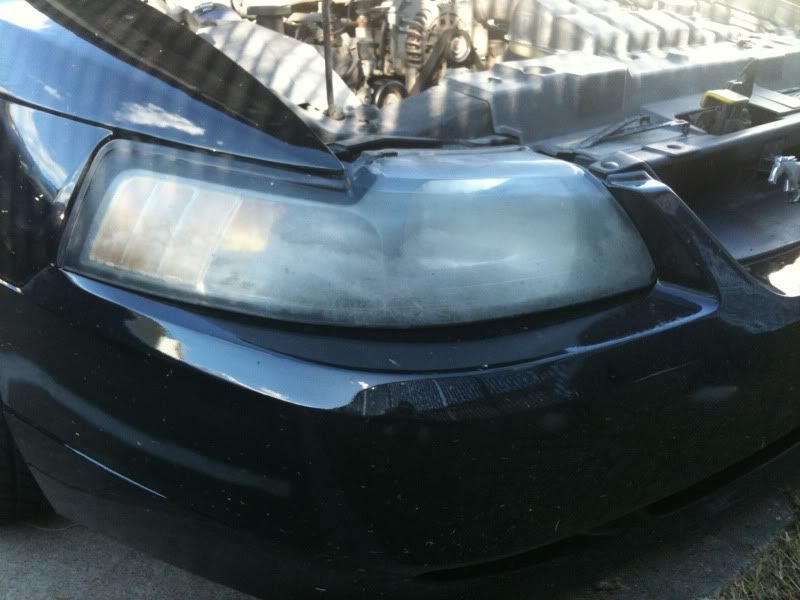
I tried the whole process above TWICE, and even tried using an electric buffer/polisher for the polishing. Of course I got the pits out, but the headlight I polished (I only did one) is now hazy from scratches. In fact, the housing as a whole looks LESS clear than the untreated headlight . See how my polished one looks worse than the one I didn't do yet.
Did I start at too low a grit? If so, how can I correct? Has anyone else tried this and gotten less than satisfactory results?


So I sanded up/down then left/right with each grit paper starting with the 320 until I ended up at 2500. I wetsanded using each for about 5 minutes each (took forever). At the end, I tried polishing with three different things: the liquid that came with the kit, 3M Rubbing Compound and Meguiar's ScratchX. None worked great.
I tried the whole process above TWICE, and even tried using an electric buffer/polisher for the polishing. Of course I got the pits out, but the headlight I polished (I only did one) is now hazy from scratches. In fact, the housing as a whole looks LESS clear than the untreated headlight
. See how my polished one looks worse than the one I didn't do yet. Did I start at too low a grit? If so, how can I correct? Has anyone else tried this and gotten less than satisfactory results?
 07-21-2009, 04:41 PM
#2
bringin lead
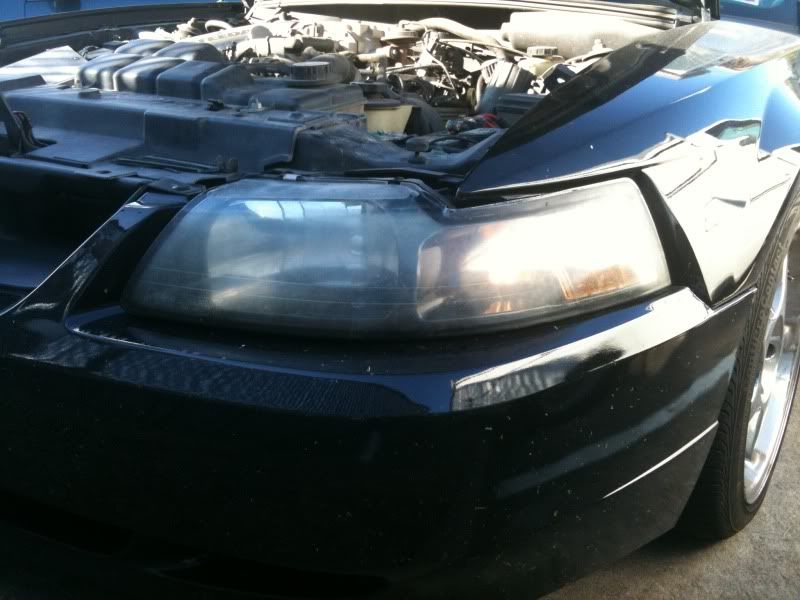
its hard to see what you're talking about with these pics. i have one of those powerball attachments for a cordless drill and use it to polish my headlights with meg plastix. meg scratchx is not abrasive enough to work on the plastic I don't think(i tried this before using plastix). maybe you should try the plastix. 

07-21-2009, 05:06 PM
#6
Join Date: Mar 2009
Posts: 705
Likes: 0
Received 0 Likes
on
0 Posts
ok im done laughing.
as others stated, you started too low. to fix it, you will have to put in a lot more work. i would recommend sanding with 800 for 10-20 minutes, and then move on to 1000, 1500, 2000 but sand each for atleast 10 minutes. another mistake u made is you barely spent any time sanding them as well.
goodluck
Trending Topics
07-21-2009, 06:02 PM
#8
6MT Someday..
Join Date: Jun 2008
Location: Louisville Ky
Age: 46
Posts: 1,229
Likes: 0
Received 0 Likes
on
0 Posts
hmmmm...320? ouch. Thats most likely the root of your problem. Too coarse for plastic. Like others said...youre gonna have to put some more work in. I agree with TouringLow-800 is the lowest I would have gone.
 07-21-2009, 09:52 PM
#10
Senior Moderator
 You used WAY to low of a grit. Polishing takes time too.
07-21-2009, 10:34 PM
You used WAY to low of a grit. Polishing takes time too.
07-21-2009, 10:34 PM
#11
I started at 400 cuz of oxidation and spent about 2 hours going to 600, 800, 1000, 2000, then lense polisher and came out perfectly. By the time you're done, you're hands should cramp up lol...
07-21-2009, 11:44 PM
#12
Yup
Thread Starter
Join Date: Jan 2006
Posts: 162
Likes: 0
Received 0 Likes
on
0 Posts
Thanks everyone for the tips...Seems I'm learning the hard way...really hard. 
OK, so tried to correct it as suggested. I used 800 grit for 20 minutes, then did 10-12 minutes each of 1000, 1500, 2000 and 2500. However, even after I polished at the end, there were still some fine scratches remaining, and not quite 100% clarity. I'm not sure if they're the same scratches from the 320 grit or the 2500 I used at the end, but they are there. I didn't use the electric polisher this time... I'm wondering if I can just buff out the scratches if I use the right combo of power buffer and compound. I am thinking of trying PlastX, and if it doesn't work by hand, either a orbital/dual-action polisher or a rotary buffer...
OK, so tried to correct it as suggested. I used 800 grit for 20 minutes, then did 10-12 minutes each of 1000, 1500, 2000 and 2500. However, even after I polished at the end, there were still some fine scratches remaining, and not quite 100% clarity. I'm not sure if they're the same scratches from the 320 grit or the 2500 I used at the end, but they are there. I didn't use the electric polisher this time... I'm wondering if I can just buff out the scratches if I use the right combo of power buffer and compound. I am thinking of trying PlastX, and if it doesn't work by hand, either a orbital/dual-action polisher or a rotary buffer...
07-22-2009, 12:09 AM
#14
2003 TL-p
i did mine with 600dry- 600wet - 1000wet - 1500wet and a shit load of scratch-x and a drill buffer and it came out perfect for me.
i also used some of this blue headlight restore goo and a drill buffer
then put a good layer of wax on it to protect it, buff it good too.
i also used some of this blue headlight restore goo and a drill buffer
then put a good layer of wax on it to protect it, buff it good too.
07-22-2009, 01:21 PM
#15
Traded in my
PlastX sucked for me as well. I used 800, 1000, 2000, grit and spent about 15-20 mins on each headlight. Then PlastX didnt clear them up all the way so when I was waxin, I hit em with the polisher and wax cleared em right up. Meguiar's Tech 2.0 wax is the shit.. 
07-22-2009, 06:08 PM
#17
 07-22-2009, 10:30 PM
#22
Yup
Thread Starter
Join Date: Jan 2006
Posts: 162
Likes: 0
Received 0 Likes
on
0 Posts
 I hand-polished for about an hour today, trying every one of...
1. Liquid polish that came with the kit
2. 3M Rubbing Compound
3. Plastx by Meguiars
4. Carnuba cleaning wax by Mothers
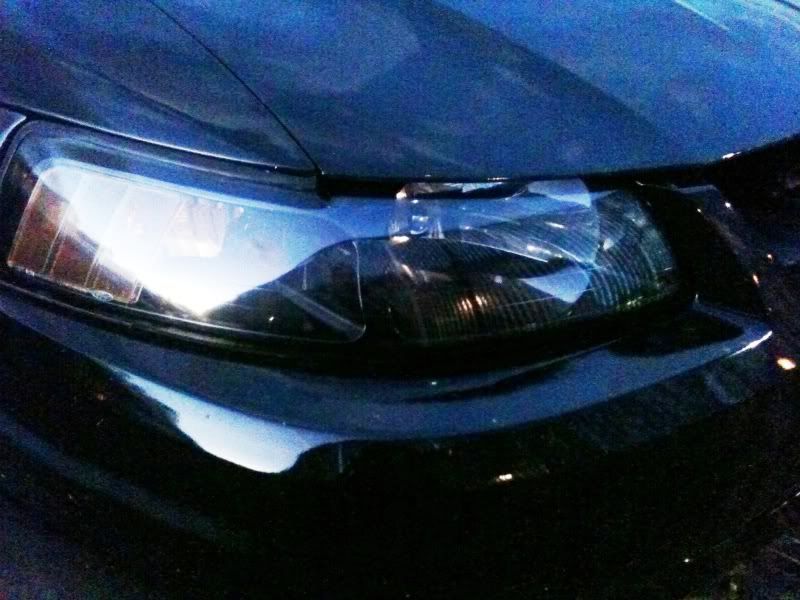
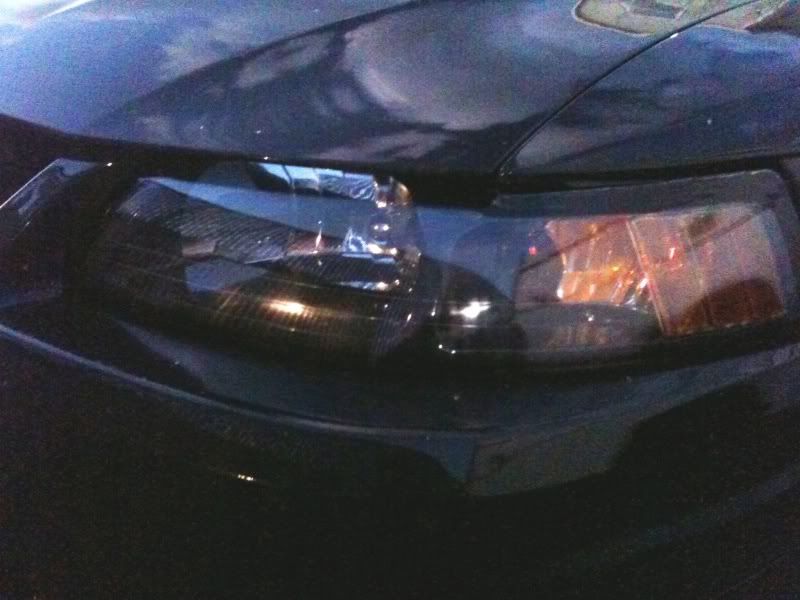
I think the liquid that came with the kit actually worked the best, applied by hand. The headlight is now...acceptable, but in no way perfect. It's free of all pits, mostly transparent, and from a few feet away it's not bad at all, but it's NOT glass-clear...very slight haze still, and if I put my face right up in front of it, I can see the nearly microscopic scratches. Again, I'm not sure if those are from the 320 or the 2500 I ended at, but I am not sure how to experiment to see which it is. I'm wondering - I corrected by mistake by starting at 800 yesterday (which I used for 20 min)...but since I used 320 initially, wouldn't those scratches need to taken out or sanded out by something of a similarly low grit? Maybe 400 and then 600 before going up to 800?
Another possibility in my mind - would a rotary buffer be able to produce enough friction/heat to slightly melt the plastic back into clarity?
 02-16-2010, 04:43 PM
#27
2007 TL
I'm a professional headlight restoration technician, I use 320-600-1000-1500-3000, electric sander run it 3000rpms to 5000rpms No wet sanding, clean with water each time your done with each grit. Sand until the yellowish look goes away, 320 and 600 are the ones that remove the yellow dirt. Go up to 3000, Polish them finally the uv coat sealer and they should look brand new. Takes me about an hour for each headlight. Is not as easy as it sounds. I charge $40 per headlight. You will probably still see scratches if you do it by hand.
Ps - I don't use those cheap kits that cost $10-25, my kit cost me about $500
Ps - I don't use those cheap kits that cost $10-25, my kit cost me about $500
 02-17-2010, 10:55 PM
#30
Traded in my
Damn..nice work. Guess that's what happens when you have experience..LOL
I'm thinking about going back over mine with just the 1500 grit and my dremel to really get rid of all the fine scratches.
I'm thinking about going back over mine with just the 1500 grit and my dremel to really get rid of all the fine scratches.
02-19-2010, 12:10 PM
#32
http://solutions.3m.com/wps/portal/3...cts/Headlight/
This is the system that my uncle uses in his hot rod shop. seems to work great and doesn't leave the scratches you may get from doing it by hand.

This is the system that my uncle uses in his hot rod shop. seems to work great and doesn't leave the scratches you may get from doing it by hand.
02-19-2010, 12:13 PM
#33
I'm a professional headlight restoration technician, I use 320-600-1000-1500-3000, electric sander run it 3000rpms to 5000rpms No wet sanding, clean with water each time your done with each grit. Sand until the yellowish look goes away, 320 and 600 are the ones that remove the yellow dirt. Go up to 3000, Polish them finally the uv coat sealer and they should look brand new. Takes me about an hour for each headlight. Is not as easy as it sounds. I charge $40 per headlight. You will probably still see scratches if you do it by hand.
Ps - I don't use those cheap kits that cost $10-25, my kit cost me about $500
Ps - I don't use those cheap kits that cost $10-25, my kit cost me about $500
02-20-2010, 06:11 PM
#34
2007 TL

Thread
Thread Starter
Forum
Replies
Last Post
tman570
2G RL Audio, Bluetooth, Electronics & Navigation
11
06-11-2019 07:56 AM
prox
5G TLX Problems & Fixes
6
09-01-2015 02:03 AM