
Going to Install Outlaw spacers and clean my EGR port tomm..Suggestions??
 06-09-2009, 05:17 PM
#1
B A N N E D
Thread Starter
iTrader: (1)

Join Date: Feb 2001
Location: The grande.. Riverdale NJ.. Hopefully moving to skyline village in Lincoln park NJ..yes dirty jersey
Age: 45
Posts: 4,657
Likes: 0
Received 3 Likes
on
3 Posts
Going to Install Outlaw spacers and clean my EGR port tomm..Suggestions??
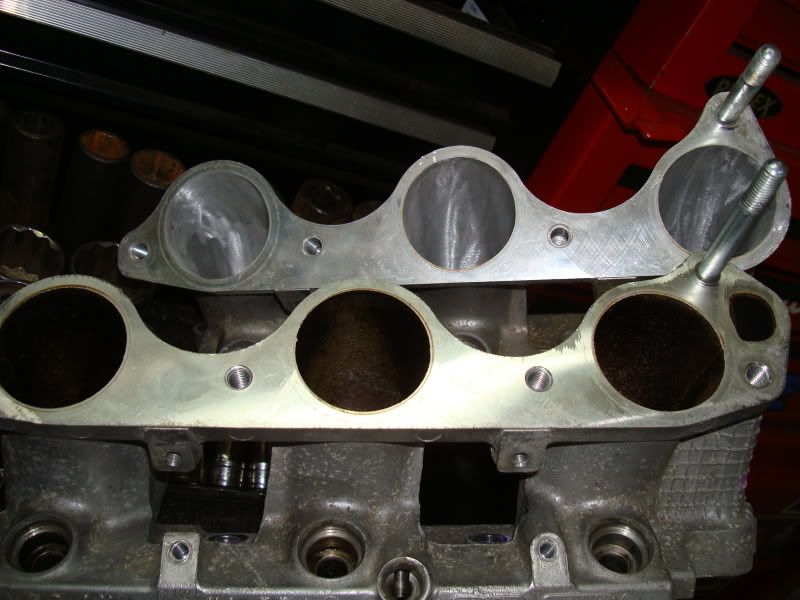
I am gonna install my Outlaw Engineering ThermoBlok SPACER KIT and clean my EGR port on my J32A2 tommorrow. Read some DIY and got the HElms manual and borrowed a torque wrench (electronic) so I know I am torqueing the screws down to what they need to be w/o stripping them. I usally do it the german way (GOODANDTIGHT) but dont wanna mess around stripping the treads on the manifold. I have all the tools ready and everything ready!
I just wanted to know if anyone had any pointers for me..??
What product would be best to clean out the egr port, should i just pour some seafoam down there and let it sit or is there something better?
What should I use to clean the gasket sealing surface?
What products should I use to clean deposits from the intake ports and lower manifold?
I read some DIY on here and the where GREAT, but if anyone has any insight or "TIPS" i would greatly apreciate it..
I am no mechanic I try to do all my own stuff, I do brakes , installed CAI and stuff like that but i never did anything like this so I'm a little weary but am gonna jump in head first thanks to u guys and my trusty Helms manual!
 06-09-2009, 05:24 PM
#2
Safety Car
iTrader: (5)

I usually put the whole intake manifold in a bucket of parts washer fluid and use a wire brush and have at it.
Brake parts cleaner works as well with multiple toothbrushes as an alternative.
It is a pain to clean but will be worth it. While you are at it. Pull the runners out and clean those up as well.
Pulling everything apart is definately easy. Helms manual will be a big help.
Best of luck and hope to hear good results
06-09-2009, 05:42 PM
#3
COTM Coordinator
Basically what jCharged said, its gonna tke some time and effort. But well worth it, it was one of the first things I did to my tl when I got it, cleaning not the spacers.
Good luck and have fun getting dirty.
Good luck and have fun getting dirty.
06-09-2009, 05:47 PM
#4
B A N N E D
Thread Starter
iTrader: (1)
Join Date: Feb 2001
Location: The grande.. Riverdale NJ.. Hopefully moving to skyline village in Lincoln park NJ..yes dirty jersey
Age: 45
Posts: 4,657
Likes: 0
Received 3 Likes
on
3 Posts
I usually put the whole intake manifold in a bucket of parts washer fluid and use a wire brush and have at it.
Brake parts cleaner works as well with multiple toothbrushes as an alternative.
It is a pain to clean but will be worth it. While you are at it. Pull the runners out and clean those up as well.
Pulling everything apart is definately easy. Helms manual will be a big help.
Best of luck and hope to hear good results
Brake parts cleaner works as well with multiple toothbrushes as an alternative.
It is a pain to clean but will be worth it. While you are at it. Pull the runners out and clean those up as well.
Pulling everything apart is definately easy. Helms manual will be a big help.
Best of luck and hope to hear good results
When u say "runners" do u mean the fuel rail?
If not what r the runners?
Sorry 4 my stupidity!
06-09-2009, 07:02 PM
#5

to clean the manifold you set it throat up and run cleaner thru there and each tube that would go to a cylinder- those are the intake runners
Then you turn it throat down to drain and repeat washing each egr port and runner as best you can- rinse both directions with water
Wont get everything- dont worry about it
Seafoam- Deep Creep (seafoam aerosol can) will soften the crud -if you let it sit overnight there will be little scrubbing required
The intake must be FREE OF ANY WATER BEFORE INSTALL- CAN CAUSE SERIOUS ENGINE DAMAGE- use compressed air- a hair dryer- turn the manifold every direction and shake
Turn the TB over to remove the 2 screws and cover to the IACV- lift out the thing and seafoam spray it all clean
wipe up residue and put back together
Spray the TB 3" plate inside itself- use throttle mechanism to move it and clean backside and edges- carb cleaner is fine for this or seafoam
May require toothbrush to get it all off- this area is important to get clean
Seafoam the intake and gas tank so the injectors, valves, and pistons are clean and working at their best
BEFORE you take anything apart- test the torque wrench! must know if its accurate~
set it to 16 and try to tighten bolt- it should click immediatly, try a few pounds up and down to confirm its accurate on a few bolts
Note- set torque wrench to 10 pounds when stored- slight spring tension helps maintain its accuracy- thats per the Snap On tool man
Last edited by 01tl4tl; 06-09-2009 at 07:04 PM.
06-09-2009, 07:04 PM
#6
read the DIY again- look at your car- realize the diy shows a 99- and there are subtle differances...

Trending Topics

 06-09-2009, 08:34 PM
#9
COTM Coordinator
oh and when you re-install the fuel rails please be sure to put vaseline or some kind of lube on the injector o-rings or you will be cussing at your car wondering why it smells like gas inside the cabin.
06-09-2009, 09:48 PM
#10
B A N N E D
Thread Starter
iTrader: (1)
Join Date: Feb 2001
Location: The grande.. Riverdale NJ.. Hopefully moving to skyline village in Lincoln park NJ..yes dirty jersey
Age: 45
Posts: 4,657
Likes: 0
Received 3 Likes
on
3 Posts
clue , I ordered it from there website, I belive heeltoe also sells there product.
Jcharged So I should take those off and soak them in some seafoam or other cleaning product also?
01TL04TL - u r da man u are full of knowledge about these cars, so how many cans of Deep Creep do u think I sould have on stand bye. Do u know any names of other good cleaning products that can get the egr, runners, cylynder tubes and TB?
Can I use the same thing to clean them all or should I buy a dirr product to clean the EGR port, runner, TB ect. ect.. If u can list a couple of good products i can find at any chain part store that would be GReat and how many cans of each I need and where to use which cleaner..
06-09-2009, 09:52 PM
#11
B A N N E D
Thread Starter
iTrader: (1)
Join Date: Feb 2001
Location: The grande.. Riverdale NJ.. Hopefully moving to skyline village in Lincoln park NJ..yes dirty jersey
Age: 45
Posts: 4,657
Likes: 0
Received 3 Likes
on
3 Posts
I have all the tools ready , some bolts to plug the coolant lines ready, and diff color zip ties im gonna zip around each diff tube and take pics b4 i start dissasembling so I know which hose goes where when re-assembling.
I think all I need is the cleaner, so if u guys can help me out w/that and lemme know a couple of the best ones to pick up that would be awsome..
U TL guys sure know your Sh()t!!!
Thanks!!
I think all I need is the cleaner, so if u guys can help me out w/that and lemme know a couple of the best ones to pick up that would be awsome..
U TL guys sure know your Sh()t!!!
Thanks!!
06-09-2009, 09:53 PM
#12
B A N N E D
Thread Starter
iTrader: (1)
Join Date: Feb 2001
Location: The grande.. Riverdale NJ.. Hopefully moving to skyline village in Lincoln park NJ..yes dirty jersey
Age: 45
Posts: 4,657
Likes: 0
Received 3 Likes
on
3 Posts
also when i take the runners off what LBS should I torque those back at when re-installing 14-16LBs?
 is that why?
06-10-2009, 04:04 AM
is that why?
06-10-2009, 04:04 AM
#14
If the instructions dont have the torque spec- and to verify anyway,
Use the torque wrench to see where they are at now
Simply start at 10 pounds, if no click when you pull its higher than that- go to 12- 14- 16 click!
Now you now where they are set from the factory robot
most people report 3 cans or carb cleaner to do the manifold and TB, same product can be used everywhere
Deep creep is easy to use for seafoam treatment with before disassembly
Let the engine do some of the work for you!
Then for cleaning parts, a can of Deep Creep or foam, and 2 cans carb cleaner should be fine-
A plastic spray bottle makes your own Deep Creep if not in your parts store
06-10-2009, 04:08 AM
#15
If outlaws site is blocked on your system- call Josh- Excelerate
He has them in stock or is very near the factory to pick up more!
He has them in stock or is very near the factory to pick up more!
06-10-2009, 09:41 AM
#16
B A N N E D
Thread Starter
iTrader: (1)
Join Date: Feb 2001
Location: The grande.. Riverdale NJ.. Hopefully moving to skyline village in Lincoln park NJ..yes dirty jersey
Age: 45
Posts: 4,657
Likes: 0
Received 3 Likes
on
3 Posts
Ok guys im ready to jump in...
Just bought :
2 bottles of Gumout Carb+Choke Cleaner
1 bottle of STP throttle body + air intake cleaner
1 bottle of Sea Foam fast acting Deep Creep (stuffs expensive $9.99)
1 hi temp gasket sealant
all for about $25
Wish me LUCK!
Just bought :
2 bottles of Gumout Carb+Choke Cleaner
1 bottle of STP throttle body + air intake cleaner
1 bottle of Sea Foam fast acting Deep Creep (stuffs expensive $9.99)
1 hi temp gasket sealant
all for about $25
Wish me LUCK!
06-10-2009, 11:01 AM
#17
seafoam is cheap once you see how well it works!
you didnt need the STP- carb cleaner is ok to use in our TB
you didnt need the STP- carb cleaner is ok to use in our TB
06-10-2009, 12:55 PM
#18
B A N N E D
Thread Starter
iTrader: (1)
Join Date: Feb 2001
Location: The grande.. Riverdale NJ.. Hopefully moving to skyline village in Lincoln park NJ..yes dirty jersey
Age: 45
Posts: 4,657
Likes: 0
Received 3 Likes
on
3 Posts
Im taking a break and reading the DIY again, so far my trottle body is spotless, and still woring on my manifold, screw the runner ill let them be dirty for now..
This is a work out!
This is a work out!
06-10-2009, 01:40 PM
#19
Traded in my

Keep at it bro..its worth it!
Wish I had bought the spacers tho..but I couldn't find em. Outlaw's site is blocke for me too and all Excelerate showed was TB spacer
06-10-2009, 02:16 PM
#20
B A N N E D
Thread Starter
iTrader: (1)
Join Date: Feb 2001
Location: The grande.. Riverdale NJ.. Hopefully moving to skyline village in Lincoln park NJ..yes dirty jersey
Age: 45
Posts: 4,657
Likes: 0
Received 3 Likes
on
3 Posts
dUDE break # 2 just finish dring everything, gotta be dry inside and out and gonna get back to start putting it back together in like 15 min will let u guys know if it starts when im done!
06-10-2009, 03:26 PM
#21
B A N N E D
Thread Starter
iTrader: (1)
Join Date: Feb 2001
Location: The grande.. Riverdale NJ.. Hopefully moving to skyline village in Lincoln park NJ..yes dirty jersey
Age: 45
Posts: 4,657
Likes: 0
Received 3 Likes
on
3 Posts
OK im done and the car started right up no problem//..
The rpms jumped for a sec then came back down to normal..
The only problem is the VSA the ! light came on but car sounds good.. Have not drove it yet but will take a quick cruise..
Anyone do this and have there lights turn on after doing this!
The rpms jumped for a sec then came back down to normal..
The only problem is the VSA the ! light came on but car sounds good.. Have not drove it yet but will take a quick cruise..
Anyone do this and have there lights turn on after doing this!
06-10-2009, 03:30 PM
#22
B A N N E D
Thread Starter
iTrader: (1)
Join Date: Feb 2001
Location: The grande.. Riverdale NJ.. Hopefully moving to skyline village in Lincoln park NJ..yes dirty jersey
Age: 45
Posts: 4,657
Likes: 0
Received 3 Likes
on
3 Posts
Help from all you guys that took apart in intake manifold to clean EGR port!
As some of you guys may know I just took apart my engine cleaned everything out up inside there and install spacers tb and IM spacers...
Did EVERYthing by the book and drid everything COMPLETely...
IT sounds like it runs fine no wierd noises (except the purge soleniod) but thats a didd story..
When i started the car up the rpms started high and bounced around for a min but came down to normal BUT the VSA light and ! ar bright orange now..
What can that be from..
Please help ...
I HOPE I DIDNT F'' up my car...
Thanks!
06-10-2009, 04:07 PM
#23
B A N N E D
Thread Starter
iTrader: (1)
Join Date: Feb 2001
Location: The grande.. Riverdale NJ.. Hopefully moving to skyline village in Lincoln park NJ..yes dirty jersey
Age: 45
Posts: 4,657
Likes: 0
Received 3 Likes
on
3 Posts
Nevermind everything is COOL i forgot to hook up a really small hose closest to the actulator in back of the engine and a plug near the cai..
Now its good to go all codes cleared!
Now its good to go all codes cleared!
06-10-2009, 05:57 PM
#26
B A N N E D
Thread Starter
iTrader: (1)
Join Date: Feb 2001
Location: The grande.. Riverdale NJ.. Hopefully moving to skyline village in Lincoln park NJ..yes dirty jersey
Age: 45
Posts: 4,657
Likes: 0
Received 3 Likes
on
3 Posts
I got it working the plug closest to the CAI on the TB was dissconnected and a small hose near the actulator on the back of the IM was also dissconnected.
I drove it for a minate and seems to respond better and it idles 200 RPMs lower .
It used to idle at like 900-1000RPMS and now it Idles at like 750..
I will open her up tommorrow and let u guys know what I think..
The whole job took me like 4-5 hours.. 2 of the hours was works and 2-3 hours was spraying / brushing rinsing/ spraying / cleaning..then waiting for everything to dry..
It was pretty easy didnt need any power tools or anything, and there was alot caked up under the first plate and the inside on the type-s is like a TB ar a certain RPMS the wire pulls the flaps open to let in more air, that was caked up all around the flaps..
Overall i got 1 blister on my thumb from holding the TB open to clean it but I am VERY happy with the work.. It was well worth it cuz even if i really dont feel a difference i know i did good for the engine cuz there was more then a shotglass full of the black crud that came off the IM, so it has to help the engine getting alll the piled up gook up out of there!
06-10-2009, 06:53 PM
#27
2003 TL-p
i did mine a few days ago, i was pulling finger fulls of gunk out of my egr ports and IM. i didnt do my runners. did another seafoam as well after everything was back together. also cleaned out the idle control valve
my engine runs much smoother and has much better response. it idles very nicely now and not high rpm like it used to. took me about 6 hours i believe with a few breaks. i am very pleased.
everyone needs to do this
my next fill up i have STP fuel injection cleaner that will go in the tank. hopefully i can get a tank of Shell v-power. woot woot
06-11-2009, 12:31 AM
#28
use the fuel cleaner at its max allowed dosage- that will be cleaning strength
Example- bottle says treats up to 21 gallons and the fine print says minimum 8 gallons- you pour it into half a tank of gas ~8 gallons
Got to look at all those pics you took of unit assembled and marked when putting it back together <g>
Example- bottle says treats up to 21 gallons and the fine print says minimum 8 gallons- you pour it into half a tank of gas ~8 gallons
Got to look at all those pics you took of unit assembled and marked when putting it back together <g>
06-11-2009, 08:58 AM
#30
B A N N E D
Thread Starter
iTrader: (1)
Join Date: Feb 2001
Location: The grande.. Riverdale NJ.. Hopefully moving to skyline village in Lincoln park NJ..yes dirty jersey
Age: 45
Posts: 4,657
Likes: 0
Received 3 Likes
on
3 Posts
I would recomend everyone do this with the DIY on here and the instructions that came with the spacers it was pretty easy and car seems to respond better and idle quiter.
I only went into my helms manual for 1 think to get the wire for the cruise and trottle off. I thought i would have to take that whole plate of with phillips head cus the wire didnt fit through the opening..But i didnt realize i had to scew the one screw all the way back to get it to fit..DUH...But other then that it was easy... U do need 2 people to slide the TB off cuz u gotta bring it strait up .. the hardes this is cleaning all the crap out some of that stuff is really caked up in there, then waiting for everything to dry, compressed air helped alot with this..
If anyone has questions while its still fresh in my mind let me know!
06-11-2009, 10:40 AM
#31
Be sure to check the freeplay in the throttle cables- should be a slight finger pressure of freeplay and TB plate be flat when throttle is wide open
You dont notice a huge differance until its over 100F outside and you are at 5000 feet, and your car is running like its 59 at sea level
In traffic it shows off too, manifold doesnt get heat soaked from rising hot air and then heat the air inside- reducing performance
You dont notice a huge differance until its over 100F outside and you are at 5000 feet, and your car is running like its 59 at sea level
In traffic it shows off too, manifold doesnt get heat soaked from rising hot air and then heat the air inside- reducing performance

Thread
Thread Starter
Forum
Replies
Last Post
jmoney2001
Car Parts for Sale
0
09-11-2015 12:07 PM