Going to drop my car myself.. Need help (Kris)
 07-31-2007, 05:56 PM
#1
Burning Brakes
Thread Starter
Going to drop my car myself.. Need help (Kris)
Kris, I'm going to be picking up some Tein S-Tech springs tonight and will be installing them myself. I will also be renting some spring compressors from Auto Zone, so I should be ok in that area.
I was searching to see if there was a DIY Car Lowering, but didn't find anything. Anybody have something similar or have details as to which bolts has to come out and any important info I need to know before I make this bad boy sit low?
I've dropped civics before, so I do know how to lower a car. Just wanna make sure I get everything down because this is a much more important car, and I just can't mess up. Thanks in advance.
 07-31-2007, 05:59 PM
#2
Racer
If you've dropped civics before this should be easy. The only thing is that you have to take out the back seats for the rears, but otherwise it's pretty much the same. Drop the shocks and switch out the springs.
07-31-2007, 06:07 PM
#4
Senior Moderator
If you have done civics before this isnt any harder. you have to remove the rear seat to get to the rear bolts, but thats not hard at all.
oh and so that you dont have to mess with the rear sway bar endlinks, just unbolt the bracket that the endlink bolts to and swing it out of the way
http://www.cardomain.com/ride/184466/7
oh and so that you dont have to mess with the rear sway bar endlinks, just unbolt the bracket that the endlink bolts to and swing it out of the way
http://www.cardomain.com/ride/184466/7
07-31-2007, 06:07 PM
#5

I heard there is a small cover flap behind the rear headrest- if so- a long extension gets a socket into the right area to get the top nuts- you may have to loosen but not remove seatback-
I could be wrong SO
look in DIY section at top of forum - there are writeups on shock install
Be careful with the compressor- verify all the tabs are solid- no welds broken- edge missing etc- or trip to emergency room hampers install in 1 night plan
I could be wrong SO
look in DIY section at top of forum - there are writeups on shock install
Be careful with the compressor- verify all the tabs are solid- no welds broken- edge missing etc- or trip to emergency room hampers install in 1 night plan
07-31-2007, 07:25 PM
#7
Senior Moderator
Originally Posted by 01tl4tl
I heard there is a small cover flap behind the rear headrest- if so- a long extension gets a socket into the right area to get the top nuts- you may have to loosen but not remove seatback-
I could be wrong SO
look in DIY section at top of forum - there are writeups on shock install
Be careful with the compressor- verify all the tabs are solid- no welds broken- edge missing etc- or trip to emergency room hampers install in 1 night plan
I could be wrong SO
look in DIY section at top of forum - there are writeups on shock install
Be careful with the compressor- verify all the tabs are solid- no welds broken- edge missing etc- or trip to emergency room hampers install in 1 night plan
Trending Topics
07-31-2007, 08:48 PM
#8
Doh
Third time today I had no idea what I was talking about
At least thats a first
rofl
Third time today I had no idea what I was talking about
At least thats a first
rofl
07-31-2007, 09:17 PM
#9
Senior Moderator
I've seen it done when I had the Comptech springs installed and when the Comptechs got replaced by the Tein springs. Seems like an easy job, provided you have the right tools (lift, air tools, compressor, etc) The rear seat goes ... but having a friend to help you with that would be a great help.
Be a sport and post pics!
Be a sport and post pics!
08-01-2007, 11:07 AM
#10
Burning Brakes
Thread Starter

Originally Posted by derrick
I've seen it done when I had the Comptech springs installed and when the Comptechs got replaced by the Tein springs. Seems like an easy job, provided you have the right tools (lift, air tools, compressor, etc) The rear seat goes ... but having a friend to help you with that would be a great help.
Be a sport and post pics!
Be a sport and post pics!
Just picked up the springs last night. I wish it was saturday already so I can lower my car. Can't wait. Wish me luck
08-01-2007, 12:49 PM
#11
Burning Brakes

dont forget to trim the bump stops, and seat the springs right.
also after you bolt it all back in, retighten all the upper pirch bolts when the suspension has a load on it and is on the ground.
also after you bolt it all back in, retighten all the upper pirch bolts when the suspension has a load on it and is on the ground.
08-01-2007, 12:53 PM
#12
Racer

Join Date: Jul 2003
Location: NYC
Age: 52
Posts: 282
Likes: 0
Received 0 Likes
on
0 Posts
Be very careful removing the rear seat...there are metal tabs at the bottom and will scratch/rip your beautiful leather seats or paint. It happened to me the first time.
08-01-2007, 01:24 PM
#13
Burning Brakes
Thread Starter
Originally Posted by JMAL
dont forget to trim the bump stops, and seat the springs right.
also after you bolt it all back in, retighten all the upper pirch bolts when the suspension has a load on it and is on the ground.
also after you bolt it all back in, retighten all the upper pirch bolts when the suspension has a load on it and is on the ground.
08-01-2007, 01:34 PM
#14
Burning Brakes
bump stops are the rubber bumpers that keep the shock from compressing out of the ride height range. you have to trim it a little (about 1", 2" or so) to handle the lower ride height. the perch bolts are the ones that bolt the top of the shock assembly to the car. also make sure the top of the shock rod is securely tightened through the bushing at the top of the perch.
08-02-2007, 03:29 PM
#16
Burning Brakes
Thread Starter
Originally Posted by JMAL
bump stops are the rubber bumpers that keep the shock from compressing out of the ride height range. you have to trim it a little (about 1", 2" or so) to handle the lower ride height. the perch bolts are the ones that bolt the top of the shock assembly to the car. also make sure the top of the shock rod is securely tightened through the bushing at the top of the perch.
Would you happen to have a pic of the rubber bump? I'm looking at this this from Tein and it says to cut off .6 inches for the front and 1.3 inches for the back.
08-02-2007, 04:34 PM
#18
Burning Brakes
Thread Starter
ok, thanks man. that's a lot of help. i do see something that resembles this on the diagram that tein has on their instruction sheet. Anyways, just trim that suggested size off the bottom right?
08-02-2007, 05:27 PM
#21
Burning Brakes
if ur using aftermarket shocks, trim the front to 1" also. remember to pull them off then cut. my friend tried to trim his with out taking all the way off and scraped up his rods pretty bad.
08-02-2007, 05:40 PM
#22
Burning Brakes
Thread Starter
i'll be using my stock shocks. Another question, on the spring itself, there's a brownish cover on some portions of the spring, is there a reason why the entire spring isn't covered?
08-02-2007, 06:02 PM
#23
just be careful or this my happen to you......https://acurazine.com/forums/showthread.php?t=153933......
08-02-2007, 09:55 PM
#25
Senior Moderator
Originally Posted by myTaLizaS3.2
i'll be using my stock shocks. Another question, on the spring itself, there's a brownish cover on some portions of the spring, is there a reason why the entire spring isn't covered?
08-03-2007, 02:03 PM
#26
02 WDP type-S Navi

wow seems like everyones lending their suggestions, as I recall don't u need a rubber mallet to get the rear shock out? tap the bolt out on the bottom of the shock? The best way to be safe when unbolting your shock with the spring compressors on, aim the top of the shock right against the street curb or a concrete wall incase the compressors fail on u and undo the nut with a open ended wrench
08-03-2007, 02:55 PM
#27
Burning Brakes
Thread Starter
thanks for all the input and advice. I will be doing this first thing tomorrow morning. I will also be taking lots of pics for anybody else who plans do lower their car in the future.
08-04-2007, 01:23 PM
#28
Burning Brakes
Thread Starter
hey, i'm in the middle of dropping my car.. got one question. the rubber bump stop that i have to cut, can someone tell me where to cut?
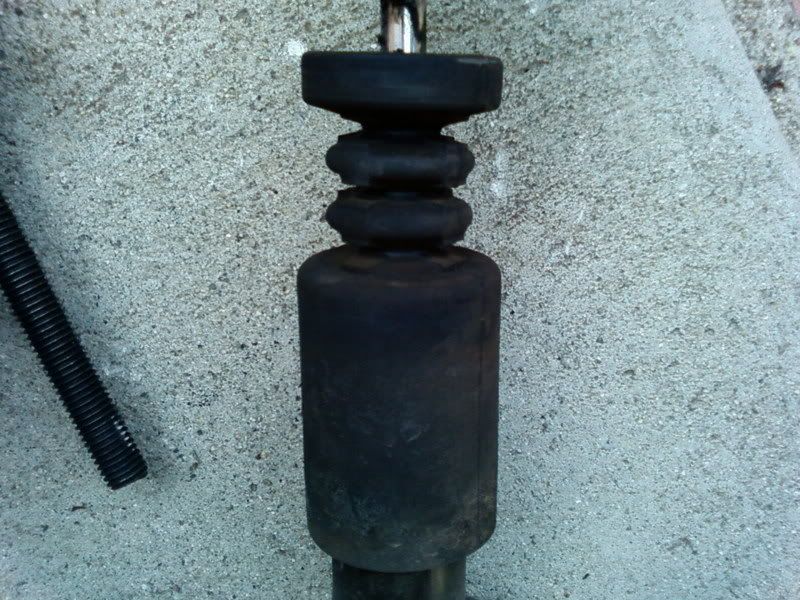
this thing is long as hell
this thing is long as hell
08-04-2007, 01:48 PM
#29
It appears the bottem has a more solid base correct? cut from that end
Dont mess with the tiers at the top
Dont mess with the tiers at the top
08-04-2007, 02:07 PM
#30
Burning Brakes
Thread Starter
the bottom is just a boot that covers the piston..dont i just cut the top? is it ok to leave the piston uncovered? if not, then i have to cut from the top..
08-04-2007, 02:16 PM
#31
The dust boot is just that, so if removed keep the shock shafts clean and no sweat.
cut where-ever is most solid and if one end has to fit exact to its perch or stop- cut the other end!
Now I see why coilovers pre-assembled by Marcus are so popular!
cut where-ever is most solid and if one end has to fit exact to its perch or stop- cut the other end!
Now I see why coilovers pre-assembled by Marcus are so popular!
08-04-2007, 02:17 PM
#32
Make sure you remove the stop from the strut before cutting it
or face horrible scarring on the smooth polished shaft- rubber seals inside-
warning danger use caution
or face horrible scarring on the smooth polished shaft- rubber seals inside-
warning danger use caution
08-04-2007, 04:54 PM
#34
Burning Brakes
Thread Starter
thanks...
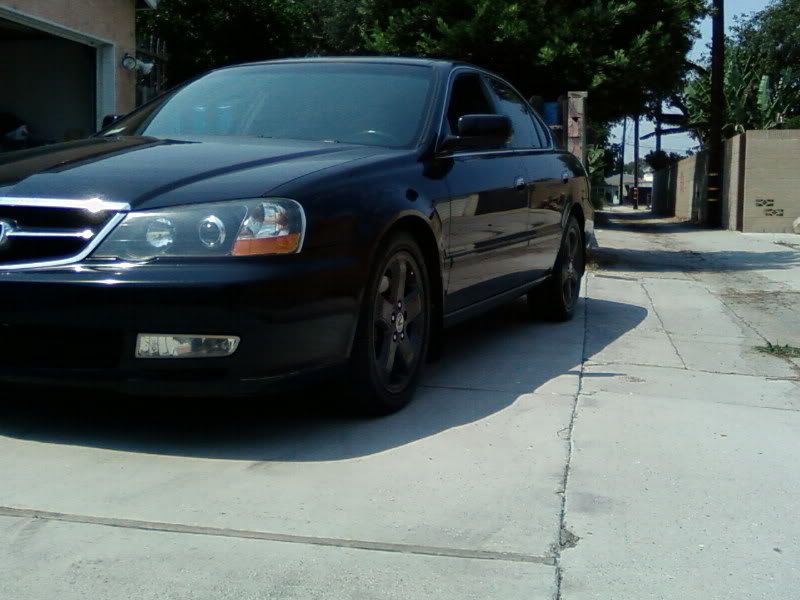
what I did was just cut one portion of the bump in the middle. I still wanted that boot to be there just because I really didn't have to take it out. But i did just leave it on there and cut it with caution. No problem at all.
here's a pic with the middle portion of the bump stop cut off and seperated from the top and boot portion..
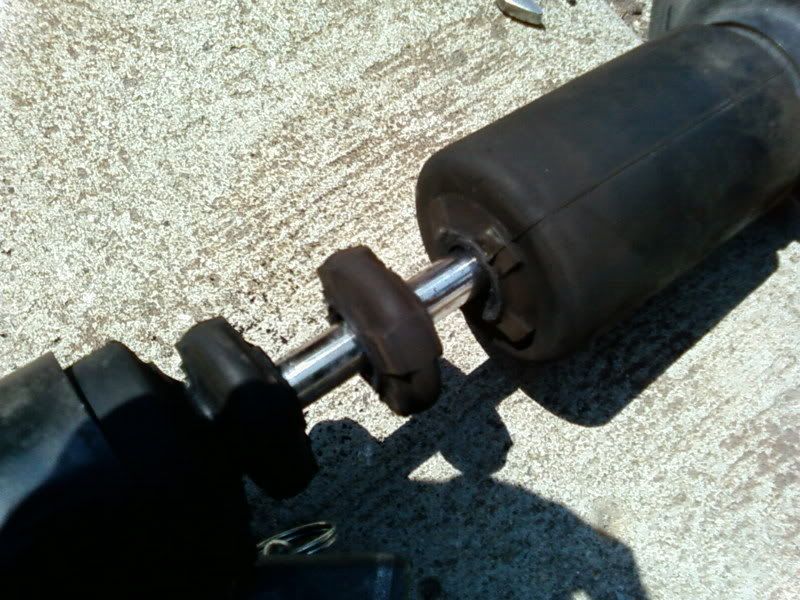
Voila, it's on..

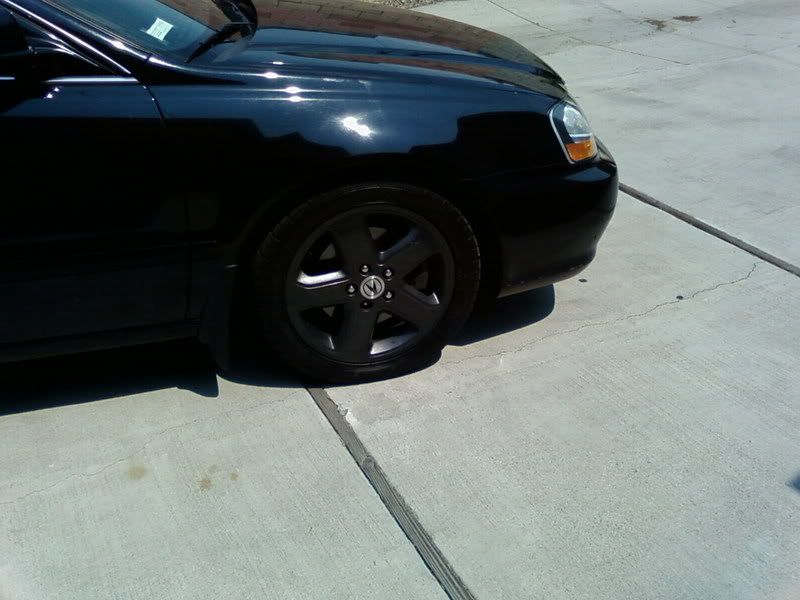
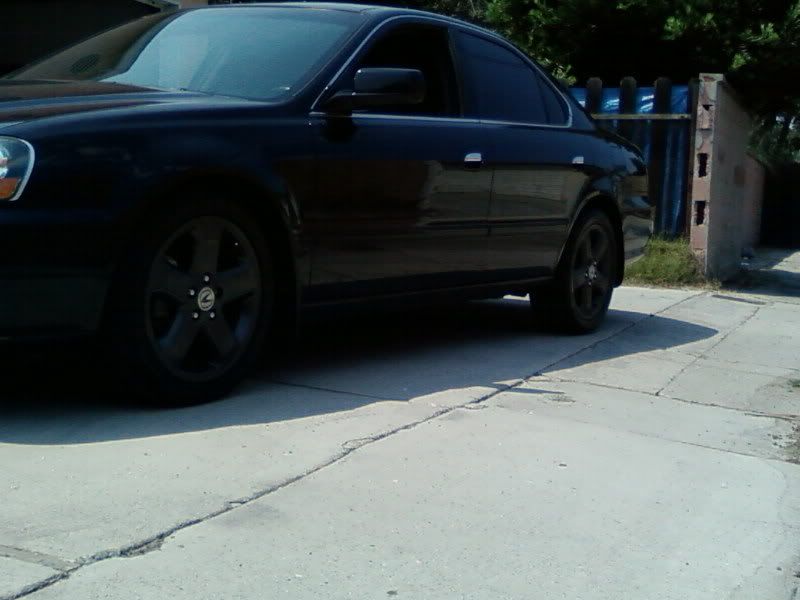
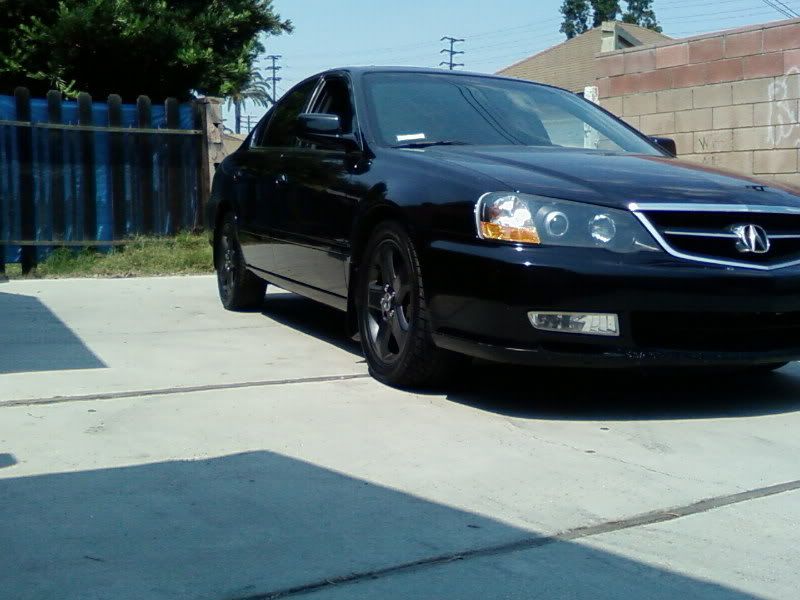
i got the two front ones done.. man...that was a lot of work. but WORTH IT!!! Looks great for only the fronts only. The next two will be finished tomorrow. my back hurts now.

what I did was just cut one portion of the bump in the middle. I still wanted that boot to be there just because I really didn't have to take it out. But i did just leave it on there and cut it with caution. No problem at all.
here's a pic with the middle portion of the bump stop cut off and seperated from the top and boot portion..
Voila, it's on..
i got the two front ones done.. man...that was a lot of work. but WORTH IT!!! Looks great for only the fronts only. The next two will be finished tomorrow. my back hurts now.
 08-04-2007, 11:51 PM
#40
Burning Brakes
Thread Starter
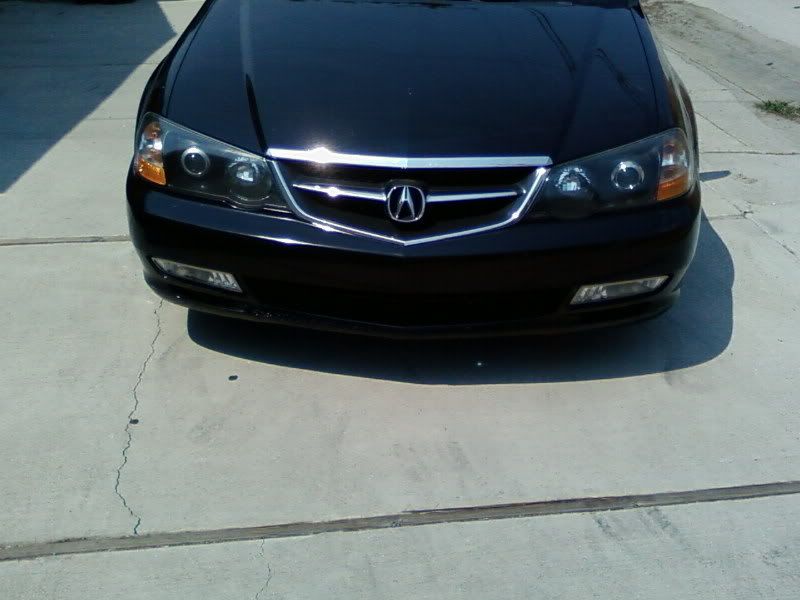
Originally Posted by FL3.2TL
Wow, very nice! I'm liking those headlights, got any closeups?

I will have final pics tomorrow for the full drop...The first spring took me 1 hour and a half to do. the second one moved along faster. haha.