
DIY: 01-03 Civic fogs on 99-01 TL
 08-23-2007, 09:37 PM
#1
DIY: 01-03 Civic fogs on 99-01 TL
DIY for 01-03 Civic Fogs on 99-01 TL
MATERIALS NEEDED:
• 01-03 Civic fogs
• Dremel w/ good metal cutting blade and sander
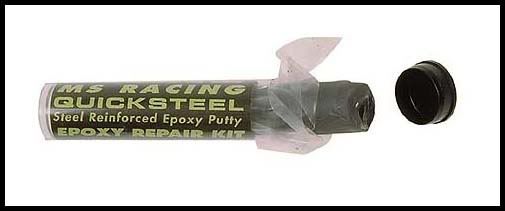
• Quicksteel or Bondo
• black silicone
• screws
• drill
INSTRUCTIONS:
(all instructions are above the picture)
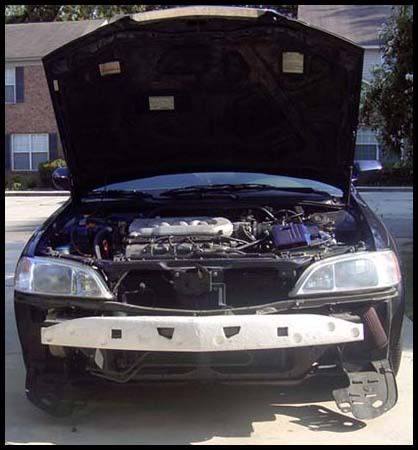
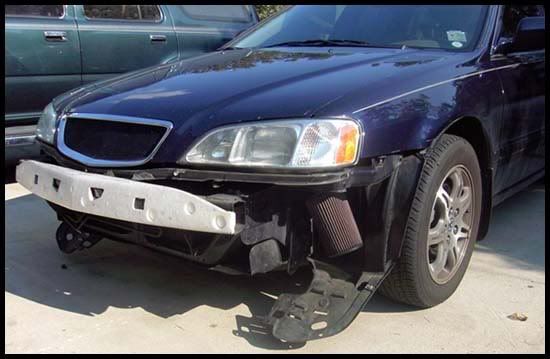
Remove the front bumper. There is a screw in each wheel well at the front. Remove all of the plastic clips from under the bumper and under the hood. There are two bolts under the hood as well.
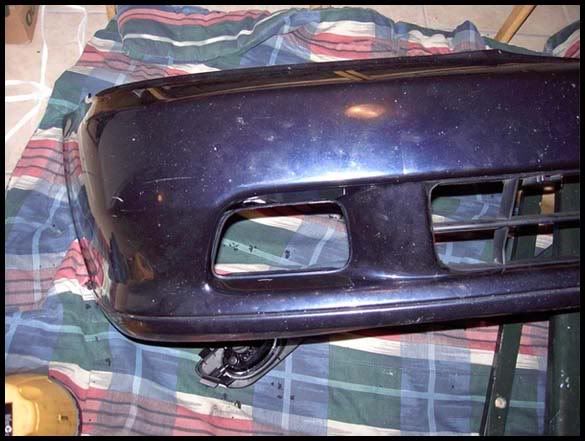
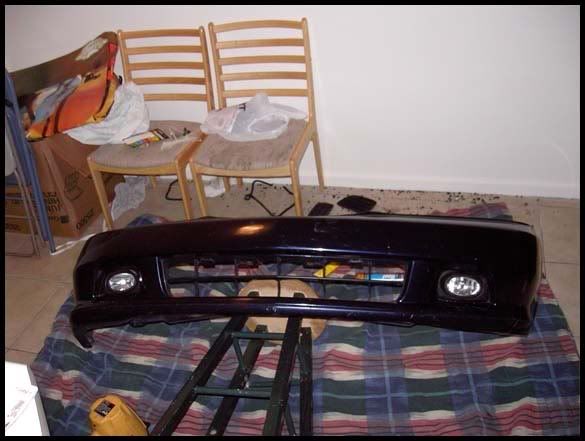
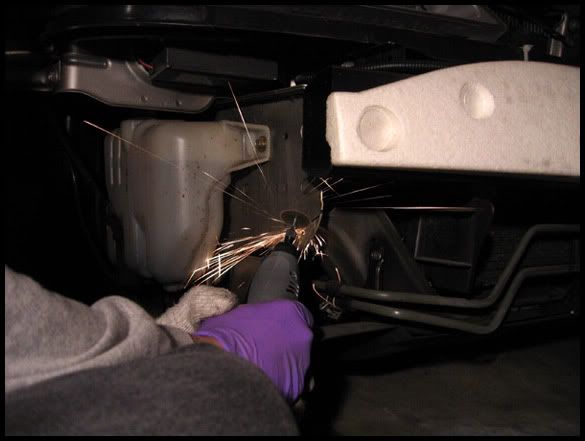
Start cutting out the pockets of the front bumper
Leave the bottom part of the pocket there to screw the fog light housing to
Test fit and slowly cut away more of the pocket as needed to have a tight fit

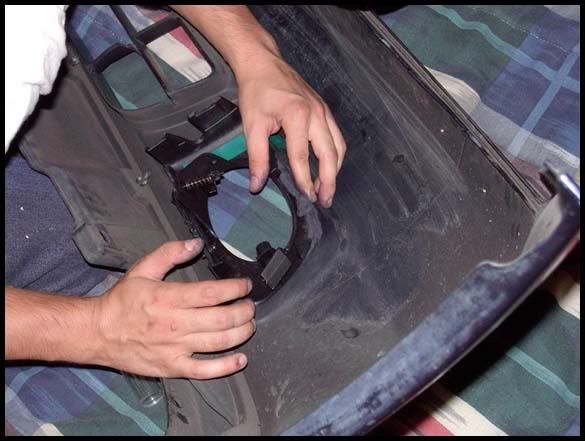
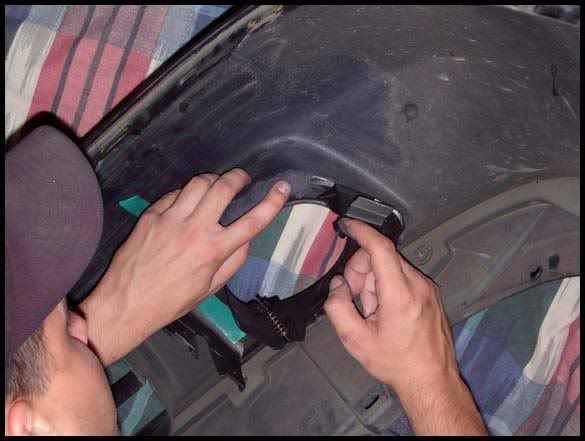
Attach the bottom or the fog light housing to the bumper with screws and make sure everything is straight
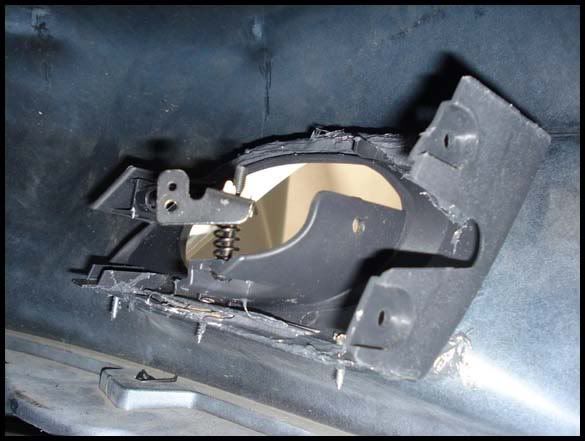
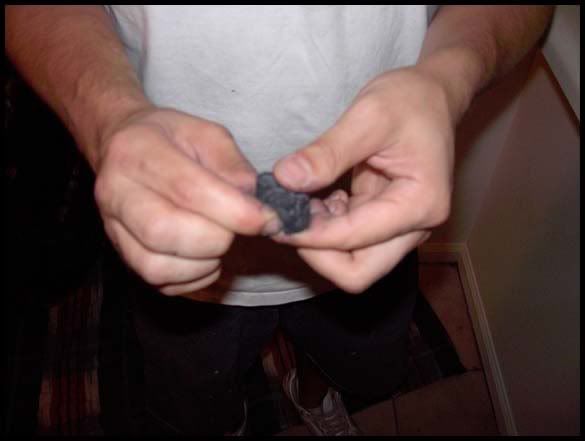
Attach the top of the housing with Quicksteel, Bondo or similar product. I used Quicksteel and it comes in a roll that you mix together to activate.
Use clamps (or green electric tape like I did) to make sure the fog housing is tight up against the bumper.
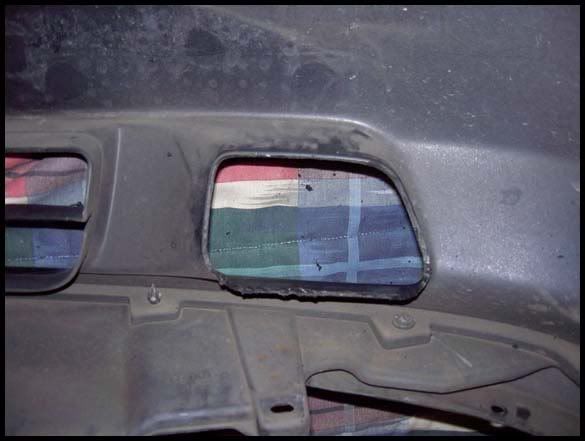
Allow the Quicksteel to dry and check for any holes between the fog housing and bumper pocket and fill those with black silicone or other sealer of your choice. I had to use roofing stuff b/c it was the only kind I could find in black. I may try to find some other stuff later, if it bothers me enough. The picture below actually magnifies it and you can’t really see it that good in person.

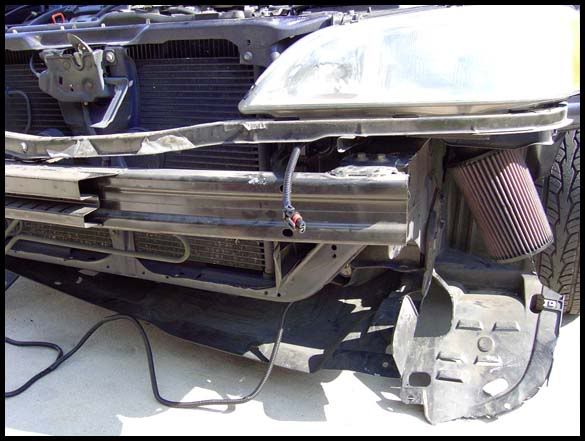
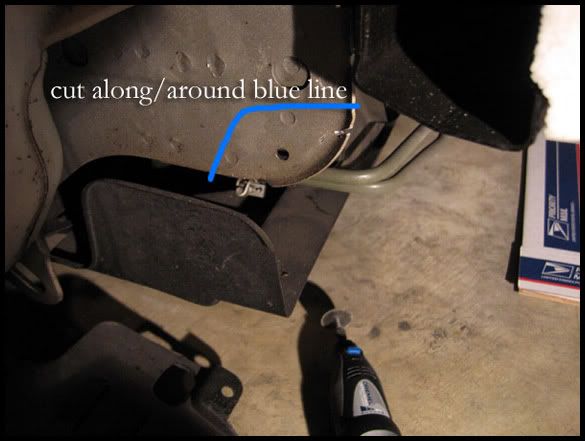
You need to cut a little notch off of the bumper that the fog housing hits when the bumper is on. You don’t need to cut out quite as much as pictured, that is from a DIY for Accord fogs. Right on the inside of that line should be fine for these.
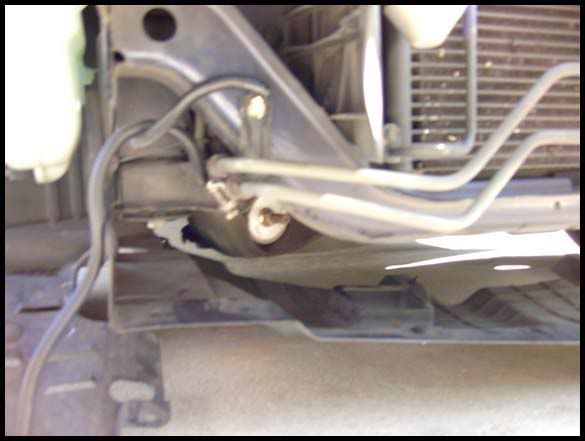
Run the wires from the front bumper where they attach to the fogs and through the engine bay and firewall and into the cabin. You will need to ground on each side of the front bumper. On the passenger side, I grounded to a random bolt by the radiator (I ran the wire below the radiator to the driver’s side). For the driver’s side, I shared the same ground that is from the negative terminal on the battery. Make sure you disconnect the negative terminal from the battery before you undo the ground to add the new one for the driver’s side fog.

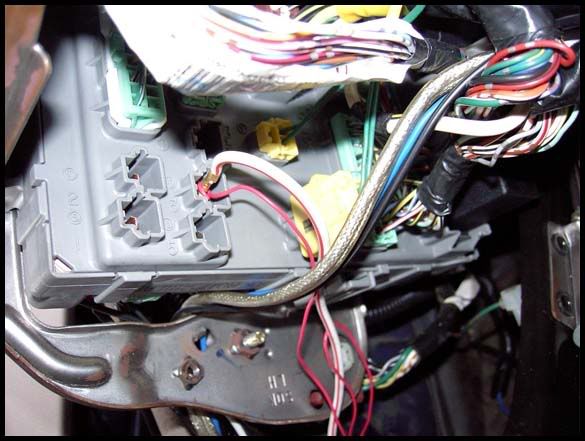
In the cabin, you will need to plug it into the socket shown to get power when the lights are turned on. The other red wire you see is one you have to add. It plugs into the same spot on the fuse box as the white wire, and the other end you have to connect to this socket, which is on the wiring harness supplied.

We haven’t really found a way to mount the switch well. salvo24 took the circuit board out of the Civic switch, and mounted it behind the blank dummy switch. You just cut a hole in the dummy switch for the little red button to stick out of.
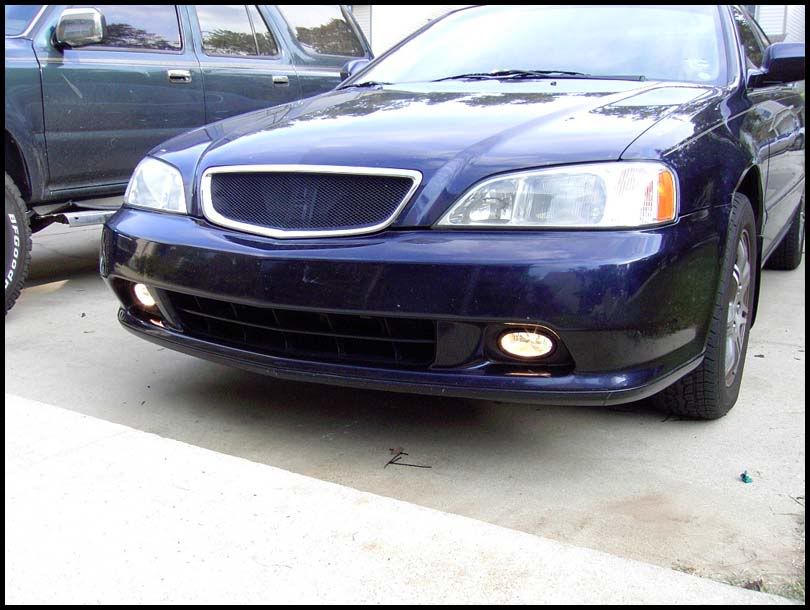
Turn everything on and enjoy!
I want to thank salvo24 and his dad for coming over and helping me figure out the wiring and showing me how to attach the housings to the bumper. We'll be able to answer any questions you may have about the install as well.
Enjoy
MATERIALS NEEDED:
• 01-03 Civic fogs
• Dremel w/ good metal cutting blade and sander
• Quicksteel or Bondo
• black silicone
• screws
• drill
INSTRUCTIONS:
(all instructions are above the picture)
Remove the front bumper. There is a screw in each wheel well at the front. Remove all of the plastic clips from under the bumper and under the hood. There are two bolts under the hood as well.
Start cutting out the pockets of the front bumper
Leave the bottom part of the pocket there to screw the fog light housing to
Test fit and slowly cut away more of the pocket as needed to have a tight fit
Attach the bottom or the fog light housing to the bumper with screws and make sure everything is straight
Attach the top of the housing with Quicksteel, Bondo or similar product. I used Quicksteel and it comes in a roll that you mix together to activate.
Use clamps (or green electric tape like I did) to make sure the fog housing is tight up against the bumper.
Allow the Quicksteel to dry and check for any holes between the fog housing and bumper pocket and fill those with black silicone or other sealer of your choice. I had to use roofing stuff b/c it was the only kind I could find in black. I may try to find some other stuff later, if it bothers me enough. The picture below actually magnifies it and you can’t really see it that good in person.
You need to cut a little notch off of the bumper that the fog housing hits when the bumper is on. You don’t need to cut out quite as much as pictured, that is from a DIY for Accord fogs. Right on the inside of that line should be fine for these.
Originally Posted by subtledreamer
and do wear your mask & goggles & gloves & long sleeve while doing this!!!
and TAKE YOUR TIME when cutting... the metal is pretty thick towards the inside.
and TAKE YOUR TIME when cutting... the metal is pretty thick towards the inside.
In the cabin, you will need to plug it into the socket shown to get power when the lights are turned on. The other red wire you see is one you have to add. It plugs into the same spot on the fuse box as the white wire, and the other end you have to connect to this socket, which is on the wiring harness supplied.
We haven’t really found a way to mount the switch well. salvo24 took the circuit board out of the Civic switch, and mounted it behind the blank dummy switch. You just cut a hole in the dummy switch for the little red button to stick out of.
Turn everything on and enjoy!
I want to thank salvo24 and his dad for coming over and helping me figure out the wiring and showing me how to attach the housings to the bumper. We'll be able to answer any questions you may have about the install as well.
Enjoy

 08-24-2007, 02:46 AM
#5
B A N N E D
Join Date: Aug 2007
Location: straight outta Saigon
Age: 56
Posts: 12
Likes: 0
Received 0 Likes
on
0 Posts
careful, you dont need to cut your frame at all.
https://acurazine.com/forums/ramblings-12/whats-acronym-mean-154393/
https://acurazine.com/forums/ramblings-12/whats-acronym-mean-154393/
08-24-2007, 08:50 AM
#7
Senior Moderator
The one thing i would recommend is not using the 2 materials you mentioned for gluing it, and get an actual plastic epoxy. It will bond and hold much stronger
Trending Topics
08-24-2007, 12:57 PM
#8
Originally Posted by eM.FoFi
careful, you dont need to cut your frame at all.
https://acurazine.com/forums/showthread.php?t=154393
https://acurazine.com/forums/showthread.php?t=154393
 08-24-2007, 12:59 PM
#9
Originally Posted by FL3.2TL
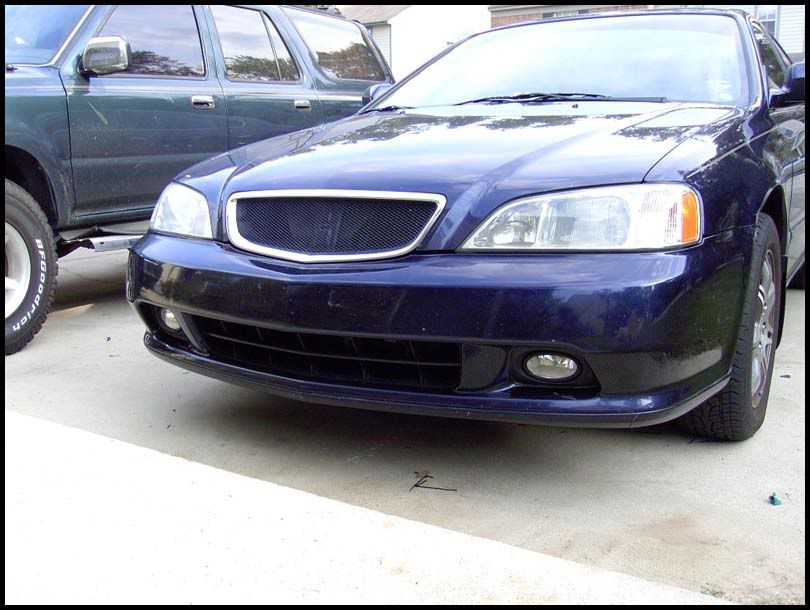
Can I get a real close up on the fog from the front of the car? And you need to get that bumper repainted dude!!
08-24-2007, 01:01 PM
#10
Originally Posted by fsttyms1
The one thing i would recommend is not using the 2 materials you mentioned for gluing it, and get an actual plastic epoxy. It will bond and hold much stronger
Everyone, you can use whatever products you want for the attaching to the bumper and sealing gaps, I just put in here what I used.
08-25-2007, 02:23 AM
#12
B A N N E D
Join Date: Aug 2007
Location: straight outta Saigon
Age: 56
Posts: 12
Likes: 0
Received 0 Likes
on
0 Posts
Originally Posted by KSuchdeve
I know what that says, but put the Civic fogs on and tell me they don't hit your frame
thats the whole reason why i tried to experiment with civic fogs instead of the accords.
08-25-2007, 03:18 AM
#13
Well it doesn't really matter if you cut this part out of the frame. It will not have any affect on the structural integrity of the car. You have to align the fog just right for it not to hit, so you may as well cut that little part out to make sure they don't no matter how you mount them
08-25-2007, 03:23 AM
#14
Racer
Join Date: Jul 2005
Location: Boston/Tallahassee
Age: 38
Posts: 392
Likes: 0
Received 0 Likes
on
0 Posts
Originally Posted by KSuchdeve
Well it doesn't really matter if you cut this part out of the frame. It will not have any affect on the structural integrity of the car. You have to align the fog just right for it not to hit, so you may as well cut that little part out to make sure they don't no matter how you mount them
I only went with the Civic fogs so I wouldn't have to cut the frame, but after figuring out where I really wanted to mount he fog housings, I went with cutting the bumper as opposed to having the fogs look shitty, basically to do it right, you need to do a little cutting.
08-25-2007, 04:17 AM
#15
B A N N E D
Join Date: Aug 2007
Location: straight outta Saigon
Age: 56
Posts: 12
Likes: 0
Received 0 Likes
on
0 Posts
hey jake, did you have to cut your frame?
btw salvo, what do you mean by cutting the frame. glad you finally got yours installed months after asking me. haha
btw salvo, what do you mean by cutting the frame. glad you finally got yours installed months after asking me. haha
09-01-2007, 10:50 PM
#16
08 Civic SI
i just ordered the fogs from ebay, i will probably tackle this next weekend. do the fogs take h11 bulbs? because im going to pick up some nice yellow bulbs for the project.
09-01-2007, 11:06 PM
#17
Yea, H11 bulbs is what it takes. The ones they come with are halogen and look pretty yellow, but if you want actual yellow, you may need to order some new ones. I am gonna end up getting hyperwhite or whatever, not much for the yellow.
09-21-2007, 04:32 AM
#18
08 Civic SI
hey do you think you could give a little more info on how you wired it? i want to do this soon but i looked at the wireharness and there is 2 grey plug in the middle that i cant seem to figure out where they connect. did you have to mod the harness at all?
09-27-2007, 04:08 PM
#23
I'm not really sure on that. Salvo24 and his pops came over to help me out with the install since I'm not good with wiring and electronics and he was testing all kinds of stuff out and the fogs needed power from there too. Can't really explain why, but they wouldn't work unless we hooked up that extra wire.
09-27-2007, 04:15 PM
#24
On the wire harness that it came along with, isn't there one end where it goes to the battery for power? I can understand the reason why they needed to draw power from the fuse, but I just figured you can do that along with the stock harness.
09-27-2007, 04:28 PM
#25
No, I didn't plug in the battery for power the only place you have to plug it in is into that place I have pictured (by the fuse box kind of under the steering wheel). Then you have to do 3 grounds (one for the switch and one for each of the fogs up front). Remember mine is a 99 so the place might be different but I'm pretty sure that it's the same place b/c Salvo24 showed me where to plug and his is a 2000.
09-27-2007, 04:35 PM
#26
ohh, i see. That's weird. Usually, they have a harness that plugs straight to the battery, then from the positive side of the battery, it runs out to the relay, and from there, connects to the passenger fog and then to the driver fog, and then into the fuse box under the dash.
I'm going to be installing some bulbs for KamikazeTL and he asked if I can install the fogs for him. Doesn't seem so hard. I made some accord fogs work with an Integra before. So I just wanted to understand the wiring part before I can do it for him.
I'm going to be installing some bulbs for KamikazeTL and he asked if I can install the fogs for him. Doesn't seem so hard. I made some accord fogs work with an Integra before. So I just wanted to understand the wiring part before I can do it for him.
09-27-2007, 05:02 PM
#28
yeah. thanks a lot man. I got one other question. I was looking at subtledreamer's DIY and I noticed that the two wires that you plugged to the fuse box, his wasn't in the same slot.. is that because he used the accord fogs?
09-27-2007, 05:07 PM
#29
Shouldn't be any different if you use the Civic fogs or not, since you are just trying to get power. The one I have it plugged into gets power when the lights are on, he might have plugged it into one that gets constant power so you don't have to have on the corner lights to have the fogs on. Get a voltage tester and try and see which plug gets power constantly or when you have the corner lights on. This is up to you.
Like I said earlier, this could also be because of the difference in years.
Like I said earlier, this could also be because of the difference in years.

 09-30-2007, 02:57 PM
#35
For which part attaching to the fog housing to the bumper? This is really up to you I guess. I think Kris mentioned a product to use on an earlier page. The Quicksteel says for plastic on the package and seems to be holding up pretty fine for me though 
08-07-2008, 12:52 PM
#36
Intermediate
Join Date: May 2008
Location: Vernon
Age: 46
Posts: 39
Likes: 0
Received 0 Likes
on
0 Posts
I just did this mod and it looks awesome. The only issues I ran into were that the 01-03 civic fogs that I got did not at all fit into the hole in the bumper and so I had to cut away the harness until it did. also the putty stick type stuff worked ok, but it is not an adhesive for plastic on plastic so keep that in mind... I also had to cut away the little bit of the frame... no way around that!
Here's what I did that is new here... I bought a 02 type-s fog light switch! it perfectly matches the blackish dash colour of my 99tl. Obviously the civic wiring harness does not match up with the Acura switch, but with a little patience, some tiny female disconnects, trial and error, and the most rudimentary wiring knowledge, I was able to make it work properly. imagine, a 99tl with an oem foglight set up inside!
I'm pretty stoked about this, if anyone wants to see some pics let me know...
08-07-2008, 01:30 PM
#37
What harness are you talking about that you had to cut away?
The Quicksteel says it's for plastic but I guess that means for metal to plastic, not plastic to plastic? Either way, it has held up pretty good for me through some pretty bad conditions.
I've been meaning to pick up that 02-03 fog light switch and hook it up. Where did you get it and how much?
You're always welcome to post pics if you want...
08-07-2008, 03:09 PM
#38
Intermediate
Join Date: May 2008
Location: Vernon
Age: 46
Posts: 39
Likes: 0
Received 0 Likes
on
0 Posts
The civic foglights come with all of the wiring, you just have to snip away the plastic connector that attaches into the civic fog light switch. You then attach the smallest female connectors you can find onto the end of each of the four wires (I can remember the actual size but they were the smallest ones). the Acura switch has five flat prongs on it that are obviously supposed to attach to an Acura plastic connector, but you just attach the four wires onto the prongs and voila!
the order is as follows (have switch facing the way it will be in the car, fog light sign on the bottom)
top prong goes to the yellow wire (from the relay) second prong is empty, the next to prongs attach to the two red power wires, and the last prong attaches to the black ground wire.
I used a similar product to the quicksteel, so I'm glad to hear that it holds up!
I ordered the Acura 02 type S switch from the Acura dealership, it was $70 Canadian.
here are some pics (the first pics I have posted by the way...)
... lol, ok I am retarded... How do I post pictures?
10-01-2008, 07:27 PM
#40
thread revival but i got a question for the OP how long exactly did it take you to finish this completely? do you think i can finish this in a day? Also for the wiring or maybe salvo can help me out on this is it just basically plug and play or do you have to do a couple of modifications to get it to work, also did you just use the original switch that came with the fogs or did you use the one from the 02-03 tls?