
Coolant Change DIY
 01-06-2012, 03:10 PM
#41

coolant drain valve on tl 3.2 block
Flushed my 3.2 today. Good DIY.....
Also, I found the block drain valve hard to break loose since there is only an awkward access. What finally worked was using the closed end of a combination wrench [12mm] while the wrench was horizontal and the other end toward the driver's side. I couldn't get enough leverage on a 12mm stubby.
Also, I found the block drain valve hard to break loose since there is only an awkward access. What finally worked was using the closed end of a combination wrench [12mm] while the wrench was horizontal and the other end toward the driver's side. I couldn't get enough leverage on a 12mm stubby.
 01-09-2012, 07:26 AM
#42
4th Gear

Join Date: Nov 2003
Location: Roswell, GA
Posts: 4
Likes: 0
Received 0 Likes
on
0 Posts
Just completed replacing all hoses, thermostat, rad cap, heater valve and drain cock on my 2001 TL. All of these components are original and almost 11 years old and so figured better safe than sorry. Unfortunately ran across the this thread after the fact. Nevertheless, it dawned on me during the hose replacement project that the absolute best way to bleed the system of air during filling is to remove the upper end of hose C (google part number 19523-P8A-A00 to see the hose I am referring to) while filling the system. This small hose connects to the top and backside of the thermostat and ensures almost all air is purged out of the system during filling. Once you see antifreeze coming out of this hose, just reconnect the hose and its clip. I only had to add about a half quart of antifreeze after a few drive sessions with no requirement for a lengthy burping session. For what it is worth I did not drain the block but still added over 5 qts of antifreeze to the system including the reservoir (I was worn out by that point � and the antifreeze in the system was not that old). That means I only missed 1 qt in the engine by not draining the block.
Good thread and hope this info helps someone else.
Good thread and hope this info helps someone else.
 05-15-2012, 01:32 PM
#44
snapfish sucks 
here they are for others who still can't see em
thanks for reposting though!
here they are for others who still can't see em
thanks for reposting though!
The following users liked this post:
jdjohn84 (05-15-2012)
05-15-2012, 01:34 PM
#45
2003 TL-S w/Navi NBP
Thread Starter

*** I'm reposting with new links to the pics ***
While doing my timing belt/water pump change, I noticed there was no DIY for a coolant change, so this is my attempt at creating one.
Since I was also changing my timing belt and water pump, I had already removed the splash shield, and had the front right wheel off. With the splash shield on, draining the radiator will be a slightly bigger mess. With the front right wheel on, accessing the drain nut on the rear of the engine block (actually right side of fwd engine) will be much more difficult.
Before grabbing any tools, get in the car and turn the ignition to the 'ON' (II) position, and turn the climate control temp all the way up to 90. This will open the heater core so that coolant inside the core will be able to drain out. Turn the ignition to 'OFF' when done.
Next, go ahead and empty the coolant reservoir. Facing the car from the front, the reservoir is located between the right end of the radiator and the battery. Unscrew the cap, pull out the hose, and then lift the reservoir up and off its bracket. Pour it out, then slide it back on its bracket.
Drain the radiator next. The radiator cap on top will need to be taken off to drain the radiator. You can remove it first, and then get a gushing flow once you loosen the drain plug on the bottom; or you can first remove the drain plug on the bottom with a dribble, and then remove the radiator cap on top for the gushing flow. You really don't want your face down there on the bottom when the flood occurs, so I recommend positioning your collection container just behind the radiator drain plug, unscrewing the drain plug, and then getting up and removing the radiator cap. Here's a pic of the white plastic drain plug on the bottom of the radiator. It just unscrews.

Once the flow becomes a slow drip, you can screw the drain plug back in. When screwing it back in, it will simply stop turning all of the sudden, and that's it. Don't try to tighten further once it stops. Dispose of the drained coolant properly...whatever that is for coolant.
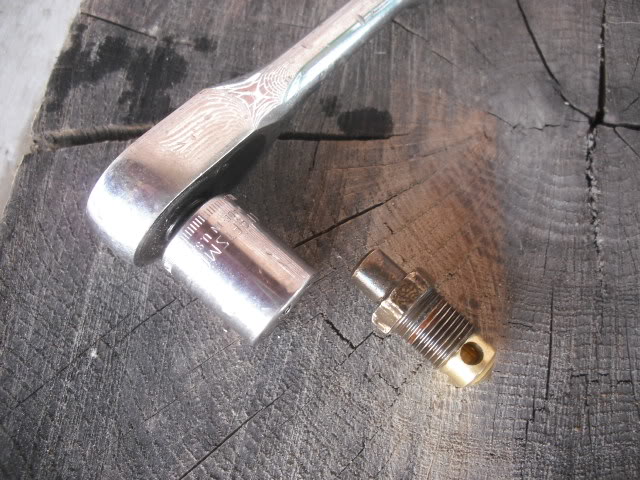
Now you're ready for the dreaded engine block drain plug. It's located on the back of the engine block, close to the firewall on the passenger side. This is actually on the side of the front-wheel drive, sideways mounted engine, but whatever. Assuming you have your front right wheel off, you can lay on the ground under the wheel, look up between the front axle/cv joint and the sway bar, and see the drain plug on the engine block. You will definitely need a flashlight. The proper support point for a jack stand is on the frame, underneath the front passenger door hinge. Here's a pic of the drain plug. It looks like a brass nipple.

As you can see, you will have to stick your hand and arm between the cv joint boot and part of the oil pump (sending unit?). Yeah, it's a tight squeeze. The smaller nut, near the tip of the nipple, is the one that has to be loosened.
Now comes the tricky part. What I found to work best was a flat 12mm wrench with a ratchet built into it. Slide it over the nut and let it hang. Then, get a length of clear vinyl tubing or rubber hose, and slip it over the nipple without disturbing the wrench hanging there. I used about 3 or 4 feet of 1/4" inner diameter (ID) clear vinyl tubing - easily obtained at Home Depot. You will want to snake the tube in from another opening rather than the same opening that your hand and arm will go through. If you reach through the opening with the tube and your hand, when you pull your hand out, you may accidentally pull the tube off the nipple. I stuck the tube up between the exhaust downpipe and the subframe, then reached through my hand/arm opening and grabbed the tube. You pretty much have to do this part totally by feel since you can't see past your arm into the darkness. Get in touch with your zen for this part as you feel around for the nipple, hose in-hand. Wait...that sounds like something else I know. Anyway, the 1/4" diameter tube slips over the nipple nice and snug. Here's a pic of the tubing over the nipple, and a 12mm wrench hanging on the nut.

Now loosen the nut with the wrench. You did put the wrench on to loosen, not tighten...right? Once it breaks free, you can easily loosen the nut further by hand, but be careful to not tug on the tube! Hey, get your mind out of the gutter. You should have the other end of the tube in your collection container, and if all goes well, you should see this.

As with draining the radiator, you will need to have the radiator cap off in order to get a good flow.
Once the flow has stopped and the tube is clear (give it a few minutes), you can remove the tube from the nipple and tighten the drain plug nut. Tighten the nipple nut (don't be a sicko) by hand first, then put your wrench on for final tightening. This nut will bottom-out when tight, so don't over do it once it bottoms out.
Dispose of this coolant, then you are ready to refill the system, OR continue with your timing belt/water pump job. Coolant capacity is about 6 qts, or one-and-a-half gallons, so you'll basically need to have two gallons of Honda coolant on-hand. Once you have replaced your water pump, or are otherwise ready to refill the system, fill the radiator up to the base of the fill neck, and also fill the reservoir tank about half-way. When re-filling the radiator, stop a few times along the way and squeeze the big radiator hoses to get as much air out as possible.
After cranking the car, check for leaks. And after coming up to temperature (i.e., the thermostat opens), and then sufficient cool down after engine shut-off, check to see if you need to top-off the radiator. I didn't need to top mine off. It seemed to take the entire 6 qts during the initial re-fill.
I hope this helps someone save a few bucks of labor!
While doing my timing belt/water pump change, I noticed there was no DIY for a coolant change, so this is my attempt at creating one.
Since I was also changing my timing belt and water pump, I had already removed the splash shield, and had the front right wheel off. With the splash shield on, draining the radiator will be a slightly bigger mess. With the front right wheel on, accessing the drain nut on the rear of the engine block (actually right side of fwd engine) will be much more difficult.
Before grabbing any tools, get in the car and turn the ignition to the 'ON' (II) position, and turn the climate control temp all the way up to 90. This will open the heater core so that coolant inside the core will be able to drain out. Turn the ignition to 'OFF' when done.
Next, go ahead and empty the coolant reservoir. Facing the car from the front, the reservoir is located between the right end of the radiator and the battery. Unscrew the cap, pull out the hose, and then lift the reservoir up and off its bracket. Pour it out, then slide it back on its bracket.
Drain the radiator next. The radiator cap on top will need to be taken off to drain the radiator. You can remove it first, and then get a gushing flow once you loosen the drain plug on the bottom; or you can first remove the drain plug on the bottom with a dribble, and then remove the radiator cap on top for the gushing flow. You really don't want your face down there on the bottom when the flood occurs, so I recommend positioning your collection container just behind the radiator drain plug, unscrewing the drain plug, and then getting up and removing the radiator cap. Here's a pic of the white plastic drain plug on the bottom of the radiator. It just unscrews.
Once the flow becomes a slow drip, you can screw the drain plug back in. When screwing it back in, it will simply stop turning all of the sudden, and that's it. Don't try to tighten further once it stops. Dispose of the drained coolant properly...whatever that is for coolant.
Now you're ready for the dreaded engine block drain plug. It's located on the back of the engine block, close to the firewall on the passenger side. This is actually on the side of the front-wheel drive, sideways mounted engine, but whatever. Assuming you have your front right wheel off, you can lay on the ground under the wheel, look up between the front axle/cv joint and the sway bar, and see the drain plug on the engine block. You will definitely need a flashlight. The proper support point for a jack stand is on the frame, underneath the front passenger door hinge. Here's a pic of the drain plug. It looks like a brass nipple.
As you can see, you will have to stick your hand and arm between the cv joint boot and part of the oil pump (sending unit?). Yeah, it's a tight squeeze. The smaller nut, near the tip of the nipple, is the one that has to be loosened.
Now comes the tricky part. What I found to work best was a flat 12mm wrench with a ratchet built into it. Slide it over the nut and let it hang. Then, get a length of clear vinyl tubing or rubber hose, and slip it over the nipple without disturbing the wrench hanging there. I used about 3 or 4 feet of 1/4" inner diameter (ID) clear vinyl tubing - easily obtained at Home Depot. You will want to snake the tube in from another opening rather than the same opening that your hand and arm will go through. If you reach through the opening with the tube and your hand, when you pull your hand out, you may accidentally pull the tube off the nipple. I stuck the tube up between the exhaust downpipe and the subframe, then reached through my hand/arm opening and grabbed the tube. You pretty much have to do this part totally by feel since you can't see past your arm into the darkness. Get in touch with your zen for this part as you feel around for the nipple, hose in-hand. Wait...that sounds like something else I know. Anyway, the 1/4" diameter tube slips over the nipple nice and snug. Here's a pic of the tubing over the nipple, and a 12mm wrench hanging on the nut.
Now loosen the nut with the wrench. You did put the wrench on to loosen, not tighten...right? Once it breaks free, you can easily loosen the nut further by hand, but be careful to not tug on the tube! Hey, get your mind out of the gutter. You should have the other end of the tube in your collection container, and if all goes well, you should see this.
As with draining the radiator, you will need to have the radiator cap off in order to get a good flow.
Once the flow has stopped and the tube is clear (give it a few minutes), you can remove the tube from the nipple and tighten the drain plug nut. Tighten the nipple nut (don't be a sicko) by hand first, then put your wrench on for final tightening. This nut will bottom-out when tight, so don't over do it once it bottoms out.
Dispose of this coolant, then you are ready to refill the system, OR continue with your timing belt/water pump job. Coolant capacity is about 6 qts, or one-and-a-half gallons, so you'll basically need to have two gallons of Honda coolant on-hand. Once you have replaced your water pump, or are otherwise ready to refill the system, fill the radiator up to the base of the fill neck, and also fill the reservoir tank about half-way. When re-filling the radiator, stop a few times along the way and squeeze the big radiator hoses to get as much air out as possible.
After cranking the car, check for leaks. And after coming up to temperature (i.e., the thermostat opens), and then sufficient cool down after engine shut-off, check to see if you need to top-off the radiator. I didn't need to top mine off. It seemed to take the entire 6 qts during the initial re-fill.
I hope this helps someone save a few bucks of labor!
05-15-2012, 02:14 PM
#47
Suzuka Master
iTrader: (1)
http://www.acuraoemparts.com/delray/...All&vinsrch=no
 05-15-2012, 04:35 PM
#49
Instructor
Everything else went according to plan.
05-15-2012, 04:48 PM
#50

One thought:
If I don't wanna touch the engine block drain plug ( difficult and need to jack up the car high ), can I drain & refill distill water for few times, say 5x, in order to "flush" all the coolant?
If I don't wanna touch the engine block drain plug ( difficult and need to jack up the car high ), can I drain & refill distill water for few times, say 5x, in order to "flush" all the coolant?
05-15-2012, 05:02 PM
#51
Not necessary to drain the block. I did it after draining the rad and maybe a half quart came out. What a waste of time. Removing the drain plug from the radiator is so simple, that you can drain the coolant more often....say every year or so. It's cheap too. So you will always have fresh coolant in there. I do it as part of my annual maintenance.
It's best not to put any water in the system. Just get the pre-mixed coolant. If your coolant is very old, then you can flush it with distilled water a couple of times. Otherwise I wouldn't bother. Just put fresh coolant in there every year or so. Your radiator will thank you.
It's best not to put any water in the system. Just get the pre-mixed coolant. If your coolant is very old, then you can flush it with distilled water a couple of times. Otherwise I wouldn't bother. Just put fresh coolant in there every year or so. Your radiator will thank you.
05-15-2012, 05:37 PM
#52
It didn't seem like 1.5 gallons came out when I opened the radiator cock and the block plug. I then flushed with water from the hose, running the engine with both plugs removed. Then I let it sit for an hour.
When I refilled, however, the car took the whole 1.5 gallons, plus the reserve tank. Plus another few ounces the next day.
I am a whole-hearted advocate of removal of both plugs.
Once every five years ain't gonna kill you.
All you have to do is jack up the car, remove a tire,
and reach above the right axle up to your elbow with a smal 12mm wrench.
The plug is softer metal than the bushing within which it is screwed, so it isn't a burden to remove.
05-18-2012, 10:34 AM
#53
2003 TL-S w/Navi NBP
Thread Starter
Just curious, when you performed your TB/water pump change back in 2010 and after you drained the engine block with the rear drain plug, was there any coolant left in the connecting pipe (#11) between the water pump and water passage (#8) when the WP was removed??
http://www.acuraoemparts.com/delray/...All&vinsrch=no
http://www.acuraoemparts.com/delray/...All&vinsrch=no
 05-18-2012, 11:07 AM
#54
2003 TL-S w/Navi NBP
Thread Starter
It's best not to put any water in the system. Just get the pre-mixed coolant. If your coolant is very old, then you can flush it with distilled water a couple of times. Otherwise I wouldn't bother. Just put fresh coolant in there every year or so. Your radiator will thank you.
Anyway, IMO running some distilled water through the system is okay. Heck, the pre-mixed stuff is half water anyway. In order to get a true flush, though, it would be necessary to run the engine a few minutes. Just draining and refilling the radiator would only change the coolant, well, in the radiator. The water pump and thermostat would prevent a full flush from occurring otherwise since the system is closed when the engine is cold. Thus, draining the block is a better solution both from a time standpoint and effectiveness. Honestly, draining the radiator is messy, and iirc, it gets coolant on some of the A/C lines and serpentine belt, so not optimal for frequent changes.
05-18-2012, 01:19 PM
#55
Suzuka Master
iTrader: (1)
When I replaced my TB, I drained the radiator only and not the block. Therefore, I wondered, had I drained the block, would that little bit in the connecting pipe still be present.
 However, now it seems it does not matter, because their will always be residual present in that pipe. I had taped a piece of long plastic across the front of the block underneath the WP down to divert the coolant spillage away from the crank sensor just in case.
 05-19-2012, 11:36 AM
#56

there is purpose to the block drain - especially first time change of coolant
In the casting process some sand is left behind--where it settles at the low point- the block drain
let that out on general good plan
just doing rad once a year? bit of a waste of material and hazmat to deal with- that often
per book (after initial 7/105) change coolant MAX every 5 years,
smart money every 3 years on coolant change -my opinion
additives in coolant go bad with age and turn acidic- in an aluminum home,,,,
anyone remember 7th grade science??
05-19-2012, 01:54 PM
#57
And I'll say it again. Engine running for five minutes with garden hose at radiator, both plugs out.
I was a little surprised no one chastised my introduction of treated water into the system.
However, we have pretty clear water here. As long as it has not rained recently,
there are minimal chemicals in the water.
Further, in the beginning of the flush, the water still had a smell to it. At the end of the flush, it was running clear. Upon refill, and system took the amount listed in the book as it's full capacity. Ergo, there was minimal tap water in the system. Any sands, crud, and such, had plenty of time to flush out.
I'll go a step further. I do not think auto manufacturers are GOD. I'd bet that sometimes solvents and such are not fully flushed from some parts before assembly. When I did the first D/F on my wife's practically-new Subaru, the trans fluid looked milky. Not healthy red. WTF was mixed in with it? Something left over from the assembly stage? Now, at 33k with two D/Fs, it looks nicer.
I feel the same way about my 167K 12yr. old Acura's radiator.
Flushed it out, replaced with OEM coolant, I'll probably never touch it again.
01-19-2014, 06:06 PM
#58
Pretty simple to do, but boy that nipple was hard to touch and harder bleed. All done.
Nice comment on the fan not cycling if the temp is set to MAX. My didn't cycle and I waited about 20 minutes with some revving. If you turn it down, then it WILL cycle.
Nice comment on the fan not cycling if the temp is set to MAX. My didn't cycle and I waited about 20 minutes with some revving. If you turn it down, then it WILL cycle.
02-07-2014, 12:52 AM
#60

[B][SIZE=4]***
Dispose of this coolant, then you are ready to refill the system, OR continue with your timing belt/water pump job. Coolant capacity is about 6 qts, or one-and-a-half gallons, so you'll basically need to have two gallons of Honda coolant on-hand. Once you have replaced your water pump, or are otherwise ready to refill the system, fill the radiator up to the base of the fill neck, and also fill the reservoir tank about half-way. When re-filling the radiator, stop a few times along the way and squeeze the big radiator hoses to get as much air out as possible.
After cranking the car, check for leaks. And after coming up to temperature (i.e., the thermostat opens), and then sufficient cool down after engine shut-off, check to see if you need to top-off the radiator. I didn't need to top mine off. It seemed to take the entire 6 qts during the initial re-fill.
Also, has anyone checked the amount of coolant drained from the radiator and engine block, respectively. It sounds like the total should be close to the 1.5 gal capacity, but I was wondering what is the split between radiator and engine block (so I can use these numbers as a check, when I do it).
Thanks if anyone can help me with any of the above questions.
02-07-2014, 02:18 AM
#61
Moderator
^^^ The coolant gets into the block by the inverse this time.. it fills up from the INLET that goes into the water pump and fills the block by even the amount from the radiator and the block..
You will notice how the radiator cant be filled until you poured about 4-5qts.. Don't sweat about the details, It will fill up the block enough so you can start the engine to remove the air in the system.
You will notice how the radiator cant be filled until you poured about 4-5qts.. Don't sweat about the details, It will fill up the block enough so you can start the engine to remove the air in the system.
The following users liked this post:
andrewSF (02-07-2014)
02-07-2014, 02:33 AM
#62
^^^ The coolant gets into the block by the inverse this time.. it fills up from the INLET that goes into the water pump and fills the block by even the amount from the radiator and the block..
You will notice how the radiator cant be filled until you poured about 4-5qts.. Don't sweat about the details, It will fill up the block enough so you can start the engine to remove the air in the system.
You will notice how the radiator cant be filled until you poured about 4-5qts.. Don't sweat about the details, It will fill up the block enough so you can start the engine to remove the air in the system.
I'm planning to use a vacuum refiller, so hopefully no need to burb air out afterwards.
03-26-2014, 12:39 AM
#63
Well, I changed the coolant in the 1999 TL today. First, thanks to the OP--it makes it much easier knowing the size of the tubing (for engine drain) and the engine drain nut size, before you start.
A side note: I used a refractometer to measure the existing anti-freeze concentration in my cooling system--it was at only 40%. I recently had the timing belt and water pump changed at the dealer, and I suspect that these guys (Fremont Acura, CA) just refilled the approx. 1/2 gallon of drained coolant with straight water. So if you ever pay a shop to change your water pump, tell them to put back new coolant instead of straight water.
Some notes on the coolant drain and fill:
1) I used a deep socket 12mm (1/4" drive, purchased from Home Depot, $2) to turn the engine drain bolt.
2) to access the engine drain bolt, I laid on my left side and put my arms between the tire rod and the transaxle.
3) I torqued the engine drain bolt to specs in owners manual (84 inch lb), to tighten. I had used a smaller wrench to loosen the nut. But the Harbor Freight 1/4" drive torque wrench (20 inch lb to 200 inch lb) WILL fit, if you use it with the Home Depot 12mm deep socket, as I did.
4) I followed the coolant change instructions in the owners manual. I drained approx. 3.4 quarts from the radiator and 2 quarts (plus another 2 to 4 oz) from the engine.
5) my drained coolant looked very clean with no deposits. The coolant had never been changed before. The car only has around 80k California miles on it, however.
6) After following the owner's manual's instructions to refill the coolant, I added back almost exactly the same amount of coolant that I had drained. I had suspected that the car had some air pockets in the cooling system before (took a while for heater to get hot--I think the dealer may have been sloppy when filling the cooling system after the water pump replacement). So I was hoping that I might be able to add more coolant than drained. I don't know if the heater now heats up faster--haven't really had a chance to test it out.
7) I hooked up a code reader with live data readout to do the coolant fill-up. I rev the engine to 1500 RPM at the throttle cable in the engine while checking the coolant temperature through the code reader, and keeping an eye on the fan. The fan didn't kick on until the coolant reached 203 degree F. (After 10 to 15mins of rev-ing engine at 1500 RPM, I had to turn the heater off to get the fan to turn on.)
05-29-2016, 07:15 PM
#64
Advanced
I just did this today, but left the block alone cuz I couldn't locate the drain bolt on the engine. Which side of the engine is it on? What other car parts is it between or around? Describe the location to me in relation to other car parts? Thanks
08-26-2017, 02:47 PM
#65

Thanks for this how-to.
For those others that do not want to drain engine block but want to �get enough of the old stuff out� read on.
Just did this for my TL. I have back issues and did not want to jack up car, maybe remove wheel, and struggle with reaching the block drain; so I did the radiator/reservoir twice. Using math my high school teacher promised would be useful someday, I calculate I was able to put in 6.3 qts of new fluid.
The entire system takes 8.6 qts (from the service manual), so doing the block, radiator, and reservoir (6.8 qts) will only replace 79% (6.8/8.6). By doing the radiator and reservoir (4.2 qts for me) twice, I was able to replace 6.3 qts or 73%.
A few tips that may be helpful. I opened the radiator drain but did not remove the radiator cap for the first five minutes of draining because I did not want a strong flow out of the drain to avoid cleaning splashed coolant. When I went to remove my radiator cap, I noticed my reservoir had drained by itself. I think this was because I left the radiator cap on.
Burping system took a long time. I left the heater on Max and waited 23 minutes on idle for the fan to turn on the first time. I was using a Lyle funnel to burp and saw bubbles still coming out after 30 minutes. After 35 minutes, no more bubbles and I was done.
07-21-2018, 06:39 PM
#66
Intermediate

I am going to change the upper and lower radiator hoses, and thermostat, with the coolant on our '08. Do you think I should bother with the engine drain nut as well?

Thread
Thread Starter
Forum
Replies
Last Post
cycdaniel
1G TSX Performance Parts & Modifications
8
12-17-2019 10:58 AM