
Accord Fog Lights installed
 03-19-2012, 09:31 AM
#1
Senior Moderator
Thread Starter
Well i started the install of my accord fogs yesterday.
Poor mans hot knife


Got them trimmed and Plastic welded and epoxied for extra strength in place


I have to finish off the front side now with some filler and plastic weld to mold and blend it all together. And wire them up.
Poor mans hot knife
Got them trimmed and Plastic welded and epoxied for extra strength in place
I have to finish off the front side now with some filler and plastic weld to mold and blend it all together. And wire them up.
 03-19-2012, 11:33 AM
#3
Nice job!
But since the 99-01 TL bumpers have that molded hollow cap on the back of the black plastic faceplate (whatever its called), we are able to mount a multitude of aftermarket fog lights.
If you go this route, you don't need to cut out the back cap and faceplate. For example.....you can mount the Hella Micro DE fogs by drilling the correct sized hole (using a fine tooth hole saw) in front of the black faceplate. Then you can cut a piece out of the back cap on the bumper to fit the fog from behind. Push the fog thru the front hole so it sticks out of the faceplate about an inch or so. Drill a few holes on the back cap to put the fog mounting bolts through, and voila....you have now mounted an aftermarket fog light.
The cap should be sturdy enough to hold the fog stable in place. If not, then you can reinforce it by using plastic cement or JB Weld to frame some metal brackets on the cap. I would also drill some holes on the cap for ventilation.
I am planning on using this method to install aftermarket HID fogs on my 2000 TL in the upcoming weeks. I will post some pics of the process.
Last edited by victus1; 03-19-2012 at 11:36 AM.

Trending Topics
03-19-2012, 06:54 PM
#8
Senior Moderator
Thread Starter
03-19-2012, 06:55 PM
#9
Senior Moderator
Thread Starter
 03-19-2012, 07:02 PM
#10
Moderator
03-19-2012, 09:00 PM
#12
Senior Moderator
Thread Starter
And, yes i believe so. These required much more trimming of the pocket than what appears in the pics of the civic.
Yea im kinda surprised i hadnt done it sooner. Just doing the little stuff while building up the funds to finish motor project.
03-19-2012, 09:27 PM
#13
Senior Moderator
iTrader: (2)
Join Date: May 2000
Location: where the weather suits my clothes
Age: 55
Posts: 27,921
Received 1,080 Likes
on
661 Posts
You can thank me later for the idea 
My lights should be here this week and installed by the weekend. Just something a little different.
My lights should be here this week and installed by the weekend. Just something a little different.
Last edited by NSXNEXT; 03-19-2012 at 09:30 PM.
03-20-2012, 07:12 AM
#15
Senior Moderator
Thread Starter
 03-20-2012, 09:23 AM
#16
Senior Moderator
Thread Starter
Crappy pic, but here is one with the bumper on the car. Once these are done im remolding the bumper and hood to flow better.

 03-20-2012, 06:58 PM
#19
looks awesome!
 03-20-2012, 10:16 PM
#21
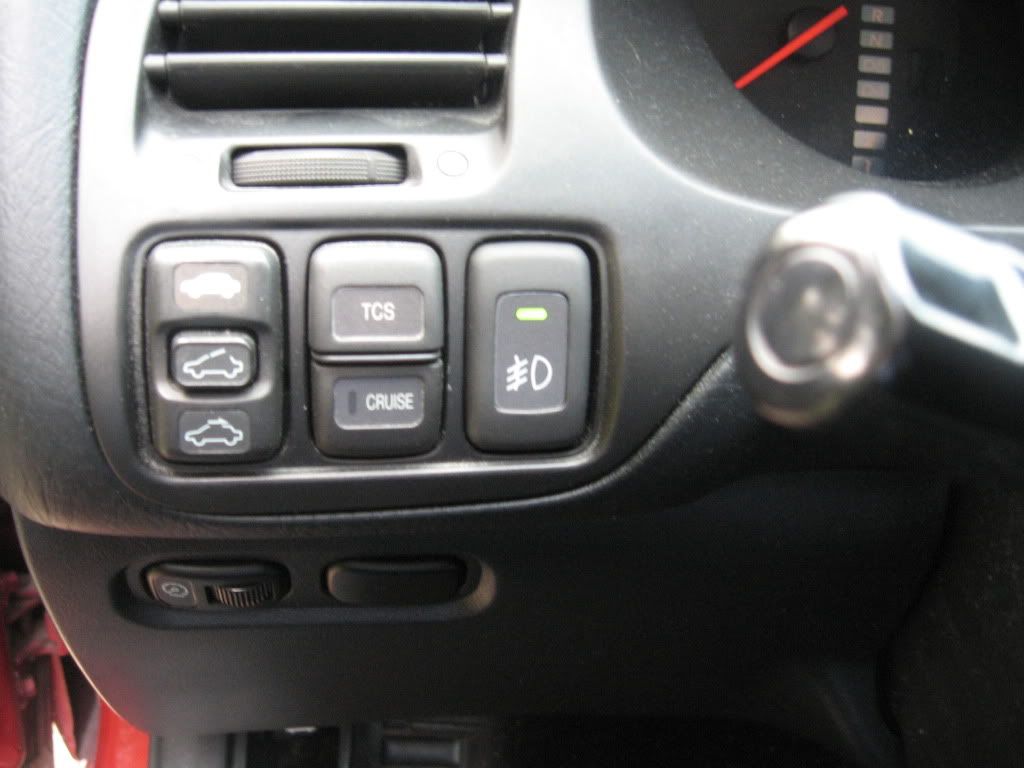
Where can these factory fog light switches be had for a good price?
03-20-2012, 10:18 PM
#22
Senior Moderator
Thread Starter
 ,I just need to figure out the wiring/pinout for the switch when i get around to wiring it.
03-20-2012, 10:19 PM
,I just need to figure out the wiring/pinout for the switch when i get around to wiring it.
03-20-2012, 10:19 PM
#23
Senior Moderator
Thread Starter
03-21-2012, 08:07 AM
#25
Senior Moderator
Thread Starter
I guess you did 
It all kinda started here
https://acurazine.com/forums/showthr...636644&page=14
Then continues on
https://acurazine.com/forums/showthr...636644&page=15
I still need to redo it a little and get a better fit and look
It all kinda started here
https://acurazine.com/forums/showthr...636644&page=14
Then continues on
https://acurazine.com/forums/showthr...636644&page=15
I still need to redo it a little and get a better fit and look
Last edited by fsttyms1; 03-21-2012 at 08:11 AM.
03-21-2012, 03:01 PM
#26
Senior Moderator
Thread Starter
Started to mold them in


03-21-2012, 05:35 PM
#28

you, sir, have alot of dedication. as of right now, im not a fan of how the headlights or your fogs sit, but i think when the molding is done, it will look killer and when you fix the curves on the hood and bumper it will look really cool.
03-21-2012, 07:49 PM
#29
Senior Moderator
Thread Starter
Whats wrong with how the fogs sit?
03-21-2012, 07:51 PM
#31
Senior Moderator
Thread Starter
Cant see real well in the pics but i ran a small hump to follow the flow of the bar in the bumper grill


03-21-2012, 07:52 PM
#32
Senior Moderator
Thread Starter
Thought about it but since i have the switch im going to hook it up. There are 5 wires, shouldnt be that hard to figure out what they do.
03-21-2012, 08:00 PM
#33
thats cool, youve got alot of skills, im sure itll look good. the way the fogs sit is fine, jsut the plastic looked weird is all, but with the molding, it should look awesome.
03-21-2012, 08:34 PM
#35
Senior Moderator
Thread Starter
03-21-2012, 08:35 PM
#36
Senior Moderator
Thread Starter
03-21-2012, 09:50 PM
#37
Senior Moderator
Thread Starter
 03-21-2012, 09:51 PM
#38
Senior Moderator
Thread Starter
now to finish them off.
03-21-2012, 10:07 PM
#40
Senior Moderator
Thread Starter
Plastic weld, and body filler to do the finish work.