
Video DIY Aftermarket Sub and Amp in RL
 03-04-2011, 06:00 PM
#1
Burning Brakes
Thread Starter
Video DIY Aftermarket Sub and Amp in RL
Here is just a little video i made to show me testing the Sub and amp with the factory bose system
I made the video on my phone so quality isnt great but figure i would show everyone since no one has really showed us how to do it.
http://www.youtube.com/watch?v=Ouafxeq91r8
I made the video on my phone so quality isnt great but figure i would show everyone since no one has really showed us how to do it.
http://www.youtube.com/watch?v=Ouafxeq91r8
 03-04-2011, 06:40 PM
#3
nice im thinking about doing the same soon
how does it sound with the factor bose system?
how does it sound with the factor bose system?
03-04-2011, 07:02 PM
#4
Burning Brakes
Thread Starter
No this was just for testing right now I need to find a place to actually run the battery cable. Wasn't able to test the true sound of it I had the sub firing right to the side of the car ill play with sub placement and see where to go from there. Possibly may switch to a sealed box for space savings and tighter bass
03-04-2011, 07:13 PM
#5
Suzuka Master
iTrader: (1)
I was seriously considering the flat woofers in a thin sealed box firing into the back of the seat or a ported box firing though the old woofer hole.
I am absolutely interested in how you run the power line. what gauge are you thinking?
I am absolutely interested in how you run the power line. what gauge are you thinking?
Trending Topics
 03-07-2011, 09:43 AM
#11
Senior Moderator
LSM, did you use the speaker level inputs, or did you run through a line-out converter? Also, I couldn't tell from the video exactly where the factory amp is. I've read it is on the right. Do I need to pull back the right side liner or the center liner or both?
You said the rattle will be gone very soon. CLD tiles? If so, what brand? I am in the works of building my boxes and am strategically planning the whole system. Looking for your experience pointers. Thanks.
You said the rattle will be gone very soon. CLD tiles? If so, what brand? I am in the works of building my boxes and am strategically planning the whole system. Looking for your experience pointers. Thanks.
03-07-2011, 04:41 PM
#13
Burning Brakes
Thread Starter
The Amp is located in the Passanger Rear Quarter Panel area. you only need to remove the silver/zinc colored 10mm. the 2 black 10mm just loosen them about 4 turns each they allow the amp to slide of out its holder.
I did use a LOC since i did not have my speaker level input connector
here is what i found locally and gave it a shot.
http://www.bestbuy.com/site/Scosche+...rter&cp=1&lp=1
I did use a LOC since i did not have my speaker level input connector
here is what i found locally and gave it a shot.
http://www.bestbuy.com/site/Scosche+...rter&cp=1&lp=1
03-07-2011, 04:45 PM
#14
Senior Moderator
Plans for the rattle? Also will you take pics of running the amp wire through the firewall? I have removed trim to run wire before, but taking a drill to my car is the only step I am nervous about.
03-07-2011, 04:55 PM
#15
Burning Brakes
Thread Starter
To be honest i am in the same boat i do not want to drill a hole in the firewall. I am thinking of running the wire under the car with the brake lines. but putting the power wire in a thick rubber hose to protect it from any damage. i know some may not like it i just dont want to drill a hole in the car.
I do expect some rattles. in the rear deck im gonna order some EDead here soon just in case
I do expect some rattles. in the rear deck im gonna order some EDead here soon just in case
03-07-2011, 09:38 PM
#16
Senior Moderator
If you do run the wire under the car (HIGHLY unrecommended, although you know this) how would you get it into the trunk? Wouldn't you have to drill anyways?
I definitely will be going through the firewall. I have read enough accounts to know it is possible with no experience. Honestly, the shop that did my first system messed almost everything up, and they got this right so I know anyone with any kind of intelligence can do it. Unfortunately for you, I probably won't be doing it for 3 more weeks, but I will post a DIY for running the amp wire unless you do it first.
I definitely will be going through the firewall. I have read enough accounts to know it is possible with no experience. Honestly, the shop that did my first system messed almost everything up, and they got this right so I know anyone with any kind of intelligence can do it. Unfortunately for you, I probably won't be doing it for 3 more weeks, but I will post a DIY for running the amp wire unless you do it first.
03-08-2011, 08:29 AM
#17
Suzuka Master
iTrader: (1)
Through the fire wall is preferred, and as with anything there will be a right and wrong way to do it. I've seen some not protect the wire and the insulation wears off causing a short, some run it through moving parts causing it to be pinched, you could add feedback into a signal line, or even cause a water leak if not careful.
I don't know if you guys have seen what a fire wall short with 00gauge wire looks like, but it is special. LoL
Under the car works nicely if there is a channel with other wires already down there. But this often limits the gauge of wire that you can use.
I don't know if you guys have seen what a fire wall short with 00gauge wire looks like, but it is special. LoL
Under the car works nicely if there is a channel with other wires already down there. But this often limits the gauge of wire that you can use.
03-08-2011, 02:56 PM
#18
Senior Moderator
Obviously you would look for a place that will not poke/puncture anything on the other side. After drilling, you should paint to prevent rust and corrosion. A gasket should be used to stop the insulation (plastic wire coating) wear Heavy is talking about. Finally, silicone should be used to keep water out of the cabin.
I was the most interested in where to drill. The rest is pretty self explanatory.
I was the most interested in where to drill. The rest is pretty self explanatory.
03-14-2011, 12:29 PM
#19
I can try and check to see where they went through the firewall on my RL when I get a chance. Someone ran the power wire prior to me buying it soall I had to do was tap into the amp for audio leads and remote on. I wound up using 19 on connector C "WHT (Radio SW {B+}) for remote
03-16-2011, 08:18 PM
#20
Burning Brakes
Thread Starter
I also used the C19 white wire for my signal. sorry i did not mention that in the video.
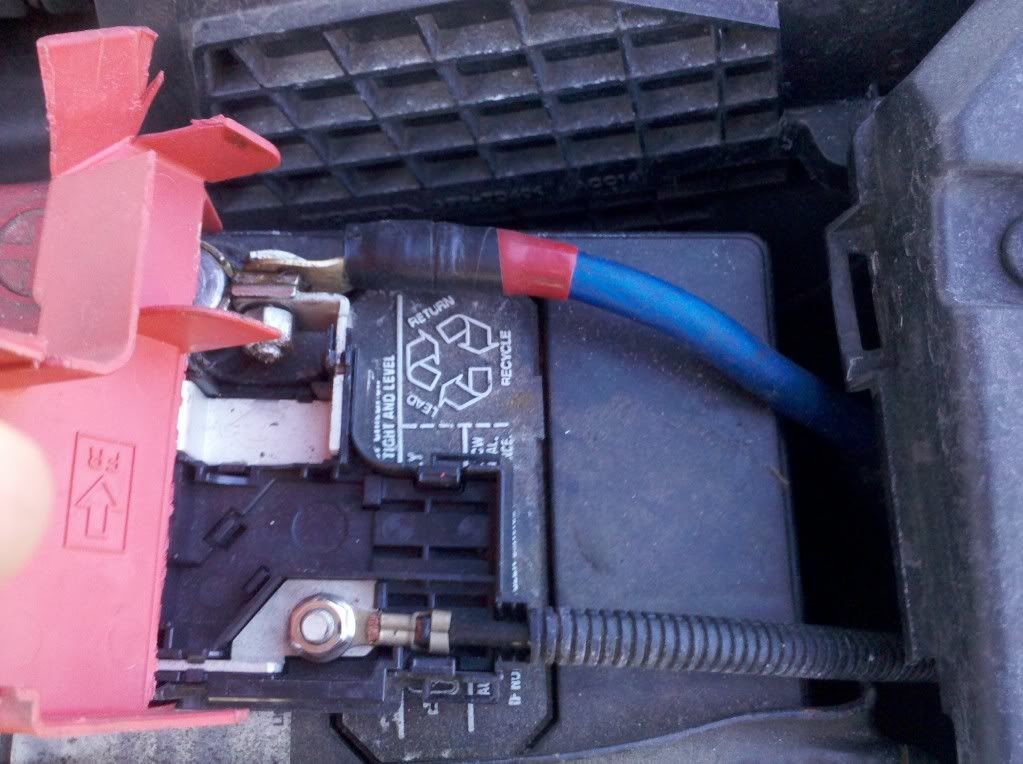
i ran my power wire under the car along side the protective covering for the brake/fuel lines. i used a 0awg wire. i went to Autozone and got 14 feet of some big heater hose. i also went to the hardware store and bought 9 rubber coated clamps that i used existing 10mm under the car for the covers and used that to hold up the power wire. also added alot of big zip ties for piece of mind.
Ive been driving with it for a week just inspected everything nothing has moved. i removed one of the rubber plugs under the spare and used that to run the wire through a grommet. added a little bit of silicone around the inside and outside to keep out any moisture. very happy with this route.
The ported box seems to be a bit too much i am going to try and make a custom box in the spare tire well that is sealed
03-17-2011, 03:18 PM
#22
Cruisin'

Join Date: Feb 2011
Age: 42
Posts: 16
Likes: 0
Received 0 Likes
on
0 Posts
I also used the C19 white wire for my signal. sorry i did not mention that in the video.
i ran my power wire under the car along side the protective covering for the brake/fuel lines. i used a 0awg wire. i went to Autozone and got 14 feet of some big heater hose. i also went to the hardware store and bought 9 rubber coated clamps that i used existing 10mm under the car for the covers and used that to hold up the power wire. also added alot of big zip ties for piece of mind.
Ive been driving with it for a week just inspected everything nothing has moved. i removed one of the rubber plugs under the spare and used that to run the wire through a grommet. added a little bit of silicone around the inside and outside to keep out any moisture. very happy with this route.
The ported box seems to be a bit too much i am going to try and make a custom box in the spare tire well that is sealed
Last edited by diamond.g; 03-17-2011 at 03:23 PM.
03-17-2011, 04:29 PM
#23
Burning Brakes
Thread Starter
A7+A8 is the Input signal
B5-B14 is the output signal.
the output signal is a stronger signal so less gain adjustments need to be made so the amp is not working as hard. also you cannot control the Sub from the headunit on the A connector.
Some songs just are stronger with bass so its nice to be able to hit the audio controls and adjust the sub down when needed
03-18-2011, 07:33 AM
#24
Cruisin'
Join Date: Feb 2011
Age: 42
Posts: 16
Likes: 0
Received 0 Likes
on
0 Posts
Ah, makes sense. This is a thread I will keep in mind. Although I sorta promised the wife that I wouldn't put a sub in the RL (when I get it).
How stout is the electrical system in the RL? I have a 1500-1bdcp (and planned on getting the 1000-4cp). So overall I am looking at some 3 thousand watts of power (2 from the sub amp alone).
How stout is the electrical system in the RL? I have a 1500-1bdcp (and planned on getting the 1000-4cp). So overall I am looking at some 3 thousand watts of power (2 from the sub amp alone).
03-18-2011, 09:21 AM
#26
Cruisin'
Join Date: Feb 2011
Age: 42
Posts: 16
Likes: 0
Received 0 Likes
on
0 Posts

I am hoping the stock system is as good as my dads stock system in his Maxima.
 I've only heard one Bose stock system I thought was aftermarket and its in my sister's 2010 Maixma. That thing thumps!
03-28-2011, 11:13 PM
I've only heard one Bose stock system I thought was aftermarket and its in my sister's 2010 Maixma. That thing thumps!
03-28-2011, 11:13 PM
#29

Wow, it's been a while since I've been on. One of my last post, a couple months ago, I said I was going to put up some pics of my install. Seems like a good time to add on to LSM Legend's post. I haven't finished it but it's OK for now.
I used a 4 guage wire and ran it down the side of the fender (had to loosen a few bolts) then pushed it to the door jam. You'll just have to keep pushing and pulling until you can get the cable lined up unless you've got tiny hands to reach in and grab it, I finallly did, thanks to my 12 year old daughter. Yes, I tried needle nose pliers too. Then in Picture 1 you'll see where it comes out on top and then I just poked a hole into the rubber boot of the door cables on the vehicle frame side and pushed the cable through. This is the only visible part of the cable. Make sure you make a small hole with no rips, once you get the cable in the rubber boot, it'll seal the hole nicely. Remove the inside plastic panels and pull the cable through and I ran it down the side with no issues and you cannot notice a thing.
I used all the same wires coming from the factory amp as LSM Legend did. I had the terrrible Mic noise coming out of the woofers but had no idea what it was, and all the "audio experts" told me to get a line filter, which I did and obviously wasn't the problem. I found this site and found my answer..LOL.
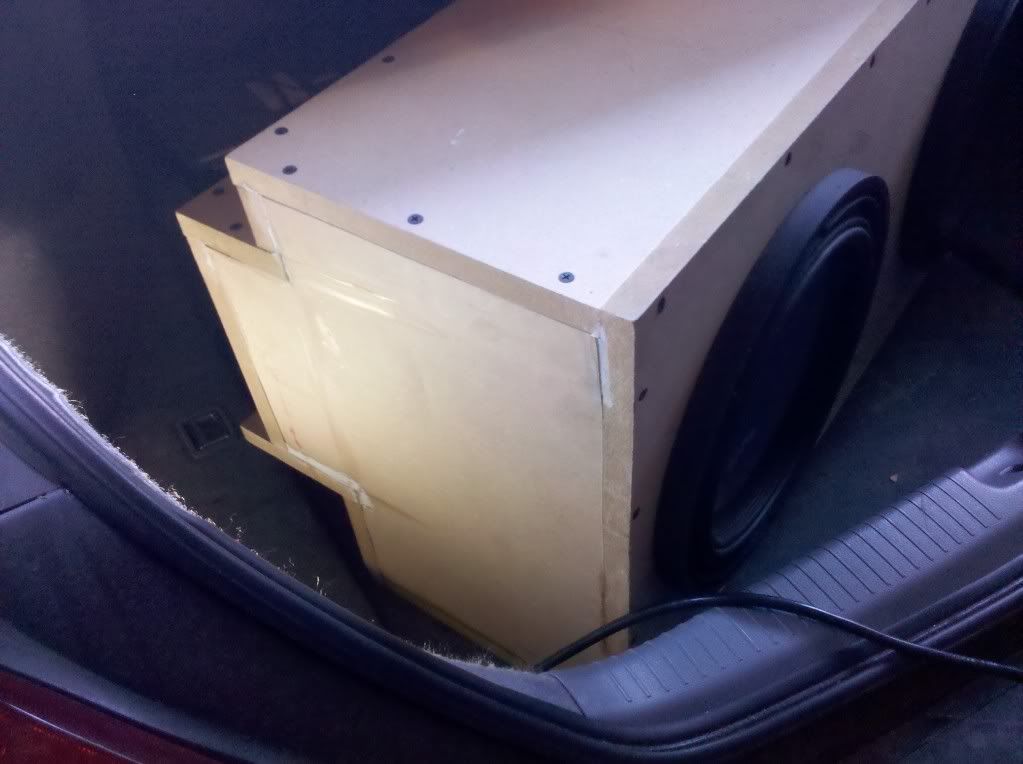
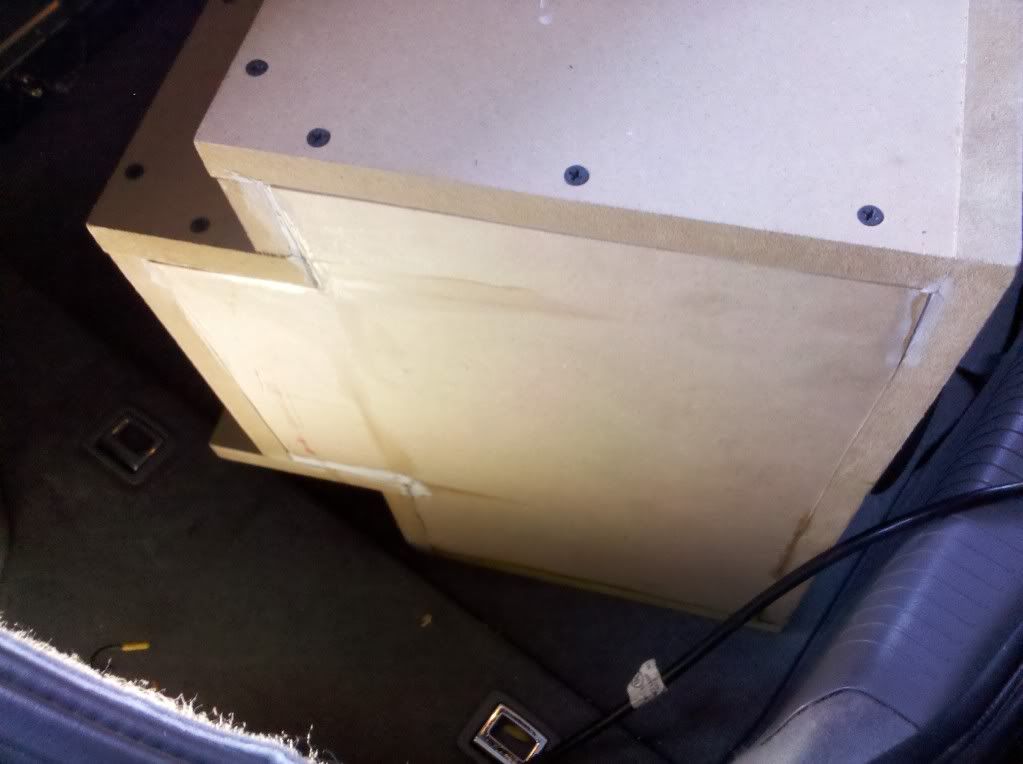
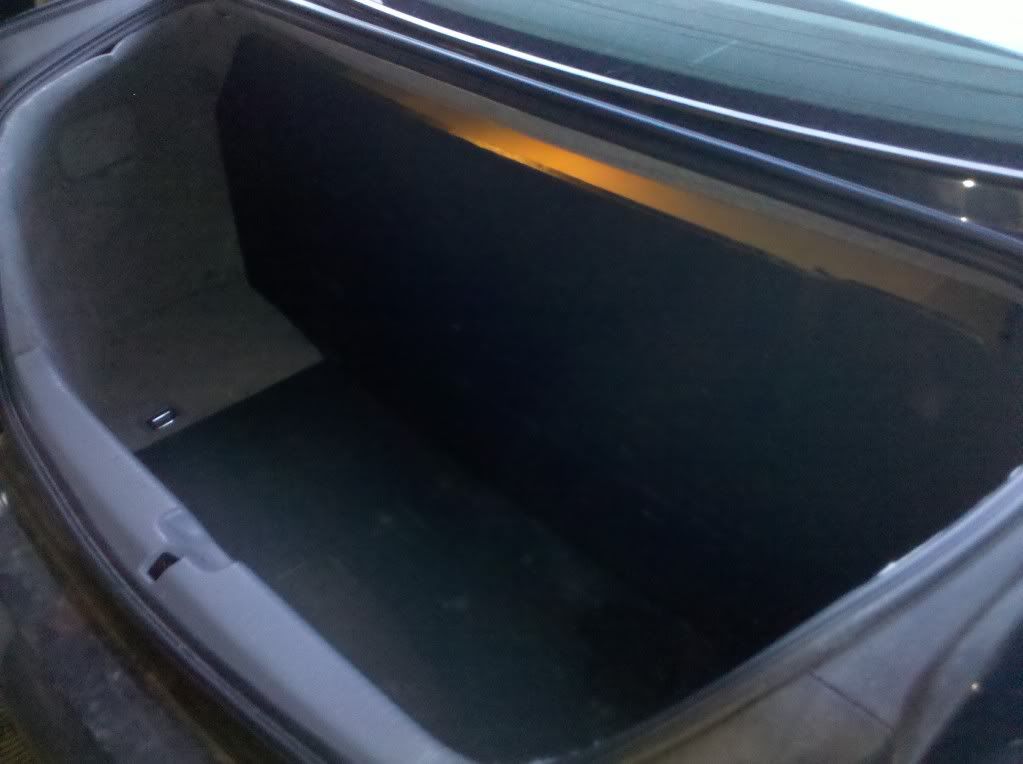
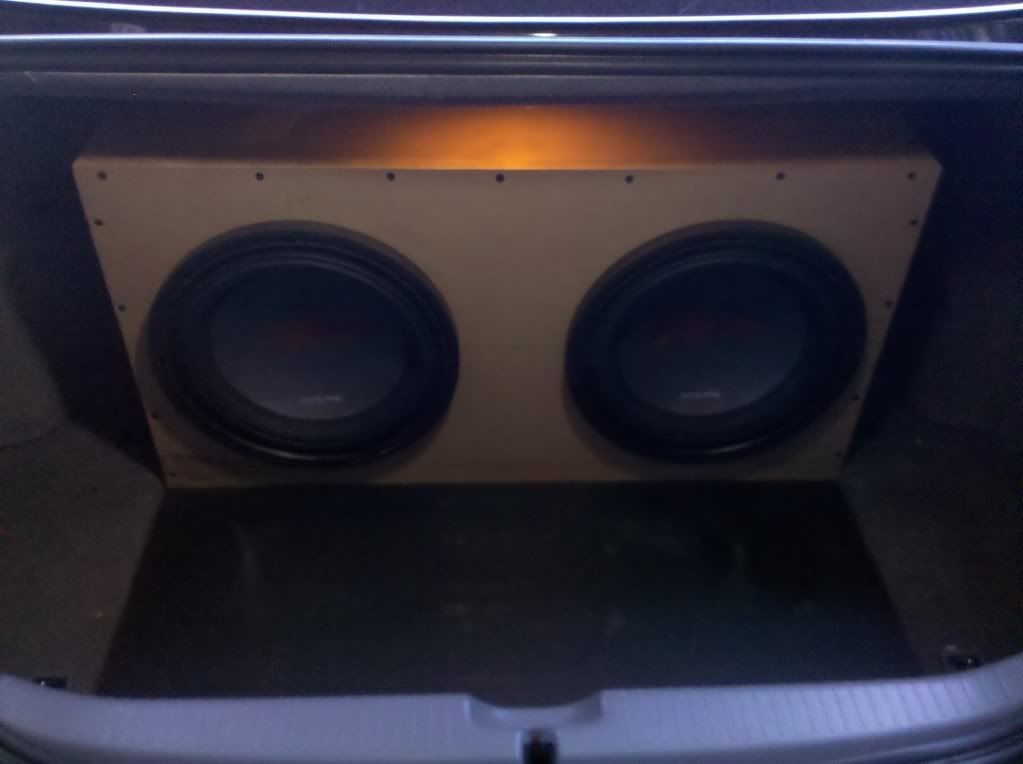
I also included a few pictures of the "custom" box that I built for the 2 - 12" subs. The box fits nicely in the trunk but I haven't carpeted it and don't know if I will. I currently have a black piece of foam cord covering it and will eventually get a nice piece of board to conceal the woofers. The way I did it, I still have tons of room left in the trunk. The back of the box looks the way it does because of the hump in the back of the trunk. My amp and other accessories sit nicely between the rear seat and box.
As for the sound quality, I thinK LSM will agree, phone video and audio sound isn't the greatest...LOL. My younger brother competes in the NE SPL circuit and he says my over all sound(highs and lows) is clear and "LOUD"....good enough for me.
OK, just tried to add the pics but don't seem to be able too. I clicked on the "Insert Image" but they're asking for a URL. I just have the pics on my C: drive. Any advice?
I used a 4 guage wire and ran it down the side of the fender (had to loosen a few bolts) then pushed it to the door jam. You'll just have to keep pushing and pulling until you can get the cable lined up unless you've got tiny hands to reach in and grab it, I finallly did, thanks to my 12 year old daughter. Yes, I tried needle nose pliers too. Then in Picture 1 you'll see where it comes out on top and then I just poked a hole into the rubber boot of the door cables on the vehicle frame side and pushed the cable through. This is the only visible part of the cable. Make sure you make a small hole with no rips, once you get the cable in the rubber boot, it'll seal the hole nicely. Remove the inside plastic panels and pull the cable through and I ran it down the side with no issues and you cannot notice a thing.
I used all the same wires coming from the factory amp as LSM Legend did. I had the terrrible Mic noise coming out of the woofers but had no idea what it was, and all the "audio experts" told me to get a line filter, which I did and obviously wasn't the problem. I found this site and found my answer..LOL.
I also included a few pictures of the "custom" box that I built for the 2 - 12" subs. The box fits nicely in the trunk but I haven't carpeted it and don't know if I will. I currently have a black piece of foam cord covering it and will eventually get a nice piece of board to conceal the woofers. The way I did it, I still have tons of room left in the trunk. The back of the box looks the way it does because of the hump in the back of the trunk. My amp and other accessories sit nicely between the rear seat and box.
As for the sound quality, I thinK LSM will agree, phone video and audio sound isn't the greatest...LOL. My younger brother competes in the NE SPL circuit and he says my over all sound(highs and lows) is clear and "LOUD"....good enough for me.
OK, just tried to add the pics but don't seem to be able too. I clicked on the "Insert Image" but they're asking for a URL. I just have the pics on my C: drive. Any advice?
03-29-2011, 12:38 AM
#30
Senior Moderator
Here is a pic of the factory Bose amp location (hopefully it shows, I've never posted a pic).
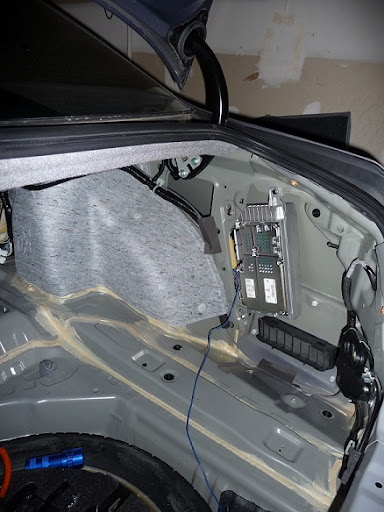
I completed running my amp wire trough my firewall and door trim yesterday and will post a DIY when I get the time. It wasn't completely obvious to me where the amp was from the OP's video b/c the camera moved so fast so I figured I would post a pic to help anyone out.
I completed running my amp wire trough my firewall and door trim yesterday and will post a DIY when I get the time. It wasn't completely obvious to me where the amp was from the OP's video b/c the camera moved so fast so I figured I would post a pic to help anyone out.

 03-29-2011, 04:16 PM
#35
Burning Brakes
Thread Starter
Nice setup L. how do those R's Like the sealed box? i was thinking about making a spare tire box so i can use more trunk space since i do have to lug around alot of photography and video equipment for shoots.
03-29-2011, 11:21 PM
#36
Haha, those pics are of my build. L helped me post them up from the photobucket link I posted because I had no clue on how to upload them myself. You can read my general write-up a few post up ^^^. I'm not completely done with the install but yeah, I say I could def. fit a couple golf bags in there. The box looks funky but the subs sound great IMO. Noone ever said a box had to be exactly square, as long as the inside cu. in. is tuned to the subs. Each sub is sealed in it's own enclosure with no ports, 2 ohm bridged to a mono amp. I've dabbled with sound systems for the past 20 years and I gotta say this is probably the best sounding setup I can remember...
As for trunk space, right now I have a foam cord board that covers the front of the box (see pics above). I plan on cutting out a piece of wood board and cutting two holes to match the sub placements, then covering it with carpeting so you would only see a wall when you opened the trunk. I built the box to fit in exactly where the groove is on the floor of the trunk and then I also have a black foam board in there, in front of the box to keep the box in place. It worked out perfect. Just have to get the wood boards and start finishing the install. As you can see in the pics, the board only extends to about where the trunk light is, so you have tons of room, unless you plan on putting a body back there..LOL. I'll post up more pics after I get the wood and carpeting in, but I'm pretty busy, so it'll probably be a few weeks.
As for trunk space, right now I have a foam cord board that covers the front of the box (see pics above). I plan on cutting out a piece of wood board and cutting two holes to match the sub placements, then covering it with carpeting so you would only see a wall when you opened the trunk. I built the box to fit in exactly where the groove is on the floor of the trunk and then I also have a black foam board in there, in front of the box to keep the box in place. It worked out perfect. Just have to get the wood boards and start finishing the install. As you can see in the pics, the board only extends to about where the trunk light is, so you have tons of room, unless you plan on putting a body back there..LOL. I'll post up more pics after I get the wood and carpeting in, but I'm pretty busy, so it'll probably be a few weeks.
03-30-2011, 08:02 AM
#37
Nice setup man. The carpeted "wall" with the sub cutouts will look great. I had that in my Accord coupe and it def saved space.
LSM- Like nynruas said thats his setup. I juts have one 10" w7 in the trunk. Never had a 10" hit like two 12s before until this. Crazy.
Anyone planning on running any sort of capacitor or upgraded battery?
LSM- Like nynruas said thats his setup. I juts have one 10" w7 in the trunk. Never had a 10" hit like two 12s before until this. Crazy.
Anyone planning on running any sort of capacitor or upgraded battery?
03-30-2011, 01:37 PM
#38
Senior Moderator
03-31-2011, 10:30 PM
#39
Senior Moderator
Nevermind. I plugged everything in today to check the connections, and I could not see any significant current drop. I had the car idling, AC on, and low and high beams on with the system thumping. Lights didn't dim a bit. Therefore, I don't see a need for a cap and probably won't install one until I see symptoms of under supplying current.
03-31-2011, 11:39 PM
#40
Senior Moderator
Like I mentioned a second ago, I plugged everything in to test, and then I intentionally listened for this but couldn't hear it. What did you hear? I don't really need someone to tell me why more than how to know if it is happening. I did have the ANC turned on. Has anyone tried turning this off to fix it without unplugging the mic? Does it only happen when driving to cancel road noise?
Thanks for any input.
Getting real close to finalizing the system and blasting away...
I definitely agree bass is addicting. Gotta get that Boom Boom!