
Need some NavTool install help please.

Thread Starter
Drifting
Joined: Jul 2008
Posts: 2,437
Likes: 591
From: Colorado
Need some NavTool install help please.
I'm pretty set on how to install the actual NavTool unit thanks to Heavy and Matt's write-ups. Thanks guys. Only question I have on the install of the unit itself is the "Parking Brake" wire. Where do you wire that one to?
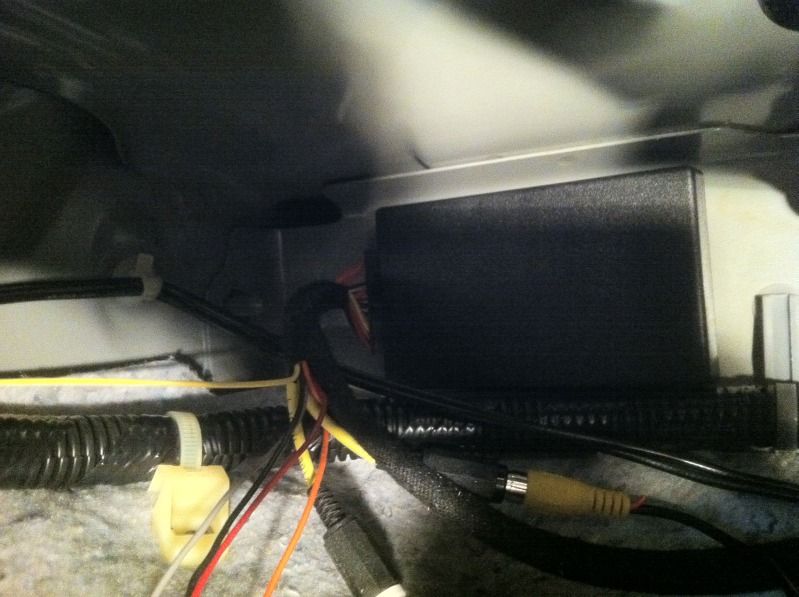
The bigger issue I'm trying to work out right now is the backup camera. I would have thought that it would basically just be power, ground and the video feed but it's not. Look at the picture below and then see if you can help me:
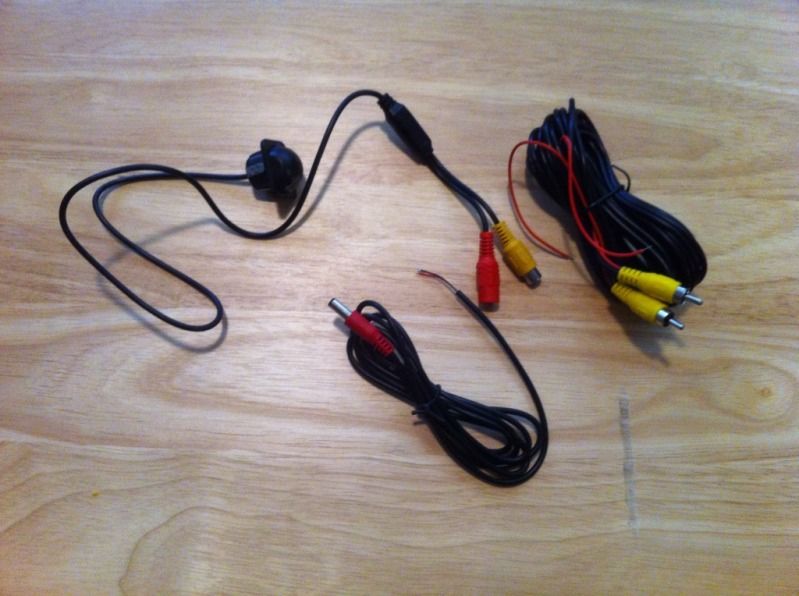
Obviously the yellow RCA from the camera is video and the red is for the power. The matching red cable splits into black and red wires. I'm assuming the red wire splices into the reverse light to signal the camera to turn on and also provide power. Black wire gets grounded. I think I have that right but please tell me if I'm wrong.
I'm more confused about the additional red wire that is entwined with the supplied yellow RCA cable. Obviously the yellow RCA plug goes into the video output on the camera and then to video input on the NavTool. What does the red wire on that cable go to though?
Hopefully you guys can give some input here. Thank you in advance for all of your help.
The bigger issue I'm trying to work out right now is the backup camera. I would have thought that it would basically just be power, ground and the video feed but it's not. Look at the picture below and then see if you can help me:
Obviously the yellow RCA from the camera is video and the red is for the power. The matching red cable splits into black and red wires. I'm assuming the red wire splices into the reverse light to signal the camera to turn on and also provide power. Black wire gets grounded. I think I have that right but please tell me if I'm wrong.
I'm more confused about the additional red wire that is entwined with the supplied yellow RCA cable. Obviously the yellow RCA plug goes into the video output on the camera and then to video input on the NavTool. What does the red wire on that cable go to though?
Hopefully you guys can give some input here. Thank you in advance for all of your help.
Thread Starter
Drifting
Joined: Jul 2008
Posts: 2,437
Likes: 591
From: Colorado
Also, a question for Matt since he has the NavTool 2.0, did you wire up the push-button input? Where does it wire to? Is it necessary if I'm not using the NavTool for video input other than the backup camera at the present time?

Pro
Joined: Apr 2012
Posts: 530
Likes: 93
You are suppose to have the parking break wire connected to the parking break switch or whatever because the NavTool is "only suppose to be used with the vehicle not in motion, and with the parking break applied"......so you can just ground this wire so you will be able to use it regardless, but if you are not using it for anything but the reverse camera you can just leave it unattached but when you want to use it for a second input (DVD player, etc) you will have to either attach it to the parking break or connect it to ground.
As far as the extra red wire goes that is just an extra 12+V reverse line, many people use these cameras to plug into a head unit at the front of the car so they would have to have some way to tell the head unit the car is in reverse...usually they would have to run an extra wire from the back reverse light 12V+ but instead this camera's manufacture decided to include it with the RCA line that would probably go into the back of the head unit. If you want you can connect the red/black to the reverse 12V+/ground and you can use the red wire on the RCA cable to connect to your reverse wire on the navtool. It's easier that way I guess but I wouldn't suggest it because I don't know if its going to generate any noise on your backup camera image since it runs alongside the RCA line.
As far as the extra red wire goes that is just an extra 12+V reverse line, many people use these cameras to plug into a head unit at the front of the car so they would have to have some way to tell the head unit the car is in reverse...usually they would have to run an extra wire from the back reverse light 12V+ but instead this camera's manufacture decided to include it with the RCA line that would probably go into the back of the head unit. If you want you can connect the red/black to the reverse 12V+/ground and you can use the red wire on the RCA cable to connect to your reverse wire on the navtool. It's easier that way I guess but I wouldn't suggest it because I don't know if its going to generate any noise on your backup camera image since it runs alongside the RCA line.
Thread Starter
Drifting
Joined: Jul 2008
Posts: 2,437
Likes: 591
From: Colorado
Thanks Matt. Also, how the hell do I make all these short wires go to their respective connections? The reverse light wiring is freakin' far away from where the harness connects at the back of the navi.
Thread Starter
Drifting
Joined: Jul 2008
Posts: 2,437
Likes: 591
From: Colorado
And what does this connector go to?
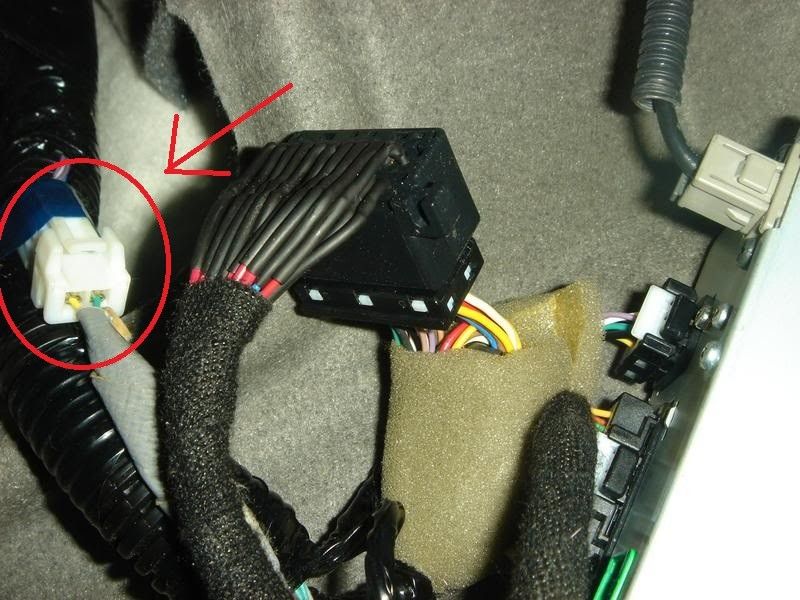
^^^That picture is from Heavy's DIY thread. That connector is just hanging there in my car, (the side with the grey wrap around it). I'm pretty sure I did not unplug it and I can't seem to find where it goes to?
^^^That picture is from Heavy's DIY thread. That connector is just hanging there in my car, (the side with the grey wrap around it). I'm pretty sure I did not unplug it and I can't seem to find where it goes to?
ok, I'm trying to follow you here so I'll try to break the questions up:
camera:
the red wire
camera:
- connect the back up light power and ground locally on the trunk lid so the only wire traveling back is the video cable.
- this way you have short wires and it will be cleaner.
- you only need the ground for a secondary input, if you are using a source input then you do not need a "parking brake" per sey, you just need a switch to ground.
- AGAIN this is only necessary for a secondary video feed NOT the camera install.
the red wire
- video cables can have remote wires made into them, its for the installers convenience and you shouldn't need it
- It photo-bombed my shot, don't get distracted.
 Hall Monitor Tampa has reported you to
  for running in the halls.
Trending Topics

Senior Moderator
Joined: Dec 2010
Posts: 31,897
Likes: 7,251
From: Austin, TX
That's what I told him.  Too bad it's so freakin' hot here. Not that I could take my 2 month old out doing shit anyway, but... I digress. Sorry for the
  OP. Hopefully, you got what you were looking for.
Too bad it's so freakin' hot here. Not that I could take my 2 month old out doing shit anyway, but... I digress. Sorry for the OP. Hopefully, you got what you were looking for.
Thread Starter
Drifting
Joined: Jul 2008
Posts: 2,437
Likes: 591
From: Colorado
Got it all finished today. Thanks for the input guys. My arms itch like crazy from the insulation in the trunk panels. Lol. Figured I'd post some pictures, mostly showing the camera I used for the install.
Most guys here all used the same camera. I don't like the way that camera sticks out so far. It just screams aftermarket to me. I used a camera that provides more of a flush/OEM look. The trade-off is that a bigger hole needs to be drilled since the cameras internals sit behind the mounting surface. The camera also came with a hole saw attachment that cut the exact size into the trim piece. Here's the camera I used:
http://www.ebay.com/itm/Universal-Ge...ht_5641wt_1037
Here are a couple iPhone pictures of the camera installed:
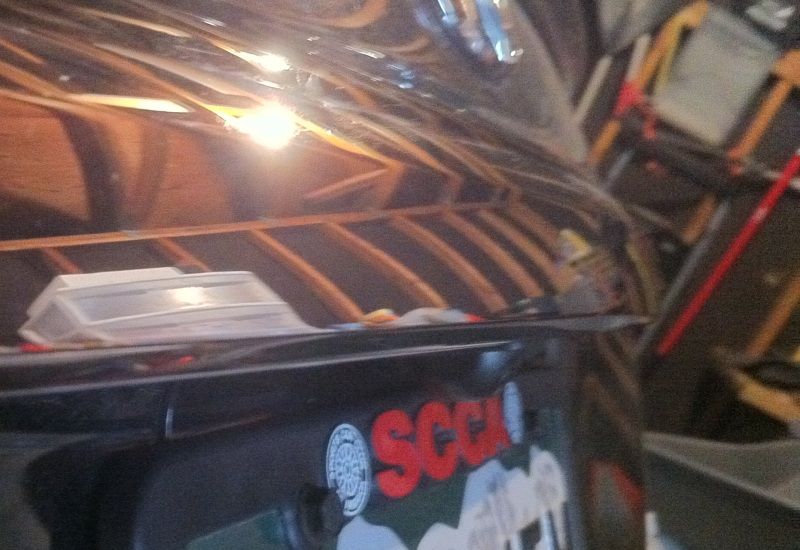

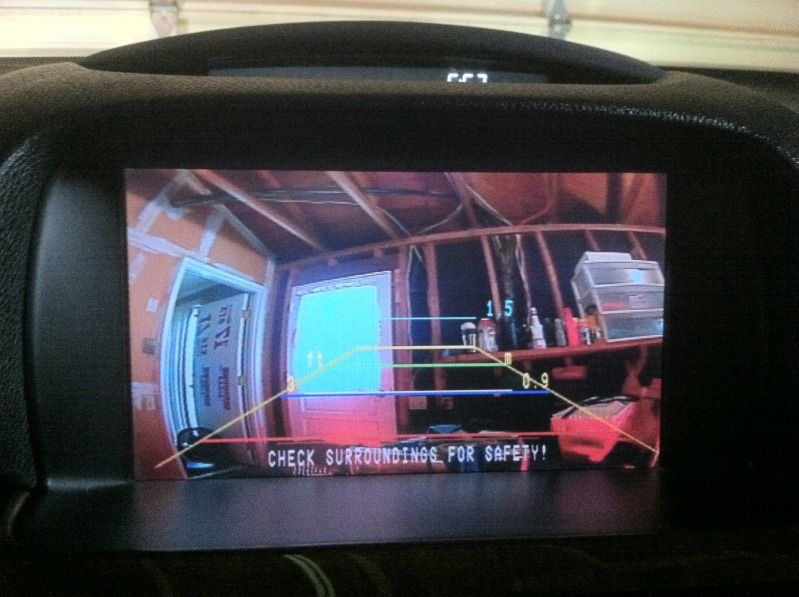
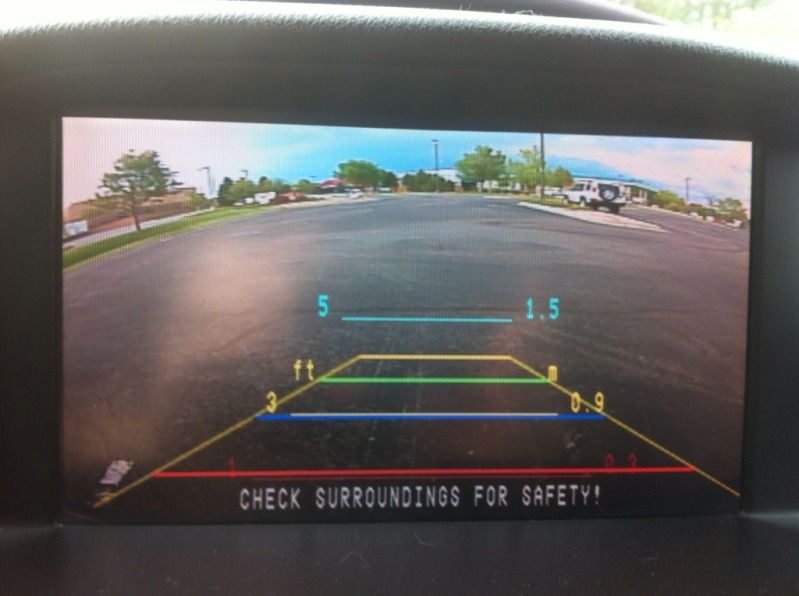
I'm happy with the image quality and viewing area too. Obviously, the image looks better in person:
Here's where I installed the NavTool unit:
Most guys here all used the same camera. I don't like the way that camera sticks out so far. It just screams aftermarket to me. I used a camera that provides more of a flush/OEM look. The trade-off is that a bigger hole needs to be drilled since the cameras internals sit behind the mounting surface. The camera also came with a hole saw attachment that cut the exact size into the trim piece. Here's the camera I used:
http://www.ebay.com/itm/Universal-Ge...ht_5641wt_1037
Here are a couple iPhone pictures of the camera installed:
I'm happy with the image quality and viewing area too. Obviously, the image looks better in person:
Here's where I installed the NavTool unit:
Senior Moderator
Joined: Dec 2010
Posts: 31,897
Likes: 7,251
From: Austin, TX
Looks good, man. Is it just me, or is the camera pointing up instead of down? 
Here is Heavy's. Maybe yours is turned? But then again, your distance thing is right-side up.

Here is Heavy's. Maybe yours is turned?
But then again, your distance thing is right-side up.
Last edited by oo7spy; Jul 17, 2012 at 09:40 AM.
i am planning to add a cam to my install and had a question about any drill or cutting on the trunk to get the wires from the cam to the inside i was thinkning maby cutting a notch where the lights for the plate are. do i need any special tool/cutting materials
Thread Starter
Drifting
Joined: Jul 2008
Posts: 2,437
Likes: 591
From: Colorado
I didn't have everything back together yet in the picture so the trunk was open. The camera is aimed properly.
Thread Starter
Drifting
Joined: Jul 2008
Posts: 2,437
Likes: 591
From: Colorado
I had to cut/drill two holes. One for the camera itself in the plastic trim piece above the license plate. The other hole I drilled was for the camera wiring going through the trunk lid. Some people cut the wires and then reattach them so you don't have to drill through the trunk lid. I didn't want to mess with the wiring on the camera. All I had to do was drill a previously existing hole out a little bigger. The trunk is aluminum so it cuts pretty easily. Don't get to carried away with it.
Thread Starter
Drifting
Joined: Jul 2008
Posts: 2,437
Likes: 591
From: Colorado

Senior Moderator
Joined: Dec 2010
Posts: 31,897
Likes: 7,251
From: Austin, TX

Thread Starter
Drifting
Joined: Jul 2008
Posts: 2,437
Likes: 591
From: Colorado
Thank you. And thank you for your input. I was on the right track but when it comes to this kind of stuff I always like to get some advice from people with more experience than myself. Everything went perfectly and I'm more than satisfied with the way it turned out. Thanks again.

Thread Starter
Drifting
Joined: Jul 2008
Posts: 2,437
Likes: 591
From: Colorado
Thread Starter
Drifting
Joined: Jul 2008
Posts: 2,437
Likes: 591
From: Colorado
I was actually thinking about doing mini HID's for my reverse lights. They are a bit pricey though. Probably going to try the LED route first. Sometimes the extra light actually messes with the camera though. I remember some guys in the 3rd gen TL section were having issues with the backup camera image being washed out a bit with extra bright LED reverse lights.
Pro
Joined: Apr 2012
Posts: 530
Likes: 93
What are you using to test it? Its probably you're camera, I've gone through two bad cameras until I finally ponied up and bought a Sony CCD Backup Camera for about $120, not as oem/flush looking but it definitely is a hell of alot more reliable. I have a 3 year warranty on it

Thread
Thread Starter
Forum
Replies
Last Post
Luis J. Rodriguez
Audio, Video, Electronics & Navigation
2
Sep 12, 2015 10:00 PM