I-006: DIY Autotoys.com Nav to Video Interface (with BOTH Audio and Video)
 07-31-2009, 10:54 PM
#1
Instructor
Thread Starter
I-006: DIY Autotoys.com Nav to Video Interface (with BOTH Audio and Video)
I just installed a navigation to video interface that includes both video and audio from a video/audio source. I have been using my iPhone 3G and a portable DVD player to watch videos. I thought I�d write up installation instructions, and give a review of the product and my experience with autotoys.com. First, I�d like to thank dipkat from the TL forum for his experiences on installing the unit into his TL. (For more info about his install see this thread - https://acurazine.com/forums/3g-tl-audio-bluetooth-electronics-navigation-94/new-navi-video-interface-w-extras-audio-i-p-usb-charging-ipod-ctrl-remote-729815/ )
Below is a picture of the product taken from the autotoy.com website, from which I purchased the interface. The interface is currently listed on the site (product #9231 - http://www.autotoys.com/x/product.php?productid=9231) for $215.00. (The actual manufacturer of the interface is not listed.)
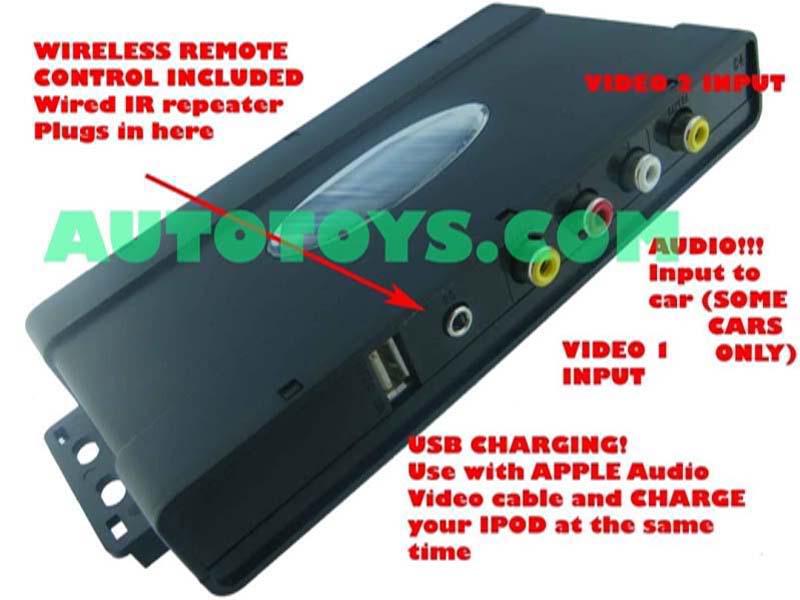
Listed functions of interface:
- USB charging port (however, doesn�t charge all iPods/iPhones)
- 2 Video Inputs (one for backup camera that switches automatically when car put in reverse)
- Wireless remote control
- Wired IR Repeater
- 12 Volt Output
- Audio feed into some cars
At the end of this posting, I�ve also posted a few observations of the interface after using if for a few days.
The experience I have had with autotoys.com has been rather frustrating, to say the least. On paper, the product seems very versatile and comprehensive in offering both an audio and video connection to feed directly through our RL�s navigation/radio. In reality, it is! However, the difficult part is actually receiving installation instructions from autotoys.com or having questions answered by autotoys. (I also never received the correct harness from autotoys to install the video interface behind the head unit as advertised, so I had to do some splicing of the wires to make both audio and video work.) Autotoys does NOT have a customer service telephone number or any phone number I could find to direct my questions. The only option is to create a dialogue via an email in their system. Responses to questions are very delayed (I experienced 3 or 4 days in between asking the question and receiving a response.) I still have not received actual installation instructions and I figured out the install by using dipkat�s notes and through my own experimentation. If this unit appeals to you, please be warned about the customer service offered by autotoys. As of now, I could not find a nav to video interface that integrates BOTH audio and video, other than this one offered by autotoys. If there is one out there offered by someone else, and the price is comparable, I would advise you DO NOT purchase the autotoys product, merely from the lack of support and customer service from them. If you do purchase the item from autotoys, hopefully my write up can make your install less painful.
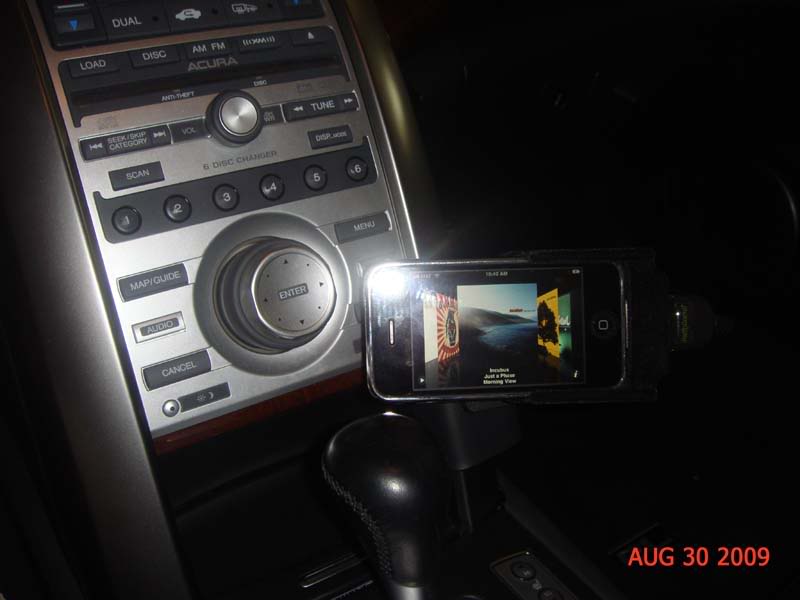
Ok, after all the headaches regarding autotoys, the good news is that I was finally able to install the interface with BOTH audio and video functioning. Below is a short video to show the unit�s functionality when using the included remote control and IR eye.
<object width="425" height="344"><param name="movie" value="http://www.youtube.com/v/n-KWTF-woyk&hl=en&fs=1&rel=0"></param><param name="allowFullScreen" value="true"></param><param name="allowscriptaccess" value="always"></param><embed src="http://www.youtube.com/v/n-KWTF-woyk&hl=en&fs=1&rel=0" type="application/x-shockwave-flash" allowscriptaccess="always" allowfullscreen="true" width="425" height="344"></embed></object>
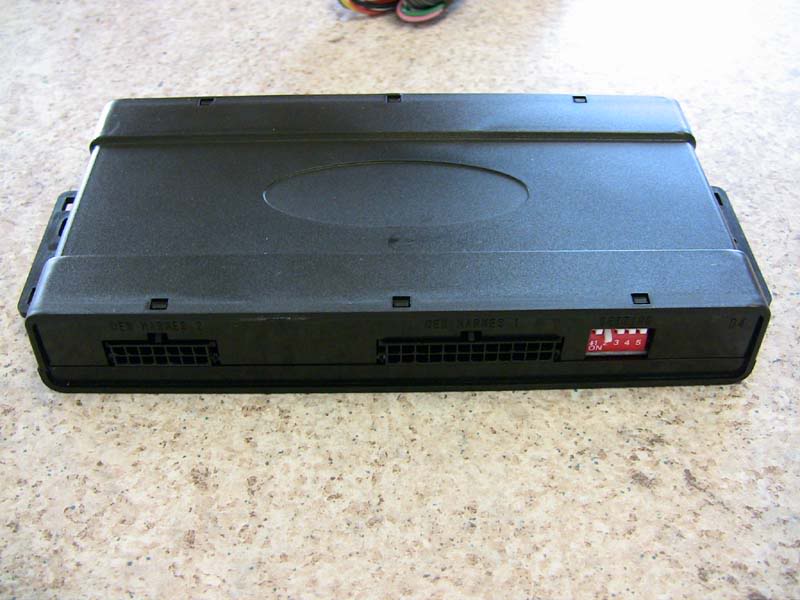
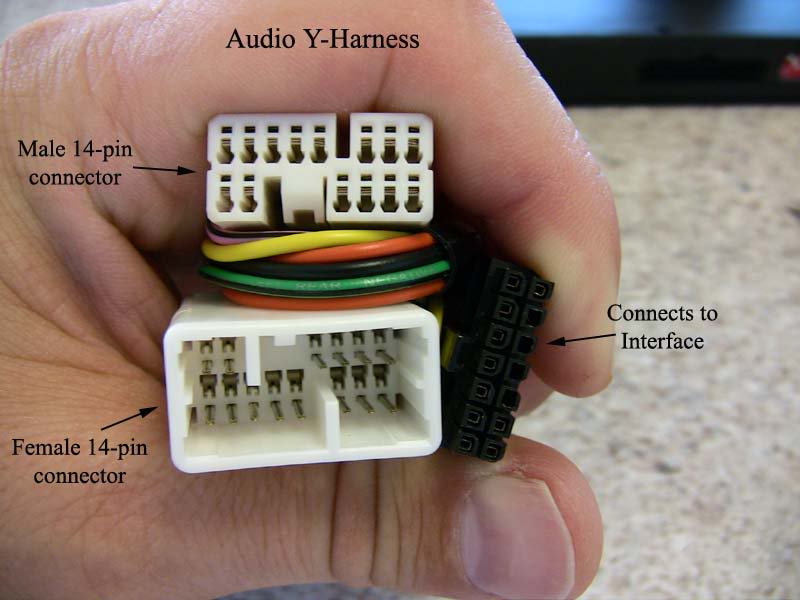
Before I proceed to detail my installation, I thought I�d briefly explain the locations of the harness connections, show some pictures, and give a couple other notes.
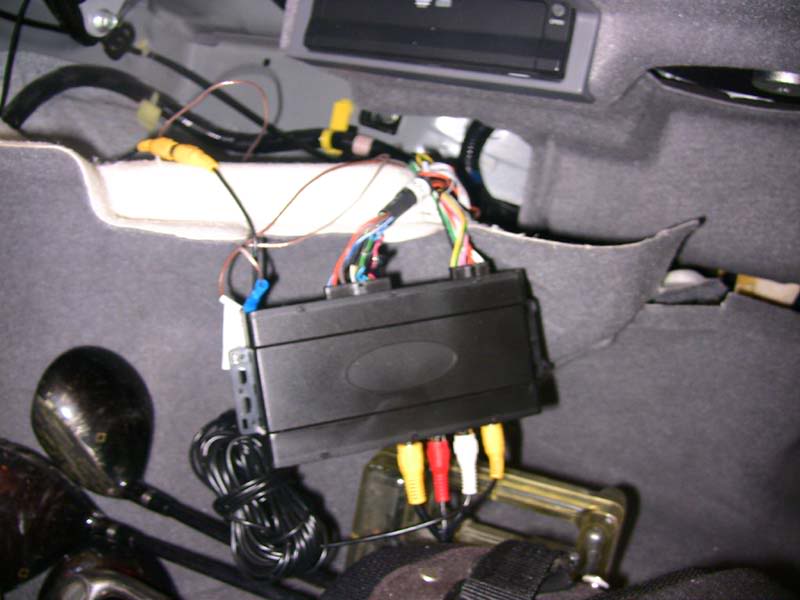
- The actual Nav to Video interface is located in the trunk next to the Navigation DVD Player.
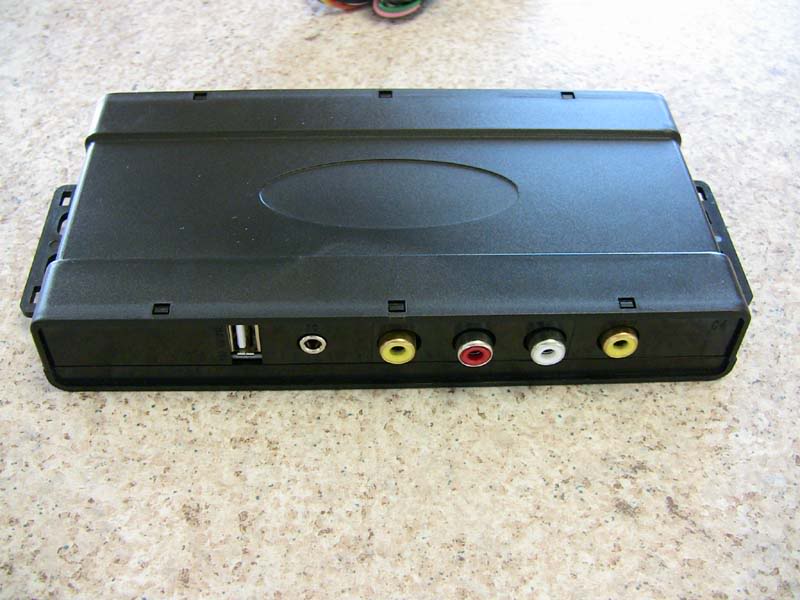
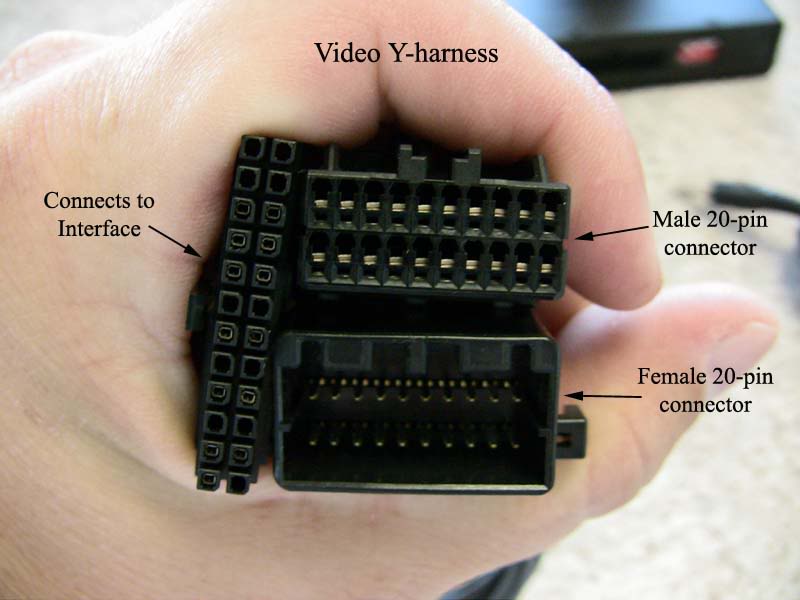
- The Video Y-harness (20-pin) is located in the trunk and connected directly to the Navigation DVD Player (not behind the head unit).
- The Audio Y-harness (14-pin) is connected to the radio behind the head unit. To feed this into the nav to video interface, I had to splice the wires and extend the harness the length of the car so that it could plug into the nav to video interface. (For my 2005 RL, I considered plugging this directly into the XM unit in the trunk; however the 14-pin harness didn�t fit. On the 2007 RL and newer, I believe the XM unit in the trunk might be different and allow this harness to be plugged in directly, but not completely sure.)
- Here�s a picture of the IR eye and the remote control.

Installation Steps:
(Disclaimer: Please proceed at your own risk. This is what I did to install the interface in my 2005 Acura RL. I cannot guarantee the same results if installed in your vehicle, even if it is also a 2005 RL. Be sure to read through these steps before starting so that you can determine if it is a DIY project you can tackle. Also, to complete this, you will need to have additional wire, Step #3, and you will need wire strippers, wire cutters, and wire connectors, Step #7, and you will need a basic understanding of how to connect/splice one wire to another.)
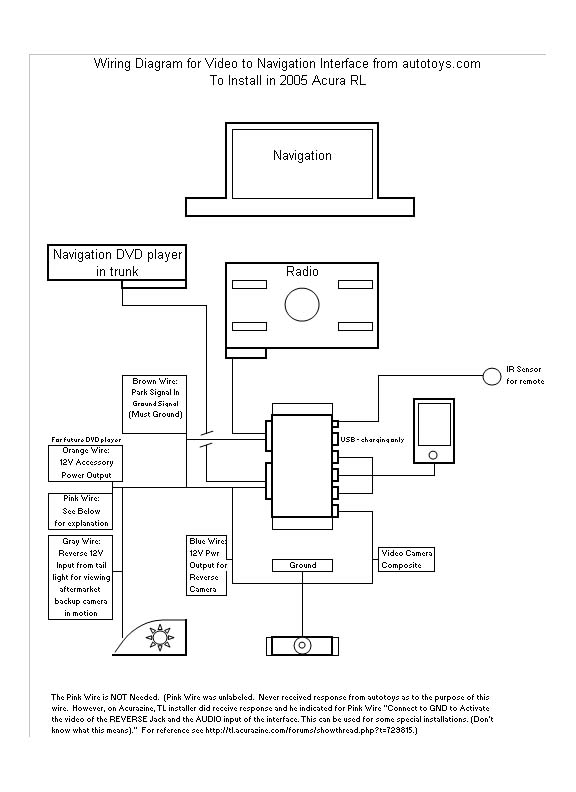
1. Create a plan before disassembling anything. I created the following schematic so that once I started disassembling things, I could quickly make the connections without taking time to figure out what goes where. Also, below are pin assignments of the interface that dipkat received from autotoys and posted.

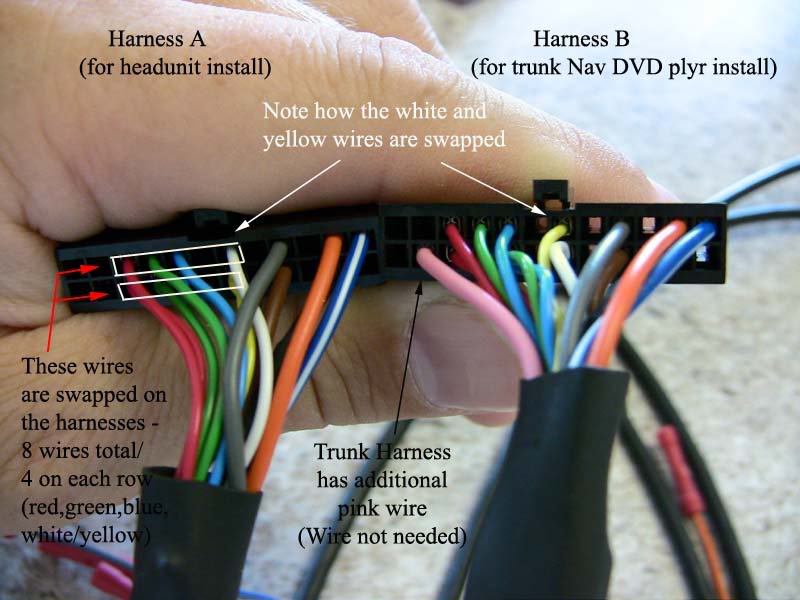
2. Determine which harness autotoys sent you � the correct one to use is the one to install in the trunk by the Navigation DVD player. (If they have sent you the one to install behind the head unit, it will most likely not fit / if it does, let us know, because you will be able to install everything behind the head unit and these instructions will not apply.) Look at the picture below.
If you have the harness to install in the trunk, then you can proceed to Step #3 of the instructions.
If you have the harness to install behind the head unit (and it doesn�t fit), you will need to swap the 4 wires shown on the upper row with the 4 wires shown on the lower row. (You�ll need to cut these 8 wires and rewire them onto the corresponding opposite row. Rewiring these can easily get confusing, so I would recommend cutting two of the same colored (and the yellow/white) wires at a time and swapping their rows.)
3. Buy and prep wire to extend the Audio harness. This will be extended from behind the head unit to the interface in trunk. To do this I bought a 100 foot roll of 22-gauge speaker wire from Radio Shack for about 10 bucks. The wire is in a strand of two wires. You'll need to cut lengths of this wire to run the length of your car. (For me I cut these in 14 foot lengths since I ran the wire under the side doors jams the length of the car and pulled into the trunk.) You'll need to cut enough of these lengths so that you can reconnect all the wires from the pieces of the harness you cut.
Label the wires you cut at each end so that once you start connecting the wires to the harness� cut wires, you are connecting the correct wires. (I.e. blue to blue, white to white, etc.) I did this by using masking tape to label the 2-wire strands with �1�, �2�, etc on each end. Since the 2-wire strands have one with a white line and the other without, I could differentiate the connections when putting into the care (ex. Blue wire at head unit is connected to #1 wire with line which is run through the floor of the car and connected to the blue wire in the trunk).
Do not actually connect the wires to the harness until the wires are run the length of the car � it is easier to snake the wires without the pin connectors on the ends.
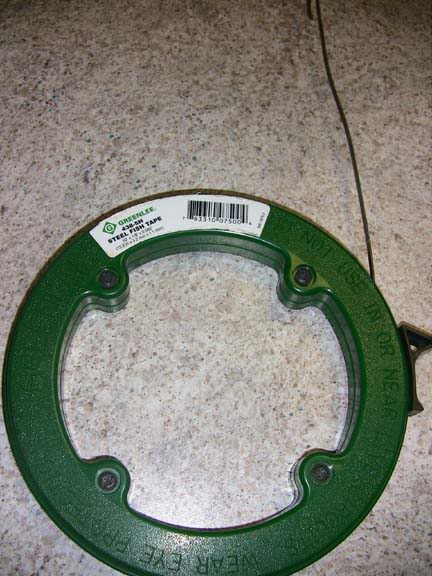
4. Run the cut Radio Shack wires the length of your car. You'll want to run the wires from the head unit to the Navigation DVD Player in the trunk. I removed some of the lower door trim and ran the wire under the door trim and carpet. In some tight spots, and so I didn't have to take out the back seat, I used a snake (steel fish tape) to pull the wire through. (You'll probably also want to run the wire for the IR eye at the same time. And you'll want to run some RCA cables this same way to extend the input into the interface. I ended up running my IR eye and RCA extensions through the center armrest, under the carpet, and under the backseat to the trunk since I was more concerned about the lengths of these.)
5. Place the Interface Unit in the trunk and connect the 20-pin Video Y-harness to the Navigation DVD Player and the interface. You�ll need to pull back the trunk liner to do this. It is a tight fit to get behind the DVD Player, but once you do, you�ll pull out the male 20-pin connector and plug it into the female end of the Video Y-harness. You�ll then plug the male end of the Video Y-harness into the Nav DVD player. Now take the remaining connector of the harness and plug it into the Nav to Video Interface.
If you have a reverse camera, you can now make the connections to the interface. (I won�t detail how to install a back up camera in these installation instructions, but let me know if you need help, and I can assist.)
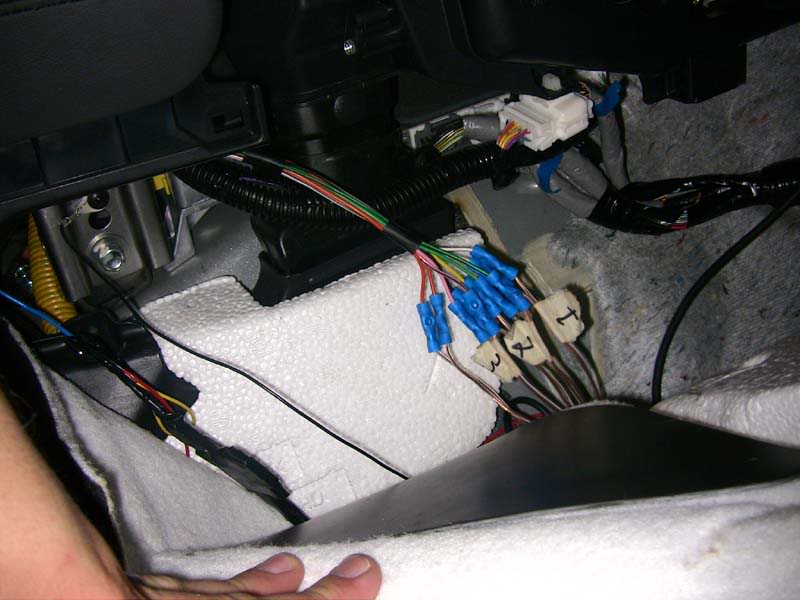
6. Remove the head unit to connect the Audio Y-harness. If you haven�t removed the radio/head unit before, it can be a lengthy process. To remove it, follow the instructions as outlined for installing the Acura Musiclink:
http://techinfo.honda.com/rjanisis/pubs/AI/BII31183.pdf
You do NOT need to remove the glove box as indicated in these instructions, but you DO need to remove the center console trim pieces, or at least enough so that you can slide the center console back an inch or so.
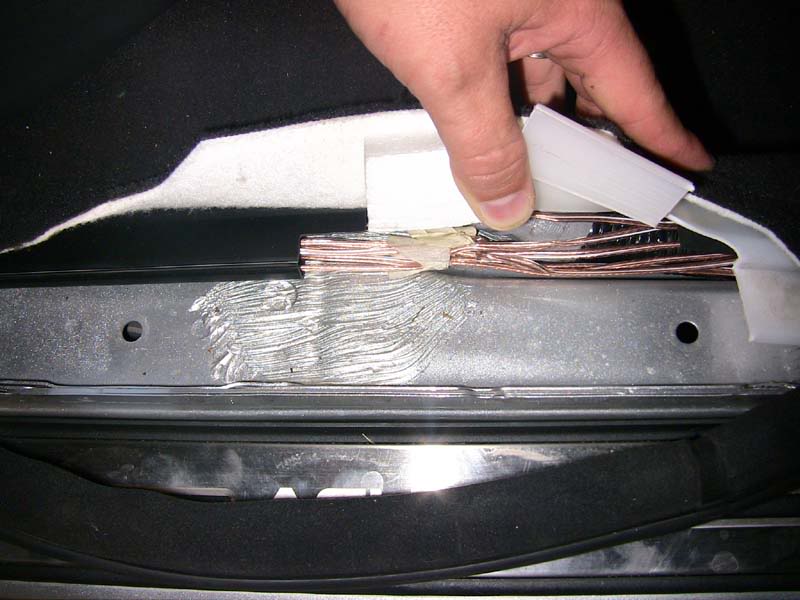
Once the back panel of the radio/navigation unit is accessible, remove the male 14-pin connector from the back of the unit and connect this to the female 14-pin connector of the Audio Y-Harness. Then take the 14-pin male connector of the Audio Y-harness and plug it into the back of the radio. Make sure that the remaining part of the harness (that fits into the Nav to Video Interface) is close to the end of the Radio Shack wires you ran under your carpet/door trim.
You can now put your radio and center console back together by following the Acura Musiclink instructions in reverse. Or you can wait to put it back together after you�re sure all connections are working.
7. Splice the wires on the Audio Interface and extend the connector to the trunk using the Radio Shack wires you ran the length of the car. To do this, cut the wires about 2 inches from the actual Audio connector that plugs into the interface in the trunk. Take this piece you cut off and connect it to the interface in the trunk. Now it�s just a matter of connecting the cut wires from the head unit to the Radio Shack wires on that end and doing the same with the wires in the trunk. Just make sure that you use your labels to correctly match up the wires. To connect the cut wires, you�ll need wire strippers, wire cutters, and wire connectors.
8. With the audio harness extended and plugged into the interface in the trunk, you'll now want to complete the other connections if you haven�t already done so (i.e. Ground wire, video harness, IR wired eye, and RCA cables from video source) and you should now be set.
9. Test your set up. With your car on, and your video/audio source on and connected to the Nav to Video Interface via the RCA ports, use the remote control aimed at the IR eye to cycle through the commands. You should be able to see video on your Navigation screen and hear audio through your car�s speakers. If it is not working, you�ll need to verify that you have everything connected and that the audio connections you made via the Radio Shack wires are correct (i.e. green wire from head unit connects to green wire in trunk, etc.)
Note that not all of the buttons on the remote control currently function. Autotoys indicated that some of these are there for future application.
10. Reassemble any part of the car you took apart to install the interface.
11. Enjoy!
Although, it took a lot longer to install than I had anticipated, it is well worth it. I still have some things to do to complete the install (like buying a Proclip for my iPhone and hiding my video/audio source switch), but at least, for now, it is functioning. Some observations from using it for a few days are:
- Navigation voice prompts override the audio of the interface. So, if you are on route to a destination, and having the Navigation guide you to this destination, while you are watching a movie with audio, the audio of the movie will be muted momentarily while the navigation voice prompt is played. This also applies to HFL.
- XM radio functionality is NOT lost with the audio connection.
- When playing audio (with or without video), the audio display on the Navigation screen or the upper (mini) display does not change. So, for example, if you were listening to XM 2 Preset 2 before changing to audio only, this (XM 2 Preset 2) will remain on the displays although you are now listening to audio through your iPod/external audio source. Of course, if you are listening to the audio of your video source while watching the video, this will not show on the Navigation screen, but only on the upper display.
- I currently switch between my iPhone 3G and a portable DVD player to watch videos. The audio quality of playing DVDs is better than playing videos through the iPod on my iPhone. This is probably just due to the reduced size of the iPhone video file. Otherwise, the audio quality is excellent!
Anyways, I hope this posting was helpful to some of you.
Below is a picture of the product taken from the autotoy.com website, from which I purchased the interface. The interface is currently listed on the site (product #9231 - http://www.autotoys.com/x/product.php?productid=9231) for $215.00. (The actual manufacturer of the interface is not listed.)
Listed functions of interface:
- USB charging port (however, doesn�t charge all iPods/iPhones)
- 2 Video Inputs (one for backup camera that switches automatically when car put in reverse)
- Wireless remote control
- Wired IR Repeater
- 12 Volt Output
- Audio feed into some cars
At the end of this posting, I�ve also posted a few observations of the interface after using if for a few days.
The experience I have had with autotoys.com has been rather frustrating, to say the least. On paper, the product seems very versatile and comprehensive in offering both an audio and video connection to feed directly through our RL�s navigation/radio. In reality, it is! However, the difficult part is actually receiving installation instructions from autotoys.com or having questions answered by autotoys. (I also never received the correct harness from autotoys to install the video interface behind the head unit as advertised, so I had to do some splicing of the wires to make both audio and video work.) Autotoys does NOT have a customer service telephone number or any phone number I could find to direct my questions. The only option is to create a dialogue via an email in their system. Responses to questions are very delayed (I experienced 3 or 4 days in between asking the question and receiving a response.) I still have not received actual installation instructions and I figured out the install by using dipkat�s notes and through my own experimentation. If this unit appeals to you, please be warned about the customer service offered by autotoys. As of now, I could not find a nav to video interface that integrates BOTH audio and video, other than this one offered by autotoys. If there is one out there offered by someone else, and the price is comparable, I would advise you DO NOT purchase the autotoys product, merely from the lack of support and customer service from them. If you do purchase the item from autotoys, hopefully my write up can make your install less painful.
Ok, after all the headaches regarding autotoys, the good news is that I was finally able to install the interface with BOTH audio and video functioning. Below is a short video to show the unit�s functionality when using the included remote control and IR eye.
<object width="425" height="344"><param name="movie" value="http://www.youtube.com/v/n-KWTF-woyk&hl=en&fs=1&rel=0"></param><param name="allowFullScreen" value="true"></param><param name="allowscriptaccess" value="always"></param><embed src="http://www.youtube.com/v/n-KWTF-woyk&hl=en&fs=1&rel=0" type="application/x-shockwave-flash" allowscriptaccess="always" allowfullscreen="true" width="425" height="344"></embed></object>
Before I proceed to detail my installation, I thought I�d briefly explain the locations of the harness connections, show some pictures, and give a couple other notes.
- The actual Nav to Video interface is located in the trunk next to the Navigation DVD Player.
- The Video Y-harness (20-pin) is located in the trunk and connected directly to the Navigation DVD Player (not behind the head unit).
- The Audio Y-harness (14-pin) is connected to the radio behind the head unit. To feed this into the nav to video interface, I had to splice the wires and extend the harness the length of the car so that it could plug into the nav to video interface. (For my 2005 RL, I considered plugging this directly into the XM unit in the trunk; however the 14-pin harness didn�t fit. On the 2007 RL and newer, I believe the XM unit in the trunk might be different and allow this harness to be plugged in directly, but not completely sure.)
- Here�s a picture of the IR eye and the remote control.
Installation Steps:
(Disclaimer: Please proceed at your own risk. This is what I did to install the interface in my 2005 Acura RL. I cannot guarantee the same results if installed in your vehicle, even if it is also a 2005 RL. Be sure to read through these steps before starting so that you can determine if it is a DIY project you can tackle. Also, to complete this, you will need to have additional wire, Step #3, and you will need wire strippers, wire cutters, and wire connectors, Step #7, and you will need a basic understanding of how to connect/splice one wire to another.)
1. Create a plan before disassembling anything. I created the following schematic so that once I started disassembling things, I could quickly make the connections without taking time to figure out what goes where. Also, below are pin assignments of the interface that dipkat received from autotoys and posted.
2. Determine which harness autotoys sent you � the correct one to use is the one to install in the trunk by the Navigation DVD player. (If they have sent you the one to install behind the head unit, it will most likely not fit / if it does, let us know, because you will be able to install everything behind the head unit and these instructions will not apply.) Look at the picture below.
If you have the harness to install in the trunk, then you can proceed to Step #3 of the instructions.
If you have the harness to install behind the head unit (and it doesn�t fit), you will need to swap the 4 wires shown on the upper row with the 4 wires shown on the lower row. (You�ll need to cut these 8 wires and rewire them onto the corresponding opposite row. Rewiring these can easily get confusing, so I would recommend cutting two of the same colored (and the yellow/white) wires at a time and swapping their rows.)
3. Buy and prep wire to extend the Audio harness. This will be extended from behind the head unit to the interface in trunk. To do this I bought a 100 foot roll of 22-gauge speaker wire from Radio Shack for about 10 bucks. The wire is in a strand of two wires. You'll need to cut lengths of this wire to run the length of your car. (For me I cut these in 14 foot lengths since I ran the wire under the side doors jams the length of the car and pulled into the trunk.) You'll need to cut enough of these lengths so that you can reconnect all the wires from the pieces of the harness you cut.
Label the wires you cut at each end so that once you start connecting the wires to the harness� cut wires, you are connecting the correct wires. (I.e. blue to blue, white to white, etc.) I did this by using masking tape to label the 2-wire strands with �1�, �2�, etc on each end. Since the 2-wire strands have one with a white line and the other without, I could differentiate the connections when putting into the care (ex. Blue wire at head unit is connected to #1 wire with line which is run through the floor of the car and connected to the blue wire in the trunk).
Do not actually connect the wires to the harness until the wires are run the length of the car � it is easier to snake the wires without the pin connectors on the ends.
4. Run the cut Radio Shack wires the length of your car. You'll want to run the wires from the head unit to the Navigation DVD Player in the trunk. I removed some of the lower door trim and ran the wire under the door trim and carpet. In some tight spots, and so I didn't have to take out the back seat, I used a snake (steel fish tape) to pull the wire through. (You'll probably also want to run the wire for the IR eye at the same time. And you'll want to run some RCA cables this same way to extend the input into the interface. I ended up running my IR eye and RCA extensions through the center armrest, under the carpet, and under the backseat to the trunk since I was more concerned about the lengths of these.)
5. Place the Interface Unit in the trunk and connect the 20-pin Video Y-harness to the Navigation DVD Player and the interface. You�ll need to pull back the trunk liner to do this. It is a tight fit to get behind the DVD Player, but once you do, you�ll pull out the male 20-pin connector and plug it into the female end of the Video Y-harness. You�ll then plug the male end of the Video Y-harness into the Nav DVD player. Now take the remaining connector of the harness and plug it into the Nav to Video Interface.
If you have a reverse camera, you can now make the connections to the interface. (I won�t detail how to install a back up camera in these installation instructions, but let me know if you need help, and I can assist.)
6. Remove the head unit to connect the Audio Y-harness. If you haven�t removed the radio/head unit before, it can be a lengthy process. To remove it, follow the instructions as outlined for installing the Acura Musiclink:
http://techinfo.honda.com/rjanisis/pubs/AI/BII31183.pdf
You do NOT need to remove the glove box as indicated in these instructions, but you DO need to remove the center console trim pieces, or at least enough so that you can slide the center console back an inch or so.
Once the back panel of the radio/navigation unit is accessible, remove the male 14-pin connector from the back of the unit and connect this to the female 14-pin connector of the Audio Y-Harness. Then take the 14-pin male connector of the Audio Y-harness and plug it into the back of the radio. Make sure that the remaining part of the harness (that fits into the Nav to Video Interface) is close to the end of the Radio Shack wires you ran under your carpet/door trim.
You can now put your radio and center console back together by following the Acura Musiclink instructions in reverse. Or you can wait to put it back together after you�re sure all connections are working.
7. Splice the wires on the Audio Interface and extend the connector to the trunk using the Radio Shack wires you ran the length of the car. To do this, cut the wires about 2 inches from the actual Audio connector that plugs into the interface in the trunk. Take this piece you cut off and connect it to the interface in the trunk. Now it�s just a matter of connecting the cut wires from the head unit to the Radio Shack wires on that end and doing the same with the wires in the trunk. Just make sure that you use your labels to correctly match up the wires. To connect the cut wires, you�ll need wire strippers, wire cutters, and wire connectors.
8. With the audio harness extended and plugged into the interface in the trunk, you'll now want to complete the other connections if you haven�t already done so (i.e. Ground wire, video harness, IR wired eye, and RCA cables from video source) and you should now be set.
9. Test your set up. With your car on, and your video/audio source on and connected to the Nav to Video Interface via the RCA ports, use the remote control aimed at the IR eye to cycle through the commands. You should be able to see video on your Navigation screen and hear audio through your car�s speakers. If it is not working, you�ll need to verify that you have everything connected and that the audio connections you made via the Radio Shack wires are correct (i.e. green wire from head unit connects to green wire in trunk, etc.)
Note that not all of the buttons on the remote control currently function. Autotoys indicated that some of these are there for future application.
10. Reassemble any part of the car you took apart to install the interface.
11. Enjoy!
Although, it took a lot longer to install than I had anticipated, it is well worth it. I still have some things to do to complete the install (like buying a Proclip for my iPhone and hiding my video/audio source switch), but at least, for now, it is functioning. Some observations from using it for a few days are:
- Navigation voice prompts override the audio of the interface. So, if you are on route to a destination, and having the Navigation guide you to this destination, while you are watching a movie with audio, the audio of the movie will be muted momentarily while the navigation voice prompt is played. This also applies to HFL.
- XM radio functionality is NOT lost with the audio connection.
- When playing audio (with or without video), the audio display on the Navigation screen or the upper (mini) display does not change. So, for example, if you were listening to XM 2 Preset 2 before changing to audio only, this (XM 2 Preset 2) will remain on the displays although you are now listening to audio through your iPod/external audio source. Of course, if you are listening to the audio of your video source while watching the video, this will not show on the Navigation screen, but only on the upper display.
- I currently switch between my iPhone 3G and a portable DVD player to watch videos. The audio quality of playing DVDs is better than playing videos through the iPod on my iPhone. This is probably just due to the reduced size of the iPhone video file. Otherwise, the audio quality is excellent!
Anyways, I hope this posting was helpful to some of you.

 08-02-2009, 03:07 PM
#4
TYPE-S KING
Join Date: Jun 2008
Location: upstate NY
Age: 42
Posts: 71
Likes: 0
Received 0 Likes
on
0 Posts
Im sorry I looked and didn’t find anything, can someone please help me locate DIY or step by step to remove the navigation system and radio on the 08 Acura TL Type S. I need to get back there to check on some wires ASAP. Please help
08-02-2009, 06:44 PM
#6
Instructor
Thread Starter
It looks like when I tried to post a link to this video originally, it didn't work. But, I think I've figured it out now...here's a short video showing me play video on my nav screen via the interface.
http://www.youtube.com/watch?v=n-KWTF-woyk
http://www.youtube.com/watch?v=n-KWTF-woyk

Trending Topics
08-03-2009, 11:58 AM
#8
Instructor
Thread Starter
I don't have much experience with the TL but I did find a couple threads that might help. Give these a try:
https://acurazine.com/forums/3g-tl-2004-2008-93/f-051-diy-video-how-remove-center-console-lower-dash-glove-box-733555/
https://acurazine.com/forums/3g-tl-performance-parts-modifications-112/comptech-short-shifter-install-pics-3g-garage-086-a-590326/
08-03-2009, 02:23 PM
#10
Instructor
Thread Starter
08-03-2009, 11:06 PM
#12
TYPE-S KING
Join Date: Jun 2008
Location: upstate NY
Age: 42
Posts: 71
Likes: 0
Received 0 Likes
on
0 Posts
Hey mssidah,
I don't have much experience with the TL but I did find a couple threads that might help. Give these a try:
https://acurazine.com/forums/showthread.php?t=733555
https://acurazine.com/forums/showthread.php?t=590326
I don't have much experience with the TL but I did find a couple threads that might help. Give these a try:
https://acurazine.com/forums/showthread.php?t=733555
https://acurazine.com/forums/showthread.php?t=590326
 2morro i will keep your guys updated
08-04-2009, 11:17 AM
2morro i will keep your guys updated
08-04-2009, 11:17 AM
#14
Chapter Leader (Chicago)
i read your story. and i think i just answered my self.
and the unit is only 215.. wow. and also do you use a cut switch to go from movie to nav. and vice versa????
and the unit is only 215.. wow. and also do you use a cut switch to go from movie to nav. and vice versa????
08-04-2009, 06:04 PM
#16
TYPE-S KING
Join Date: Jun 2008
Location: upstate NY
Age: 42
Posts: 71
Likes: 0
Received 0 Likes
on
0 Posts
i spent over 5 hours trying to make this shit works, i did every thing like i should and still no Video feed. please check this video out and see if you help. im so tired and mad maybe i missed something

08-04-2009, 07:43 PM
#17
Instructor
Thread Starter
I think I can help. It looks like the harness they sent you is the one to install behind the headunit. To make this one work for the trunk, you will need to swap some wires.

You'll want to swap the wires I have higlighted in the harness on the left (Harness A). You'll need to cut these wires and reattach to the opposite row. You'll want to be careful when you do this because it can get confusing, but I would recommend cutting both red wires first, then swap the connection, then move on to the next colored wires. Lastly, you'll swap the white wire with the yellow wire. After you swap these wires (4 from the top row with the 4 from the bottom row) it should work. If they would have sent you Harness B from the picture, you wouldn't need to swap these wires.
Anyways, I hope this works for you! Good news is the audio is working so now just a few more wires to splice and you should get video also. Let me know if you run into anymore issues and hopefully I can assist.
08-04-2009, 08:46 PM
#18
TYPE-S KING
Join Date: Jun 2008
Location: upstate NY
Age: 42
Posts: 71
Likes: 0
Received 0 Likes
on
0 Posts
Hey Mssidah,
I think I can help. It looks like the harness they sent you is the one to install behind the headunit. To make this one work for the trunk, you will need to swap some wires.

You'll want to swap the wires I have higlighted in the harness on the left (Harness A). You'll need to cut these wires and reattach to the opposite row. You'll want to be careful when you do this because it can get confusing, but I would recommend cutting both red wires first, then swap the connection, then move on to the next colored wires. Lastly, you'll swap the white wire with the yellow wire. After you swap these wires (4 from the top row with the 4 from the bottom row) it should work. If they would have sent you Harness B from the picture, you wouldn't need to swap these wires.
Anyways, I hope this works for you! Good news is the audio is working so now just a few more wires to splice and you should get video also. Let me know if you run into anymore issues and hopefully I can assist.
I think I can help. It looks like the harness they sent you is the one to install behind the headunit. To make this one work for the trunk, you will need to swap some wires.
You'll want to swap the wires I have higlighted in the harness on the left (Harness A). You'll need to cut these wires and reattach to the opposite row. You'll want to be careful when you do this because it can get confusing, but I would recommend cutting both red wires first, then swap the connection, then move on to the next colored wires. Lastly, you'll swap the white wire with the yellow wire. After you swap these wires (4 from the top row with the 4 from the bottom row) it should work. If they would have sent you Harness B from the picture, you wouldn't need to swap these wires.
Anyways, I hope this works for you! Good news is the audio is working so now just a few more wires to splice and you should get video also. Let me know if you run into anymore issues and hopefully I can assist.
so i guess thats why i don't have the pink wire .
Thanks a lot for your help
08-04-2009, 09:37 PM
#19
Instructor
Thread Starter
I actually did try this. After comparing the two harnesses they sent me, I plugged both of them into the Nav Unit and interface. Only the one with the pink wire (Harness B) worked. So I thought I'd confirm my suspicion and I swapped these 8 wires on Harness A (since it didn�t fit behind the head unit where they said it would) and plugged it into the Nav Unit and interface, and it worked. So I'm pretty confident you can do the same and get the video to work.
When you cut the wires makes sure you cut far enough away from the actual plug before reconnecting the opposing same colored wire (a couple inches or so) so that you have room to work and that you don�t accidentally pull the wire out of the pins. If you pull the wires out of the plug, it would be a lot of work to get them back in without messing up the plug. You may need to pull the black covering back a little to give you more length on the wires before cutting.
Hopefully this makes sense. If not, let me know and I can hopefully give a little more direction.
08-05-2009, 11:02 AM
#20
Intermediate

Join Date: May 2006
Location: Manhattan
Age: 44
Posts: 30
Likes: 0
Received 0 Likes
on
0 Posts
Hey guys I am interested in buying this for just the backup camera only. I am not looking to install video or audio.. Would this work? I was first thinking of getting the Navtool but they are asking $300 since they are not doing a group buy.. Thanks in advance
08-05-2009, 12:38 PM
#21
Instructor
Thread Starter
If you didn't install the IR eye, you wouldn't be able to view the backup camera while in motion, but it would still activate when the transmission is put in Reverse. Plus, seeing the camera while in motion isn't necessary, just fun to play with while driving.
I believe the interface gets it power from the audio harness, so you would need to splice into this to get it to work, but it shouldn't be too bad. This is what dipkat from the TL forum had to do to get his video only working.
If you do order it, ask autotoys how power is supplied to the interface. I'm curious if the mysterious Pink wire somehow supplies this power without the need to splice the audio harness.
08-06-2009, 11:33 PM
#22
TYPE-S KING
Join Date: Jun 2008
Location: upstate NY
Age: 42
Posts: 71
Likes: 0
Received 0 Likes
on
0 Posts
thanks again,
08-07-2009, 12:05 PM
#23
Instructor
Thread Starter
It worked, i changed the wires as you showed me and wallaaa like magic. the only thing that i don't like and im not sure if you have the same issue, when you are watching a video in order for you to switch back to Navi you have to hit off instead of pressing NAV input override on/off, or even just pressing AUX audio only and switch back.
thanks again,
thanks again,

I've noticed the same thing too, with needing to turn it off to go back to Navi. Not sure if there is a different way to switch back.
08-09-2009, 04:36 PM
#25
Instructor
Thread Starter
08-09-2009, 04:46 PM
#26
Instructor
Thread Starter
I love to come to VA and do it.  With doing the install once, I could get yours done rather quickly. I even have some friends out that way that I haven't seen in a couple years that I'd like to visit. Unfortunately, the wife won't let me take any trips without her and the kids.
With doing the install once, I could get yours done rather quickly. I even have some friends out that way that I haven't seen in a couple years that I'd like to visit. Unfortunately, the wife won't let me take any trips without her and the kids.
08-12-2009, 03:34 PM
#27
Intermediate
Join Date: May 2006
Location: Manhattan
Age: 44
Posts: 30
Likes: 0
Received 0 Likes
on
0 Posts
To install just a backup camera with this would be pretty easy. That is, as long as autotoys sends you the video harness to install in the trunk.
If you didn't install the IR eye, you wouldn't be able to view the backup camera while in motion, but it would still activate when the transmission is put in Reverse. Plus, seeing the camera while in motion isn't necessary, just fun to play with while driving.
I believe the interface gets it power from the audio harness, so you would need to splice into this to get it to work, but it shouldn't be too bad. This is what dipkat from the TL forum had to do to get his video only working.
If you do order it, ask autotoys how power is supplied to the interface. I'm curious if the mysterious Pink wire somehow supplies this power without the need to splice the audio harness.
08-15-2009, 03:57 PM
#28
Instructor
Thread Starter
Hey i bought this on monday and received it yesterday.. I was trying it out last night just to see if it works with just the video harness and nothing happens.. Just a grey screen on the navi. I am going to try it with the audio harness plugged in and splice it.. Wish me luck
Let us know how everything goes.
08-16-2009, 01:34 AM
#29
Instructor
Thread Starter
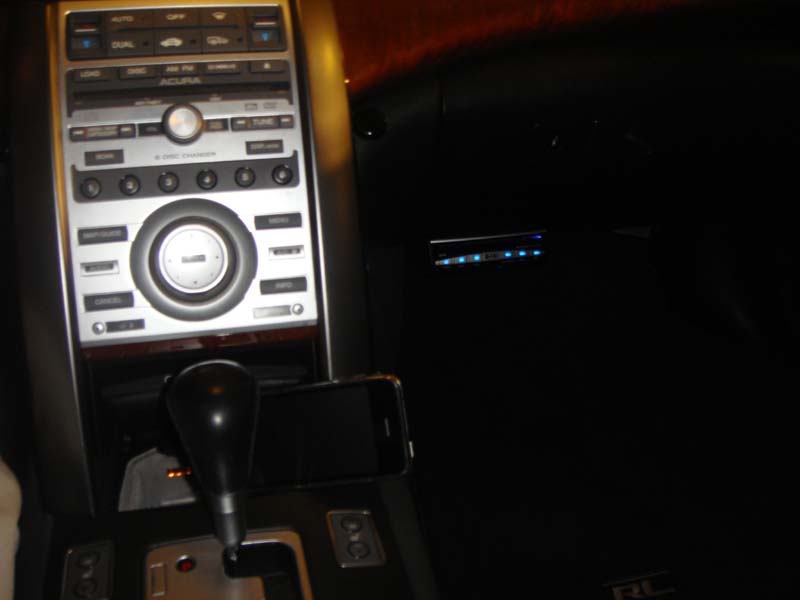
So I've modified a couple of things with the setup that I thought I'd post. First, I finally bought a car DVD player to use instead of the portable dvd player. The DVD player I bought has a wired IR eye (kind of like the one with the nav to video interface) so that I can put the DVD player out of sight and still control it with a remote. For now I've installed it under the glove box as far back as it fits so it's out of sight from anyone trying to peek in through the car through the windows. I didn't realize this until I installed it, but the button lights match our blue lights perfectly which I thought was pretty cool.
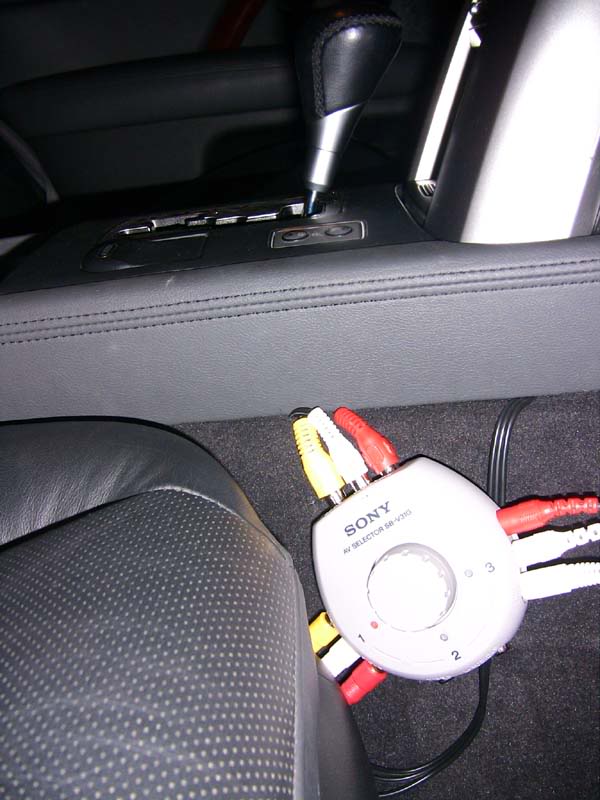
The other modification is how I hid the rca switch to switch between iPhone, iPod, and DVD player. First, I painted the switch black then hid it under the carpet. And yes, I did have to cut my RL. I cut a circular hole the size of the switch in the carpet and tucked the switch under the carpet with all the components connected. Here's before and after pictures.
Before:

After:
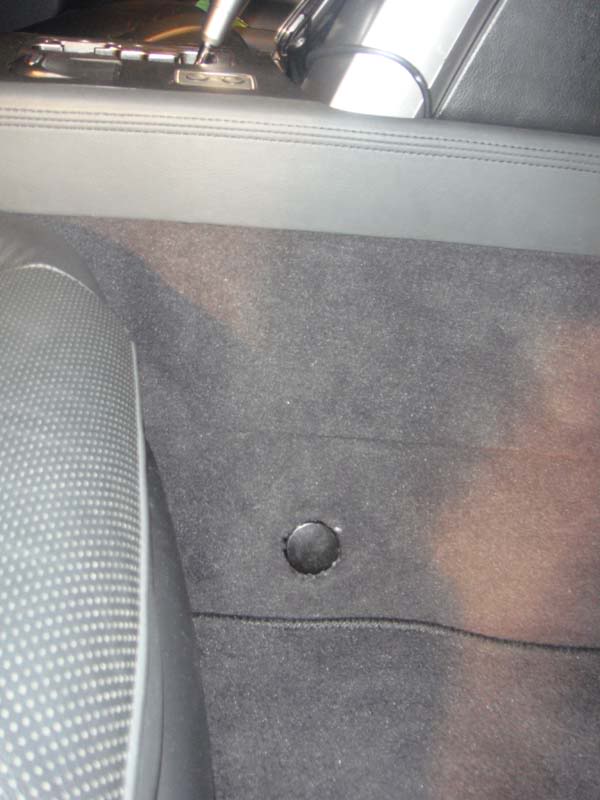
The other modification is how I hid the rca switch to switch between iPhone, iPod, and DVD player. First, I painted the switch black then hid it under the carpet. And yes, I did have to cut my RL.
I cut a circular hole the size of the switch in the carpet and tucked the switch under the carpet with all the components connected. Here's before and after pictures.Before:
After:
 08-19-2009, 09:46 PM
#31
7th Gear

Join Date: May 2009
Location: Indianapolis, IN
Posts: 7
Likes: 0
Received 0 Likes
on
0 Posts
Great write-up jhal! Just to clarify, which kit did you order/what did you request? If one orders/receives the rear kit, does it still come with the 14 pin audio connector? Your method seems pretty straight forward and it looks like as long as you get the 14 pin and 20 pin connectors, it can be made to work no matter whether you receive the front or rear kit.
This will be my first TSX mod and can't wait to get parts ordered and get started!
(I also posted this question on the TL forum before I saw this post... Feel free to only reply to one)
This will be my first TSX mod and can't wait to get parts ordered and get started!
(I also posted this question on the TL forum before I saw this post... Feel free to only reply to one
)
08-20-2009, 12:37 PM
#32
Instructor
Thread Starter
Great write-up jhal! Just to clarify, which kit did you order/what did you request? If one orders/receives the rear kit, does it still come with the 14 pin audio connector? Your method seems pretty straight forward and it looks like as long as you get the 14 pin and 20 pin connectors, it can be made to work no matter whether you receive the front or rear kit.
This will be my first TSX mod and can't wait to get parts ordered and get started!
(I also posted this question on the TL forum before I saw this post... Feel free to only reply to one)
This will be my first TSX mod and can't wait to get parts ordered and get started!
(I also posted this question on the TL forum before I saw this post... Feel free to only reply to one
) When I placed my order, I had ordered the kit to install behind the head unit. However, when communicating with autotoys, in addition to the 14 pin audio connector I received, they said they had accidentally sent me the video harness for the trunk. They ended up sending me the "correct" harness to go behind the head unit separately (although it ended up not working). So, I'm not completely sure if they would send the 14 pin connector if you request the harness for installation in the trunk...sorry.If autotoys has the correct video connector to install behind the head unit for the TSX (my guess is that they do not), but if they do, it would make it a lot easier. You could then install both video and audio harnesses there, with the interface more easily accessible from the driver's seat, and you wouldn't need to splice any wires. The only challenge, although a small one, would be running the wires to the trunk for the backup camera if you choose to install one.
If you do buy and install the harness, you'll need to let us know how it goes. I'm now curious if autotoys has a harness that will work behind the head unit for the TSX or if for most Acuras, they do not have a harness to fit behind the head unit. Also, good luck with autotoys altogether!
 08-31-2009, 07:32 PM
#34
Intermediate

Join Date: May 2008
Age: 40
Posts: 36
Likes: 0
Received 0 Likes
on
0 Posts
hey i know you said it about 100 times but what if ordering from the site i have to order the kit that is for the rear of the car becuase the "SOBs" lol dont have the one thats for the headunit. And please tell me you live in florida so i can pay you to do mine
09-01-2009, 11:20 AM
#35
Instructor
Thread Starter
But, I actually live in Utah.If autotoys sends you the kit for the rear, you will actually be in good shape.
The video Y-harness for the trunk is the one you need to avoid any cutting up of the video harness. Just make sure they send you the audio Y-harness. It is this audio Y-harness that you will need to run from the head unit to the trunk by splicing.
09-02-2009, 06:52 PM
#36
Instructor
Thread Starter
I was just looking at the autotoys site for the product I bought (product #9231 - http://www.autotoys.com/x/product.php?productid=9231) and it looks like there are some changes since I purchased it.
First, it is now listed at $226 instead of the $215 that I paid.
Second, it now has "ACURA and EXTENSION OPTIONS" where it lists
- "For TL with XM (wires at rear and audio plug at XM TUNER)(+$25.00)"
- "For MDX or cars with under the seat, 12ft EXTENSION audio cable (+$15.00)"
I'm guessing these options were added to alleviate the wiring problems some of us experienced when the interface was first introduced. If these do work on the RL, it might make the install easier, and you wouldn't need to do the wire splicing that I had to do, but I don't know for sure.
Since I don't know the compatibility of these extension options, if anyone has any additional insight, please post for other potential buyers. I know it can be a PITA trying to get detailed information from autotoys, so if anyone has purchased and/or used either of these options, let us know so we can possibly make it easier for other Acurazine members looking to buy this.
(BTW, as a side note, thank you to all you fellow Acurazine members for all your insight!!! I am very appreciative! I have been able to save needless trips to the dealer because of the experiences you have shared. I have been able to tackle DIY fixes and maintenance like replacing the climate control bulbs myself for $5.74, replacing the latches for the power outlet and coin holder closing mechanisms for $12.01, changing the rear differential fluid for under $50.00, and just many other things that has made my RL ownership a very positive one. Sorry to get a little sappy and to add this as a side note, I just feel this forum has been very beneficial for me, and I don't think I've thanked you guys for everything you have contributed. I just hope with this DIY I can give a little back. )
First, it is now listed at $226 instead of the $215 that I paid.
Second, it now has "ACURA and EXTENSION OPTIONS" where it lists
- "For TL with XM (wires at rear and audio plug at XM TUNER)(+$25.00)"
- "For MDX or cars with under the seat, 12ft EXTENSION audio cable (+$15.00)"
I'm guessing these options were added to alleviate the wiring problems some of us experienced when the interface was first introduced. If these do work on the RL, it might make the install easier, and you wouldn't need to do the wire splicing that I had to do, but I don't know for sure.
Since I don't know the compatibility of these extension options, if anyone has any additional insight, please post for other potential buyers. I know it can be a PITA trying to get detailed information from autotoys, so if anyone has purchased and/or used either of these options, let us know so we can possibly make it easier for other Acurazine members looking to buy this.
(BTW, as a side note, thank you to all you fellow Acurazine members for all your insight!!!
I am very appreciative! I have been able to save needless trips to the dealer because of the experiences you have shared. I have been able to tackle DIY fixes and maintenance like replacing the climate control bulbs myself for $5.74, replacing the latches for the power outlet and coin holder closing mechanisms for $12.01, changing the rear differential fluid for under $50.00, and just many other things that has made my RL ownership a very positive one. Sorry to get a little sappy and to add this as a side note, I just feel this forum has been very beneficial for me, and I don't think I've thanked you guys for everything you have contributed. I just hope with this DIY I can give a little back. )
09-03-2009, 12:47 AM
#37
Cruisin'

Join Date: Apr 2008
Location: Cerritos, CA
Age: 44
Posts: 18
Likes: 0
Received 0 Likes
on
0 Posts
i think this is the manufacturer web site.
this is the link that sells same item with $220. i think this is the manufacturer web site.
http://venturatechnology.com.mx/prod...eo_integration
recently I bouth a digital media player from Fry's. I think its so cool if this connected with interface. it plays videos and music directly from ubs flash memory or sd card.
http://www.frys.com/product/5721842?...H:MAIN_RSLT_PG
http://venturatechnology.com.mx/prod...eo_integration
recently I bouth a digital media player from Fry's. I think its so cool if this connected with interface. it plays videos and music directly from ubs flash memory or sd card.
http://www.frys.com/product/5721842?...H:MAIN_RSLT_PG
09-03-2009, 04:39 PM
#38
6th Gear

Join Date: Sep 2009
Age: 60
Posts: 6
Likes: 0
Received 0 Likes
on
0 Posts
I was just looking at the autotoys site for the product I bought (product #9231 - http://www.autotoys.com/x/product.php?productid=9231) and it looks like there are some changes since I purchased it.
First, it is now listed at $226 instead of the $215 that I paid.
Second, it now has "ACURA and EXTENSION OPTIONS" where it lists
- "For TL with XM (wires at rear and audio plug at XM TUNER)(+$25.00)"
- "For MDX or cars with under the seat, 12ft EXTENSION audio cable (+$15.00)"
I'm guessing these options were added to alleviate the wiring problems some of us experienced when the interface was first introduced. If these do work on the RL, it might make the install easier, and you wouldn't need to do the wire splicing that I had to do, but I don't know for sure.
Since I don't know the compatibility of these extension options, if anyone has any additional insight, please post for other potential buyers. I know it can be a PITA trying to get detailed information from autotoys, so if anyone has purchased and/or used either of these options, let us know so we can possibly make it easier for other Acurazine members looking to buy this.
(BTW, as a side note, thank you to all you fellow Acurazine members for all your insight!!! I am very appreciative! I have been able to save needless trips to the dealer because of the experiences you have shared. I have been able to tackle DIY fixes and maintenance like replacing the climate control bulbs myself for $5.74, replacing the latches for the power outlet and coin holder closing mechanisms for $12.01, changing the rear differential fluid for under $50.00, and just many other things that has made my RL ownership a very positive one. Sorry to get a little sappy and to add this as a side note, I just feel this forum has been very beneficial for me, and I don't think I've thanked you guys for everything you have contributed. I just hope with this DIY I can give a little back. )
First, it is now listed at $226 instead of the $215 that I paid.
Second, it now has "ACURA and EXTENSION OPTIONS" where it lists
- "For TL with XM (wires at rear and audio plug at XM TUNER)(+$25.00)"
- "For MDX or cars with under the seat, 12ft EXTENSION audio cable (+$15.00)"
I'm guessing these options were added to alleviate the wiring problems some of us experienced when the interface was first introduced. If these do work on the RL, it might make the install easier, and you wouldn't need to do the wire splicing that I had to do, but I don't know for sure.
Since I don't know the compatibility of these extension options, if anyone has any additional insight, please post for other potential buyers. I know it can be a PITA trying to get detailed information from autotoys, so if anyone has purchased and/or used either of these options, let us know so we can possibly make it easier for other Acurazine members looking to buy this.
(BTW, as a side note, thank you to all you fellow Acurazine members for all your insight!!!
I am very appreciative! I have been able to save needless trips to the dealer because of the experiences you have shared. I have been able to tackle DIY fixes and maintenance like replacing the climate control bulbs myself for $5.74, replacing the latches for the power outlet and coin holder closing mechanisms for $12.01, changing the rear differential fluid for under $50.00, and just many other things that has made my RL ownership a very positive one. Sorry to get a little sappy and to add this as a side note, I just feel this forum has been very beneficial for me, and I don't think I've thanked you guys for everything you have contributed. I just hope with this DIY I can give a little back. )jhal, Awesome write up! I have been following these install threads for a bit and this one nails it. I have a couple of quick questions if you have the insight.
Can I integrate my existing backup camera that was part of the factory install? I have an 07 TL. The backup camera was part of the Nav package.
How are you connecting the iPhone at the console? I didn't see any mention of the cabling. Do you run an extended USB cable from the unit in the trunk?
Thanks for the help and all of the time put into making this a much easier install for the rest of us.
09-04-2009, 12:58 PM
#39
Instructor
Thread Starter
this is the link that sells same item with $220. i think this is the manufacturer web site.
http://venturatechnology.com.mx/prod...eo_integration
http://venturatechnology.com.mx/prod...eo_integration
Excellent find kool6123! Now we know of an alternate place to purchase the interface. Hopefully working with and getting info from the manufacturer, Ventura Technology, will be easier than with autotoys.
09-04-2009, 01:19 PM
#40
Instructor
Thread Starter
jhal, Awesome write up! I have been following these install threads for a bit and this one nails it. I have a couple of quick questions if you have the insight.
Can I integrate my existing backup camera that was part of the factory install? I have an 07 TL. The backup camera was part of the Nav package.
How are you connecting the iPhone at the console? I didn't see any mention of the cabling. Do you run an extended USB cable from the unit in the trunk?
Thanks for the help and all of the time put into making this a much easier install for the rest of us.
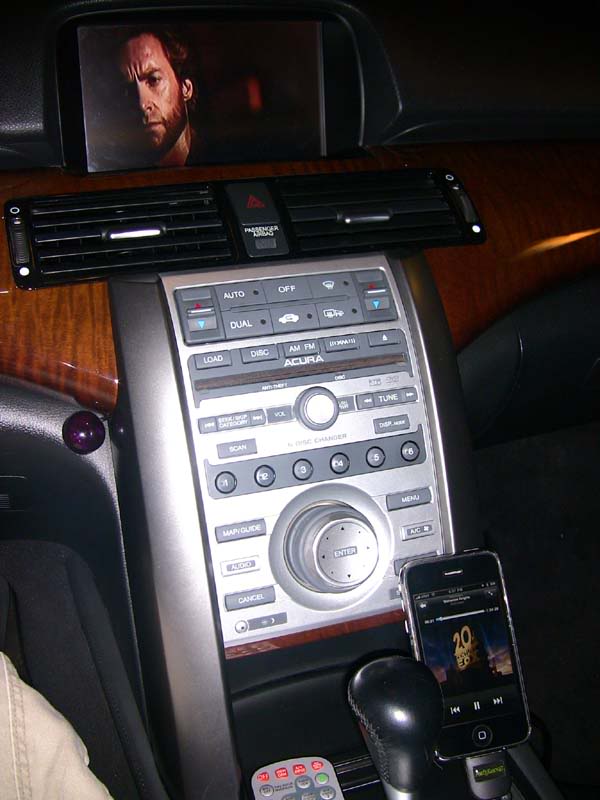
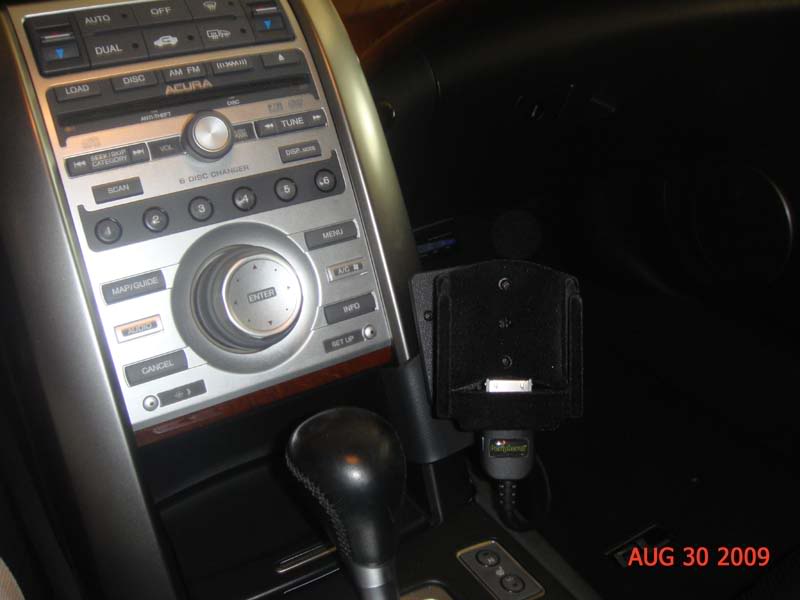
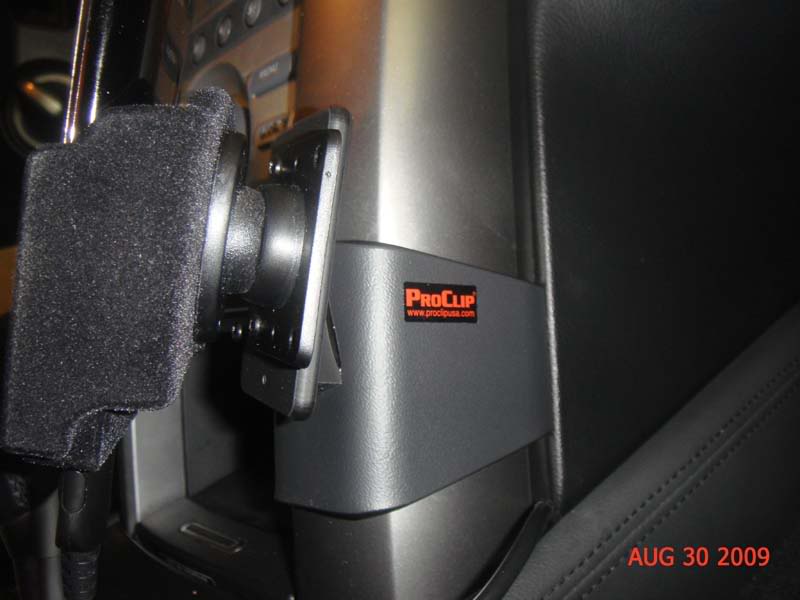
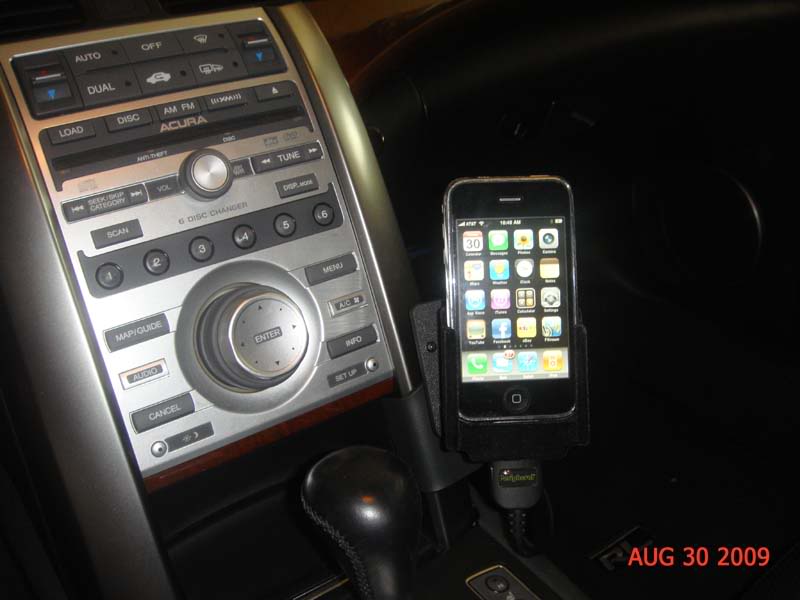
As far as integrating the factory backup camera, I am not sure. I'm not quite sure how it is wired to the navigation. If it is simply wired with RCA cables, it would be easy, but I'm guessing it uses some different connector to connect the camera to the nav unit.
To connect my iPhone at the console, I ran an RCA cable from the interface in the trunk to an RCA switch closer to the driver's seat. At this switch, I plugged in the iPhone connector's RCA cables which feeds to the iPhone. The iPhone connector I bought was the PERIPHERAL PXP01. I bought mine <here> on ebay from hifisoundconnection for under $30.
