Comptech Short Shifter Install/pics 3G Garage #A-086
 01-30-2006, 08:10 AM
#1
How may I help you.....?
Thread Starter
Join Date: Aug 2005
Location: Northern VA
Age: 46
Posts: 1,932
Likes: 0
Received 10 Likes
on
3 Posts
Comptech Short Shifter Install/pics 3G Garage #A-086
OK... This past Friday I installed my Comptech SS by myself and took pictures. I promised a write-up and here it is. Let me start by saying that I am by no means a mechanic, I just like to work on my car. I did not know if I could do this but it turned out to sound alot harder than it actually was. Anyone can do this. The difference was unbelievable.
Install Time about 2 hours
Tools needed:
-Butter Knife
-Rag or cloth
-Phillips Screwdriver
-Socket set 8mm and 12mm
-Hex wrench (I think 2mm)
For the purpose of this install, when I referenc the center console, I mean the part starting with the cupholders and going back to the rear of the console. The center tray will be the section from the cup holders, forward to the black plastic area between the radio preset buttons and the Top accessory door.
Start by cleaning out your center console, then remove the rubber insert in the bottom and unscrew the two screws...

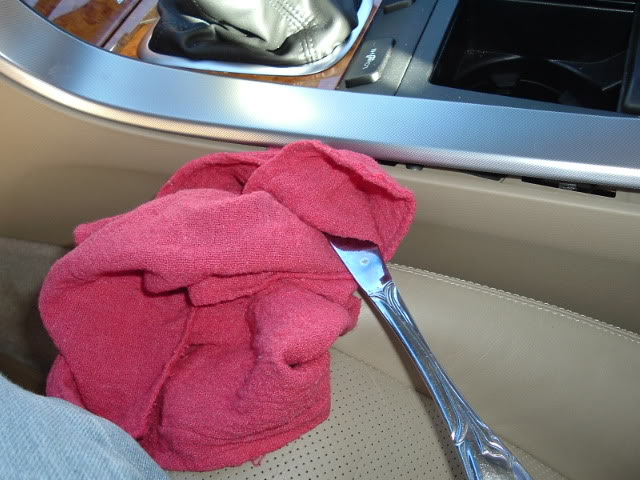
Next, remove the silver trim pieces. Use the butter knife to pry under the trim piece starting at the end near the center console and work your way up, gently prying. I found that taking the butter knife and wrapping a rag around the end prevented scratches and knicks in the trim. I would insert the knife under the trim then slowely rotate the blade from hor. to vert. and the trim would pop up. When you get to the top of the trim, there are clips holding it in place. Grasp the trim at the curve (right next to the accessory doors) and gently pull away. The clips will pop right out.
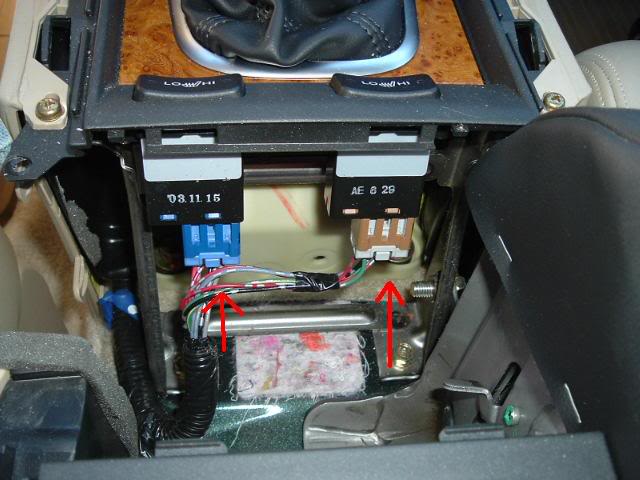
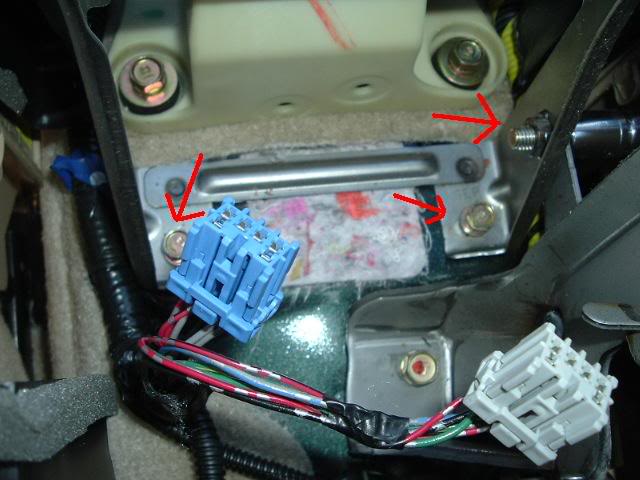
Once the trim is off, unscrew the 6 small screw that were underneath the trim. This picture shows the 4 that hold the center tray on, but there are two more behind it that hold the console in place. Once you unscrew the ones holding the console, you will need to slide the console to the rear about 6-8 inches. There is still some crap holding the center console so you can not remove it completely, but you can easily slide it back out of the way.
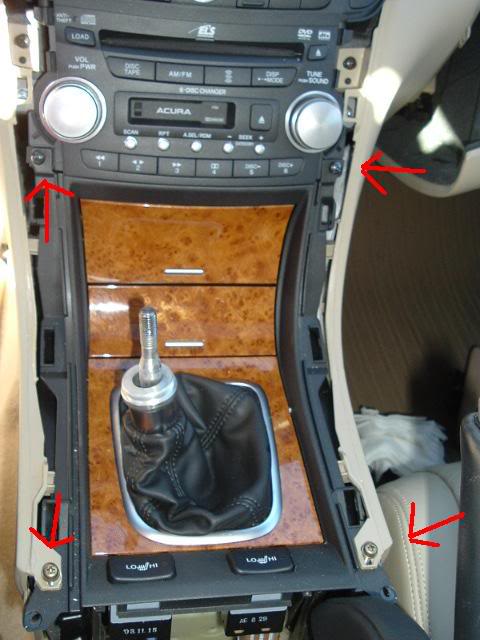
(You can see the two holes above where I removed the screws holding the center console in place. The red arrows indicate the 4 screws holding the center tray in place.)
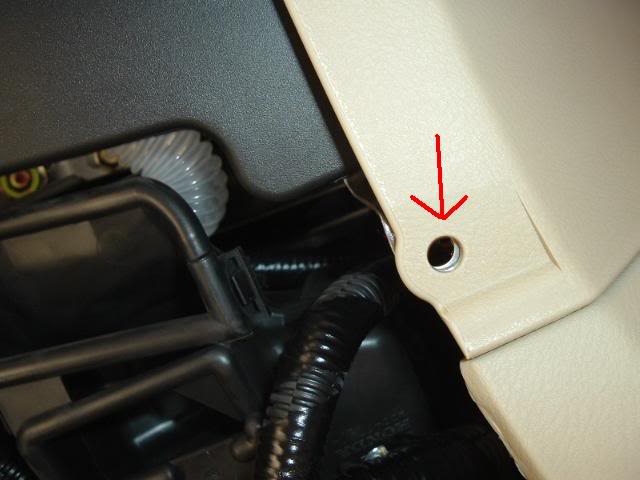
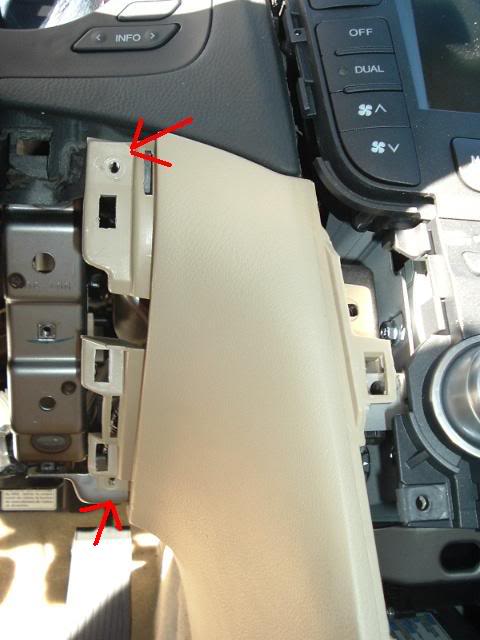
Next is removing the covering under the steering wheel. (The directions say to also remove the glove box but you will not have to do this. It will save alot of time by NOT removing it.) Unscrew the one screw located underneath and to the right of the panel. It is the only screw. You can then use the butter knife again to pry the panel away. It is held by clips that will pop off without too much pressure. Be careful as there are wiring harnesses plugged in behind the VSA panel.

Remove the Wiring harnesses
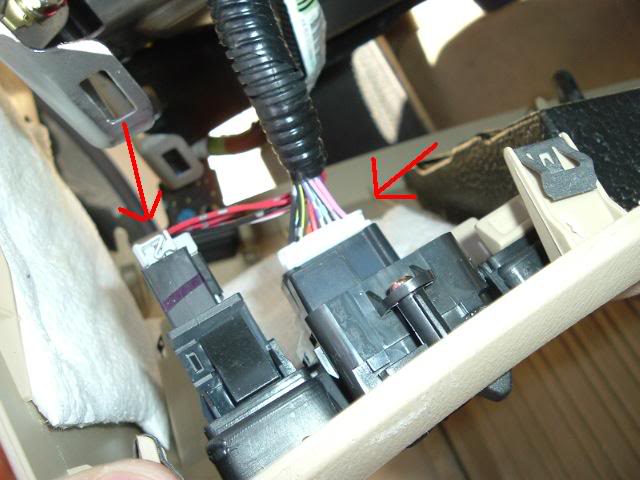
Set that panel aside and now we are going back to the center. When you slide the center console back, you will see the wiring harnesses for the Seat heaters. Go ahead and unplug them. In case you forget, Blue is drivers side and Brown is passenger side.
Now you need to remove the side panel (right side). The left panel can stay in place without problem. To remove it you would have to take out the glovebox and we are skipping that step to save time. The (right side) panel is removed by unscrwing the one screw at the top. There are two clips holding it to the center tray. These will easily pop out.
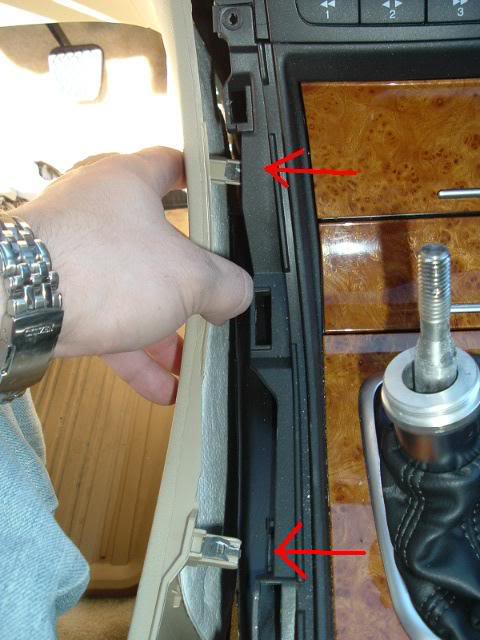
Once that panel has been removed you can now pull out the center tray. Remove it by lifting up, and then pulling it toward you. There is a little tounge and groove type of connection at the top of the piece (between the radio preset buttons and the top accessory door) You will see what I mean. There is also a harness plugged into the back of this piece for the cig lighter. Make sure you remove that. Then the center tray will just slide right out.
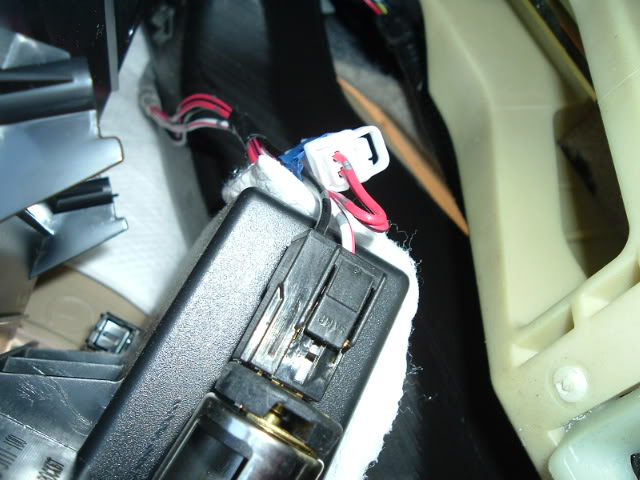
(Above is cig lighter harness)
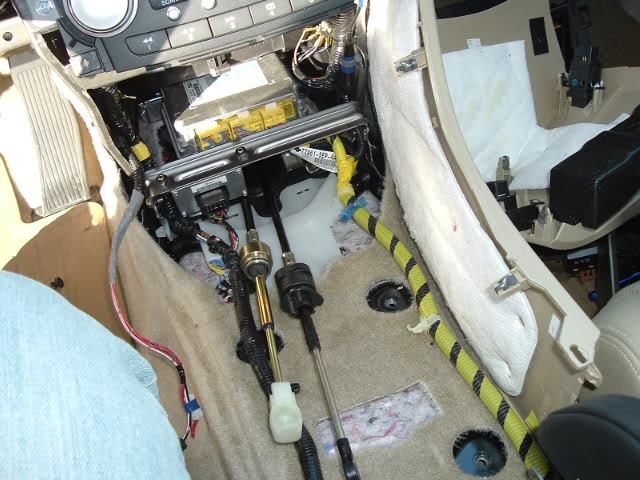
Next we need to remove the silver bracket under the wires for the seat heaters. There are two bolts into the floor and one bolt on the right side. Remove all three. (The bolts on the floor are 8mm and the one on the side is 12mm) Once those are removed, you will pop out the white plastic holders that hold the black plastic HVAC tunnel in place. Once the plastic tabs are off, the black HVAC housing will slide down and out.
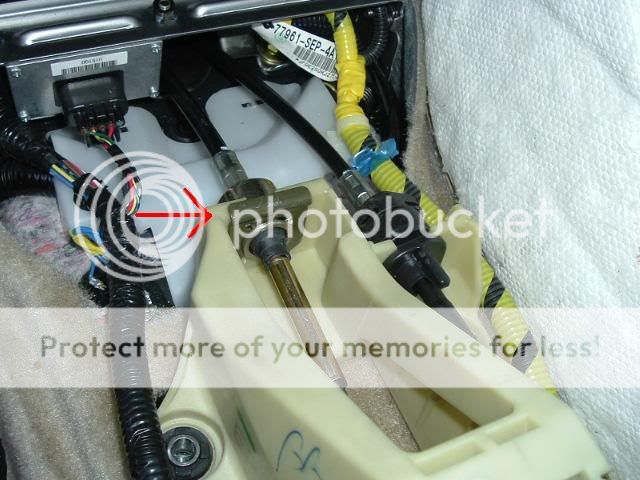
This is what you now see.
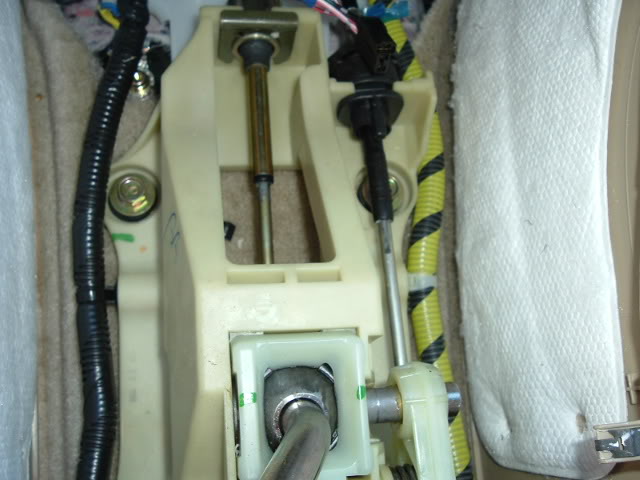
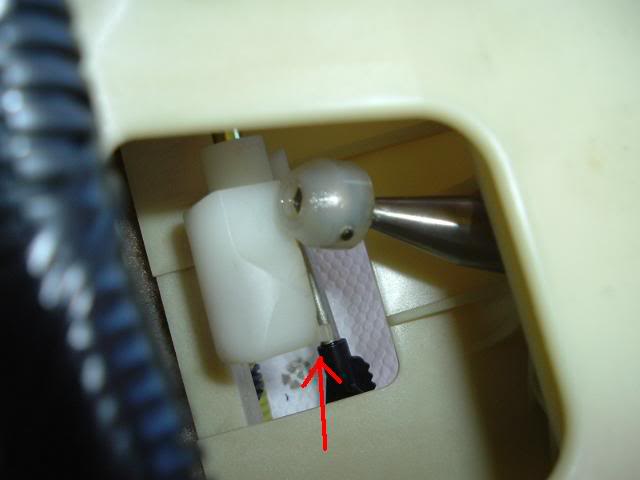
First thing we do is pull the clips that are holding the wire bundles out of the way. There is one clip on each side of the yellow housing... Once the wire bundles are out of the way look on the right side of this piece, there is a retaining pin and washer holding the linkage in place. Remove the retaining pin and the washer. The linkage can just hang there with no problem.
Next, you will need to look into the (yellowish) shroud from the LEFT side... you may need to lay down in the passenger footwell to get in there. When you look into the housing, you will see a small metal retaining pin holding the little metal rod in place. You remove this by spreading the ends of the retaining pin apart, and pushing forward. (the part you spread apart is in the rear and then you push it forward.. rear and foward being relative to if you were sitting in the drivers chair.) When that metal retaining pin is off, the metal rod will pull away from the remaing plastic piece.
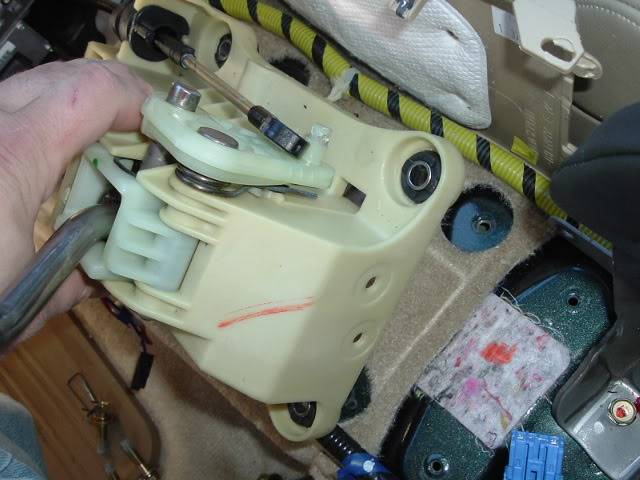
Now you can remove the large bolts holding the (yellowish) housing to the floorboard. (these are 12mm) (ignore the blood smeared on the housing and dribbled all around... must be something sharp in all this junk...)
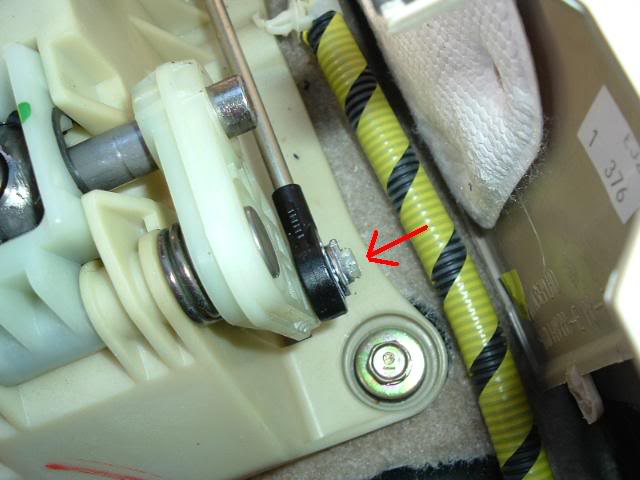
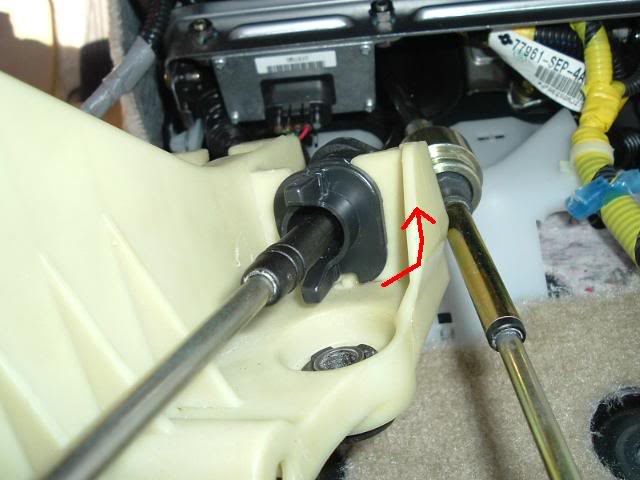
Now we need to remove the two linkage pieces at the front of the housing. The metal clip is removed by simply prying it straight up.
The black plastic clip is a little harder. from the inside (as you are looking at it just like the next pic) you must turn the whole black plastic piece on both sides of the yellow housing counter-clockwise 90degrees, then it will pop straight up. The best way to do this is to grasp the black part on the forward edge of the yellow housing and as you turn the inside part with your fingers, turn the outside part with your hand. Use more force on the outside than the inside or you might break off one of the tabs on the inside. (Yes, I broke my tan off but it does not cause any problems at all) If you break it, it really is no big deal.
This is what you see now.
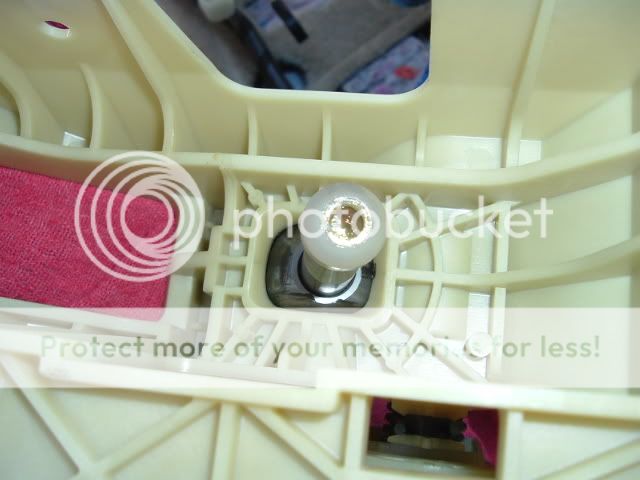
Comptech says to place the housing ina bench vise but I did not need to do this. Take the yellow housing (it will now be loose and detached from the car) and turn it upside down so you are looking at the little plastic ball (called the bushing) on the end of the metal rod. I will tell you what I did but you may have a different technique. End result just needs to be the same. I placed the yellow housing (upside down) between my knees. I then used the metal bar provided by Comptech and pulled it up underneath the plastic bushing so that I could pull it towards me. U then wrapped the end in my rag so it would not go flying off somewhere. Then I pulled like a SOB in order to get that bushing to pop off. It is not easy and you will need to use some force. Justmake sure you are pulling the bushing STRAIGHT UP off the metal rod and not at an angle.
With Bushing on:
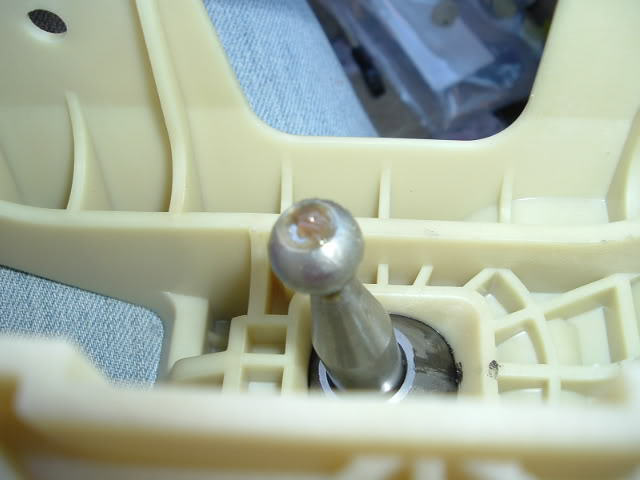
With Bushing Off:
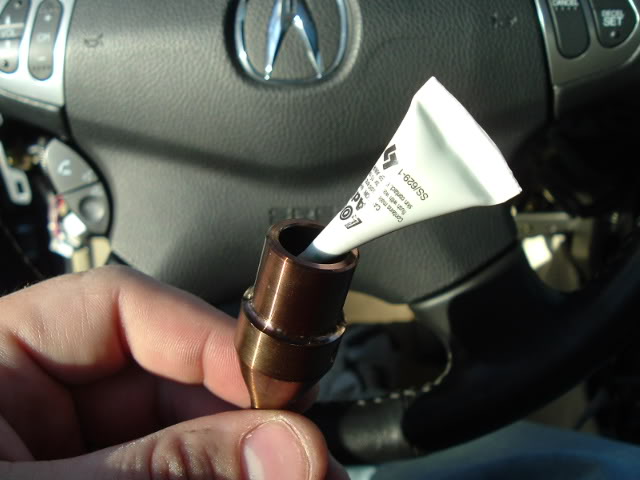
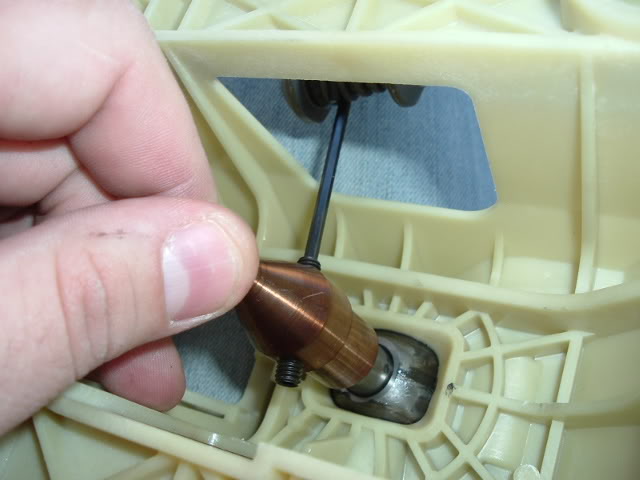
Now take your NEW Comptech Short Shifter (yes the brass looking metal doo-hickie) and turn it upside down. You need to squirt some Locktite (provided by Comptech) into the inside of the SS. Make sure you DO NOT GET ANY of this crap on the outside of the SS, especially not on the little ball at the end. It says that the Locktite will be dry in 10 minutes and completely curred in 36-48 hours.
Now slide the COmptech SS over the little ball where we removed the bushing. Slide it down all the way to the end. Use a 2mm(I think...) hex wrench to tighten the provided screws into the SS. This will secure the Comptech SS so make sure it is tight.
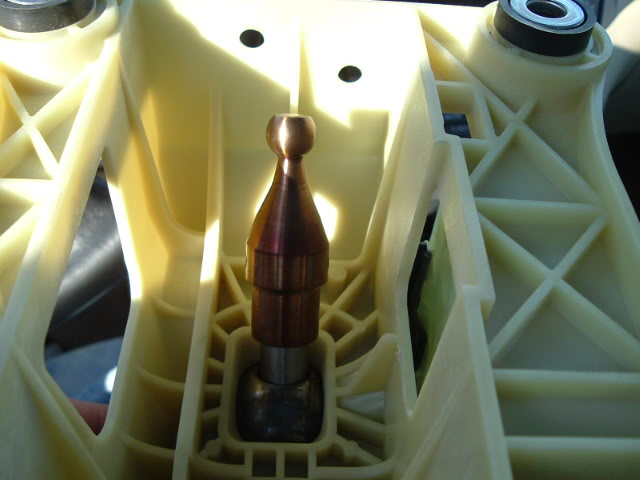
This is what it will look like when you are done... Remember, this is still upside down from when we pulled it off the floorboard..
Now you need to put the bushing back onto the little ball at the end of the COmptech SS. I found that if you use the metal tool Comptech provided to remove the bushing, you can place it on top of the bushing and push down until it snaps onto the SS ball.
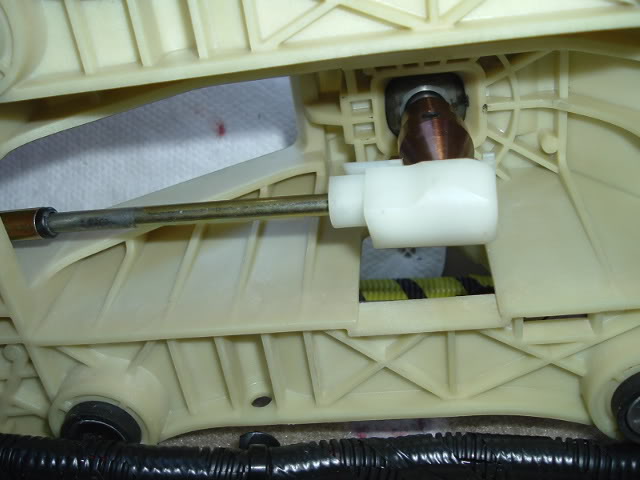
When you place the yellow housing back where it belongs, you will need to reattach the linkage with the small retaining pin. The linkage will be closer to the floorboard than before. Once the retaining pin is in place, it will look like this:
The next thing you do should be to bolt the yellow housing back to the floor. If you put the linkage cables on before bolting to the floor, you will have an issue with the top right bolt. Linkage will be in the way.
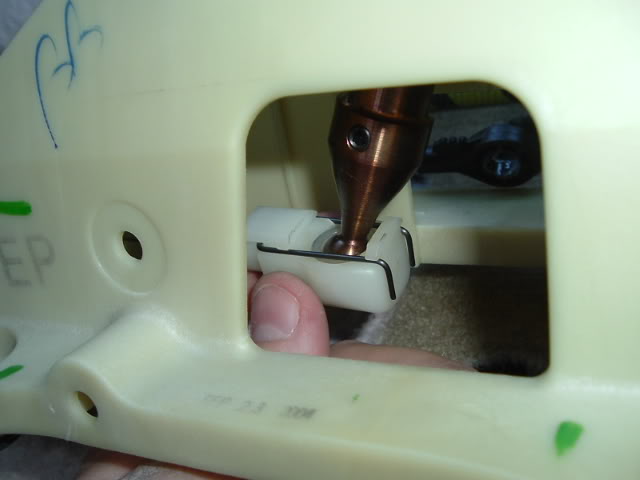
So... Bolt the housing back down, attach the two linkage pieces at the front and then the linakge piece ont he right side with the retaining pin.
-------------YOU NOW HAVE A COMPTECH SHORT SHIFTER-----------------
I figue if you made it this far, I do not need to tell you how to put your car back together. Assembly is easy after you have taken it apart.
Good luck with this guys. I can not stress enough how easy this was to do, especially for me being a guy who had never done this before. There is no way anyone should pay upwards of $300 when they can do it themselves. If people use the Comptech Instructions and these notes together, it should be a piece of cake.
Hope this helps guys. If you have any questions... let me know....
Install Time about 2 hours
Tools needed:
-Butter Knife
-Rag or cloth
-Phillips Screwdriver
-Socket set 8mm and 12mm
-Hex wrench (I think 2mm)
For the purpose of this install, when I referenc the center console, I mean the part starting with the cupholders and going back to the rear of the console. The center tray will be the section from the cup holders, forward to the black plastic area between the radio preset buttons and the Top accessory door.
Start by cleaning out your center console, then remove the rubber insert in the bottom and unscrew the two screws...
Next, remove the silver trim pieces. Use the butter knife to pry under the trim piece starting at the end near the center console and work your way up, gently prying. I found that taking the butter knife and wrapping a rag around the end prevented scratches and knicks in the trim. I would insert the knife under the trim then slowely rotate the blade from hor. to vert. and the trim would pop up. When you get to the top of the trim, there are clips holding it in place. Grasp the trim at the curve (right next to the accessory doors) and gently pull away. The clips will pop right out.
Once the trim is off, unscrew the 6 small screw that were underneath the trim. This picture shows the 4 that hold the center tray on, but there are two more behind it that hold the console in place. Once you unscrew the ones holding the console, you will need to slide the console to the rear about 6-8 inches. There is still some crap holding the center console so you can not remove it completely, but you can easily slide it back out of the way.
(You can see the two holes above where I removed the screws holding the center console in place. The red arrows indicate the 4 screws holding the center tray in place.)
Next is removing the covering under the steering wheel. (The directions say to also remove the glove box but you will not have to do this. It will save alot of time by NOT removing it.) Unscrew the one screw located underneath and to the right of the panel. It is the only screw. You can then use the butter knife again to pry the panel away. It is held by clips that will pop off without too much pressure. Be careful as there are wiring harnesses plugged in behind the VSA panel.
Remove the Wiring harnesses
Set that panel aside and now we are going back to the center. When you slide the center console back, you will see the wiring harnesses for the Seat heaters. Go ahead and unplug them. In case you forget, Blue is drivers side and Brown is passenger side.
Now you need to remove the side panel (right side). The left panel can stay in place without problem. To remove it you would have to take out the glovebox and we are skipping that step to save time. The (right side) panel is removed by unscrwing the one screw at the top. There are two clips holding it to the center tray. These will easily pop out.
Once that panel has been removed you can now pull out the center tray. Remove it by lifting up, and then pulling it toward you. There is a little tounge and groove type of connection at the top of the piece (between the radio preset buttons and the top accessory door) You will see what I mean. There is also a harness plugged into the back of this piece for the cig lighter. Make sure you remove that. Then the center tray will just slide right out.
(Above is cig lighter harness)
Next we need to remove the silver bracket under the wires for the seat heaters. There are two bolts into the floor and one bolt on the right side. Remove all three. (The bolts on the floor are 8mm and the one on the side is 12mm) Once those are removed, you will pop out the white plastic holders that hold the black plastic HVAC tunnel in place. Once the plastic tabs are off, the black HVAC housing will slide down and out.
This is what you now see.
First thing we do is pull the clips that are holding the wire bundles out of the way. There is one clip on each side of the yellow housing... Once the wire bundles are out of the way look on the right side of this piece, there is a retaining pin and washer holding the linkage in place. Remove the retaining pin and the washer. The linkage can just hang there with no problem.
Next, you will need to look into the (yellowish) shroud from the LEFT side... you may need to lay down in the passenger footwell to get in there. When you look into the housing, you will see a small metal retaining pin holding the little metal rod in place. You remove this by spreading the ends of the retaining pin apart, and pushing forward. (the part you spread apart is in the rear and then you push it forward.. rear and foward being relative to if you were sitting in the drivers chair.) When that metal retaining pin is off, the metal rod will pull away from the remaing plastic piece.
Now you can remove the large bolts holding the (yellowish) housing to the floorboard. (these are 12mm) (ignore the blood smeared on the housing and dribbled all around... must be something sharp in all this junk...)
Now we need to remove the two linkage pieces at the front of the housing. The metal clip is removed by simply prying it straight up.
The black plastic clip is a little harder. from the inside (as you are looking at it just like the next pic) you must turn the whole black plastic piece on both sides of the yellow housing counter-clockwise 90degrees, then it will pop straight up. The best way to do this is to grasp the black part on the forward edge of the yellow housing and as you turn the inside part with your fingers, turn the outside part with your hand. Use more force on the outside than the inside or you might break off one of the tabs on the inside. (Yes, I broke my tan off but it does not cause any problems at all) If you break it, it really is no big deal.
This is what you see now.
Comptech says to place the housing ina bench vise but I did not need to do this. Take the yellow housing (it will now be loose and detached from the car) and turn it upside down so you are looking at the little plastic ball (called the bushing) on the end of the metal rod. I will tell you what I did but you may have a different technique. End result just needs to be the same. I placed the yellow housing (upside down) between my knees. I then used the metal bar provided by Comptech and pulled it up underneath the plastic bushing so that I could pull it towards me. U then wrapped the end in my rag so it would not go flying off somewhere. Then I pulled like a SOB in order to get that bushing to pop off. It is not easy and you will need to use some force. Justmake sure you are pulling the bushing STRAIGHT UP off the metal rod and not at an angle.
With Bushing on:
With Bushing Off:
Now take your NEW Comptech Short Shifter (yes the brass looking metal doo-hickie) and turn it upside down. You need to squirt some Locktite (provided by Comptech) into the inside of the SS. Make sure you DO NOT GET ANY of this crap on the outside of the SS, especially not on the little ball at the end. It says that the Locktite will be dry in 10 minutes and completely curred in 36-48 hours.
Now slide the COmptech SS over the little ball where we removed the bushing. Slide it down all the way to the end. Use a 2mm(I think...) hex wrench to tighten the provided screws into the SS. This will secure the Comptech SS so make sure it is tight.
This is what it will look like when you are done... Remember, this is still upside down from when we pulled it off the floorboard..
Now you need to put the bushing back onto the little ball at the end of the COmptech SS. I found that if you use the metal tool Comptech provided to remove the bushing, you can place it on top of the bushing and push down until it snaps onto the SS ball.
When you place the yellow housing back where it belongs, you will need to reattach the linkage with the small retaining pin. The linkage will be closer to the floorboard than before. Once the retaining pin is in place, it will look like this:
The next thing you do should be to bolt the yellow housing back to the floor. If you put the linkage cables on before bolting to the floor, you will have an issue with the top right bolt. Linkage will be in the way.
So... Bolt the housing back down, attach the two linkage pieces at the front and then the linakge piece ont he right side with the retaining pin.
-------------YOU NOW HAVE A COMPTECH SHORT SHIFTER-----------------
I figue if you made it this far, I do not need to tell you how to put your car back together. Assembly is easy after you have taken it apart.
Good luck with this guys. I can not stress enough how easy this was to do, especially for me being a guy who had never done this before. There is no way anyone should pay upwards of $300 when they can do it themselves. If people use the Comptech Instructions and these notes together, it should be a piece of cake.
Hope this helps guys. If you have any questions... let me know....

The following 8 users liked this post by jmbnova:
bigwavedave25 (03-31-2020),
FOXfoto (09-12-2012),
Millimus (03-04-2013),
nick6289123 (10-27-2011),
profi247 (02-26-2017),
and 3 others liked this post.
01-30-2006, 08:26 AM
#2
Team Anthracite Member
That is one hell of a writeup! Thank you very much! I'm doing the install this week and this will be a great reference! One question... in the Comptech instructions, it talks about applying grease to the shifter ball. Is this not necessary? You don't mention it anywhere.
01-30-2006, 08:28 AM
#3
How may I help you.....?
Thread Starter
Join Date: Aug 2005
Location: Northern VA
Age: 46
Posts: 1,932
Likes: 0
Received 10 Likes
on
3 Posts
I didn't have any grease with me, so i just used my finger to transfer some of the grease.. the bushing will retain some grease on it regardless.... I just didn't have any with me...
01-30-2006, 08:34 AM
#4
Senior Moderator
Regions Leader
Regions Leader
Excellent DIY JMB!!!!!
I will be using these instructions soon as I get the SS, should have it anyday now.
Cant thank you enough for taking the time to document the procedure.
So......do you like it???
I will be using these instructions soon as I get the SS, should have it anyday now.
Cant thank you enough for taking the time to document the procedure.
So......do you like it???
01-30-2006, 08:35 AM
#6
Senior Moderator
Regions Leader
Regions Leader
Originally Posted by zax123
That is one hell of a writeup! Thank you very much! I'm doing the install this week and this will be a great reference! One question... in the Comptech instructions, it talks about applying grease to the shifter ball. Is this not necessary? You don't mention it anywhere.
Does it call out for any type of grease in particular?
JMB, how did you take the shift boot off?
01-30-2006, 08:38 AM
#7
How may I help you.....?
Thread Starter
Join Date: Aug 2005
Location: Northern VA
Age: 46
Posts: 1,932
Likes: 0
Received 10 Likes
on
3 Posts
It really is not.... Like i said, I am not exactly a mechanic.. but I have now done myt AEM CAI (twice) and the Comptech SS by myself without any problems. Just make sure you remember which screws go where... ( I say as I am calling Acura to get one replacement screw... lol)
Trancemission - I absolutely LOVE this thing. The shift boot is attached to what i was calling the center tray... it comes off with it... or did you mean the boot from the shift knob?
Doesn't mention any particular kind of grease....
Trancemission - I absolutely LOVE this thing. The shift boot is attached to what i was calling the center tray... it comes off with it... or did you mean the boot from the shift knob?
Doesn't mention any particular kind of grease....
Trending Topics
01-30-2006, 08:52 AM
#10
How may I help you.....?
Thread Starter
Join Date: Aug 2005
Location: Northern VA
Age: 46
Posts: 1,932
Likes: 0
Received 10 Likes
on
3 Posts
I have an aftermarket knob but i think the way it worked was that you pulled down on the small ring of metal just at the top of the shift boot... when you pulled that down it popped the knob off...
this is mine so im not positive... someone should be able to chime in and tell us if we are right

this is mine so im not positive... someone should be able to chime in and tell us if we are right
01-30-2006, 08:54 AM
#12
Senior Moderator
Regions Leader
Regions Leader
Originally Posted by Nandito28
does comptech have a web site? where is the best deal at for the shifter?
https://acurazine.com/forums/sponsored-sales-group-buys-10/comptech-short-shifter-tsx-tl-330087/
01-30-2006, 08:54 AM
#13
How may I help you.....?
Thread Starter
Join Date: Aug 2005
Location: Northern VA
Age: 46
Posts: 1,932
Likes: 0
Received 10 Likes
on
3 Posts
comptech.com but also check the group buy thread by excelerate https://acurazine.com/forums/showthread.php?t=330087
 we posted them at the exact same time...lol!
 01-30-2006, 09:56 AM
#17
How may I help you.....?
Thread Starter
Join Date: Aug 2005
Location: Northern VA
Age: 46
Posts: 1,932
Likes: 0
Received 10 Likes
on
3 Posts
We messed up dude.. its comptechusa.com heres the direct link http://www.comptechusa.com/store/tleng.html
shipping for them is like $5...
shipping for them is like $5...
01-30-2006, 10:11 AM
#18
Pro

Join Date: Nov 2005
Location: FLorida
Age: 40
Posts: 592
Likes: 0
Received 0 Likes
on
0 Posts
Than it would be cheaper for me to go thru Comptechusa.com...
Bought it! Thanks for the help! Look fwd to installing this baby!
Hey jmbnova, did this mod help out any on the 3rd gear problem?
Bought it! Thanks for the help! Look fwd to installing this baby!
Hey jmbnova, did this mod help out any on the 3rd gear problem?
01-30-2006, 10:26 AM
#19
How may I help you.....?
Thread Starter
Join Date: Aug 2005
Location: Northern VA
Age: 46
Posts: 1,932
Likes: 0
Received 10 Likes
on
3 Posts
I think it did... it seems to slide in a little easier... I have been toying with the idea of swapping the fluid to Honda MTF... I hear that is supposed to get rid of it completely...
The following users liked this post:
monacm2 (10-25-2014)
01-30-2006, 10:33 AM
#21
Team Anthracite Member
I read somewhere that GM MTF fluid was the best... if you search around, you should find it... I'm thinking of doing it, but it looks like a ton of work.
01-30-2006, 10:38 AM
#22
How may I help you.....?
Thread Starter
Join Date: Aug 2005
Location: Northern VA
Age: 46
Posts: 1,932
Likes: 0
Received 10 Likes
on
3 Posts
I heard thaty the GM was better too but that if there was ever a problem, it is discernable from the Honda MTF and Acura would know, thus voiding your warranty...
01-30-2006, 10:46 AM
#24
Senior Moderator
Regions Leader
Regions Leader
Originally Posted by jmbnova
I think it did... it seems to slide in a little easier... I have been toying with the idea of swapping the fluid to Honda MTF... I hear that is supposed to get rid of it completely...
it worked for me bro..
but lets stay on track here guys
I cant wait to do this mod.
01-30-2006, 12:40 PM
#26
tTLiang
Join Date: Aug 2005
Posts: 651
Likes: 0
Received 0 Likes
on
0 Posts
Originally Posted by jmbnova
I have an aftermarket knob but i think the way it worked was that you pulled down on the small ring of metal just at the top of the shift boot... when you pulled that down it popped the knob off...
this is mine so im not positive... someone should be able to chime in and tell us if we are right
this is mine so im not positive... someone should be able to chime in and tell us if we are right
very nice write-up BTW. my fingers were hurting after the install. no way i could type this much. lol. great job!!!
01-30-2006, 02:36 PM
#27
I do my own work.
Join Date: Jul 2004
Location: ATL
Age: 42
Posts: 1,488
Likes: 0
Received 0 Likes
on
0 Posts
good write-up, though I believe the directions were sufficient. -installed mine a few weeks ago...it's so so, no real performance gain. I guess I like it  easy install.
I have been using the GM FM fluid for the last 20K miles. I can't tell a huge difference, but the gearbox feels fine. It must be good if I'm not having any 3rd gear issues...and as far as Acura "knowing" that you put GM fluid in it...I don't think they'd run any labs tests, thats for sure...if you have a mechanical problem, it'd be hard to blame it on some MTF.
now, if you just NEVER changed the MTF, that'd be a different story.
easy install.I have been using the GM FM fluid for the last 20K miles. I can't tell a huge difference, but the gearbox feels fine. It must be good if I'm not having any 3rd gear issues...and as far as Acura "knowing" that you put GM fluid in it...I don't think they'd run any labs tests, thats for sure...if you have a mechanical problem, it'd be hard to blame it on some MTF.
now, if you just NEVER changed the MTF, that'd be a different story.
01-31-2006, 12:56 AM
#29
Originally Posted by jmbnova
I have an aftermarket knob but i think the way it worked was that you pulled down on the small ring of metal just at the top of the shift boot... when you pulled that down it popped the knob off...
this is mine so im not positive... someone should be able to chime in and tell us if we are right
this is mine so im not positive... someone should be able to chime in and tell us if we are right
01-31-2006, 09:15 AM
#30
Team Nighthawk Mambo King
Join Date: Mar 2005
Location: Westfield, MA
Age: 64
Posts: 1,089
Likes: 0
Received 2 Likes
on
2 Posts
jmbnova, great job in allowing us to see what it takes to do this SS mod, had read it earlier but unfortunately at work there is a filter that prevents us to see pictures stored in "personal" sites, anyways you said that it feels "crisp" and I would like you to really define it, I drove back in the day a friend's Berreta 5 spd that he claimed it felt "crisp" compared to my then Civic Si and I really didn't like the feel, it was more like "notchie" and you had to line up just right or you would miss shift, so today driving the car I paid great attention to the feel and travel and can truly say that it feels short "er" than my previous rides and I don't know if "shorter" than that would be a good thing, do you have enought time to press the clutch or do you rapid fire now?? ...thanks great job BTW
01-31-2006, 09:24 AM
#31
321 whp SAE
Join Date: Jul 2004
Location: Matawan, NJ
Age: 45
Posts: 1,090
Likes: 0
Received 0 Likes
on
0 Posts
Originally Posted by HEK
jmbnova, great job in allowing us to see what it takes to do this SS mod, had read it earlier but unfortunately at work there is a filter that prevents us to see pictures stored in "personal" sites, anyways you said that it feels "crisp" and I would like you to really define it, I drove back in the day a friend's Berreta 5 spd that he claimed it felt "crisp" compared to my then Civic Si and I really didn't like the feel, it was more like "notchie" and you had to line up just right or you would miss shift, so today driving the car I paid great attention to the feel and travel and can truly say that it feels short "er" than my previous rides and I don't know if "shorter" than that would be a good thing, do you have enought time to press the clutch or do you rapid fire now?? ...thanks great job BTW
01-31-2006, 09:32 AM
#32
I do my own work.
Join Date: Jul 2004
Location: ATL
Age: 42
Posts: 1,488
Likes: 0
Received 0 Likes
on
0 Posts
It IS solid. The adapter effectively increases the distance from the pivot point on the lever. Reducing the leverage in this way makes the driver exert a little more effort for the shift, but it's definitely not "notchier". Just nice and firm. I wish the top of the lever were just a tiny bit lower...
01-31-2006, 10:34 AM
#33
tTLiang
Join Date: Aug 2005
Posts: 651
Likes: 0
Received 0 Likes
on
0 Posts
Originally Posted by bklynpanman
if you don't mind i'll chime in here with an opinion. i just installed the short shifter and it's great. it's not drastically shorter.. you can't just flick your wrist. it "clicks" into the gears now.. it's solid.... I would have to say it's just right.. it doesn't throw off your shift timing at atll. my gf drove it and she hasn't driven stick in a while, and she loves it.
01-31-2006, 11:54 AM
#34
Team Nighthawk Mambo King
Join Date: Mar 2005
Location: Westfield, MA
Age: 64
Posts: 1,089
Likes: 0
Received 2 Likes
on
2 Posts
Originally Posted by bklynpanman
if you don't mind i'll chime in here with an opinion. i just installed the short shifter and it's great. it's not drastically shorter.. you can't just flick your wrist. it "clicks" into the gears now.. it's solid.... I would have to say it's just right.. it doesn't throw off your shift timing at atll. my gf drove it and she hasn't driven stick in a while, and she loves it.
01-31-2006, 02:38 PM
#35
Intermediate

Join Date: Oct 2005
Posts: 45
Likes: 0
Received 0 Likes
on
0 Posts
this is great writeup. Thank you!!!!!!!!! but still scary.. to try.. for someone like me who has no experince in anything like this........ care to recommend on newbie like me who dont even know how to hammer the nail.. would u recommend someone like that doin git? i realli want to.. but very scary to take things apart..... but great job!! i always wanted to see write up for short shifte
01-31-2006, 03:03 PM
#36
tTLiang
Join Date: Aug 2005
Posts: 651
Likes: 0
Received 0 Likes
on
0 Posts
Originally Posted by convenientstore
this is great writeup. Thank you!!!!!!!!! but still scary.. to try.. for someone like me who has no experince in anything like this........ care to recommend on newbie like me who dont even know how to hammer the nail.. would u recommend someone like that doin git? i realli want to.. but very scary to take things apart..... but great job!! i always wanted to see write up for short shifte
01-31-2006, 03:26 PM
#37
How may I help you.....?
Thread Starter
Join Date: Aug 2005
Location: Northern VA
Age: 46
Posts: 1,932
Likes: 0
Received 10 Likes
on
3 Posts
Originally Posted by SIK TL
What type of shift knob is that?
I think everyone else described the 'feel' of the SS much better than I would have been able to. Solid is the best word to describe it.
Thanks for all the feedback guys... I have certainly gained alot from this site so I wanted to do a little something that someone else can use....
02-01-2006, 11:48 AM
#38
Team Nighthawk Mambo King
Join Date: Mar 2005
Location: Westfield, MA
Age: 64
Posts: 1,089
Likes: 0
Received 2 Likes
on
2 Posts
I come to ask again one question that escaped me on my last post, is the shifter now so close that you could possibly downshift from 5th to 2nd ?? ...this happened to a few guys at another Forum back when I had my RSX-S and actually blew their engines which made me stop thinking about it then.
I know the kids that had this happen to them where both young and inexperienced, but Honda didn't honor their mistake with a new engine...anyone fear this??...thanks
I know the kids that had this happen to them where both young and inexperienced, but Honda didn't honor their mistake with a new engine...anyone fear this??...thanks
 02-01-2006, 02:24 PM
#40
tTLiang
Join Date: Aug 2005
Posts: 651
Likes: 0
Received 0 Likes
on
0 Posts
Originally Posted by HEK
I come to ask again one question that escaped me on my last post, is the shifter now so close that you could possibly downshift from 5th to 2nd ?? ...this happened to a few guys at another Forum back when I had my RSX-S and actually blew their engines which made me stop thinking about it then.
I know the kids that had this happen to them where both young and inexperienced, but Honda didn't honor their mistake with a new engine...anyone fear this??...thanks
I know the kids that had this happen to them where both young and inexperienced, but Honda didn't honor their mistake with a new engine...anyone fear this??...thanks