When you click on links to various merchants on this site and make a purchase, this can result in this site earning a commission. Affiliate programs and affiliations include, but are not limited to, the eBay Partner Network.
I was going to update my question thread, but this was getting long and decided to start a fresh thread. So I've been enjoying the Navtool and Grom Audio units so I figured I'd update those following or interested. So here is what I did. Before I go any further, I got a lot of help from the forum and people here. I have to send a special shout out to Matt W for the inspiration to run this setup and for his DIY, HEAVY_RL(No he's not, he's my brutha) for his DIY, oo7spy (nothing to do with Octapussy), M T L T L, Nersh7 and everyone else on the forum. This place is great!!
Ill start with wiring the Navtool. I've labeled the wires and given descriptions below;
1. This is grounded (Grey from the Navtool)
2. This is also grounded (Black from the Navtool)
3. This runs from one end of the switch (Yellow from the Navtool)
4. This is grounded and running to the other end of the switch
5. This is open and not being used (Orange from the Navtool)
6. This is where I am sourcing power to the Navtool from. I did an inline tap explained later below at 6x.
7. This is connected to the OEM Navigation harness
8a-c. These are plugged into the back of the Navigation ROM unit
9. This is Video 1 which I have the media player plugged into
10. This is Video 2 which I am contemplating what to do with. I have the OEM backup cam so I can use this for something else
The everything fit nicely with nothing hanging out. I used 3M heavy duty double sided tape and stuck the Navtool to the back near the back of the Navigation unit and covered up with the liner.
6x. Power source.
Thanks oo7spy I decided to get my power from the Navigation harness. I stripped enough tape from the Connector to allow an inline tap to fit in and tapped the red wire (power) from the Navtool at this location. Below an exert taken from the service manual of the connector. I tapped into the white wire from position 1.
Grounds
All the grounds from the first diagram run here.
Now for the good stuff.
So the orange RCA and the two white cables (connected to the switch) were run behind the trunk and under the rear seats and under the carpet, then up through the arm area (the arm rest was removed). I left the switch wires there and continued to run the RCA behind the radio and through to the top part of the inner glove box. The Grom unit harness was connected to the back of the radio and also run through to the top of the inner glove box as shown below.
Glove Box
I removed the glove box so that I could run the harness for the Grom unit as well as the RCA cables. With the glove box completely out I was able to determine that the wires could fit through the little opening. I didn't like how close the wires were to rubbing, and although I didn't necessarily have to, I used a rotary tool and cut a small opening at the top/back of the upper glove box so the harness/cables had room to play. It is not clearly shown, but if you imagine looking down birds eye view, I cut a small opening so that when I open the door to the upper glove box, the wires are not pinched at all.
The Switch
The Navtool switch is from from pleasing to the eye so I went to an electronic store and picked up my own simple push button switch. Although it is from from the switch I wanted it end up working well. I ran the switch wires up trough to the lower arm rest compartment and then reattached the arm rest section. To get the wires through, I took out the light unit and bulb and fit my switch in. Fitting was far from perfect but it prevented me from having to cut anything in case I want to revert to stock from whatever reason.
Media Player(s)
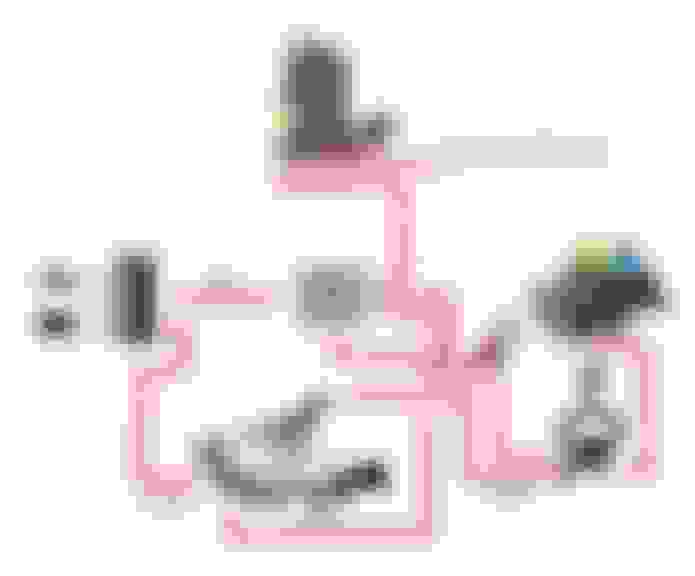
So inspired by Matt W's setup, I decided to go with the same media player by Incredisonic. Now something interested happened with getting my player to work which actually let me to another idea. So to make a long story short, my media player will not work via RCA and only works via HDMI. So after pondering for a couple days and not getting a response from the people I purchased it from on eBay, I decided to try to make it work. I found an HDMI to RCA box for $20 which allowed me to use HDMI port instead of RCA. The beauty to this all is that everything is powered by the USB cable on the Grom unit. Below is a picture of the units;
When I was testing this out I had to leave my upper glove box open but was able to close the glove box. I was able to find a 1.5' long HDMI cable and two male RCA connectors and now everything will fit up top. Here is a diagram to explain how things are connected. You will notice a USB adapter I call 'Octapussy'. This allowed me to prevent the use of an inverter. Octapussy is using power from the Grom unit and sending it to the Incredicsonic as well as the HDMI to RCA box. It has 10 other things I can connect to it if need be (Yellow Top, here I come...);
So with this setup I have awesome MP3 functionality with the Grom unit. It could be better, but I was actually impressed when I finally got it working. I have video capabilities with the Incredisonic which plays a decent amount of file types which I'm happy with. This unit is actually pretty nice for home use also. I mentioned earlier that the RCA connection doesn't work and that part of it is faulty. Since I resorted to using the HDMI to RCA box I realized I could do this;
For those that don't know what that is, its an app called WAZE. Its great for using while driving (Google it). I can use the HDMI to plug into my phone and use this on my screen. This for me was bonus. Also since I can use my phone on my screen via HDMI I can throw up YouTube or anything via browser or rest of the phone for that matter (of course I mean my passengers . And there she is so far. The only thing I am waiting for is an infrared extender. I found one online that I can power via USB and instead of soldering, one end goes on top of the infrared eye on the Incredisonic player and the other end I will need to run behind the radio and mount the sensor somewhere. I could do it in the 'Not an ashtray' or anywhere else. That is to come in the next couple of weeks.
Glad it all worked out for you. Having the screen mirror the iphone screen is a huge bonus! Thanks for the write up and all the back-end research, I will now do this sometime during the winter.
I'm not sure if the iPhone has hdmi out or what kind of out it has. I was looking into getting audio/video out from my spare S3 phone but couldn't find anything that for sure works. I'm running Waze on my Blackberry Z10 which has a mini HDMI port which allows a total mirror of my phone. All in all I am happy with how things work.
My addition is going possibly be a front cam but I want something that records. The only recorders I see are the ones that are dash or rear-view mirror mounted.
Glad u got it working, maybe u should post a video of ur setup and how it works.
On a side note, how hard was it run the RCA cables from the front of the car to the trunk ?
I actually just received the infrared extender today and installed it to see how it worked. Everything now works like a charm. I am still waiting for my usb hub so I can make it a little cleaner. The HDMI to RCA takes up much wanted space in the upper compartment along with the long grom wires. Once I get the hub, I will possibly post a video of how it works even though it works exactly like Matt W's just without the inverter.
I ran the RCA from the back to the front. I decided to go under the seats since its a direct rout to where i needed to go more or less. It wasn't hard at all and took next to no time since I had the center console out already. Even so, still a fairly easy job. I took out the back seats to make it easier and since I took them out to install the Mugen suspension, I got it pretty quick 4 (bolts). I went under the seads and under the carpet in the middle where it raises, through the console and behind the radio and then to the glove box. Not a bad job at all.
Here is a price list of what I spend. I had things laying around already like wire and a switch. Here is the rest more or less.
Incredisonic Media Player $35
HDMI2RCA $20
Grom Audio (HON1U2P) $135 (labour day sale)
Grom Audio aux in/usb cable $15
Navtool $170 (Labour day sale)
USB Octapus $10
RCA to 3.5mm $3
17' RCA cable $7
This is a great forum. Being brand new here I am looking to do a DVD player with headrest DVD Monitors....I am getting some great information here. Thanks so much for the post and great work.
One quick question though....why the need for the switch in the center console? What is that controlling? I see that it is connected to the NavTool but is it used just to turn the video signal on and off? Can the unit not be left on and just toggled between through the selection on the radio/nav unit? Sorry for the long winded question.
Nersh and Heavy, you're both correct. The Navtool is actually constantly on weather you like it or not. The button toggles between the Navtool's video1 and video2 with a simple push. If the button is pushed for 2 seconds, it goes to the OEM Nav screen.
From where did you get the Navtool for that price ? And have you dig anything about duplicating ur video to headrest monitors ? The headrest of the RL being the way it is, do you see it as a challenge to install monitors or the other way around ?
Is the switch a momentary contact style switch? I have the Navtool on order but it is on backorder for a couple of weeks. I am trying to have everything wired before it gets here so I can just put that in and have it ready to go. Based on the comment about holding in the switch for two seconds to revert back to Nav screen I am guessing it is a momentary contact switch but wanted to confirm.
I will try to get some pictures of my setup when I am done. I will be installing the USA Spec, Navtool, 1/2 DIN DVD player with USB and SD Card inputs.
My 'not an ashtray' is my 'so much change I can't make change' tray. In other words I've leaving it untouched. That is where my gauges would have went if I went air but I've recently decided not to.

 09-20-2014, 06:05 PM


 . And there she is so far. The only thing I am waiting for is an infrared extender. I found one online that I can power via USB and instead of soldering, one end goes on top of the infrared eye on the Incredisonic player and the other end I will need to run behind the radio and mount the sensor somewhere. I could do it in the 'Not an ashtray' or anywhere else. That is to come in the next couple of weeks.


