When you click on links to various merchants on this site and make a purchase, this can result in this site earning a commission. Affiliate programs and affiliations include, but are not limited to, the eBay Partner Network.
Embarking on DIY 2006 RL head gasket replacement - help?
Hi all. A combustion test indicates a head gasket leak (see my earlier post here). The engine is not overheating, but coolant is frequently exploding out of the reservoir.
I got one quote of $4100 for head gasket replacement (!) and another for just over $2000 ($1350 labor and around $700 in parts).
I called an engine replacement shop, and they said head gasket replacement never lasts long, so I should replace the engine. That would cost upwards of $5000 if they could even find the engine, which they couldn't at the time.
The car has a rebuilt title and 176K miles, so resale value would be low. On the other hand, until the exploding coolant, it's been rock-solid, and used car prices are high, so I'd like to keep it running for a few more years.
I'm fairly mechanically inclined but I've never taken apart an engine before. Sounds like now's the time to learn. I don't need the car as a daily driver, so I can take a few weeks on this if I need to. And if the gasket replacement doesn't hold up and I need to do it again in 20,000 miles, well, I'll know what I doing the second time around. And worst case, I suppose I could get totally stuck, and I get it towed to the shop that quoted me $2000.
I understand I'll need a torque wrench with gauge, and a big socket wrench and/or breaker bar. No problem, acquiring new tools is always fun.
I'd love it if I could find a post on this forum or some YouTube videos walking me through the process, but I've done some searching and haven't found any sort of tutorial like that. This
looks like a decent starting point, but an end-to-end tutorial would be awesome. Is anyone else aware of something like that?
Is there anything I should do at the same time? I see replacing spark plugs and valve adjustment as two things that people do when replacing head gaskets. Should I do those? (I don't know how, but I did find a
"I called an engine replacement shop, and they said head gasket replacement never lasts long, so I should replace the engine." Sounds like their own opinion... I have heard people replacing head gaskets and never having issues with their cars after that - so that makes it my opinion, or rather shared experience I have heard from others...
Put all numbers on the paper, add, subtract, include all (not just money, but your labor, DIY aspect and risks) - and make a decision... based on all you included, it may be time to consider to retire the car, and look for replacement ...
Put all numbers on the paper, add, subtract, include all (not just money, but your labor, DIY aspect and risks) - and make a decision... based on all you included, it may be time to consider to retire the car, and look for replacement ...
Thanks. We love the car, so like I said, I'm taking a shot at doing the head gasket replacement. Took off the intake manifold today. Going well so far!
I wouldn't risk putting a aftermake head gasket, but I hope everything goes well and I wish you the best of luck. Check the heads OEM bolts for tension, if they are in order, then re-use them. It is also advisable to check the head for a plane.
Good luck!
I'd go OEM - it's a lot of work to undergo if you have to repeat due to using pattern junk.
Since the car hasn't overheated, the head & block should be true so probably won't need skimming.
As long as you are scrupulously clean with the mating surfaces, you ought to get a good bond if you let the engine warm up gently & cool down slowly.
Last one I did was a FIAT 1050cc engine, so I was able to lift the head/carb/manifolds off as a unit. I think yours might require a bit more disassembly...
There's always a hidden rubber pipe somewhere, so ensure that you HAVE disconnected everything.
I wouldn't risk putting a aftermake head gasket, but I hope everything goes well and I wish you the best of luck. Check the heads OEM bolts for tension, if they are in order, then re-use them. It is also advisable to check the head for a plane.
Good luck!
Thank you! I downloaded the service manuals and have been using those and YouTube for reference, but I'm mainly following your instructions in the other thread:
Drain the antifreeze, remove the intake manifold, remove the valve covers, remove the pipes with the fuel rails, unscrew the exhaust manifolds along with the studs, remove the timing mechanism, unscrew the head bolts and remove the heads.
So far so good. Removed the valve covers and fuel rails today:
I'm not sure about the next step, though: "unscrew the exhaust manifolds along with the studs"
The cylinder head removal procedure in the service manual contains 28 steps, but I don't see anything matching "exhaust manifolds". Where is this part? Is there another name for it?
Have you disconnected the battery? Remove the serpentine belt, unscrew the power steering pump and put it aside, unscrew the serpentine belt tensioner, unscrew the crankshaft pulley, remove the timing covers, take the battery stud and screw it into the timing tensioner, remove the timing belt, remove the alternator, drain the antifreeze from the radiator, unscrew the thermostat housing (attention, more antifreeze will flow out), unscrew the 8 nuts of the exhaust manifold on both sides. Now you have a choice, unscrew the exhaust manifolds from the bottom and completely get them out, or unscrew the studs into which these nuts were screwed. And unscrew 8 bolts from each head, remove the heads.
I got a replacement engine from www.lowmileageengines.com. Wade got proof that it ran, what the mileage was on the engine and a good warranty. That said, Eric the car guy on YouTube has a good walkthrough on this that I followed on my original engine before I but the bullet to get another engine. The process is not bad. You have to take the top plate off the intake manifold and then you gain access to bolts that hold the manifold on. Then you can take the head covers off and gain access to the bolts. Replace the water pump, timing belt and tensioner while you�re there. If your serpentine belt is old I would replace that too.
edit: I see you�ve already started. I didn�t read all the comments first. There is no manifold to unbolt on these. It is cast into the head. You�re looking for the catalytic converters that are bolted to the front and rear of the engine. One on each. They�re very big. You can�t miss them.
Have you disconnected the battery? Remove the serpentine belt, unscrew the power steering pump and put it aside, unscrew the serpentine belt tensioner, unscrew the crankshaft pulley, remove the timing covers, take the battery stud and screw it into the timing tensioner, remove the timing belt, remove the alternator, drain the antifreeze from the radiator, unscrew the thermostat housing (attention, more antifreeze will flow out), unscrew the 8 nuts of the exhaust manifold on both sides. Now you have a choice, unscrew the exhaust manifolds from the bottom and completely get them out, or unscrew the studs into which these nuts were screwed. And unscrew 8 bolts from each head, remove the heads.
Thanks! Yes, battery is disconnected, and antifreeze is drained. Time to work on the serpentine belt and power steering pump.
Eric the car guy on YouTube has a good walkthrough on this that I followed on my original engine before I but the bullet to get another engine.
Thanks! Why did you decide to replace the engine in the end?
Also, do you remember which video you followed? Or maybe what vehicle he was working on? His only head gasket video that I can find is on a Civic 4-cylinder.
His videos are great. I'm watching this timing belt replacement video right now, which gets me partway there:
Remove the serpentine belt, unscrew the power steering pump and put it aside, unscrew the serpentine belt tensioner
Got these done today. Next step is to unscrew the crankshaft pulley. Looks like I need an impact wrench for that, so one is on the way. Making a little progress each day!
Got these done today. Next step is to unscrew the crankshaft pulley. Looks like I need an impact wrench for that, so one is on the way. Making a little progress each day!
, and the impact wrench plus that socket did the job. Amazon's same-day delivery failed me, so I lost a day or two, but I guess I don't mind getting a break.
Removed the timing belt today. Looks like it's still looped around the engine mount bracket. Do I need to remove that, or just let the timing belt sit where it is? Here's a picture showing it just folded up at the bottom of the engine bay:
Also, I found several different sets of instructions on how to remove the timing belt. I followed the service manual, which said to thread the battery clamp bolt like you described, and then remove the idler pulley. I see other people remove the tensioner; should I do that too?
Next I got the alternator off, but didn't get it out of the car. I imagine once the front head comes off, I can remove it, so I didn't spend a lot of time trying to wiggle it out past the power steering reservoir. Here it is just sitting there:
Things are a mess in there. I assume I should do a good job cleaning up belts and wheels before hooking everything back up. Are there other places that I should be especially diligent trying to clean?
Tomorrow I hopefully disconnect the catalytic converters and then remove the heads! Any comments and advice are always welcome! Thanks for all your help!
Removed the timing belt today. Looks like it's still looped around the engine mount bracket. Do I need to remove that, or just let the timing belt sit where it is?
I'm guessing you already know this, but the timing belt is a service item that you need to replace every X years or Y miles, whichever comes first - now that you've come this far, it would be crazy to reinstall the old belt. Put a new one on there whilst you're in this far.
I'm guessing you already know this, but the timing belt is a service item that you need to replace every X years or Y miles, whichever comes first - now that you've come this far, it would be crazy to reinstall the old belt. Put a new one on there whilst you're in this far.
The timing belt isn't that far off, if the belt is ok, considering the cost of a new belt, then it's not crazy to put the old belt back in. Let him first solve the problem with the head gasket, and then, if desired, change the belt.
I'm guessing you already know this, but the timing belt is a service item that you need to replace every X years or Y miles, whichever comes first - now that you've come this far, it would be crazy to reinstall the old belt. Put a new one on there whilst you're in this far.
Thanks for the suggestion. In a case of unfortunate timing, I just had the timing belt + water pump service done in the past few thousand miles. So the belt is good.
Let him first solve the problem with the head gasket
The heads are out! Took me quite a while, working on it off and on. The rear catalytic converter was a major pain, with bolts rusted on and hard to access. I tried taking the 12mm upper bolts off with a 1/4" drive socket and broke the wrench. A 3/8" drive did the job, though. The 14mm bolts underneath the car weren't nearly as bad (maybe because I already had a 3/8" drive 14mm).
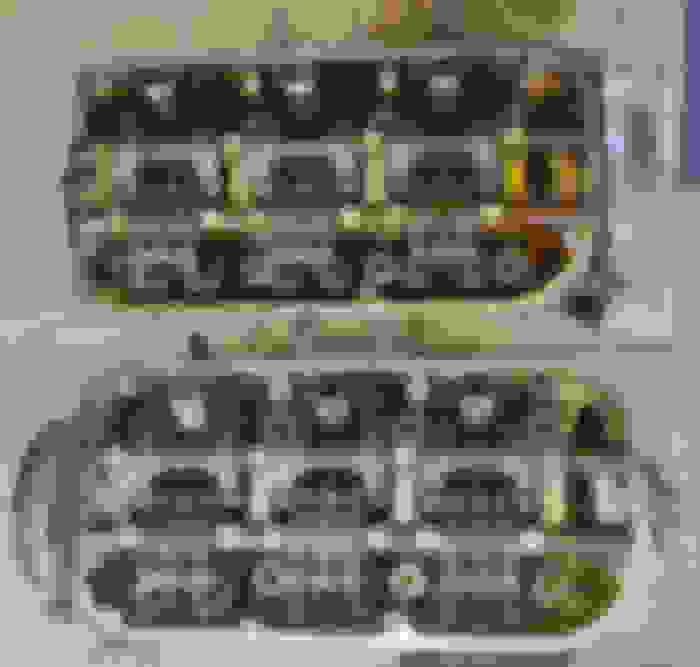
Here they are, on their way to the machine shop today!
Yes! The machine shop was backed up, so the heads were there for two weeks. But in the two weeks since I got them back, I did manage to get them reinstalled with only minor hiccups.
The timing belt was tedious, but with a couple hours of painstaking work, I got that right on the first try.
I accidentally swapped the two not-quite-identical lower intake gaskets, resulting in a major vacuum leak. Easy fix, though. Also had a fuel leak from one of the injectors. Not sure how that happened, but replacing an O-ring fixed that.
And no more exploding coolant! The head gasket replacement took care of that. And I got lots of new tools and experience along the way! It was a fun, satisfying, and massively money-saving project. Thanks for all the help from this forum!

 08-18-2022, 12:17 PM