
Ready for TINT tomorrow – Back seats & parcel shelf out (pics)
 04-26-2002, 07:30 PM
#1
Team Owner
Thread Starter
Join Date: Oct 2000
Location: Hellertown, Pa. USA
Age: 57
Posts: 20,014
Likes: 0
Received 0 Likes
on
0 Posts
Ready for TINT tomorrow – Back seats & parcel shelf out (pics)
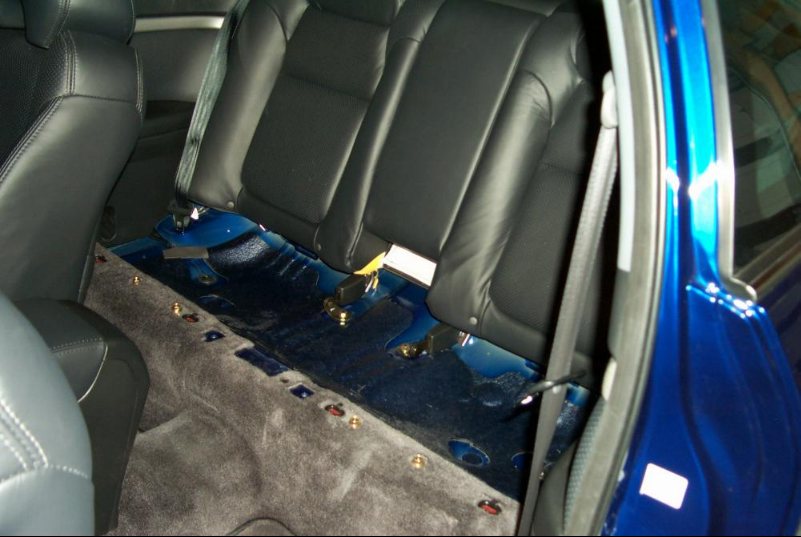
I took out the back seat and rear parcel shelf so they can apply the TINT to the entire rear window.
It took about 45-minutes because I took my time not to scratch the leather.
You have to remove the BOTTOM of the seats, and then the seat BACK.
After that you can get out the rear parcel shelf and finally the BRAKE light.
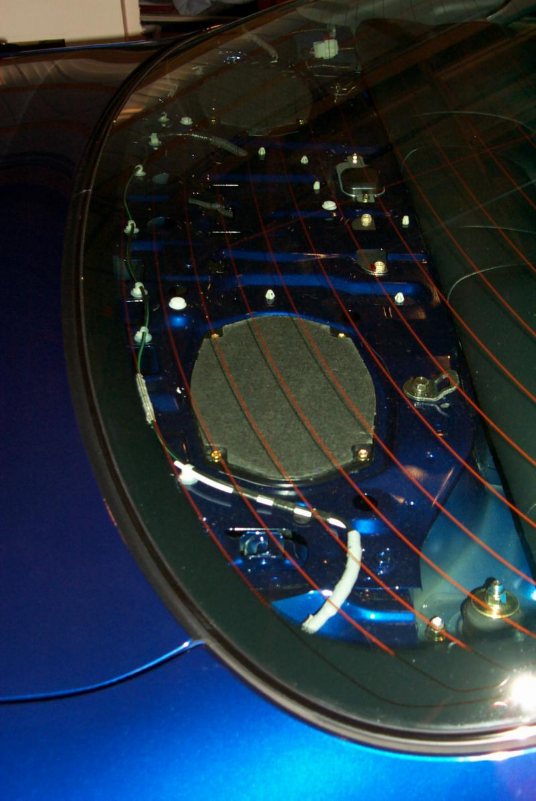
You can see the NAV antenna in the third picture and the rear shock bolts in the second.
Shawn S
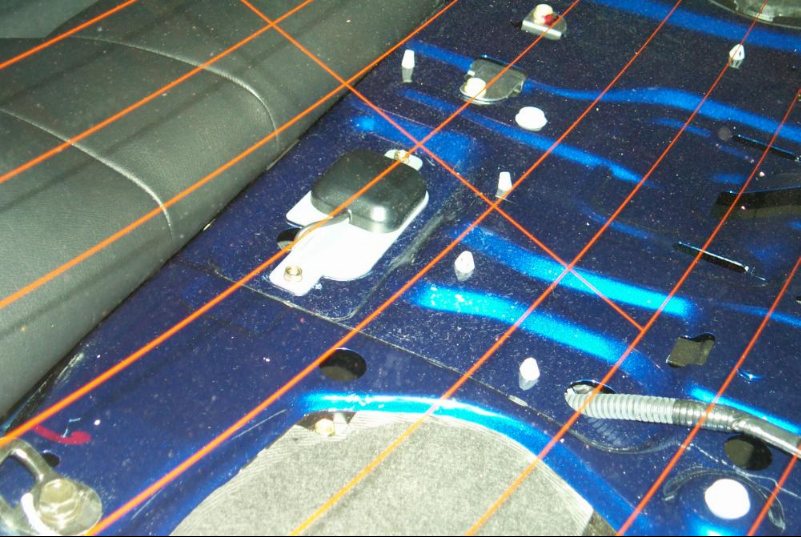
The BRAKE light housing.
I think this is where a lot of the RATTLES in the back originate in some cars.
It took about 45-minutes because I took my time not to scratch the leather.
You have to remove the BOTTOM of the seats, and then the seat BACK.
After that you can get out the rear parcel shelf and finally the BRAKE light.
You can see the NAV antenna in the third picture and the rear shock bolts in the second.
Shawn S
The BRAKE light housing.
I think this is where a lot of the RATTLES in the back originate in some cars.

 04-26-2002, 08:16 PM
#3
Drifting

Join Date: Jul 2000
Location: Houston
Posts: 2,173
Likes: 0
Received 0 Likes
on
0 Posts
I wish I would have done that when I had mine tinted. I may end up having it re-tinted so I can go darker and better quality. I will have them take the rear deck out at the same time.
 04-26-2002, 10:31 PM
#5
Darth Chocolate
Join Date: May 2001
Location: Loo-a-vul
Age: 50
Posts: 431
Likes: 0
Received 0 Likes
on
0 Posts
Originally posted by tw1112
They can't tint with out the seats out?
They can't tint with out the seats out?
 04-26-2002, 11:46 PM
#7
Suzuka Master

Join Date: May 2001
Location: PA
Posts: 5,773
Likes: 0
Received 0 Likes
on
0 Posts
Originally posted by WebToker
I wish I would have done that when I had mine tinted. I may end up having it re-tinted so I can go darker and better quality. I will have them take the rear deck out at the same time.
I wish I would have done that when I had mine tinted. I may end up having it re-tinted so I can go darker and better quality. I will have them take the rear deck out at the same time.
Trending Topics

 04-27-2002, 05:32 PM
#11

Hehehehe
Man I like my tint which doesn't cover the third brakelight. The guy who did mine did such an excellent job - over the dots with no problems and not over the brakelight.

Man I like my tint which doesn't cover the third brakelight. The guy who did mine did such an excellent job - over the dots with no problems and not over the brakelight.
04-27-2002, 05:46 PM
#12
nItIn

Join Date: Mar 2001
Location: Live in Philly, Work in New York
Age: 47
Posts: 935
Received 0 Likes
on
0 Posts
Originally posted by JRock
Hehehehe
Man I like my tint which doesn't cover the third brakelight. The guy who did mine did such an excellent job - over the dots with no problems and not over the brakelight.
Hehehehe
Man I like my tint which doesn't cover the third brakelight. The guy who did mine did such an excellent job - over the dots with no problems and not over the brakelight.
04-27-2002, 05:56 PM
#13
East Coast Boost.!

Join Date: Apr 2002
Location: NYC & LI
Posts: 4,365
Likes: 0
Received 0 Likes
on
0 Posts
No 3rd Brake Light
I'm gonna be getting tints soon. I decided that since i have a spoiler and since it has a brake light in it, that I would just take out the one in the cabin. I took out the rear deck and recarpeted the entire thing. I took pics and tell me if you guys can even tell. I'll post them.
04-27-2002, 06:44 PM
#14
War Eagle!!!
Join Date: Aug 2001
Location: Birmingham, AL
Age: 45
Posts: 1,967
Likes: 0
Received 0 Likes
on
0 Posts
I just took pics of my car with the third brake light covered with tint just for comparison to the non-tint brake light pic...I'll post them when I can plug my dsc-p50 in and upload them...I'm at the office now, with no cable :angry:
04-27-2002, 07:13 PM
#16
War Eagle!!!
Join Date: Aug 2001
Location: Birmingham, AL
Age: 45
Posts: 1,967
Likes: 0
Received 0 Likes
on
0 Posts
Cob, we've got black dots all around the edges of our rear and front windows. Apparently it's part of some system whether it's the defrogger or part of the antenna or part of some fucked up design flaw, I don't know. But they're etched ON the glass, not IN it...therefore the film has a difficult time of adhering (sp?) to the glass, unless your tint installer does a damn good job...Mine kinda did but there's one place on the rear that's noticeable if you're real close to the glass...you'll see in my pics..
04-27-2002, 07:18 PM
#17
Team Owner
Thread Starter
Join Date: Oct 2000
Location: Hellertown, Pa. USA
Age: 57
Posts: 20,014
Likes: 0
Received 0 Likes
on
0 Posts
I had two or three people E-Mail and/or PM me for more specific directions of what I did.
Instead of replying back to those individually, I figured I would just add it here.
I hope this is clear enough.
************************************************** **********
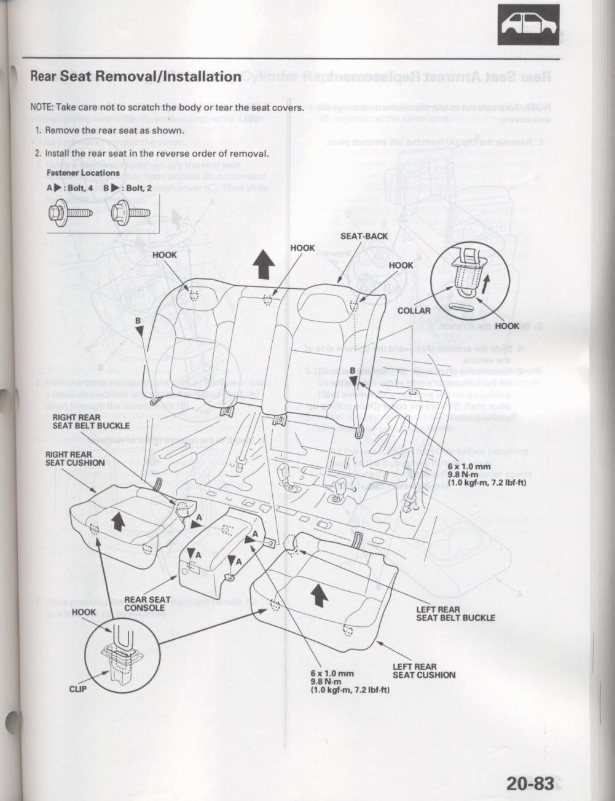
First you need to remove the two bottom cushions. They just pull right up and out with a good tug.
Next you need to remove the center storage compartment and rear seatback bolts.
(Turny Clicky Thing required)
There are TWO bolts at the front of the console and four across the bottom of the seatback.
Remove the center storage compartment.
With your two feet where the cushions were, lift the rear seatback up out of the guide rails (about SIX inches) and tilt forward.
I didn’t actually take the seatback out, but you need to get it out of the way somewhat to get at the rear parcel shelf.
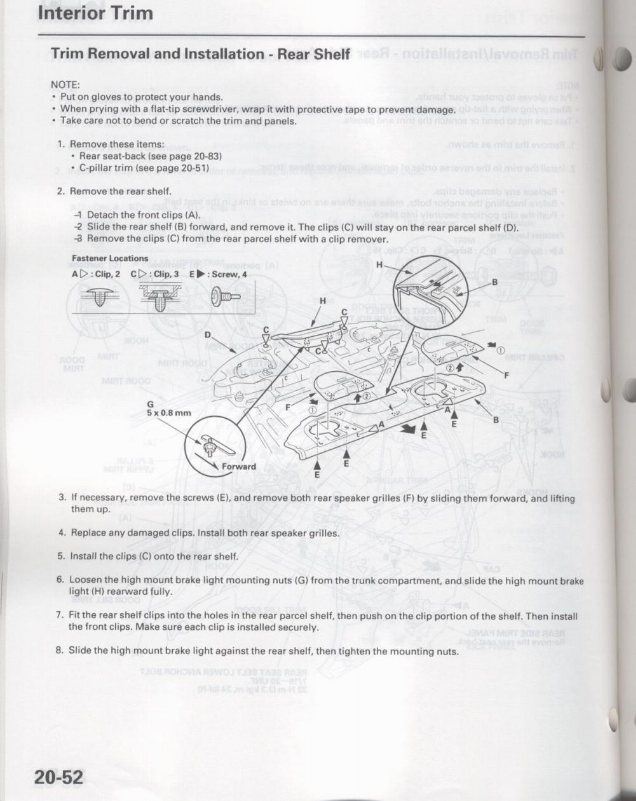
Once the rear seatback is loose, you can get to the TWO plastic fasteners that hold the parcel shelf in.
Pull those out carefully with a flat blade screwdriver watching that they don’t break.
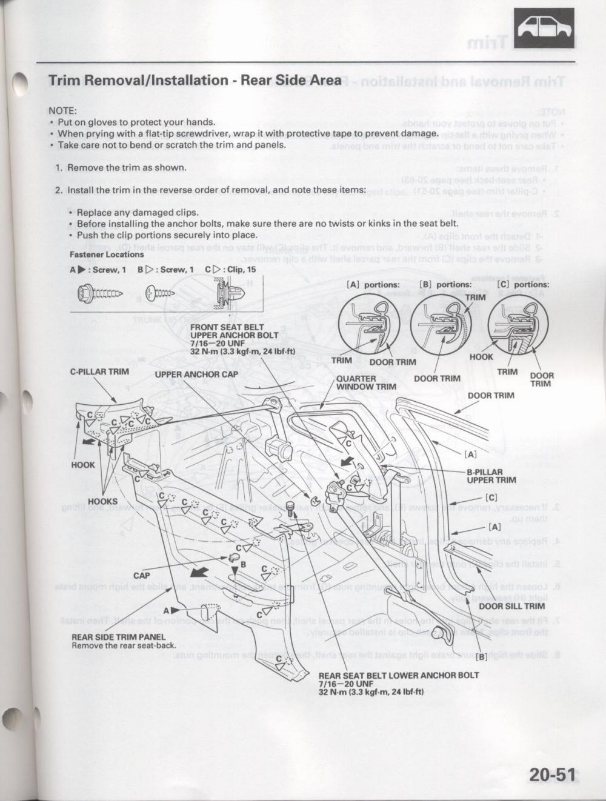
Next you need to pull off the TWO rear pillar covers that the seatbelt goes through.
No fittings to remove, just a good tug and they will come off.
They don’t need to come completely off, just far enough to allow room for the parcel shelf to fit out.
Pull the parcel shelf out, take it out of car and snap the pillar covers back in place.
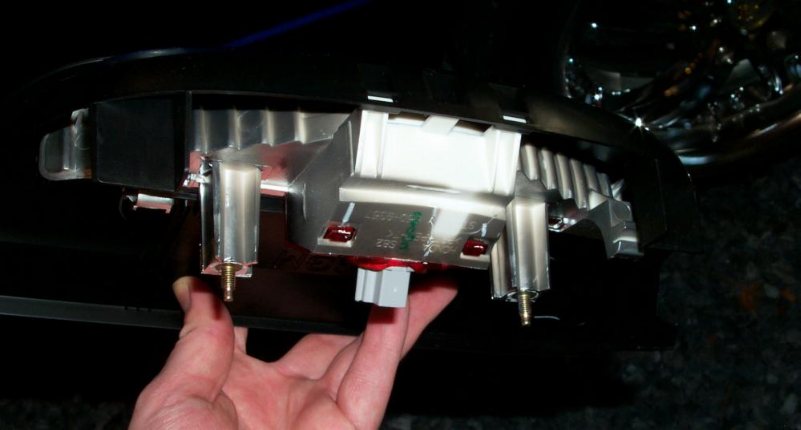
There are TWO nuts UNDER the parcel shelf that hold the brake light in place.
Remove those from the trunk side and it lifts right out.
To reassemble, hold these directions up to the nearest mirror and read backwards.
Shawn S
Instead of replying back to those individually, I figured I would just add it here.
I hope this is clear enough.
************************************************** **********
First you need to remove the two bottom cushions. They just pull right up and out with a good tug.
Next you need to remove the center storage compartment and rear seatback bolts.
(Turny Clicky Thing required)
There are TWO bolts at the front of the console and four across the bottom of the seatback.
Remove the center storage compartment.
With your two feet where the cushions were, lift the rear seatback up out of the guide rails (about SIX inches) and tilt forward.
I didn’t actually take the seatback out, but you need to get it out of the way somewhat to get at the rear parcel shelf.
Once the rear seatback is loose, you can get to the TWO plastic fasteners that hold the parcel shelf in.
Pull those out carefully with a flat blade screwdriver watching that they don’t break.
Next you need to pull off the TWO rear pillar covers that the seatbelt goes through.
No fittings to remove, just a good tug and they will come off.
They don’t need to come completely off, just far enough to allow room for the parcel shelf to fit out.
Pull the parcel shelf out, take it out of car and snap the pillar covers back in place.
There are TWO nuts UNDER the parcel shelf that hold the brake light in place.
Remove those from the trunk side and it lifts right out.
To reassemble, hold these directions up to the nearest mirror and read backwards.
Shawn S
04-27-2002, 08:09 PM
#19
War Eagle!!!
Join Date: Aug 2001
Location: Birmingham, AL
Age: 45
Posts: 1,967
Likes: 0
Received 0 Likes
on
0 Posts
Originally posted by Shawn S
There are TWO nuts UNDER the parcel shelf that hold the brake light in place.
Remove those from the trunk side and it lifts right out.
There are TWO nuts UNDER the parcel shelf that hold the brake light in place.
Remove those from the trunk side and it lifts right out.
As promised, here are the pics of a backwindow tint with third brake light covered:
watch out for raindrops falling on head:

I need to wax badly:

better view:

from the front to show the windshield tint also:

and one last one to show how light 32% tint can look in certain conditions:
 04-27-2002, 10:25 PM
#21
Team Owner
Thread Starter
Join Date: Oct 2000
Location: Hellertown, Pa. USA
Age: 57
Posts: 20,014
Likes: 0
Received 0 Likes
on
0 Posts
momentum3.2,
EASY on the picture size.
Some of us have DIAL-UP you know.
As for the NUTS, look at my FOURTH photo.
You can see the BOLT portion of the connection.
Maybe that will help you locate them.
Shawn S
EASY on the picture size.
Some of us have DIAL-UP you know.
As for the NUTS, look at my FOURTH photo.
You can see the BOLT portion of the connection.
Maybe that will help you locate them.
Shawn S
04-27-2002, 11:07 PM
#22
War Eagle!!!
Join Date: Aug 2001
Location: Birmingham, AL
Age: 45
Posts: 1,967
Likes: 0
Received 0 Likes
on
0 Posts
Yeah I goofed on the image, I'll swap them out real quick...I accidentaly linked the 1600x1200 images...
my bad bros!
Shawn, I checked and double checked. The bolts are there but there's no nuts! I think my audio shop gratefully forgot to put them back on when the tint was done...I'll just ask my dealership when it's getting the ecu and tps sensor replaced on tuesday...
my bad bros!
Shawn, I checked and double checked. The bolts are there but there's no nuts! I think my audio shop gratefully forgot to put them back on when the tint was done...I'll just ask my dealership when it's getting the ecu and tps sensor replaced on tuesday...
 05-16-2002, 07:25 PM
#25
Team Owner
Thread Starter
Join Date: Oct 2000
Location: Hellertown, Pa. USA
Age: 57
Posts: 20,014
Likes: 0
Received 0 Likes
on
0 Posts
Originally posted by X-GoldDigger
Hey Shawn,
I'm trying to figure how to take the back seats out. Can you help?
Thanks.
Hey Shawn,
I'm trying to figure how to take the back seats out. Can you help?
Thanks.
Pull the two rear cushions out. No fasteners, they just lift out.
Remove (6) bolts holding down the center console & seat back.
Remove the center console.
Lift the seatback up about 4 inches to unhook it from the shelf area.
You DON’T need to remove the rear seat back from the car.
Tip the top of the seatback forward until you see the (2) plastic plugs holding the shelf in.
Pry loose the (2) plugs with a flat screwdriver being careful not to break them.
Remove the left & right plastic C-pillar covers going to the roof.
No fasteners, they just pull off with a good tug.
They are connected to the seatbelts so they don’t need to come out of the car.
Once out of the way the rear parcel shelf will lift right out.
The brake light is held in by (2) nuts you get at from the trunk side.
Snap the C-pillar covers back on and hook the seatback back onto the shelf and leave everything out until the tint is done.
 05-16-2002, 07:27 PM
#26
Team Owner
Thread Starter
Join Date: Oct 2000
Location: Hellertown, Pa. USA
Age: 57
Posts: 20,014
Likes: 0
Received 0 Likes
on
0 Posts
And since this is a post that is pretty old, the tint job is already done.
Check it out if you haven’t seen the finished job.
Shawn S
Check it out if you haven’t seen the finished job.
Shawn S
08-11-2002, 12:37 PM
#27
Darth Chocolate
Join Date: May 2001
Location: Loo-a-vul
Age: 50
Posts: 431
Likes: 0
Received 0 Likes
on
0 Posts
Addendum
Originally posted by Shawn S
Here YA go.........................
Pull the two rear cushions out. No fasteners, they just lift out.
Remove (6) bolts holding down the center console & seat back.
Remove the center console.
Lift the seatback up about 4 inches to unhook it from the shelf area.
You DON’T need to remove the rear seat back from the car.
Tip the top of the seatback forward until you see the (2) plastic plugs holding the shelf in.
Pry loose the (2) plugs with a flat screwdriver being careful not to break them.

Remove the left & right plastic C-pillar covers going to the roof.
No fasteners, they just pull off with a good tug.
They are connected to the seatbelts so they don’t need to come out of the car.
The rest was easy.

Once out of the way the rear parcel shelf will lift right out.
The brake light is held in by (2) nuts you get at from the trunk side.
Snap the C-pillar covers back on and hook the seatback back onto the shelf and leave everything out until the tint is done.
I'm getting my windows tinted this Tuesday. Non-metallic, of course.
35% on the front sides, and 20% on the back sides and back. 35/18 is the legal limit in KY.
08-12-2002, 12:54 AM
#28
Where's your 6th gear?

Join Date: Jun 2002
Location: Kow Kuntry
Posts: 669
Likes: 0
Received 0 Likes
on
0 Posts
What you need to do is find tint installers with skills or ones that are not lazy. The guys who did mine covered my rear window, including the 3rd brake light, without removing any trim.
08-12-2002, 10:26 AM
#29
nItIn
Join Date: Mar 2001
Location: Live in Philly, Work in New York
Age: 47
Posts: 935
Received 0 Likes
on
0 Posts
Originally posted by Kalin
What you need to do is find tint installers with skills or ones that are not lazy. The guys who did mine covered my rear window, including the 3rd brake light, without removing any trim.
What you need to do is find tint installers with skills or ones that are not lazy. The guys who did mine covered my rear window, including the 3rd brake light, without removing any trim.
I had taken my car in for the rear deck rattles, and the service manager asked if my rear seats or shelf had ever been taken out or if i had any body work done back there that he should know off that could be causing the rattles. i said no, and he got upset and called me a liar saying that if you want me to fix the rattle be honest with me ... there is no way the tint couldve been installed that good without taking out the rear deck\seat. i laughed at him!
08-12-2002, 10:39 AM
#30
Team Owner
Thread Starter
Join Date: Oct 2000
Location: Hellertown, Pa. USA
Age: 57
Posts: 20,014
Likes: 0
Received 0 Likes
on
0 Posts
Originally posted by Kalin
What you need to do is find tint installers with skills or ones that are not lazy. The guys who did mine covered my rear window, including the 3rd brake light, without removing any trim.
What you need to do is find tint installers with skills or ones that are not lazy. The guys who did mine covered my rear window, including the 3rd brake light, without removing any trim.
For the record, my tint guy said he COULD tint the entire window without removing the shelf, but he COULDN’T guarantee there wouldn’t be any bubbles in the area by the brake light.
There is NO WAY you can effectively get a squeegee back there to smooth them all out.
There is only an 1/8” gap there and you need to reach down almost 6” to the edge of the tint.
You can force a small tool down there, but you’ll never get effective pressure on the glass.
My installer is ANAL like me and suggested I do this. I agreed.
I’ve seen my share of crappy tint jobs that the car owners think are just fine.
I’ve also been complemented on the amazing job done on MY car.
If you don’t have bubbles back there great, but I wasn’t taking the chance.
Shawn S
08-12-2002, 06:19 PM
#31
Darth Chocolate
Join Date: May 2001
Location: Loo-a-vul
Age: 50
Posts: 431
Likes: 0
Received 0 Likes
on
0 Posts
Yea, that was my situation. I want it done right, and the guy told me over the phone that if the light was built in to the shelf, he couldn't guarantee that he could tint over it.
The way I figure, it was a learning experience to pull it apart and see what was there. And I don't plan on putting the light back in, so I can consider it a weight reduction mod.
As far as finding someone who would tint over the light for me... HA! This end of town only has like two tint places: a good one and a bad one. The place I'm going (good one) has been there longer than I've been alive, they guarantee everything for life, and it's only costing me $115. I'm getting low-end Formula One tint (a Llumar brand), but it's the best non-metallic they have.
I guess tomorrow I'll see if my work was worth it.
The way I figure, it was a learning experience to pull it apart and see what was there. And I don't plan on putting the light back in, so I can consider it a weight reduction mod.
As far as finding someone who would tint over the light for me... HA! This end of town only has like two tint places: a good one and a bad one. The place I'm going (good one
) has been there longer than I've been alive, they guarantee everything for life, and it's only costing me $115. I'm getting low-end Formula One tint (a Llumar brand), but it's the best non-metallic they have.I guess tomorrow I'll see if my work was worth it.
08-12-2002, 06:28 PM
#32
Banned

Join Date: Apr 2002
Location: San Antonio, Tx
Age: 50
Posts: 1,747
Likes: 0
Received 0 Likes
on
0 Posts
Re: Ready for TINT tomorrow – Back seats & parcel shelf out (pics)
Weird, they didn't remove my seats or rear deck or light to install my tint, and its the whole window. He had a tool that slid between the light and the window.
08-12-2002, 06:29 PM
#33
Banned
Join Date: Apr 2002
Location: San Antonio, Tx
Age: 50
Posts: 1,747
Likes: 0
Received 0 Likes
on
0 Posts
Originally posted by Sypher
They can, they just can't tint over the third brake light unless you (or they) take the seats out and remove the brake light.
They can, they just can't tint over the third brake light unless you (or they) take the seats out and remove the brake light.

 08-14-2002, 12:28 AM
#35
Instructor

Join Date: May 2001
Location: Alameda, CA
Age: 58
Posts: 105
Likes: 0
Received 0 Likes
on
0 Posts
I had this all apart this weekend to install a new stereo, but I was wondering about one thing.
Is the 3rd light just sitting on top of a complete deck, or is there a cutout section where the light is?
The reason I ask is that I have the spoiler and I want to get rid of the light. So, do I need to make a new MDF-based deck, or can I just get rid of the light and still look good?
Thanks...Michael
08-14-2002, 03:05 AM
#36
Senior Moderator
you will have to customize/rebuild the rear deck to make it work, i'm planning on doing this myself.
09-14-2006, 12:18 PM
#37
Dude

Originally Posted by mattg
you will have to customize/rebuild the rear deck to make it work, i'm planning on doing this myself.