LED Gauges Conversion

Finally got around to doing this a few weeks ago. I totaly forgot to post this up. I've only seen a few other members that have done this. Everything was purchases as kits from ledautomotive.com. These guys are really great. Responded to my emails promptly and the customer service was great!

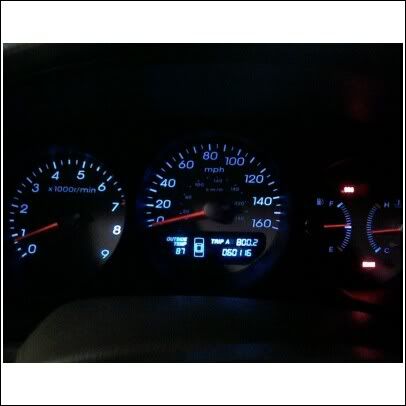
They have all the install instructions on there website, so I didn't need to do a write-up (thank god). This took about an hour with my buddies help. I've taken the dash apart several times so don't be afraid about that part, its just a little scary the first time. But so simple. Really happy with the results. Pictures don't do it justice cause it looks so good in person! Even adjusted the color on my Head Unit to match the same blue!

Picture didn't turn out real good for some reason. There are no hot spots at all! This picture really doesn't show it well. I'll have to try again with a diff cam so you can get the full effect!

They have all the install instructions on there website, so I didn't need to do a write-up (thank god). This took about an hour with my buddies help. I've taken the dash apart several times so don't be afraid about that part, its just a little scary the first time. But so simple. Really happy with the results. Pictures don't do it justice cause it looks so good in person! Even adjusted the color on my Head Unit to match the same blue!
Picture didn't turn out real good for some reason. There are no hot spots at all! This picture really doesn't show it well. I'll have to try again with a diff cam so you can get the full effect!
User Awaiting Email Confirmation
iTrader: (5)
Joined: Nov 2007
Posts: 7,786
Likes: 1
From: San Francisco
Looks good.
Yeah we need some new pictures because judging by that the lighting looks very inconsistent.
I wanted to do this for a long time...but it's been placed on the back burner for now.
Yeah we need some new pictures because judging by that the lighting looks very inconsistent.
I wanted to do this for a long time...but it's been placed on the back burner for now.
Yeah the pictures are really shitty for some reason. It looks amazing! With the solder less kits they have, its insanely easy!
User Awaiting Email Confirmation
iTrader: (5)
Joined: Nov 2007
Posts: 7,786
Likes: 1
From: San Francisco
 I'll get around to it sometime.
Never taken apart the dash though...
A little worried about scratching or messing something up.
Have the projects I do myself I f*** something up!

Yeah, if you weren't so far i'd offer to help man, I could take that thing apart with my eyes closed! I was freaking out the first time I had to do it to. As long as you take your time and aren't in a hurry you can't mess it up. Didn't scratch a thing, and it all goes back together nice and snug!
Trending Topics

 I've done that before too. and then im gonna make you put it back together like the cabin filters haha


Yea, the first time I honestly thought I was going to crack it. But that panel is thick, so you cant break it unless you really try. Ive taken the dash apart numerous times.
LEDautomotive are good people. I used to have the blue kit, now I have whats in my avatar.
LEDautomotive are good people. I used to have the blue kit, now I have whats in my avatar.
To many cars in my garage
Joined: Feb 2009
Posts: 1,501
Likes: 2
From: Kanata,Ontario,Canada
User Awaiting Email Confirmation
iTrader: (5)
Joined: Nov 2007
Posts: 7,786
Likes: 1
From: San Francisco
Cool.
Damn man...that sucks.
Plus I had an aftermarket HU so I dont have to worry about the all the radio lights. I just changed the LED color on my HU to match.

Racer
Joined: Nov 2008
Posts: 368
Likes: 0
http://cgi.ebay.com/ebaymotors/2pcs-...Q5fAccessories
Ive said this a million times and tried to save everyone cash. If you want to pay ledautomotive go for it but heres a link to the person I bought all of mine from, same quality and same brightness. Only downfall is its out of country so it takes a little bit longer to recieve. I can vouch that these are reliable since ive been running them for over 6 months. My grand total was about 40 dollars and thats because i ordered a LOT of extras.
http://cgi.ebay.com/ebaymotors/2pcs-...Q5fAccessories
http://cgi.ebay.com/ebaymotors/2pcs-...Q5fAccessories
Racer
Joined: Nov 2008
Posts: 368
Likes: 0
I think there are 3 in the cruise control switch, 3 in the In the sunroof switch, 2 in the select/reset buttons, 1 in the seat heater buttons, about three or 4 in the climate controll if you have navi and one in the dimmer switch. I think that adds up to a total of eleven. For the autostick if you have it you need to custom make all the letters and numbers so that it is clear and the bulb size for that is a single 74, theres a how to on the tl side if I remember right.
If you want to see the way my dash lights up its in my pro in the photo album, I used all hyper white bulbs.
I just took a look at ledauto's install diagram to count the bulbs, for the entire gauge cluster the bulb size is 74 and that includes the turn signals and odometer. everything else is size T3 from the link that I provided. I would order about 8 sets of them for a total of 16 bulbs.
I think there are 3 in the cruise control switch, 3 in the In the sunroof switch, 2 in the select/reset buttons, 1 in the seat heater buttons, about three or 4 in the climate controll if you have navi and one in the dimmer switch. I think that adds up to a total of eleven. For the autostick if you have it you need to custom make all the letters and numbers so that it is clear and the bulb size for that is a single 74, theres a how to on the tl side if I remember right.
If you want to see the way my dash lights up its in my pro in the photo album, I used all hyper white bulbs.


Alright, this took a really long time, but I finally got some decent pics! I used two different exposures to give you guys a good feel for what these puppies look like.
This first shot is what the light output looks like to the naked eye:

And this shot is a better representation of the true colors of the gauges. Its blown out with a higher exposure to show the color. But the first pick is what the light output actually looks like.

This first shot is what the light output looks like to the naked eye:
And this shot is a better representation of the true colors of the gauges. Its blown out with a higher exposure to show the color. But the first pick is what the light output actually looks like.

9th Gear
Joined: Mar 2003
Posts: 9
Likes: 0
From: Charlotte, NC
If you were to spend time and money into making a product, as well as making a guide for the product, and you found out that some people were purchasing product from another company, but using your guide, then you should feel as if you were getting ripped off
Pics look good, hope you enjoy the lights

Don't feel like you got ripped off, you paid for great customer service and for the expertise. Also, other companies do not offer installation guides.
If you were to spend time and money into making a product, as well as making a guide for the product, and you found out that some people were purchasing product from another company, but using your guide, then you should feel as if you were getting ripped off
Pics look good, hope you enjoy the lights

That would be my guess. I got the blue look with white bulbs and left the film alone. The only white gauges i've seen have been with removing the film.
I would rate the difficulty of the install to be maybe a 5/10 at the most.