Intake Manifold Part 1, The Tear Down
 09-22-2002, 07:09 PM
#1
Suzuka Master
Thread Starter
Join Date: Sep 2000
Location: Woodstock, GA
Age: 53
Posts: 9,431
Likes: 0
Received 0 Likes
on
0 Posts
Intake Manifold Part 1, The Tear Down
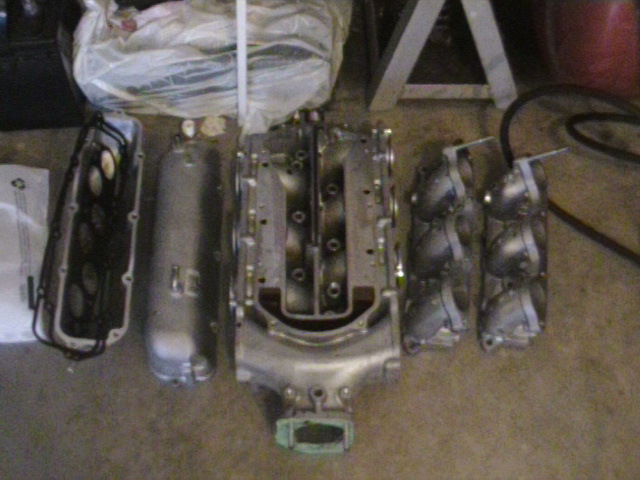
I finally got the time to begin a port and polish (following in Mike's foot steps!!), along with port matching, of the intake manifold. I just got everything off including the injector bases. Pics are below of the tear down only. I will probably begin some of the porting tonight and finish it up tomorrow. Additional pics will follow.
But from what you can see below there is plenty of benefit to polishing. It is rough in there with plenty casting marks.
The following pics are of the V portion of the engine without the manifold in place:


Here is a close up of one of the head intake ports; you can see the two intake valves in there pretty clearly:

All of the parts on my garage floor:
Rear Injector Base:

Close up an injector base port; notice the rough surface and the casting marks:

Intake Manifold:

Close Up of the entry to the intake manifold from where the throttle body would attach; again, notice the casting marks:

Entrance into the front chamber:

One of the passages to the center plenum:

Runner entrance:

Close up of the Runner outlet to the injector base:

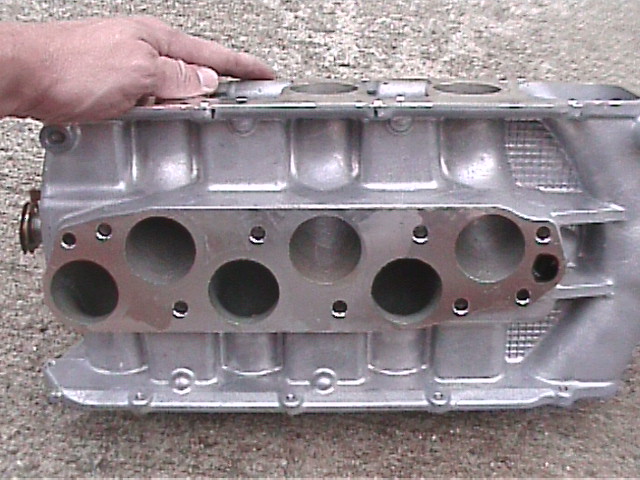
Bottom of the intake manifold where it attaches to the injector bases:
That is it, as if that wasn't enough, for now. I'll start a new thread on the during and after pics that another on putting everything back together. But the tear down was pretty easy, just over an hour. I expect the porting to take about two to three hours and then an hour to put it back together. So it could be done in an afternoon.
I did buy all new gaskets which cost me about $80 and then about $50 on various grit cartridge rolls. So for an afternoon's work and less than $150 you can easily do this your self. But you will need a good compressor and an air grinder...
But from what you can see below there is plenty of benefit to polishing. It is rough in there with plenty casting marks.
The following pics are of the V portion of the engine without the manifold in place:
Here is a close up of one of the head intake ports; you can see the two intake valves in there pretty clearly:
All of the parts on my garage floor:
Rear Injector Base:
Close up an injector base port; notice the rough surface and the casting marks:
Intake Manifold:
Close Up of the entry to the intake manifold from where the throttle body would attach; again, notice the casting marks:
Entrance into the front chamber:
One of the passages to the center plenum:
Runner entrance:
Close up of the Runner outlet to the injector base:
Bottom of the intake manifold where it attaches to the injector bases:
That is it, as if that wasn't enough, for now. I'll start a new thread on the during and after pics that another on putting everything back together. But the tear down was pretty easy, just over an hour. I expect the porting to take about two to three hours and then an hour to put it back together. So it could be done in an afternoon.
I did buy all new gaskets which cost me about $80 and then about $50 on various grit cartridge rolls. So for an afternoon's work and less than $150 you can easily do this your self. But you will need a good compressor and an air grinder...
 09-22-2002, 07:21 PM
#2
Community Architect
robb m.
robb m.
wow, I think I'll tackle it myself Steve...thanks for the pictorial! 
09-22-2002, 07:37 PM
#4
Suzuka Master
Thread Starter
Join Date: Sep 2000
Location: Woodstock, GA
Age: 53
Posts: 9,431
Likes: 0
Received 0 Likes
on
0 Posts
Originally posted by acur8ly
What kind of gains do u expect from doing this?
What kind of gains do u expect from doing this?
09-22-2002, 07:43 PM
#6
Suzuka Master
Thread Starter
Join Date: Sep 2000
Location: Woodstock, GA
Age: 53
Posts: 9,431
Likes: 0
Received 0 Likes
on
0 Posts
Originally posted by Zapata
porting and extrude/hone. What is the difference. I know what each does but are they the same thing?
porting and extrude/hone. What is the difference. I know what each does but are they the same thing?
BTW, it is thought that extrude honing is better in general. But if care is taked and the work done diligently, a hand porting and loishing can acheive the same results. It just takes time...
09-22-2002, 07:53 PM
#7
Safety Car

From your time to dismantle, it seems the removal is pretty straightforward - any hiccups or pointers for the procedure?
Are you doing anything to the Throttle-Body?? Any enlargement would necessitate a bigger butterfly-valve - or are you leaving that as it is?
I think if/when you add the S/C, gains will be very impressive.
I have thought about this, but might go with Extrude Honing instead of the p/p.
Do you see any significant size difference between the runner diameter and the intake port?
Is it me... or does it look like there are velocity-stacks (like a venturi plate) on the intake runner (towards the plenum-side)?
Trending Topics
09-22-2002, 08:04 PM
#8
Suzuka Master
Thread Starter
Join Date: Sep 2000
Location: Woodstock, GA
Age: 53
Posts: 9,431
Likes: 0
Received 0 Likes
on
0 Posts
Originally posted by allmotor_2000
From your time to dismantle, it seems the removal is pretty straightforward - any hiccups or pointers for the procedure?
Are you doing anything to the Throttle-Body?? Any enlargement would necessitate a bigger butterfly-valve - or are you leaving that as it is?
Do you see any significant size difference between the runner diameter and the intake port?
Is it me... or does it look like there are velocity-stacks (like a venturi plate) on the intake runner (towards the plenum-side)?
I'm leaving the TB alone right now. I am considering shaping it a little at the outlet to match up with the manifold; but that would be all. I am not equipped to make a new throttle plate...
The runner ports all the way from the manifold, injector base to the head ports matched up pretty well. I'll touch them up a bit along with match the gaskets but there won't be too much to do here.
There are, what the manual calls, funnels at the entrance to the runners from the font and rear chamber. Is this what you are referring to??
09-22-2002, 10:00 PM
#10
Senior Moderator
Nice pics Steve. Are you going to P&P the center plenum? That one bolt on the inject base was pretty tough to get at.
btw, my gas mileage has go to hell in a hand basket. can't keep my foot from burying the throttle but still...it's drinking like a frat boy
btw, my gas mileage has go to hell in a hand basket. can't keep my foot from burying the throttle but still...it's drinking like a frat boy
09-22-2002, 10:48 PM
#11
Suzuka Master
Join Date: Jan 2001
Location: Santa Clarita, CA
Posts: 8,546
Likes: 0
Received 0 Likes
on
0 Posts
Originally posted by Mike
Nice pics Steve. Are you going to P&P the center plenum? That one bolt on the inject base was pretty tough to get at.
btw, my gas mileage has go to hell in a hand basket. can't keep my foot from burying the throttle but still...it's drinking like a frat boy
Nice pics Steve. Are you going to P&P the center plenum? That one bolt on the inject base was pretty tough to get at.
btw, my gas mileage has go to hell in a hand basket. can't keep my foot from burying the throttle but still...it's drinking like a frat boy

 09-23-2002, 06:44 AM
#13
Suzuka Master
Thread Starter
Join Date: Sep 2000
Location: Woodstock, GA
Age: 53
Posts: 9,431
Likes: 0
Received 0 Likes
on
0 Posts
Originally posted by Mike
same pic better lighting
same pic better lighting
Why did you pulls off the valve covers??
About polishing up the center chamber, I am planning on it. Not that I would see anything to be had from it; but since it is off and I have extra catridge rolls, I might as well.
09-23-2002, 06:53 AM
#14
Xe- For Better Hwy Vision

Join Date: May 2001
Location: Valley Forge, PA.
Posts: 1,265
Likes: 0
Received 0 Likes
on
0 Posts
scalbert,
Looks like your are clearly on your way to some extra hp
and intake flow.
What gaskets did you end up changing? I was surpised to see 80 bones total- I usally get raped on gaskets from the dealer.
BTW, I agree in terms of doing the final "hand polishing". It's
kind of like a jewler with that unfinished 2ct diamond.
09-23-2002, 07:28 AM
#15
Suzuka Master
Thread Starter
Join Date: Sep 2000
Location: Woodstock, GA
Age: 53
Posts: 9,431
Likes: 0
Received 0 Likes
on
0 Posts
Originally posted by xenon7
What gaskets did you end up changing? I was surpised to see 80 bones total- I usally get raped on gaskets from the dealer.
What gaskets did you end up changing? I was surpised to see 80 bones total- I usally get raped on gaskets from the dealer.
It ended up being more than I expected; averaging about $14 per gasket. Plus, it looks like I could reuse some of the metal gaskets as my car has only 2700 miles on it right now. But I decided to play it safe and get gaskets.
09-23-2002, 11:20 AM
#16
Senior Moderator
Originally posted by scalbert
And much better camera!!!
Why did you pulls off the valve covers??
About polishing up the center chamber, I am planning on it. Not that I would see anything to be had from it; but since it is off and I have extra catridge rolls, I might as well.
And much better camera!!!
Why did you pulls off the valve covers??
About polishing up the center chamber, I am planning on it. Not that I would see anything to be had from it; but since it is off and I have extra catridge rolls, I might as well.

ahh....that's probably a good thing....gas mileage being as sucky as it is.
09-23-2002, 11:48 AM
#18
Suzuka Master
Thread Starter
Join Date: Sep 2000
Location: Woodstock, GA
Age: 53
Posts: 9,431
Likes: 0
Received 0 Likes
on
0 Posts
Originally posted by Mike
Btw, I talked to a guy who builds racing engines. He said to leave the rear injector base rough in order to atomize the air into the heads.
Btw, I talked to a guy who builds racing engines. He said to leave the rear injector base rough in order to atomize the air into the heads.
My thoughts are that the increased velocity will help the swirl effect as both air and fuel is pulled into the cylinder thus allowing for greater atomization.
But just my $0.02, I'll try it anyway just for the experience. Who knows, it might end up working out for the better.
09-23-2002, 12:07 PM
#19
Senior Moderator
Cool, I was just passing that tidbit along.
Btw, what tools are you going to use for the P&P? Post some pics of the tools and materials. It would also be nice to see the work as the manifold becomes progressively smoother.
ps:upgrade your camera
Btw, what tools are you going to use for the P&P? Post some pics of the tools and materials. It would also be nice to see the work as the manifold becomes progressively smoother.
ps:upgrade your camera
09-23-2002, 12:15 PM
#20
Suzuka Master
Thread Starter
Join Date: Sep 2000
Location: Woodstock, GA
Age: 53
Posts: 9,431
Likes: 0
Received 0 Likes
on
0 Posts
Originally posted by Mike
Cool, I was just passing that tidbit along.
Btw, what tools are you going to use for the P&P?
Cool, I was just passing that tidbit along.
Btw, what tools are you going to use for the P&P?
To help with some shaping I'll use a carbide tipped bit. But for the most part I will use standard aluminum-oxide cartridge rolls for 80% of the work ranging in grit from 80 - 320. I'll end with some polishing using flap wheels at about 600 grit.
http://www.mscdirect.com/PDF.process?pdf=873
09-23-2002, 12:19 PM
#21
Suzuka Master
Thread Starter
Join Date: Sep 2000
Location: Woodstock, GA
Age: 53
Posts: 9,431
Likes: 0
Received 0 Likes
on
0 Posts
Originally posted by Mike
ps:upgrade your camera
ps:upgrade your camera
06-30-2008, 10:50 AM
#23
Instructor
iTrader: (2)
Join Date: Jun 2005
Location: Windsor, ontario
Age: 38
Posts: 243
Likes: 0
Received 4 Likes
on
3 Posts
Originally Posted by corpsdawg
Yup, i'm bringing back a very old thread. How many people have ported and polished their intake (lower and upper)? Any noticeable or measurable gains?
06-30-2008, 07:55 PM
#26
Instructor

Join Date: Jun 2006
Age: 36
Posts: 153
Likes: 0
Received 0 Likes
on
0 Posts
I've heard different stories about the degree of difficulty of doing P&P yourself. I have all the tools, but has anyone done this themselves? Also, for those of you who sent yours off, what was about the cost and time to have them done?
07-01-2008, 10:51 AM
#27
Senior Moderator
i did mine along with eliminate the vsa , and sent out the thrttle body ... this is the type of mod that should be done near the end of all other mods
07-01-2008, 07:29 PM
#28
Instructor
Join Date: Jun 2006
Age: 36
Posts: 153
Likes: 0
Received 0 Likes
on
0 Posts
Well i plan on staying NA, so if i had intake, headers, spacers and pulleys would this gain a significant amount? I may also consider getting the P2R plenums. How much did a shop charge you for the P&P? Did you send your TB off to kingmotorsport?
07-02-2008, 07:56 AM
#29
Senior Moderator
iTrader: (2)
Join Date: May 2000
Location: where the weather suits my clothes
Age: 55
Posts: 27,921
Received 1,080 Likes
on
661 Posts
Originally Posted by corpsdawg
Well i plan on staying NA, so if i had intake, headers, spacers and pulleys would this gain a significant amount? I may also consider getting the P2R plenums. How much did a shop charge you for the P&P? Did you send your TB off to kingmotorsport?
IMO the cost to hp is soooo not worth it. I would guess maybe 5 hp gain. Are you also p&p the lowers? I did my lowers and it wasn't that hard to do. I used a combination of dremel and air tools.


 07-02-2008, 10:46 AM
#32
B A N N E D
Join Date: Jul 2008
Location: Arlington, VA
Age: 54
Posts: 20
Likes: 0
Received 0 Likes
on
0 Posts
Originally Posted by corpsdawg
oh wow. How much did that run you? Tell us when you install them and how they feel 
07-02-2008, 01:43 PM
#34
B A N N E D
Join Date: Jul 2008
Location: Arlington, VA
Age: 54
Posts: 20
Likes: 0
Received 0 Likes
on
0 Posts
Originally Posted by nbennettksu
wtfuck you waiting on?
07-02-2008, 06:17 PM
#36
B A N N E D
Join Date: Jul 2008
Location: Arlington, VA
Age: 54
Posts: 20
Likes: 0
Received 0 Likes
on
0 Posts
Originally Posted by nbennettksu
badass, I was planning on doing hat. just couldnt wait any longer
