When you click on links to various merchants on this site and make a purchase, this can result in this site earning a commission. Affiliate programs and affiliations include, but are not limited to, the eBay Partner Network.
Recently on my '04 TSX 6MT the "VSA" & /?\ lights came on, my brake lights stopped working, and when the cruise control was engaged, I was able to step on the brakes, slow the car down & the CC stayed engaged. I learned from some other forums on the internet that this is a sign of a faulty/broken brake pedal switch.
Why a broken brake pedal switch would cause the VSA warning lights to come on?...I have no freaking idea, but that's how Honda did it...It's also kind of funny that the service technicians & manuals say that if these lights come on they say "you have a major problem with the VSA and the vehicle is not safe to operate". HAHA!!!
Since I don't trust dealerships for anything except for selling me parts, I decided to do this on my own. The switch cost about $14 (Acura dealership said they charge about $300 to install). It took me about 10 minutes, but if I had to do it again, it would take me only 3-5 minutes. This fix does not require any mechanical skills whatsoever. I can promise you that.
Below is what you will need, and following are pics showing what you will be looking at.
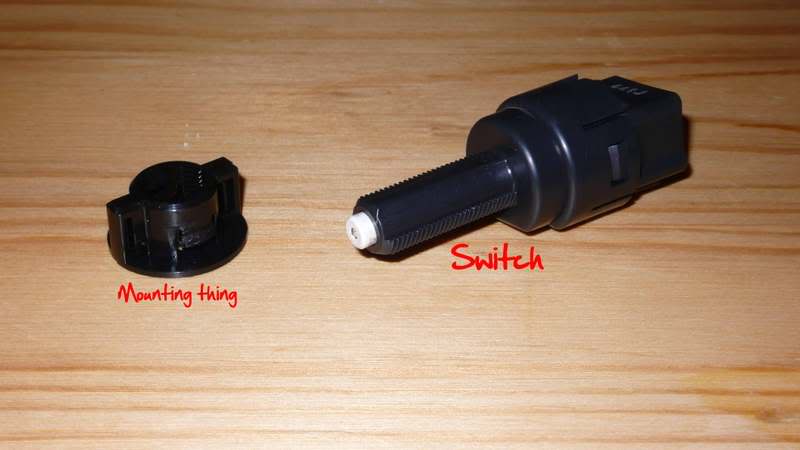
1) Switch: Part#: 36750-SMA-003
2) Phillips screwdriver
3) About 5% of your brain capacity
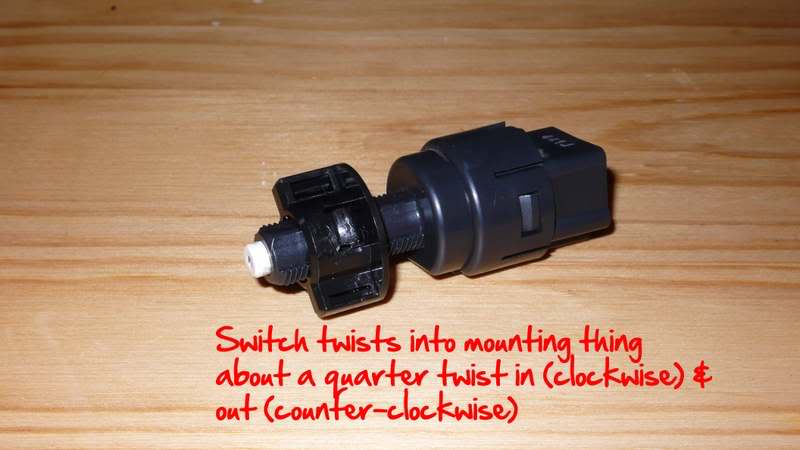
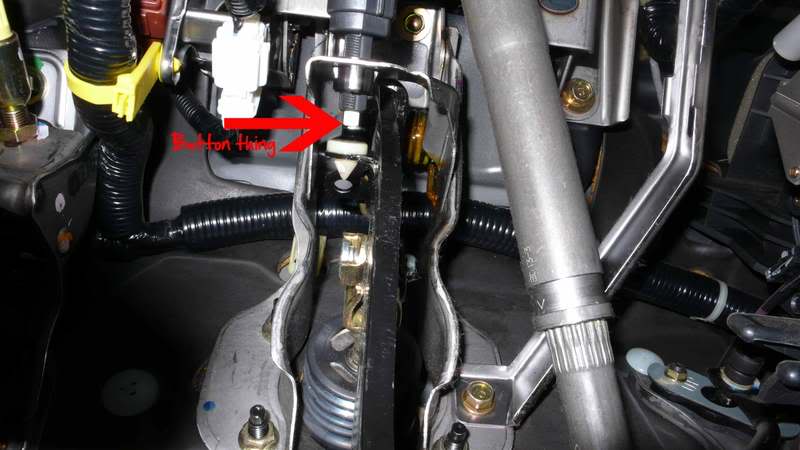
Here's the broken switch that was removed from the car with the twist in mounting thing. Even though the new switch comes with the mounting thing, it is not necessary to replace this and it makes it a lot easier. The white thing at the end of the switch (think tire pressure gauge) is what comes out when you press the brake pedal. The switch can be removed with a quarter counter-clockwise turn and inserted into place with a quarter turn clockwise.
Here's how you do it:
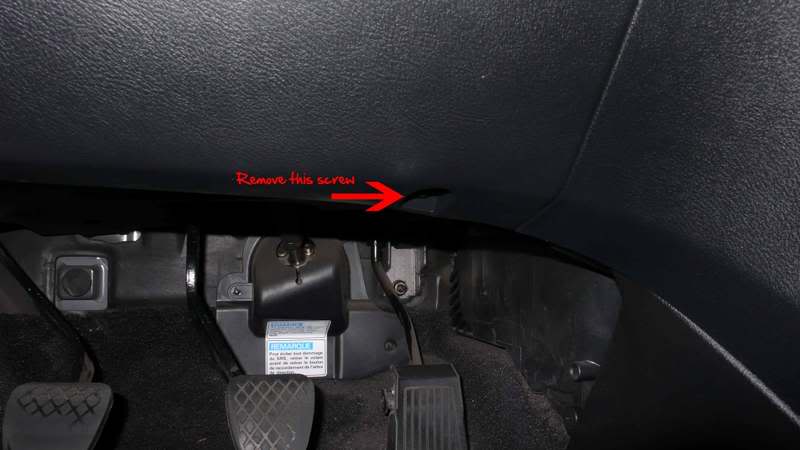
Remove the screw holding in the panel under the steering wheel
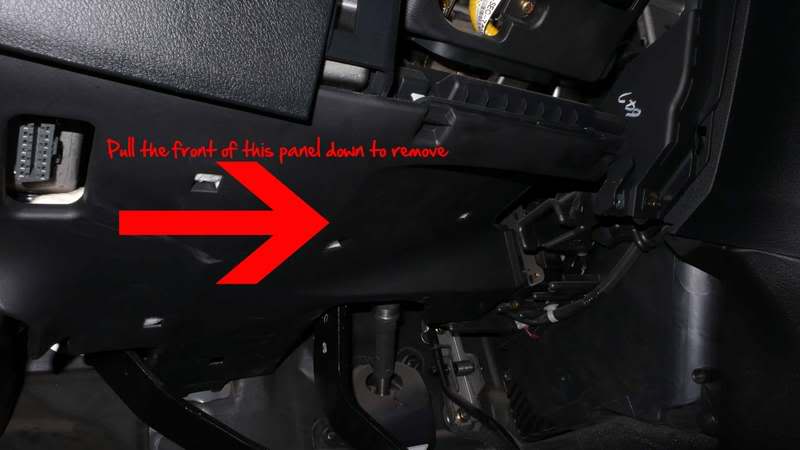
Pull down on the front of the panel above the pedals - there are 3 clips on the front & the rear of the panel rests on these rubber things
Here's what you should see
Another view
As you can see, when the pedal is pressed, the white thing comes out
It should be pretty self explanatory...
1) unplug the wiring harness out of the switch
2) twist out the switch
3) insert the new switch with the brake pedal in it's resting position - slide the switch in...it will make contact with the white plastic attached to the pedal..when the white button thing is pressed in and you cannot push the switch in anymore, twist clockwise & it should lock into place...obviously you want the white button thing to be almost all the way in because when you push the brake pedal, the white button thing will come out and turn on the brake lights etc...
4) plug in the wiring harness
5) test and put the panels back together and you're done!!!
EDIT: I don't know why all my pics are so small..this has never happened to me before...
EXCELLENT DIY ... mod may want to append the subject line with "(*PICS*)"....
Some maintenance procedures suggest disconnecting the battery ... did you perform that on this swap-out? If so, those doing this will want to ensure they have their radio (and NAVI) codes handy after reconnecting the battery.
Thanks!...Just trying to help where I can...
Actually, when I picked up the part from Acura, I walked back to the service bays (not recommended unless you want to risk being yelled at by service techs) & asked one of the guys if unplugging the battery was necessary...he said "no" and told me it will reset itself when installed...
Thanks! My car had the exact same problem. Followed your instructions and everything is back to normal. Glad my Acura dealer had one brake switch left in stock.
I had to do this exact thing on my old RSX also. I didn't know i had no brake lights till someone stopped me on the road to tell me. And yes it is very easy to install, took a whole 5 mins.
Thanks so much for this bro! Same exact problem. Fixed it at work in 10 min. Recommend anyone try this first. Screw the dealership. Mine was 6.42 with tax at Kuni Honda. Now to my power steering......
Thanks for this DIY! I had the VSA ! and the (!) E brake lights on. I don't know if this fixed it yet because mine would come on sporadically.
I'll add in that for some people, you'll have to use the new mounting thing. For me, the old mounting thing was white and the new switch which looked exactly like the one in the first pic wouldn't fit through it. The new mounting thing that came with the switch fit in perfectly though and then I was able to put the new switch in.
Switch was $15 for me from my Honda dealer in Canada. New part number here is 36750-SMA-013
Nice! I replaced a clutch pedal and it seem similar. I am sure saved a lot of money doing it myself. My bracket was split apart and cause the car to skip gears.
Acura RDX 2007 - same problem with VSA lights and ABS lights coming on at the same time. Happens on/off, a bit sporadic and annoying. When starting the car and the lights came on, I had trouble shifting from Park to Drive since you have to have the brakes engaged to shift. Changing the part has resolved the problem!
Thanks for this guide. Couldn't have been easier. Even though this part is dirt cheap, it's possible that your defective switch is still good but only needs cleaning. After replacing mine (was causing intermittent VSA light to come on), I opened up the old switch to inspect what could have failed. It's a super simple device with just the plastic plunger, a spring, and some small metal contacts on the inside. Sure enough, the little metal contacts that register when the plunger is depressed had a significant amount of brake dust on them. It must have just accumulated in there over time. I'm pretty sure that's what was causing the failure. It's easy enough to clean. So if you have some time and have this problem, you may want to check to see if this is your issue as well before replacing the switch.


 ... mod may want to append the subject line with "(*PICS*)"....