
06 TSX Utility Bi Removal/Console teardown?
 05-01-2006 | 09:06 PM
#1

Thread Starter
Recovering SUV Addict...
Joined: Apr 2006
Posts: 204
Likes: 0
From: Pittsburgh
06 TSX Utility Bi Removal/Console teardown?
Does anyone know how to take apart the center Console in the '06 TSX? An specifically, how to remove the bin under the radio?
I'm going to be installing a Sirius Starmate/Streamer Replay this weekend, and I want a clean install - all the wires running in the center console, drill a small hole in the bin and in the compartment under the radio, fish the wires through, and voila...
I'll be sure to post full, step by step pics for others to use...(both here and siriusbackstage.com).
Is there anywhere to download this info? Or possibly a manual to pick up at like advance auto parts or something? Anyone? Bueller? McFly?
05-01-2006 | 09:14 PM
#2
Banned
Joined: Nov 2005
Posts: 3,716
Likes: 0
Originally Posted by Ronin317
Does anyone know how to take apart the center Console in the '06 TSX? An specifically, how to remove the bin under the radio?
You will see 2 holes on the bottom front.
Stick something in them to act like handles and just pull (I used a disposable chopstick broken into 2)
05-01-2006 | 09:24 PM
#3
Thread Starter
Recovering SUV Addict...
Joined: Apr 2006
Posts: 204
Likes: 0
From: Pittsburgh
Originally Posted by fuckleberry
Remove the rubber mat in that box.
You will see 2 holes on the bottom front.
Stick something in them to act like handles and just pull (I used a disposable chopstick broken into 2)
You will see 2 holes on the bottom front.
Stick something in them to act like handles and just pull (I used a disposable chopstick broken into 2)
 Word. I'll try that. Now if I can get that console/armrest out to drill a small hole to run some wires along the floor...
this is going to look SLICK. I got the Streamer GTR en route, and it's black and silver - matches my ebony interior perfectly...Right now I have my old sportster sitting in my cupholder - it's just not the right shape to fit anywhere.
XM SUCKS...
05-02-2006 | 11:05 AM
#4

Instructor
Joined: Feb 2006
Posts: 133
Likes: 0
http://community.webshots.com/album/482100858sQavkT
that's a very helpful gallery dealing w/removal of the center console. It is for an '04 or '05, but I think the directions are the same.
Someone who has done an '06 said that the clips are much harder to pull on the '06 for some reason (don't remember why), so be careful. It was elduderino that did an install on the '06, you can probably search for topics started by him to find it.
Good luck to you, and please take lots of pics + notes! I'll be installing an amp in my '06 either this weekend or the next, and I am curious to see how easy/hard it will be to remove that center console.
05-02-2006 | 01:31 PM
#5
Banned
Joined: Nov 2005
Posts: 3,716
Likes: 0
Originally Posted by defjukie
http://community.webshots.com/album/482100858sQavkT
that's a very helpful gallery dealing w/removal of the center console. It is for an '04 or '05, but I think the directions are the same.
that's a very helpful gallery dealing w/removal of the center console. It is for an '04 or '05, but I think the directions are the same.
But that guy must have octopus fingers with them suction cups and superhuman strength.
have a looky here:
http://andylee.us/gallery/console
 05-02-2006 | 10:41 PM
#7
Cruisin'
Joined: Apr 2006
Posts: 19
Likes: 0
From: Rockaway, NJ
I'm doing an installation tomorrow night - the Harman Kardon Drive + Play into my 2006 TSX (1 week old). We wrestled for a while the other night with the center console...eventually got the clip by the drivers's side heated seat switch up.....hoping tomorrow we get it all. I'll take some pictures.
Trending Topics
05-03-2006 | 12:06 AM
#8
The Power of a Grill
Joined: Oct 2004
Posts: 864
Likes: 1
From: San Antonio, TX
Originally Posted by fuckleberry
yeah I bookmarked that page.
But that guy must have octopus fingers with them suction cups and superhuman strength.
have a looky here:
http://andylee.us/gallery/console
But that guy must have octopus fingers with them suction cups and superhuman strength.
have a looky here:
http://andylee.us/gallery/console
05-03-2006 | 10:54 AM
#9
Senior Moderator
Joined: Jan 2006
Posts: 4,036
Likes: 1
From: ffx.va.us
I attempted to remove my console a while ago with no luck.
The 'back end of pliers' method managed to pop 1 of the back 2 clips, but no manner of pulling would get me the other one, and I couldn't get it up.
I tried pulling up from the front with both my hands and a screwdriver, and all i managed to do was scratch my not-an-ashtray a little bit.
I'm quite frustrated with it and still want to get that thing out. I tried for 2 days with no success, but I gotta give it another go one of these days. Soon.
05-03-2006 | 11:46 AM
#11
Senior Moderator
Joined: Jan 2006
Posts: 4,036
Likes: 1
From: ffx.va.us
sadly yes. dwiller's post above gives me hope that it will come out without having to source it out to a shop or something stupid like that. Really I just need to take another crack at it, with another friend.
05-03-2006 | 01:49 PM
#12

6th Gear
Joined: Apr 2006
Posts: 6
Likes: 0
From: SW Virginia
console instructions
Here's a link with instructions for the accessories. Just use the one for the Cass/Media. It shows how to take that all apart.
Instruction link
Instruction link
05-03-2006 | 03:04 PM
#13
Senior Moderator
Joined: Jan 2006
Posts: 4,036
Likes: 1
From: ffx.va.us
We've all seen this doc before. (Direct link: https://www.hondacuraworld.com/Merch...attachment.pdf) But the problem is it doesn't give a good idea of how to remove the panel by hand (its says gently lift up, yeah right), and those of us who have tried to have found it difficult to do. The exploded diagram is very useful to see where the clips are though.
05-04-2006 | 02:21 AM
#14
Cruisin'
Joined: Apr 2006
Posts: 19
Likes: 0
From: Rockaway, NJ
Well, we did it. It was not easy. The full installation of the Harmon Kardon Drive + Play took about 5 hours. Keep in mind, we are television people, not professional installers. But it is a very clean installlation that we may improve a little this weekend.
It was hard to get the center console out. The handle of the pliers trick worked for us....I think we got about 3 clips that way. The two in the back (closest to the arm rest) and then we used the handle of the pliers in the gap by the E-brake, facing towards the front to get another clip in the middle.
When we tried this briefly last Sunday, we used a flat-head screw driver covered in electrical tape (to prevent scratching) and inserted it just to the left of the driver's seat heater and pried up a bit - this was able to release a clip. This was very nerve racking. So we left that one undone for we picked up with the project today. Be very careful if you try this.
So after the plier trick and combined with the clip by the driver's seat heater, we had about 4 clips undone. The passenger side was tougher....we just kept pulling and pulling and had faith in the plastic and that it wouldn't break. I was very nervous, as I just got my car 1 week ago. Finally it gave.
Everything else pretty much comes out easily...the front storage pocket, the not an ashtray.
I will be putting a web page together with my pictures soon. If I can figure out how to post here, I'll do that too.
05-04-2006 | 09:07 AM
#15
Banned
Joined: Nov 2005
Posts: 3,716
Likes: 0
Sorry , didn't have a chance to post this earlier.
I pulled up off the front clips quite easily like this:

Use a sturdy long plastic cable tie,
with the thin end, prob the left/right corners for gap(s) on the other side to push the cable tie thru, that's your handle there.
and yes, I still have the panel out - waiting for things and time
I pulled up off the front clips quite easily like this:
Use a sturdy long plastic cable tie,
with the thin end, prob the left/right corners for gap(s) on the other side to push the cable tie thru, that's your handle there.
and yes, I still have the panel out - waiting for things and time
05-04-2006 | 09:23 AM
#16
Banned
Joined: Nov 2005
Posts: 3,716
Likes: 0
another tip: The rear clips are tough one to pop. With the "plier hande" trick, make sure the inserted end of the handle is rested on the end of that clip you're trying to pop.
Like this:

Obviously whatever you inserted to pry that one should better be not too rounded and is rubberized.
Like this:
Obviously whatever you inserted to pry that one should better be not too rounded and is rubberized.
05-04-2006 | 09:55 PM
#19
Thread Starter
Recovering SUV Addict...
Joined: Apr 2006
Posts: 204
Likes: 0
From: Pittsburgh
Alright...I decided I was bored when I got home from work and did the install earlier this evening. Here's how it went. This is an '06 AT non-navi. I'd assume the navi would be the same...MT too, but don't quote me on that.
Allow me to apologize for the pic quality in advance, as these are very rushed, not up to my usual quality (i'm pretty much a pro photographer...). most of the time it was one handed, fixed focus, and with the shitty flash on the rebel xt, as my batteries for the shoe flash were dead...
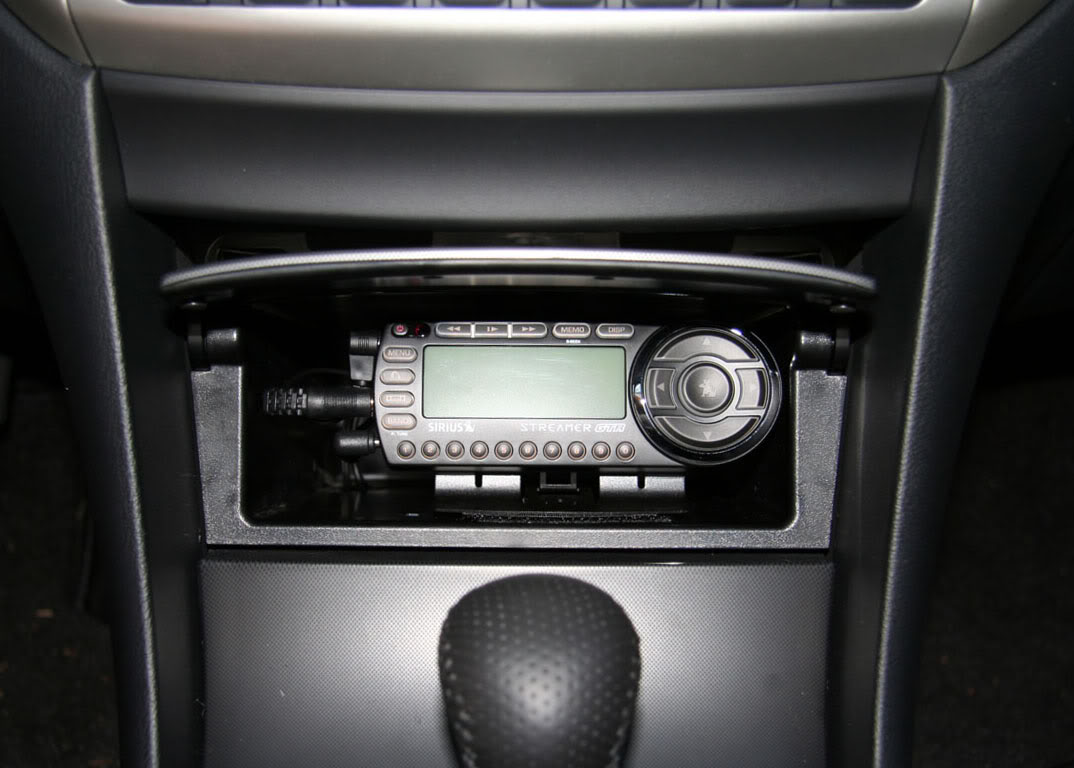
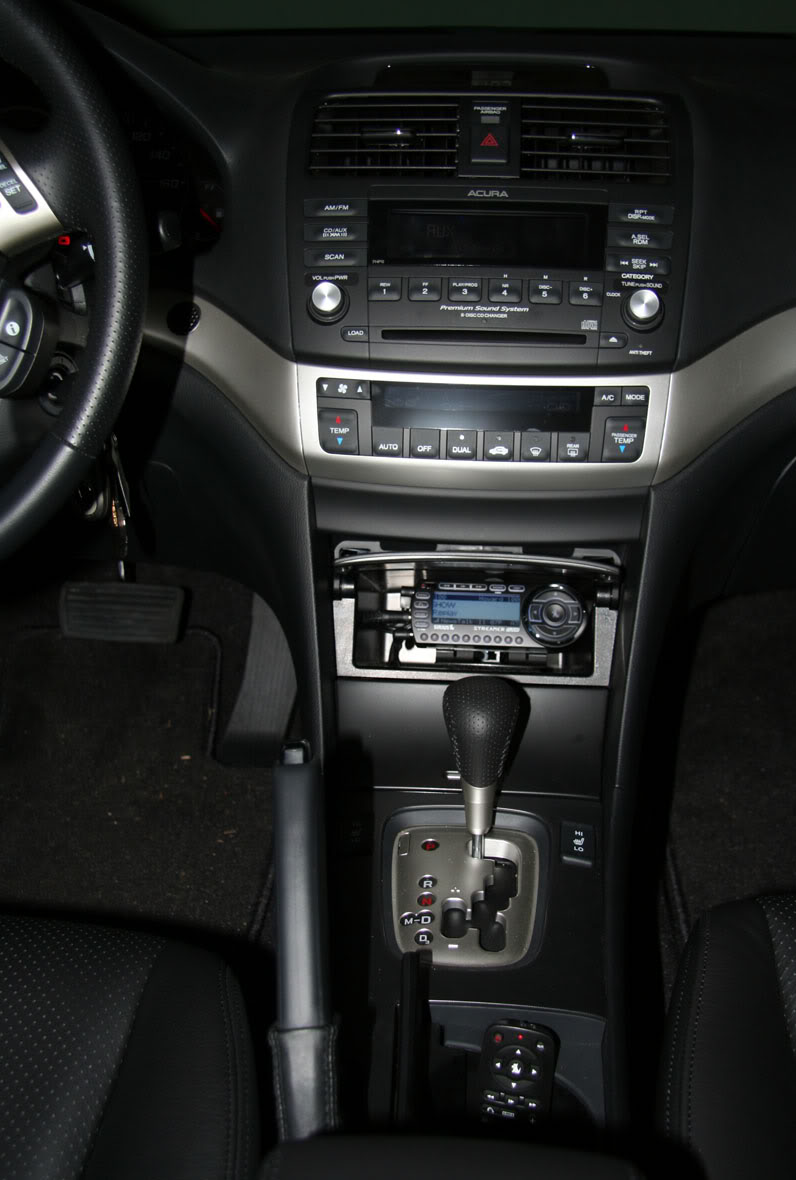
This is a Sirius Streamer GTR - essentially the Starmate Replay with a black and silver housing. Same size, same software, same remote. I used a Home kit stand to hold the unit in the storage bin, ordered from www.tss-radio.com. They friggin ROCK. I ordered saturday morning, it was at my house monday morning, with standard priority shipping! And the price was right...
I replaced a Sportster Replay that was just too big to do what I wanted. I wanted a clean install that looked stock...
Here we go!
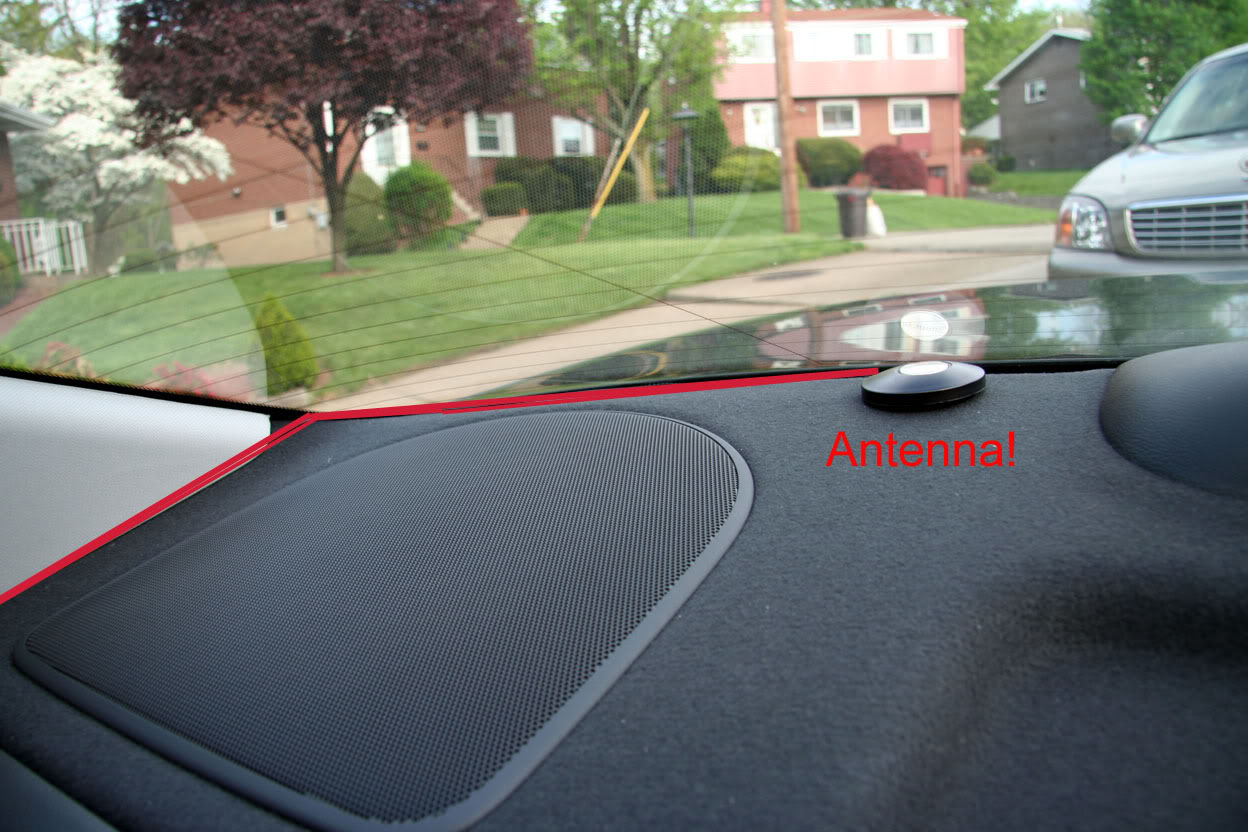
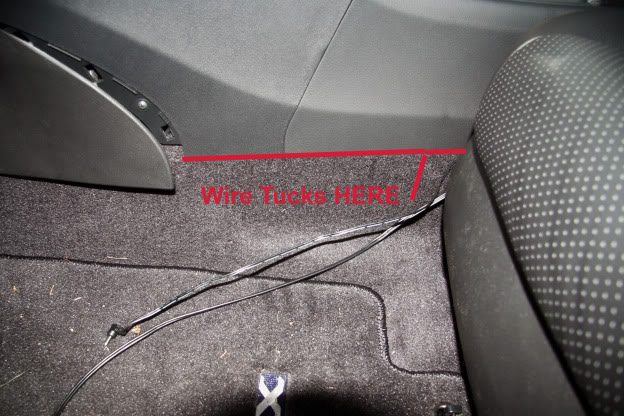
The antenna was put on the back dash, as shown here.

I put a piece of velcro on the bottom and stuck it to the carpet on the dash. Then I ran and Tucked the Wire as shown.
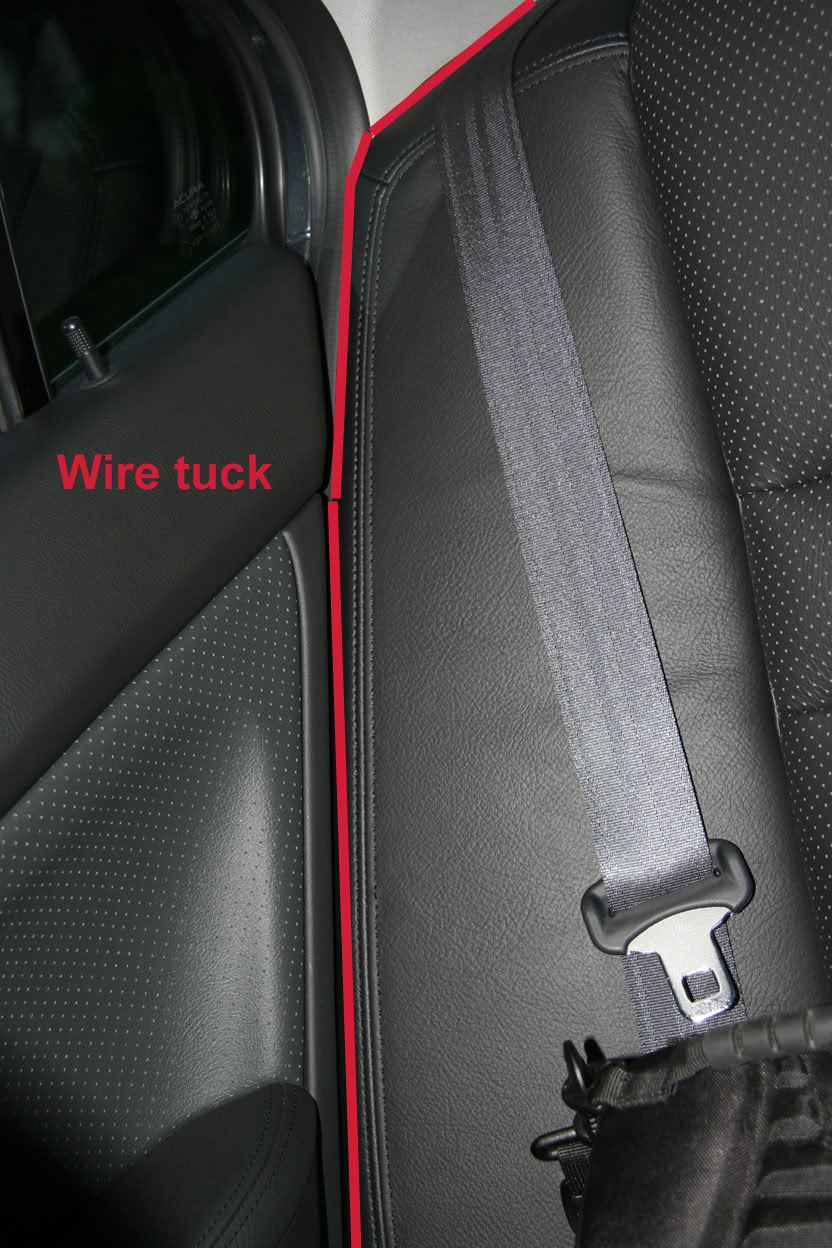
I then ran and tucked the wire between the seat and door jam, and subsequently uner the trim along the door, then under the backseat (under the tracks) and then tucked it under the lip of the center console along the floor...
I removed the bin under the radio, and set it aside (also removed the rubber mat in the bin).
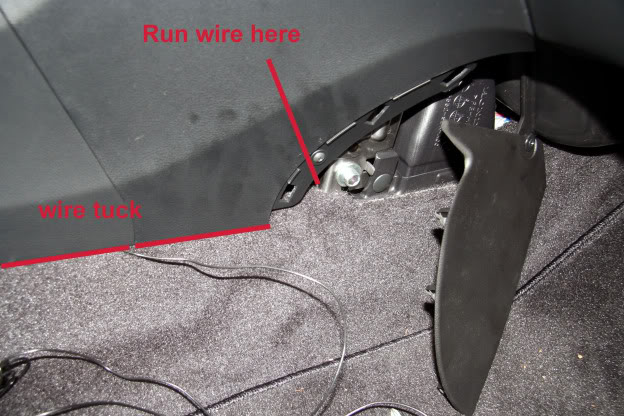
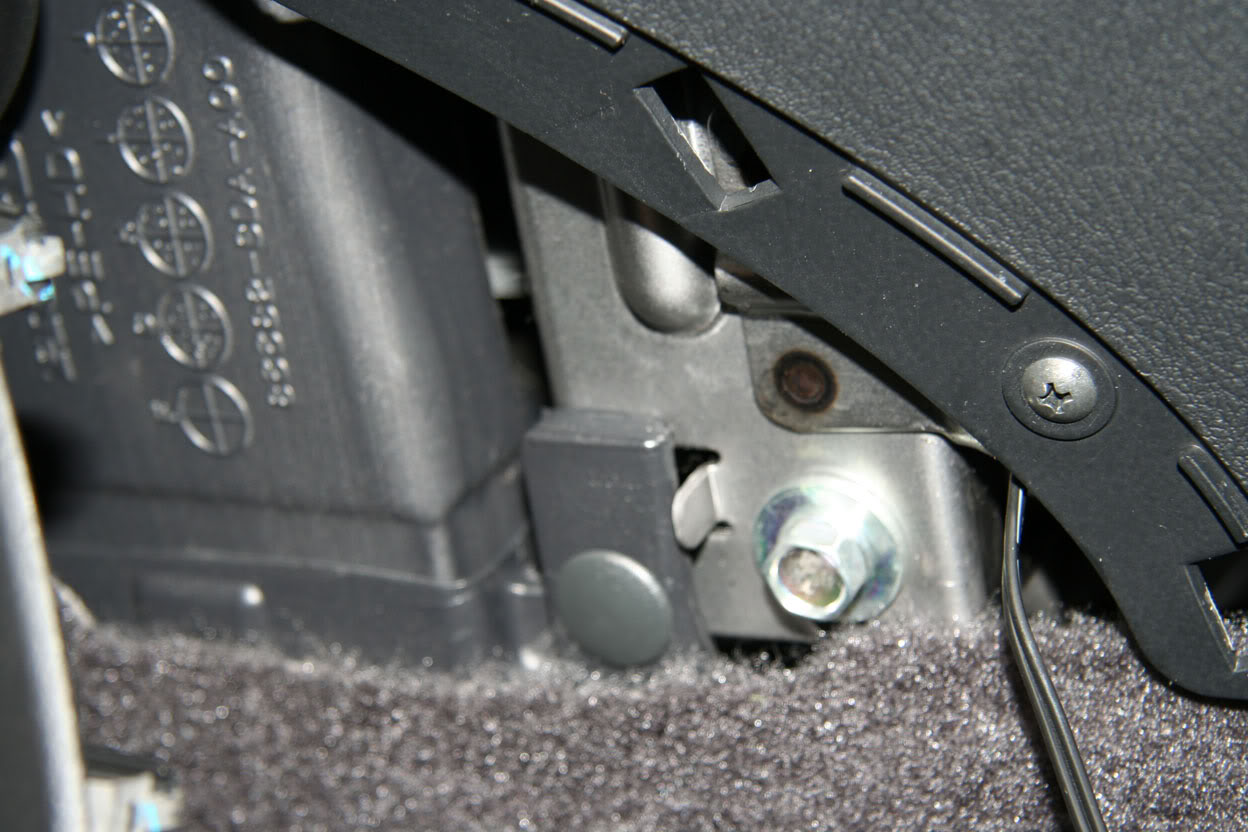
Then I removed the panel on the frontmost part of the center console on the passenger side, tucking the antenna wire all along and then putting it right in the gap between the support bracket and floor.
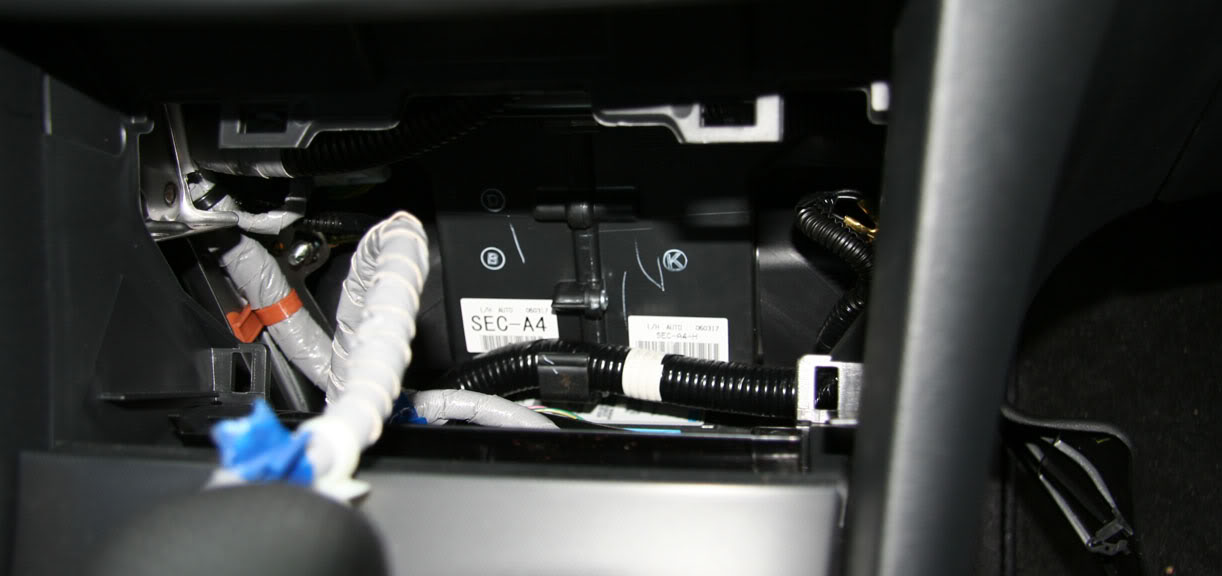
Reach inside the dash, and grab the wire and pull it up. BE CAREFUL - some of the pieces in there are pretty sharp!
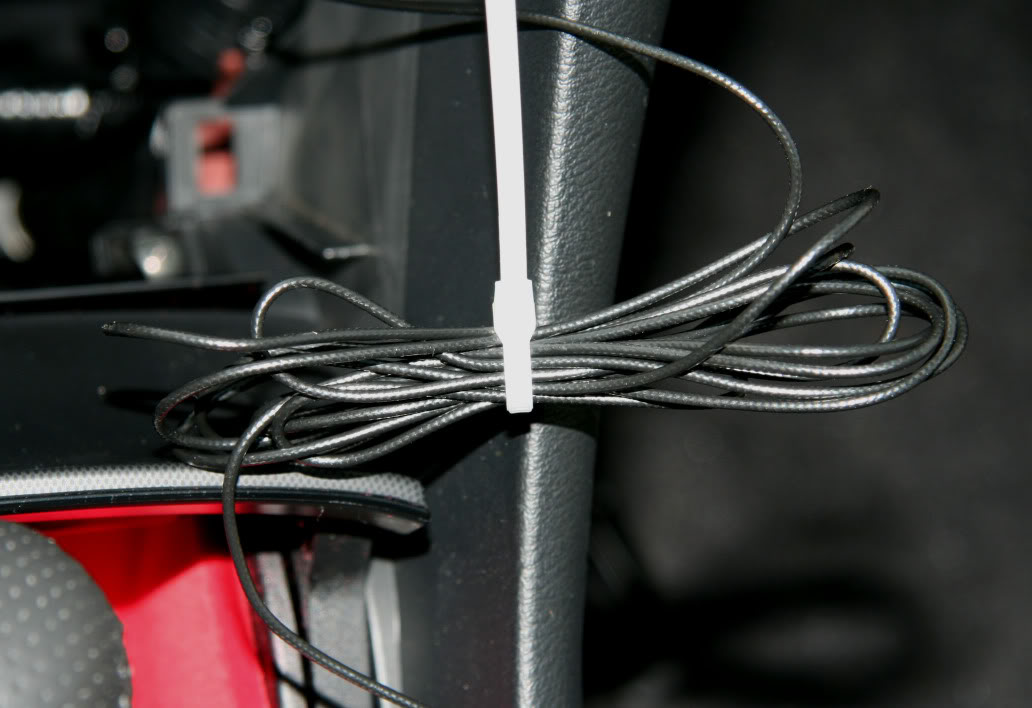
Bundle up the excess wire (leaving enough to go into the bin and the sirius...) with a zip tie.
Okay, now the hard part - what to do about running the wires from the armrest storage bin? Well, I emptied the bin, lifted the rubber mat in the bottom, and the idea hit me...run it where the wires for the outlet and aux in are! However, this proved to be MUCH harder than I wanted. I had a rough time trying to get the console top to pop out as some have outlined above, and I didn't want to force it.
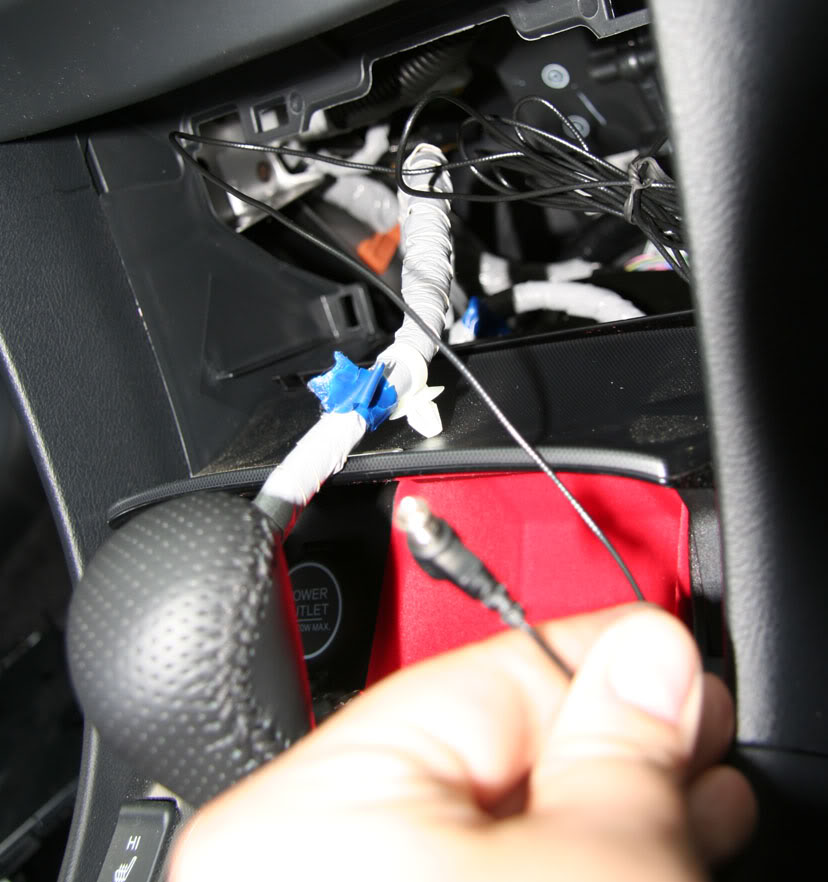
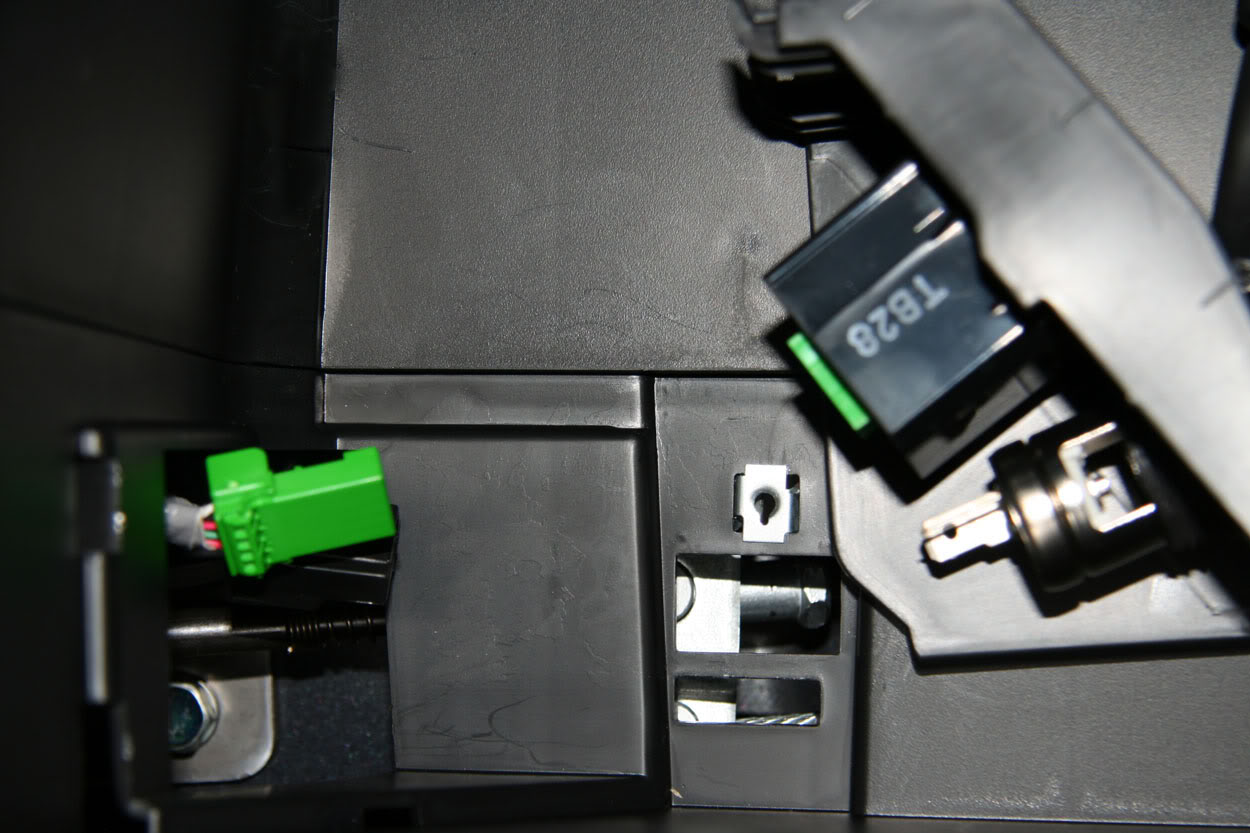
Time to get creative. So here's what I did. I removed the plate that houses the outlet and aux input.
I took the aux wire and the power cord, and ran them into the hole, reached inside with a Trim/Dash tool (from pro-fit international, pictured below), and pushed the connectors out from under the compartment between the driver's seat and the center console.

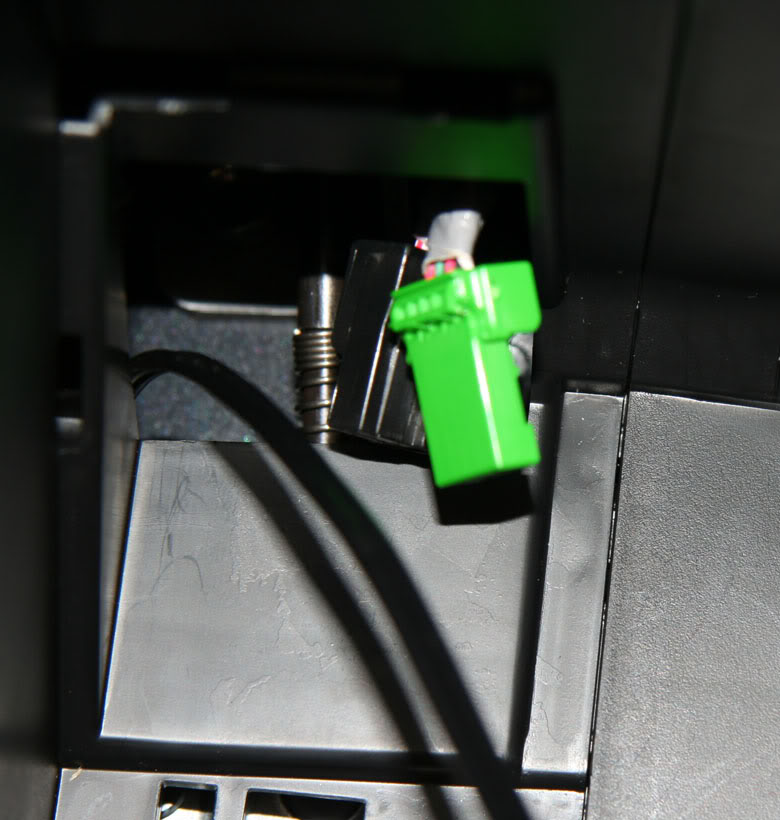
As with the passenger side, I tucked it, and slid it between the dash support bracket and the floor, and reached inside and pulled the wires up.
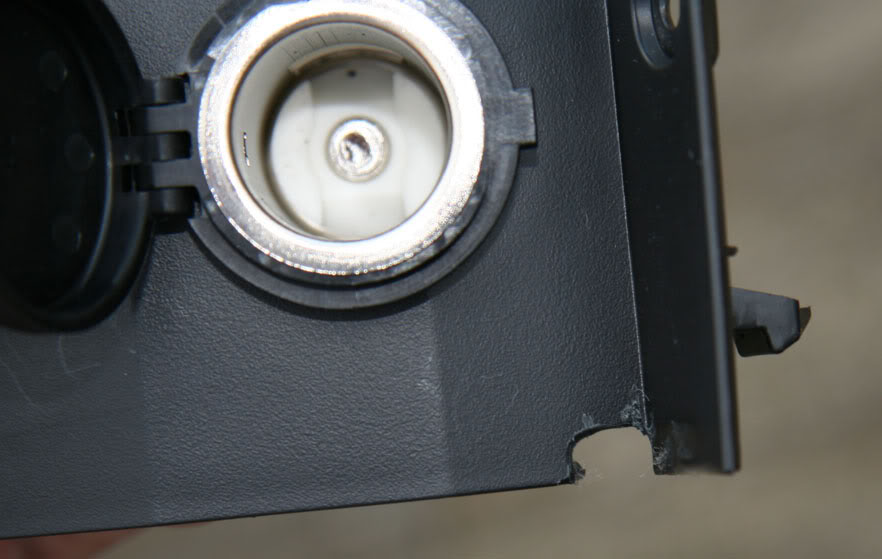
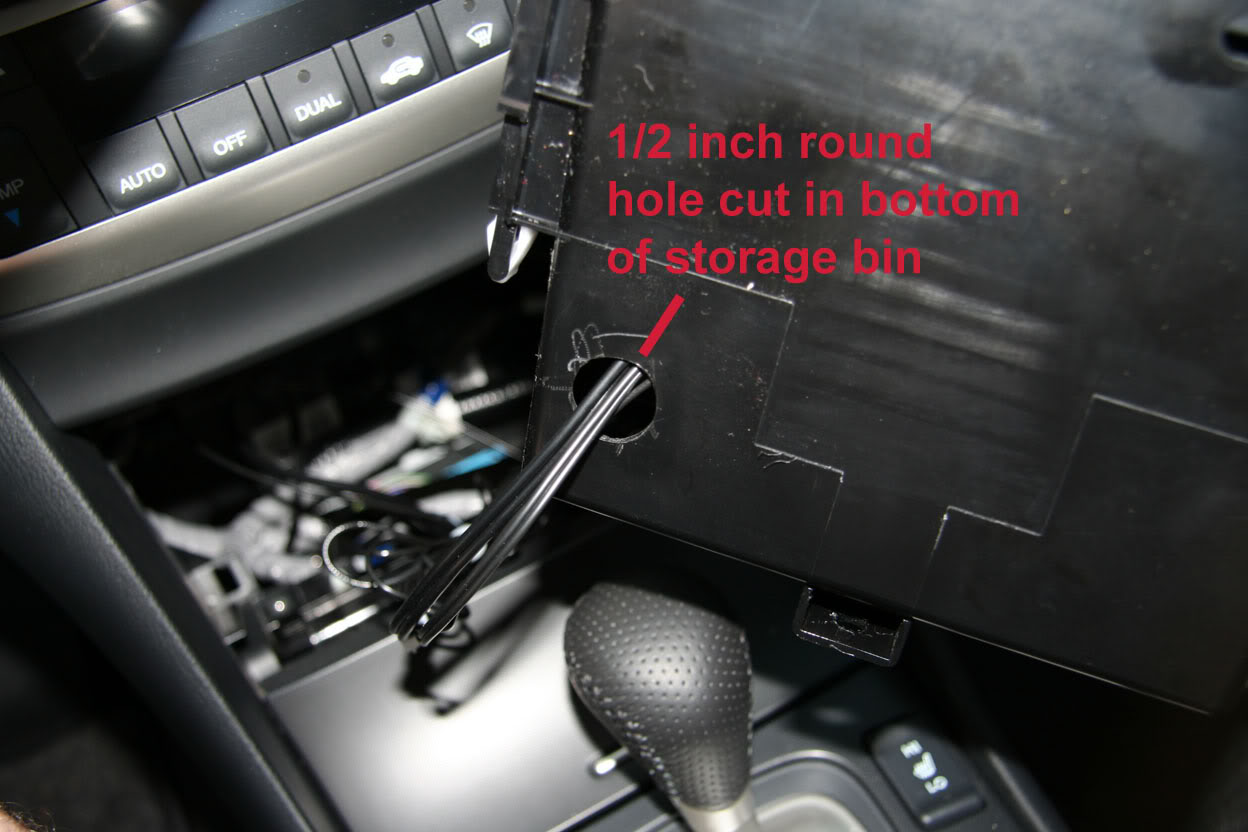
I took a break, and then busted out the drill and dremel. First, I cut a small hole in the bottom of the storage bin, in the back left corner. Then I took the housing from the armrest power and aux ports, and cut a small notch in the side, as shown. I smoothed it out and polished it...as best I could at the time. if I had more daylight and time, I could have done it better.
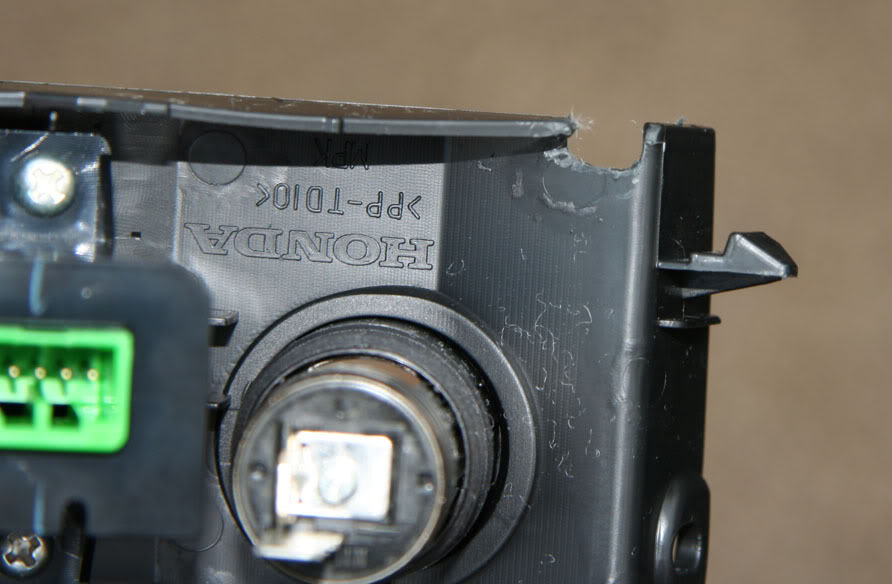
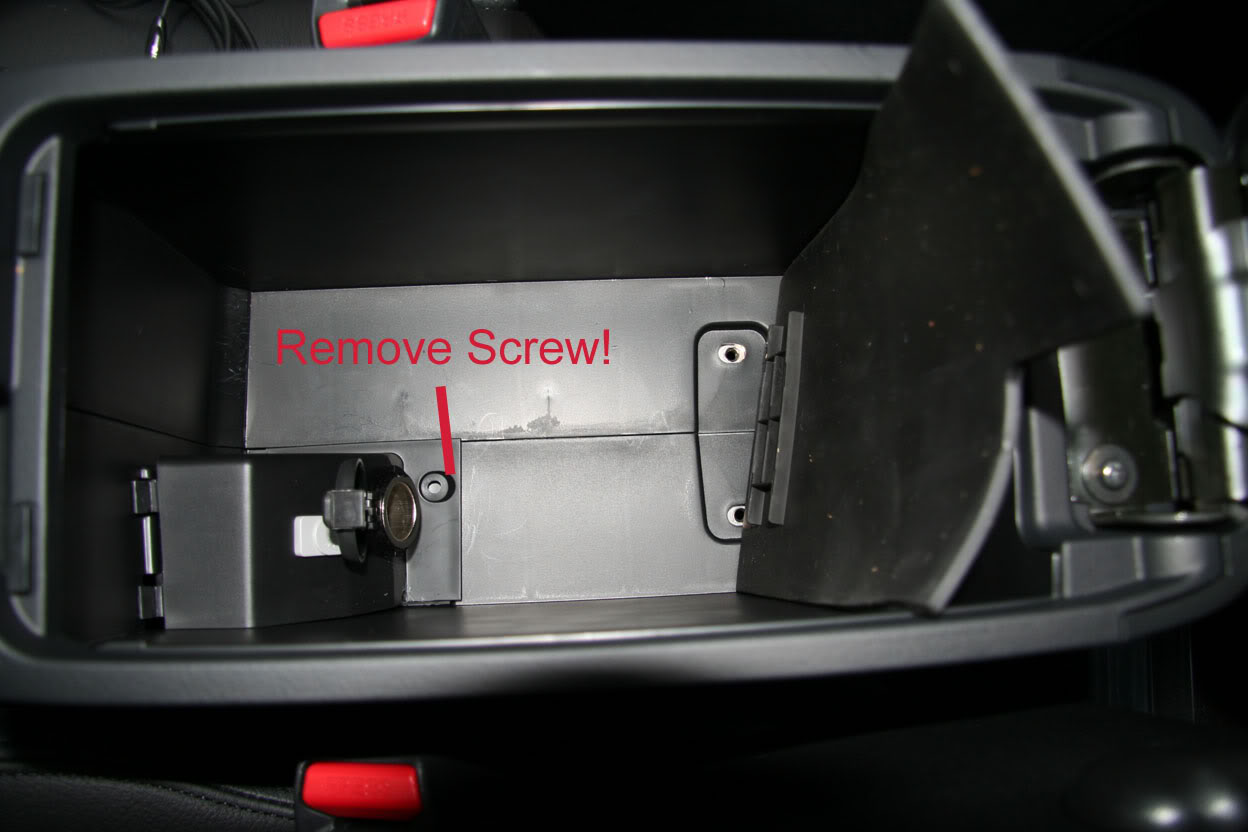
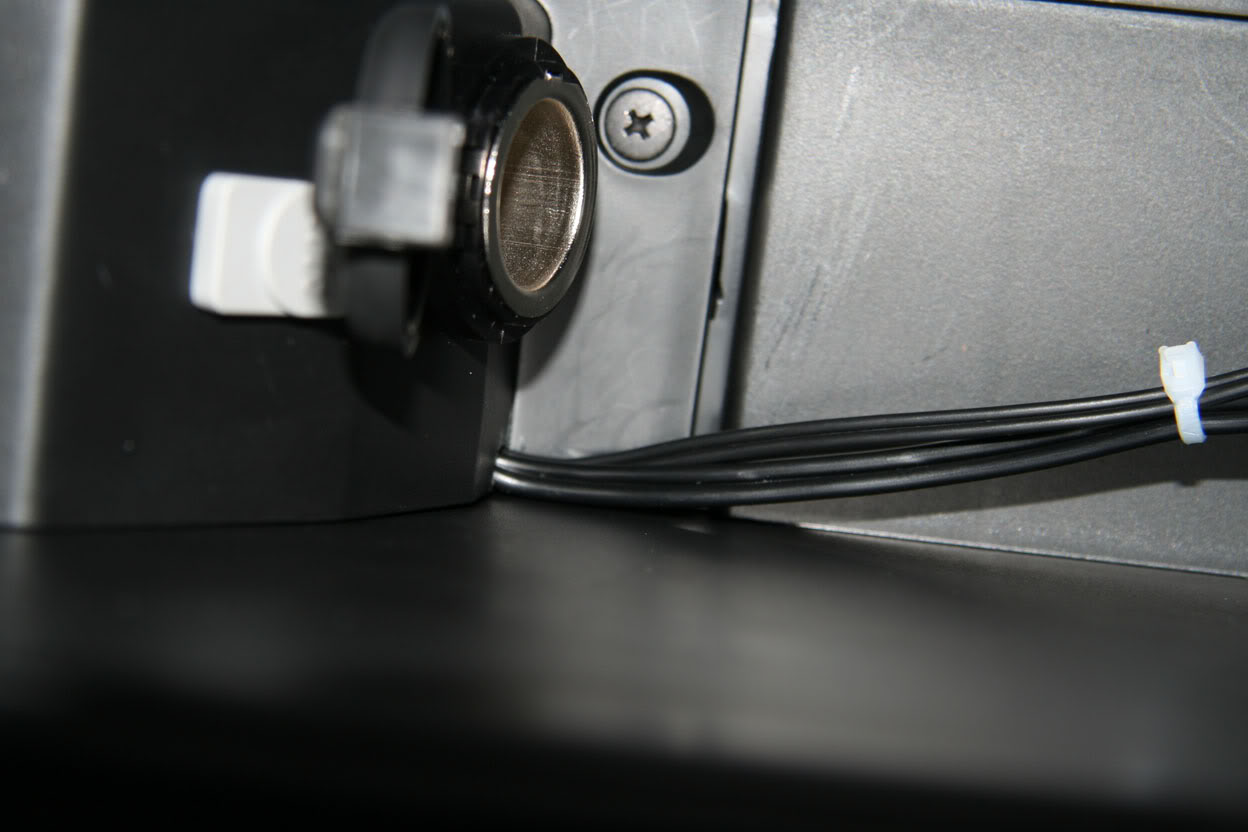
I used a few zipties to secure the cables in the hole, and to bundle them, then reconnected the aux/power ports, ran the cables in the notch, and replaced the plate that holds the ports, snapping it into place. I then replaced the screw, put the mat down, and plugged them in!
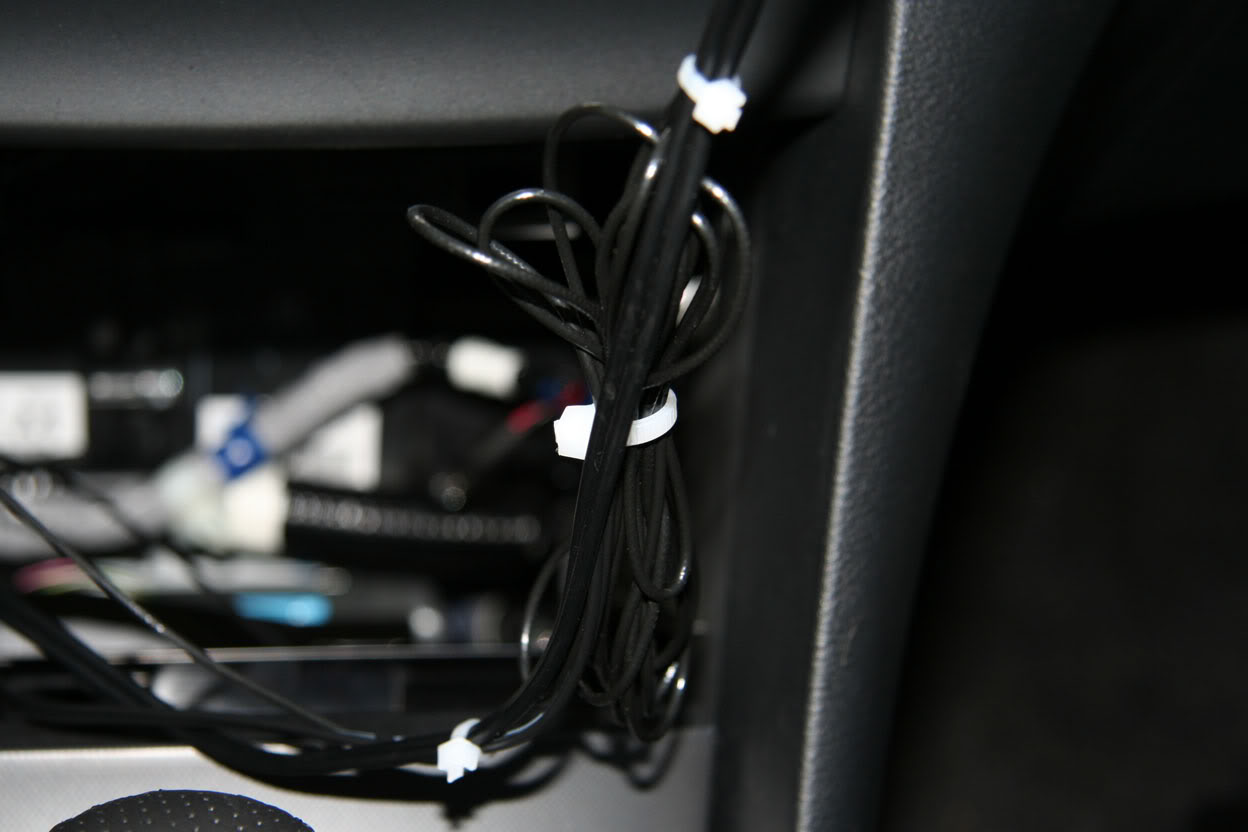
Next, I went back to the dash, and bundled my cables up with more ties, and made sure I had enough length to go into the bin.
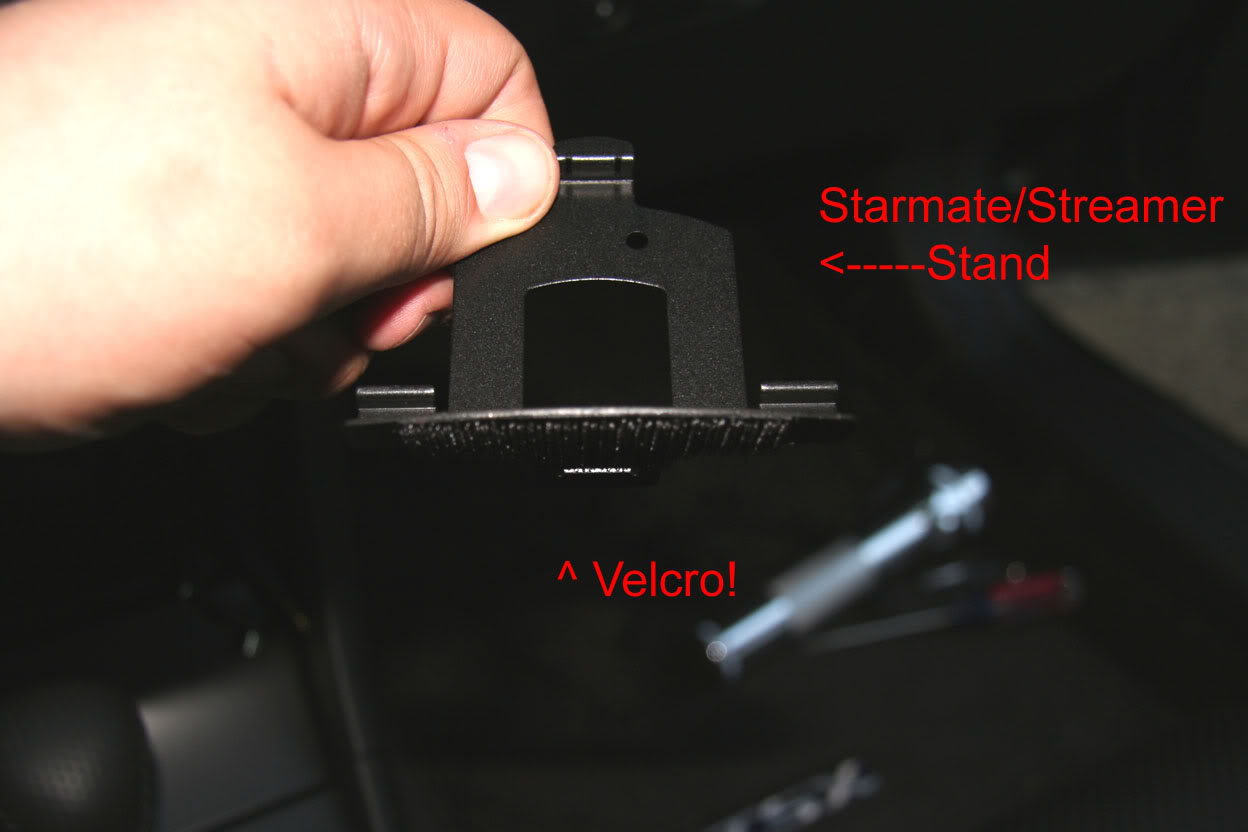
Next, I took the Streamer stand, and put some velcro on the bottom. I had thought about screwing it in place, but decided against it for now.
I then ran the wires into the bin as shown...
And put the bin back in place.

Then all that was left was to tuck wires (all zip tied up for organization), plug in the unit, velcro it in place...
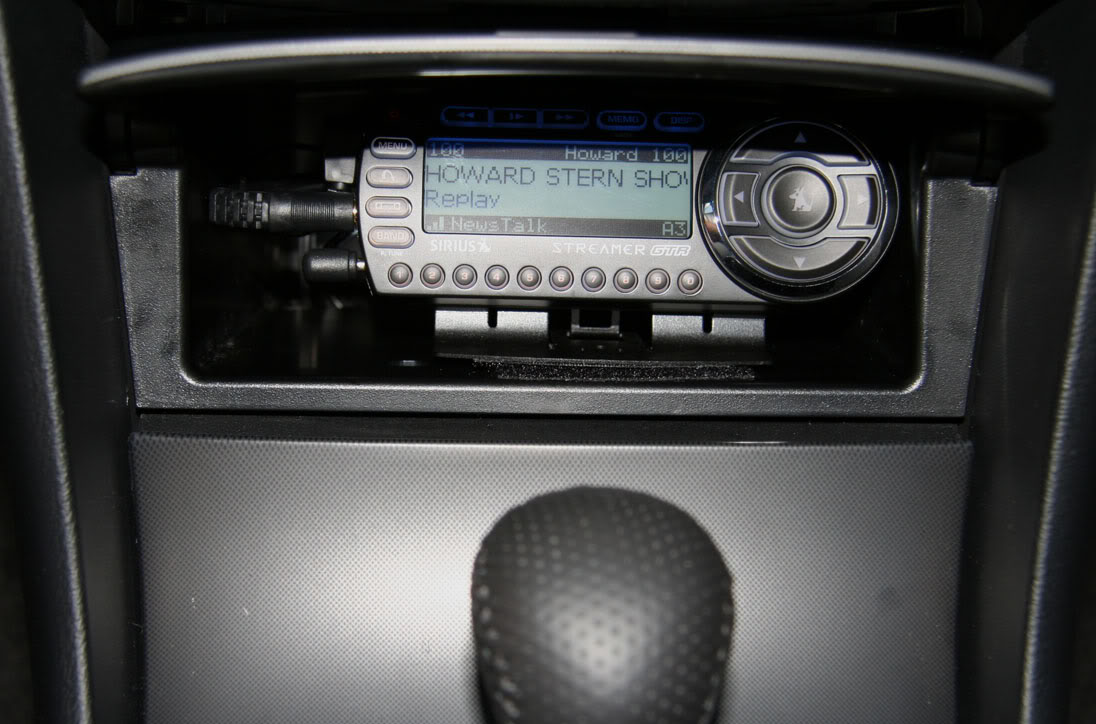
And FIRE IT UP!
All closed up...
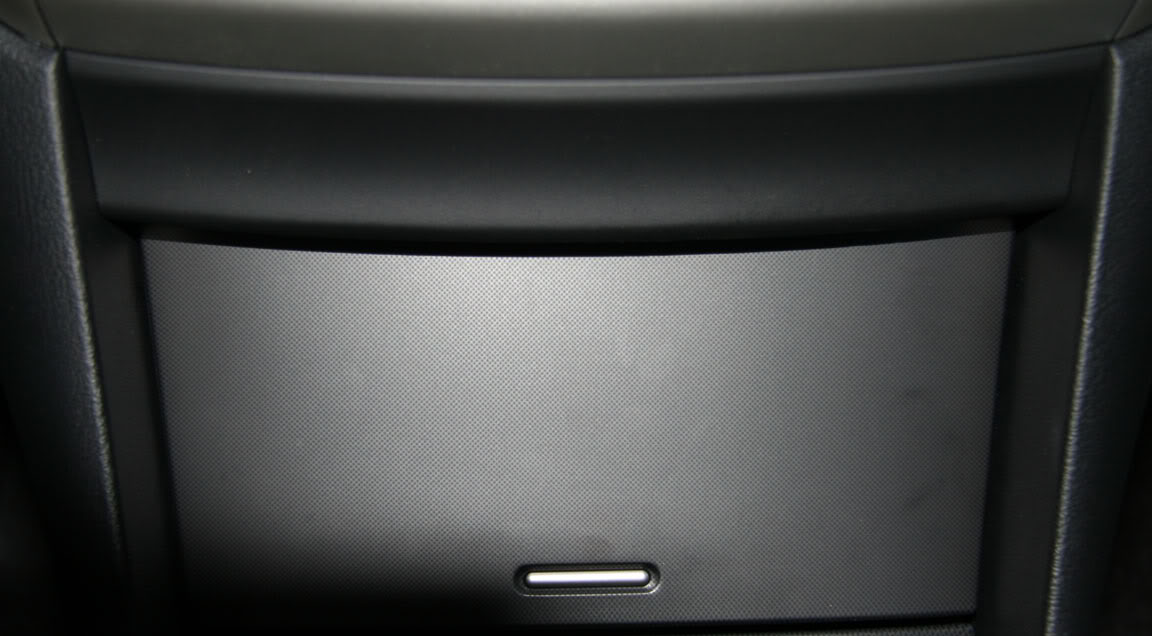
So in the end, I have no wires exposed, it fits in the stock bin, and is still removable for when I feel like bringing it in the house.
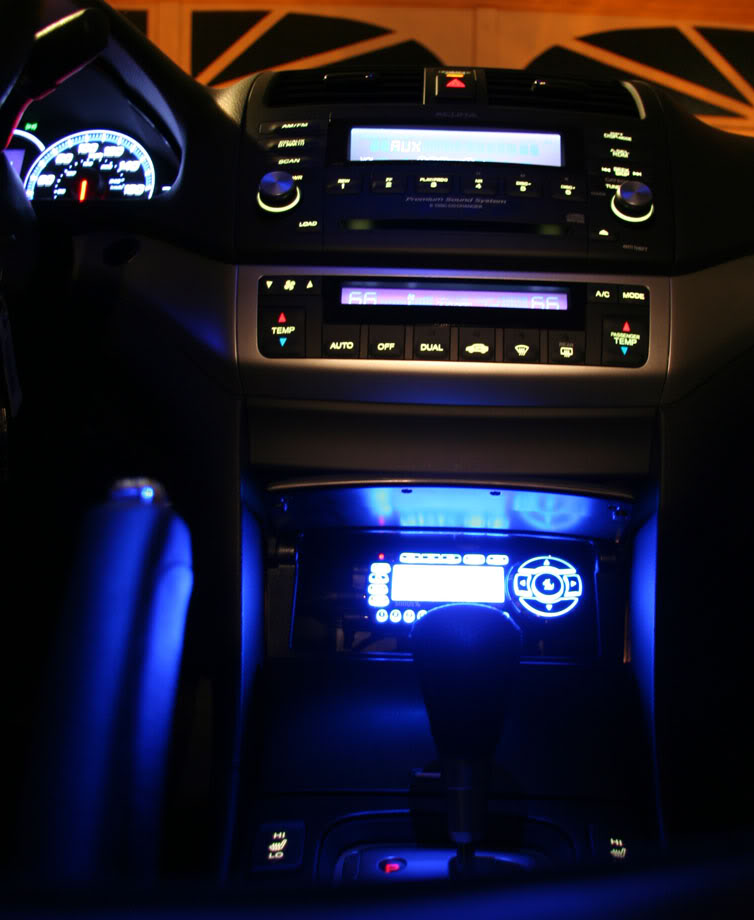
I'm going to get a night pic of it all lit up shortly...
Any questions...let me know!
Allow me to apologize for the pic quality in advance, as these are very rushed, not up to my usual quality (i'm pretty much a pro photographer...). most of the time it was one handed, fixed focus, and with the shitty flash on the rebel xt, as my batteries for the shoe flash were dead...
This is a Sirius Streamer GTR - essentially the Starmate Replay with a black and silver housing. Same size, same software, same remote. I used a Home kit stand to hold the unit in the storage bin, ordered from www.tss-radio.com. They friggin ROCK. I ordered saturday morning, it was at my house monday morning, with standard priority shipping! And the price was right...
I replaced a Sportster Replay that was just too big to do what I wanted. I wanted a clean install that looked stock...
Here we go!
The antenna was put on the back dash, as shown here.
I put a piece of velcro on the bottom and stuck it to the carpet on the dash. Then I ran and Tucked the Wire as shown.
I then ran and tucked the wire between the seat and door jam, and subsequently uner the trim along the door, then under the backseat (under the tracks) and then tucked it under the lip of the center console along the floor...
I removed the bin under the radio, and set it aside (also removed the rubber mat in the bin).
Then I removed the panel on the frontmost part of the center console on the passenger side, tucking the antenna wire all along and then putting it right in the gap between the support bracket and floor.
Reach inside the dash, and grab the wire and pull it up. BE CAREFUL - some of the pieces in there are pretty sharp!
Bundle up the excess wire (leaving enough to go into the bin and the sirius...) with a zip tie.
Okay, now the hard part - what to do about running the wires from the armrest storage bin? Well, I emptied the bin, lifted the rubber mat in the bottom, and the idea hit me...run it where the wires for the outlet and aux in are! However, this proved to be MUCH harder than I wanted. I had a rough time trying to get the console top to pop out as some have outlined above, and I didn't want to force it.
Time to get creative. So here's what I did. I removed the plate that houses the outlet and aux input.
I took the aux wire and the power cord, and ran them into the hole, reached inside with a Trim/Dash tool (from pro-fit international, pictured below), and pushed the connectors out from under the compartment between the driver's seat and the center console.
As with the passenger side, I tucked it, and slid it between the dash support bracket and the floor, and reached inside and pulled the wires up.
I took a break, and then busted out the drill and dremel. First, I cut a small hole in the bottom of the storage bin, in the back left corner. Then I took the housing from the armrest power and aux ports, and cut a small notch in the side, as shown. I smoothed it out and polished it...as best I could at the time. if I had more daylight and time, I could have done it better.
I used a few zipties to secure the cables in the hole, and to bundle them, then reconnected the aux/power ports, ran the cables in the notch, and replaced the plate that holds the ports, snapping it into place. I then replaced the screw, put the mat down, and plugged them in!
Next, I went back to the dash, and bundled my cables up with more ties, and made sure I had enough length to go into the bin.
Next, I took the Streamer stand, and put some velcro on the bottom. I had thought about screwing it in place, but decided against it for now.
I then ran the wires into the bin as shown...
And put the bin back in place.
Then all that was left was to tuck wires (all zip tied up for organization), plug in the unit, velcro it in place...
And FIRE IT UP!
All closed up...
So in the end, I have no wires exposed, it fits in the stock bin, and is still removable for when I feel like bringing it in the house.
I'm going to get a night pic of it all lit up shortly...
Any questions...let me know!
 05-04-2006 | 10:42 PM
#21
Cruisin'
Joined: Apr 2006
Posts: 19
Likes: 0
From: Rockaway, NJ
Nice pics Ronin and Huckleberry.
Here is a link to my installation.
http://web.mac.com/davewiller/iWeb/iPod/iPodTSX.html
Dave
Here is a link to my installation.
http://web.mac.com/davewiller/iWeb/iPod/iPodTSX.html
Dave
06-15-2006 | 08:29 PM
#23

I meant to type in Lohms!
Joined: May 2006
Posts: 19
Likes: 0
From: Royal Oak, MI
I did a very similiar install to Ronin today in my '06. I installed the starmate in the same location and ran the wires to the AUX and Power outlet in the center armrest the same way. However I mounted the antenna on the passanger side dash corner and ran the wire down the side and tucked under the rubber molding on the door jam - then under the carpet to the center bin console. I also did not drill a hole in the center bin, I just removed the useless light from the top of the bin and the hole was a perfect size. I then secured the unit using the suction cup mount to provide support behind, and used some 3M double sided tape to secure the bottom of the bracket that the actual Starmate attaches to. I used this method in my prior car (03 Nissan Altima) and it was very secure and didn't move at all. I will take some pics tomorrow and post. I'm very happy with the install and can't wait to have Sirius back in my car. It took only 2 hours total.

Thread
Thread Starter
Forum
Replies
Last Post
GWEEDOspeedo
Car Parts for Sale
4
01-15-2016 10:39 PM
ExcelerateRep
4G TL Performance Parts & Modifications
8
10-14-2015 08:20 AM